Tutoriel sur les composants pour débutants du Raspberry Pi Pico W
Ce tutoriel sur les composants du Raspberry Pi Pico W pour débutants vous apprendra à interagir avec le microcontrôleur pour interagir avec des composants simples tels que des LED, des capteurs à ultrasons et bien d'autres éléments que l'on trouve dans un kit pour débutants.
Si vous êtes un débutant complet, ce tutoriel vous aidera à comprendre MicroPython afin que vous puissiez lire, écrire et modifier du code. Avec ces connaissances, vous pouvez combiner du code et des composants pour créer quelque chose qui a un cas d'utilisation dans le monde réel.
Si vous venez d'un Pico, ce tutoriel vous apprendra à contrôler le Pico W sans fil. Auparavant, vous ne pouviez interagir avec le Pico qu'au moyen d'un interrupteur, d'un bouton ou d'un dispositif d'interaction physique. Ce n'est plus le cas ! Vous pouvez désormais contrôler les composants à l'aide de votre téléphone ou de votre ordinateur.
Flux du tutoriel
Introduction
Le tutoriel Hello World pour le Pico W
Un pas en avant
Méthodes de base pour transmettre les données d'un capteur
- Pico W et capteur ultrasonique HC-SR04
- Transmettre une page web avec les données du capteur
- Réduire la charge utile avec AJAX
- Pimoroni Phew pour rationaliser le codage des points finaux
Connexion aux services web
- Enregistrer les données climatiques du capteur DHT22 dans Google Sheets avec IFTTT
- Construire une télécommande Spotify avec les fonctions play/pause/skip
Contrôle GPIO sans code avec PiCockpit
- Installation super simple de PiCockpit sur Pico W
- Contrôle simple des LED avec PiCockpit et Pico W
- Pico W, ventilateur 5V et transistor, contrôlé par PiCockpit
MQTT
Table des matières
Résumé des objectifs du tutorat
- Apprendre à interagir avec les éléments fondamentaux qui composent les projets plus vastes
- Contrôlez tous ces éléments sans fil - pas d'interrupteurs, de boutons ou d'autres dispositifs d'interaction.
- Mieux comprendre les atouts du Pico W
Liens importants
Repo Github pour le code du tutoriel (sauf secrets.py)
Erreurs, suggestions, commentaires ? Laissez un commentaire dans la boîte de commentaires ci-dessous, m'envoyer un courriel ou Tweetez-moi.
OSError : [Errno 98] EADDRINUSE
Si vous obtenez cette erreur, débranchez et rebranchez votre Raspberry Pi Pico.
Vous pouvez également le faire en tapant ces commandes dans le Shell de Thonny :
import machine
machine.reset()
Résultat :

Soudure des broches d'en-tête
Lorsque vous achetez un Raspberry Pi Pico W, il se peut qu'il ne soit pas livré avec des connecteurs vous permettant de connecter des composants à votre Pico.
A l'heure où nous écrivons ces lignes, le Pico WH (H pour headers) n'est pas encore sorti. Notre méga-article sur le Pico W suit l'évolution de sa sortie.
Toutefois, si vous pouvez trouver un Pico W avec des connecteurs pré-soudés, je vous conseille de l'acheter.
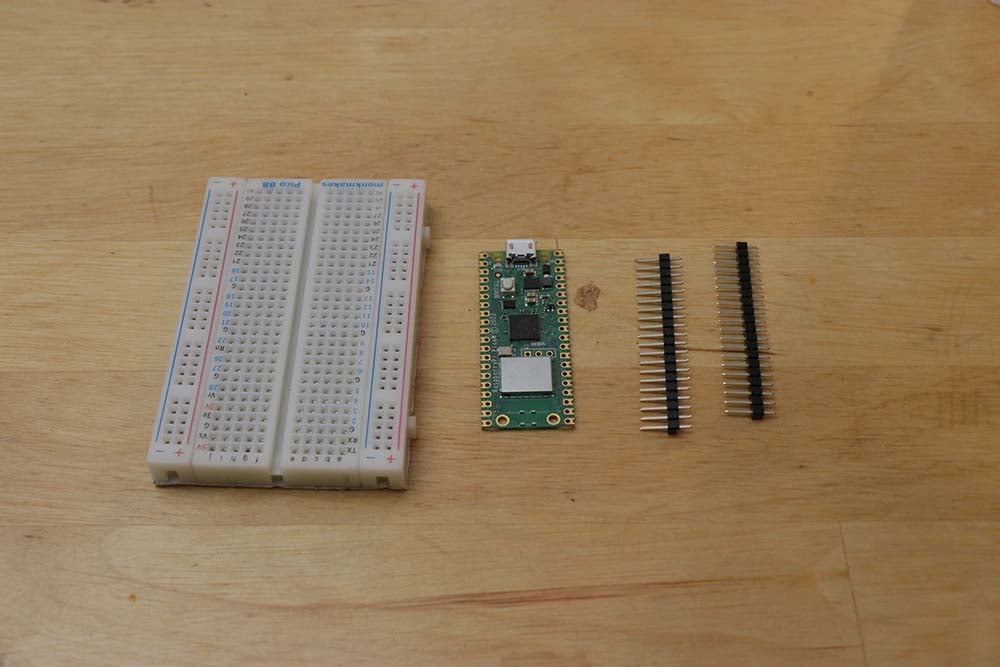
Néanmoins, pour le reste d'entre nous, il est très simple de souder des connecteurs sur le Pico W. Vous aurez besoin de
- Planche à pain
- Fer à souder et soudure
- En-têtes
Lorsque vous achetez vos connecteurs, assurez-vous d'en acheter un qui est conçu pour le Pico W. Contrairement aux connecteurs de la série Raspberry Pi Zero, les connecteurs du Pico W ne sont pas juxtaposés. Elles sont situées aux extrémités opposées de la carte.
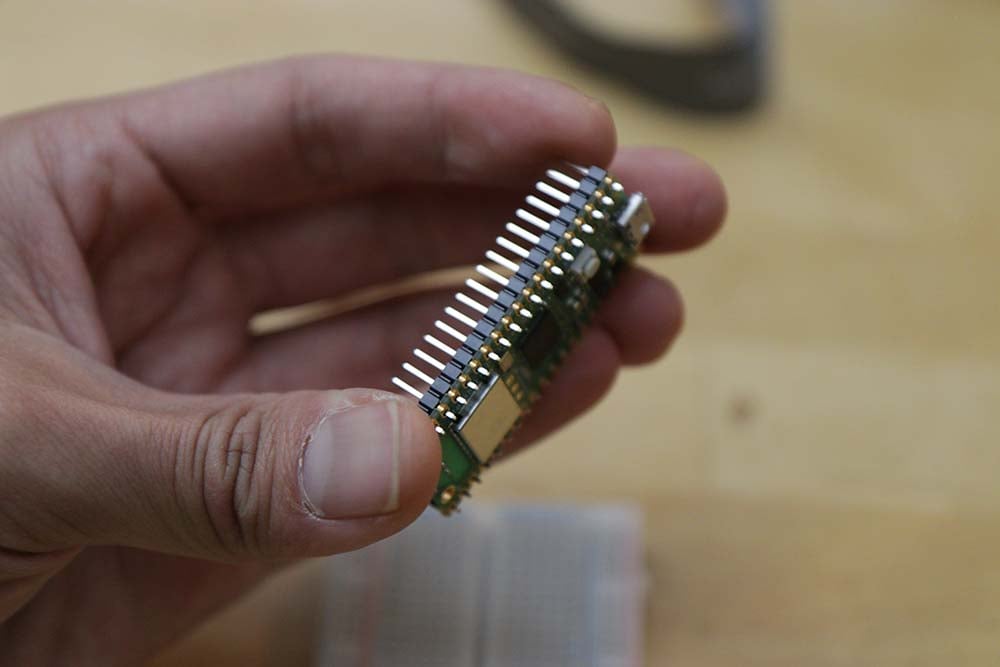
Les broches ont un côté long et un côté court. Vous voudrez que les broches les plus longues soient du côté où vous voyez les étiquettes GPIO (GP0, GP1, GND, VBUS, VSYS, etc.).
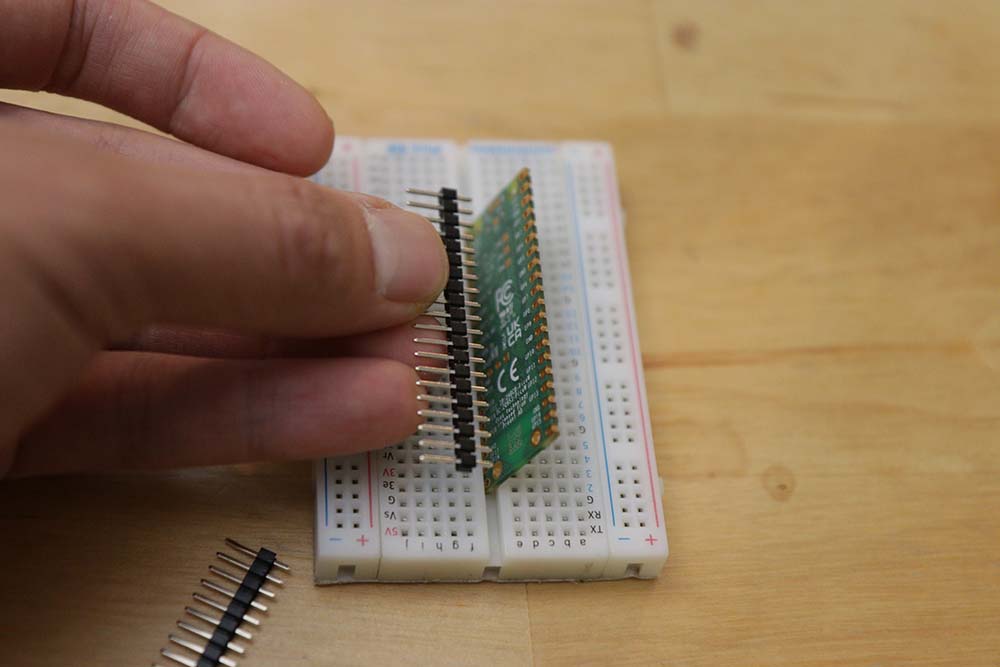
Par conséquent, insérez les broches les plus longues dans la planche à pain. Vous aurez besoin de quatre trous et d'un espacement d'une gouttière entre eux. En cas de doute, testez avec votre Pico W.
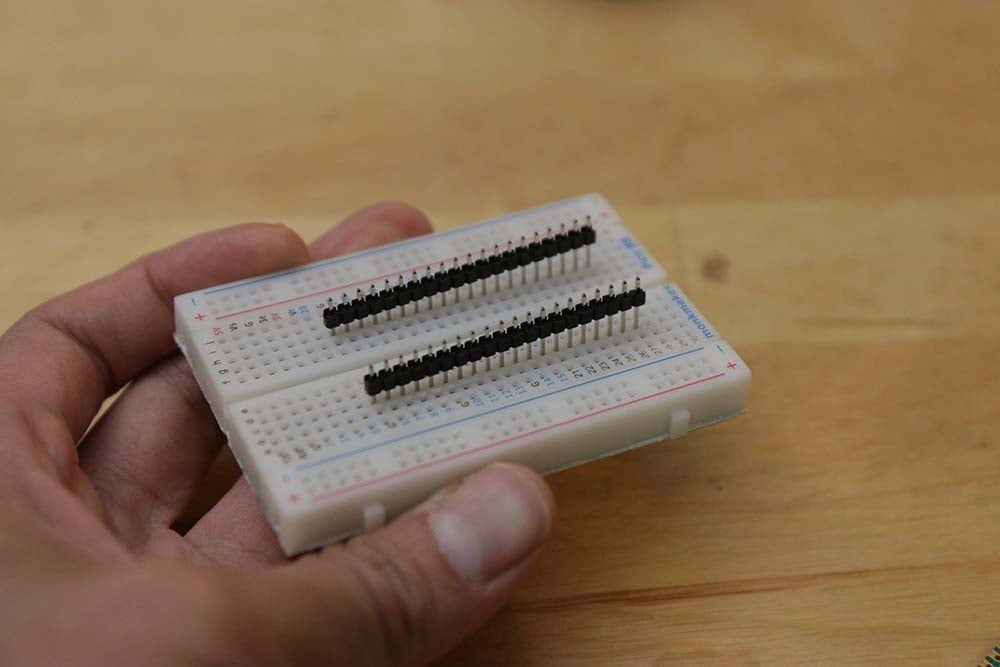
La soudure est facile. Assurez-vous que votre fer à souder est chaud et utilisez la pointe du fer à souder.
Ce que j'ai trouvé le plus efficace, c'est d'approcher la pointe du fer à souder de la broche, de faire en sorte que la soudure touche la pointe et de la voir couler le long de la broche pour créer une connexion.
Après la soudure, assurez-vous qu'il n'y a pas de soudure superflue qui pourrait relier deux broches GPIO ou des restes de soudure sur votre carte.
Utiliser Thonny comme éditeur de code

Thonny reste le moyen le plus simple de programmer votre Raspberry Pi Pico W.
Si vous utilisez le système d'exploitation Raspberry Pi, il est déjà installé.
Cependant, si vous utilisez Windows ou Mac, vous devrez le télécharger et le configurer.
Voici un guide qui vous guidera à travers les différentes étapes.
Veillez également à reportez-vous au guide sur la manière de télécharger des fichiers sur votre Pico W.
Mettez à jour votre micrologiciel en téléchargeant la dernière version de l'UF2
Lorsque vous avez acheté votre Pico W, il se peut que vous ayez déjà le micrologiciel périmé.
De nombreux changements vont être apportés au Pico W, il est donc préférable de mettre à jour votre micrologiciel dès maintenant.
Parmi les changements que j'ai constatés depuis le jour de la sortie, il y a des améliorations dans la fonction de point d'accès du WLAN, et de futures mises à jour pourraient débloquer la fonction Bluetooth sur la carte.
Mise à jour maintenant ! Voici un guide dans notre méga-article.
1. Servez une page web qui dit "Hello World" sur la Pico.

L'un des projets les plus fondamentaux de tous les tutoriels de programmation est le projet "Hello World".
Le "Hello World" d'un microcontrôleur se traduit généralement par le clignotement d'une diode électroluminescente. C'est très facile. Voici comment procéder.
Cependant, puisque la Pico W peut servir une page web, commençons par apprendre à servir une page web contenant un message "Hello World".
La configuration utilisée ici constituera l'élément de base le plus fondamental pour le reste des tutoriels.
Il y a deux façons de se connecter au Pico W. Vous pouvez lui faire rejoindre un réseau WiFi ou vous pouvez diffuser un hotspot SoftAP similaire à celui de votre smartphone. Si vous voulez essayer ce dernier, suivre ce lien. Toutefois, par souci de cohérence, nous nous connecterons toujours à un réseau WiFi plutôt que de diffuser un réseau à partir de la Pico W.
Ainsi, fondamentalement, les étapes de la diffusion d'une page web sont les suivantes :
- Se connecter au WiFi
- Écrire du code pour servir index.html à toute personne qui se connecte à l'adresse IP de la Pico W.
Nous allons créer quelques fichiers. Sauvegardez-les et téléchargez-les sur votre Raspberry Pi Pico W. Voici comment télécharger des fichiers, au cas où vous l'auriez manqué.
wifi.py
wifi.py est un fichier de base destiné à vous aider à vous connecter à votre réseau WiFi. Créer un fichier séparé et l'importer dans main.py permettra de réduire l'encombrement du code.
Notez que vous devez modifier le code de votre pays dans la ligne rp2.country('DE') si votre pays n'est pas l'Allemagne.
import rp2
import network
import ubinascii
import machine
import urequests as requests
import time
from secrets import secrets


def init_wifi():
    # Set country to avoid possible errors
    rp2.country('DE')

    wlan = network.WLAN(network.STA_IF)
    wlan.active(True)

    # Load login data from different file for safety reasons
    ssid = secrets['ssid']
    pw = secrets['pw']

    wlan.connect(ssid, pw)

    # Wait for connection with 10 second timeout
    timeout = 10
    while timeout > 0:
        if wlan.status() < 0 or wlan.status() >= 3:
            break
        timeout -= 1
        print('Waiting for connection...')
        time.sleep(1)

    # Define blinking function for onboard LED to indicate error codes
    def blink_onboard_led(num_blinks):
        led = machine.Pin('LED', machine.Pin.OUT)
        for i in range(num_blinks):
            led.on()
            time.sleep(.2)
            led.off()
            time.sleep(.2)

    wlan_status = wlan.status()
    blink_onboard_led(wlan_status)

    if wlan_status != 3:
        raise RuntimeError('Wi-Fi connection failed')
    else:
        print('Connected')
        status = wlan.ifconfig()
        print('ip = ' + status[0])
secrets.py
wifi.py importations secrets.pyoù vous stockez les informations relatives à votre réseau WiFi.
secrets.py est un simple fichier JSON qui contient votre SSID WiFi et votre mot de passe.
secrets = {
    'ssid': 'SM-A520W9371',
    'pw': 'starting',
    }
serve_webpage.py
Comme son nom l'indique, cette page sert de site web aux utilisateurs qui se connectent au Pico W.
Lorsqu'il reçoit une connexion, le Pico W trouve un fichier appelé index.html et l'envoie au client connecté, comme le montre la ligne response = get_html('index.html').
import socket

def serve_webpage():
    #Function to load in html page
    def get_html(html_name):
        # open html_name (index.html), 'r' = read-only as variable 'file'
        with open(html_name, 'r') as file:
            html = file.read()

        return html

    # HTTP server with socket
    addr = socket.getaddrinfo('0.0.0.0', 80)[0][-1]

    s = socket.socket()
    s.bind(addr)
    s.listen(1)

    print('Listening on', addr)

    # Listen for connections
    while True:
        try:
            cl, addr = s.accept()
            print('Client connected from', addr)
            response = get_html('index.html')
            cl.send('HTTP/1.0 200 OK\r\nContent-type: text/html\r\n\r\n')
            cl.send(response)
            cl.close()

        except OSError as e:
            cl.close()
            print('Connection closed')
Enfin, nous devons créer le fichier index.html qui sera envoyé à un client connecté.
<!DOCTYPE html>
<html>
    <head>
        <title>Pico W</title>
    </head>
    <body>
        <h1>Hello World</h1>
    </body>
</html>
Il s'agit d'un simple modèle HTML avec deux modifications : l'une concerne le champ <title>qui affiche "Pico W" comme titre et la balise <h1> qui dit "Hello World".
main.py
Comme nous avons placé tout le code ailleurs, notre main.py n'a plus qu'à importer et appeler ces fonctions pour servir la page web Hello World.
Comme vous pouvez le voir, nous initialisons d'abord le WiFi avant de servir la page web.
from wifi import init_wifi
from serve_webpage import serve_webpage

init_wifi()
serve_webpage()
Vous y êtes presque !
En vous référant à la capture d'écran ci-dessous, assurez-vous que :
- Vous avez téléchargé cinq fichiers dans votre Raspberry Pi Pico W (voir l'encadré rouge en bas à gauche).
- Assurez-vous que votre interprète est réglé sur MicroPython (Raspberry Pi Pico) (voir encadré en bas à droite)
- Ensuite, mettez en évidence le main.py dans votre éditeur de code, et cliquez sur le bouton vert d'exécution (boîte rouge en haut à gauche)
- Une fois que vous l'aurez exécuté, vous verrez votre adresse IP dans le Shell. Allez dans votre navigateur et tapez cette adresse, vous verrez la page web Hello World.
- Si votre Shell n'est pas ouvert, allez dans Affichage -> Shell.

Si tout se passe bien, vous verrez la page ci-dessous.

2. Commande sans fil d'une LED
Maintenant que les bases sont posées, faisons un pas en avant.
L'un des projets Raspberry Pi les plus fondamentaux consiste à faire clignoter une LED.
Allons encore plus loin en contrôlant la LED sans fil. Nous voulons pouvoir faire clignoter la LED, l'allumer et l'éteindre.
Pour ce faire, vous devez mettre en place un circuit et un serveur web avec trois boutons - ON, OFF, BLINK.

Pour ce projet, vous aurez besoin d'une DEL, d'une résistance de 330 ohms, d'un fil de connexion et d'une planche à pain.
Nous utiliserons une LED rouge car la plupart des kits en sont équipés. Notez que si vous utilisez une LED d'une autre couleur, vous devrez ajuster la résistance.
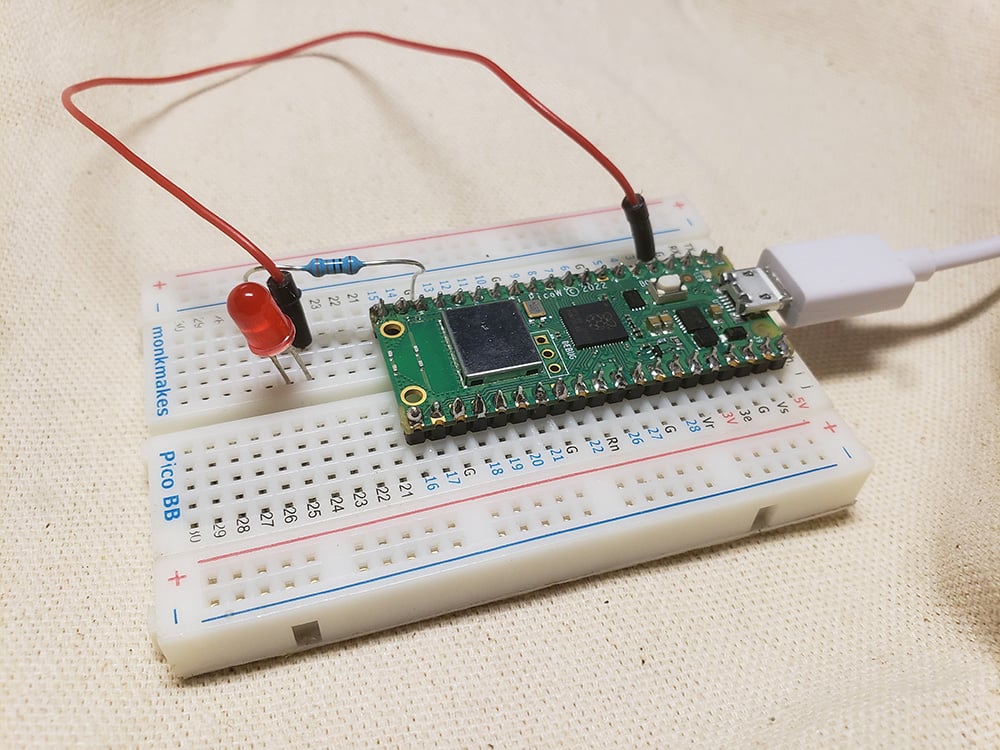
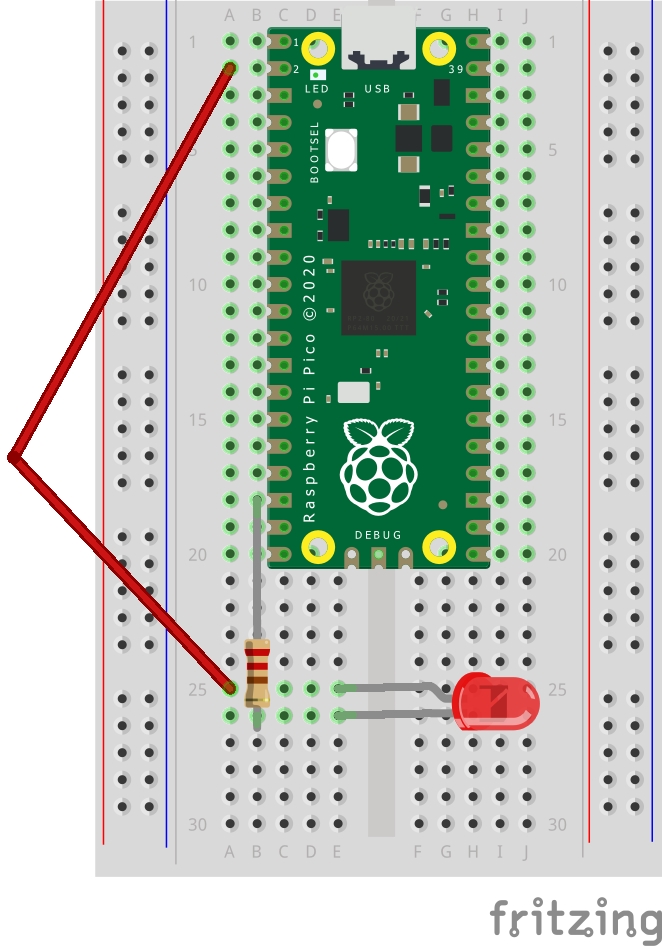
Voici comment connecter les composants
- GPIO 2 -> branche longue de la LED (anode/positive)
- GND -> résistance de 330 ohms -> branche courte de la LED (cathode/négative)
Code pour contrôler la LED sur le Pico W
Reprenons ce que nous avons fait dans le tutoriel précédent. Les deux seuls fichiers que nous devrons modifier sont index.html pour ajouter des boutons et main.py d'interagir avec la DEL en fonction des données fournies par la index.html.
Les parties en gras indiquent les nouvelles lignes qui ont été ajoutées aux index.html. Ils ajoutent trois boutons et un paragraphe qui dit "Control the LED".
<!DOCTYPE html>
<html>
<head>
<title>Pico W</title>
</head>
<body>
<h1>Pico W</h1>
<p>Control the LED</p>
<a href=\"?led=on\"><button>ON</button></a>
<a href=\"?led=off\"><button>OFF</button></a>
<a href=\"?led=blink\"><button>BLINK</button></a>
</body>
</html>Remarquez que lorsque vous appuyez sur les boutons, vous verrez un paramètre ajouté à l'adresse IP de votre Pico W (par ex. http://192.168.43.134/%22?led=blink\). Ces paramètres sont capturés par le backend du Pico W et contrôlent la LED.
Nous allons déménager serve_webpage.pydans le code de l main.py fichier.
Voici main.py:
from wifi import init_wifi
import socket
import machine
import time

init_wifi()


#LED controls
led = machine.Pin(2, machine.Pin.OUT)

def blink_led():
    led.on()
    time.sleep(0.2)
    led.off()
    time.sleep(0.2)

#Function to load in html page
def get_html(html_name):
    # open html_name (index.html), 'r' = read-only as variable 'file'
    with open(html_name, 'r') as file:
        html = file.read()

    return html

# HTTP server with socket
addr = socket.getaddrinfo('0.0.0.0', 80)[0][-1]

s = socket.socket()
s.bind(addr)
s.listen(1)

print('Listening on', addr)

# Listen for connections
while True:
    try:
        cl, addr = s.accept()
        print('Client connected from', addr)
        request = cl.recv(1024)
        print(request)

        request = str(request)
        led_on = request.find('?led=on')
        led_off = request.find('?led=off')
        led_blink = request.find('?led=blink')
        print('led_on = ', led_on)
        print('led_off = ', led_off)
        print('led_blink = ', led_blink)
        if led_on > -1:
            print('LED ON')
            led.on()

        if led_off > -1:
            print('LED OFF')
            led.off()

        if led_blink > -1:
            print('LED BLINK')
            blink_led()

        response = get_html('index.html')
        cl.send('HTTP/1.0 200 OK\r\nContent-type: text/html\r\n\r\n')
        cl.send(response)
        cl.close()

    except OSError as e:
        cl.close()
        print('Connection closed')
Le premier segment, et le plus important, se trouve ci-dessous :
request = cl.recv(1024)
        print(request)

        request = str(request)
        led_on = request.find('?led=on')
        led_off = request.find('?led=off')
        led_blink = request.find('?led=blink')
        print('led_on = ', led_on)
        print('led_off = ', led_off)
        print('led_blink = ', led_blink)
        if led_on > -1:
            print('LED ON')
            led.on()

        if led_off > -1:
            print('LED OFF')
            led.off()

        if led_blink > -1:
            print('LED BLINK')
            blink_led()
La variable "request", lorsqu'elle est imprimée, produit le premier bloc de texte ci-dessous. Les trois dernières lignes sont les instructions d'impression qui vérifient si la LED est allumée, éteinte ou clignote :
b'GET /%22?led=blink\\%22 HTTP/1.1\r\nHost: 192.168.43.134\r\nConnection: keep-alive\r\nCache-Control: max-age=0\r\nUpgrade-Insecure-Requests: 1\r\nUser-Agent: Mozilla/5.0 (Windows NT 10.0; Win64; x64) AppleWebKit/537.36 (KHTML, like Gecko) Chrome/107.0.0.0 Safari/537.36\r\nAccept: text/html,application/xhtml+xml,application/xml;q=0.9,image/avif,image/webp,image/apng,*/*;q=0.8,application/signed-exchange;v=b3;q=0.9\r\nReferer: http://192.168.43.134/%22?led=on\\%22\r\nAccept-Encoding: gzip, deflate\r\nAccept-Language: en-US,en;q=0.9,es;q=0.8,zh-TW;q=0.7,zh-CN;q=0.6,zh;q=0.5\r\n\r\n'
led_on =  456
led_off =  -1
led_blink =  10
Le code ci-dessus tente de rechercher des chaînes de caractères spécifiques telles que "led=on". S'il existe, sa valeur sera supérieure à -1, ce qui déclenchera l'action correspondante de la si déclaration.
Par exemple, si led=on existe dans les paramètres, la variable led_on sera supérieure à -1, ce qui signifie que l'option si led_on > -1 se déclenche et s'exécute led.on();
La seule chose compliquée ici est le led_blink qui déclenchera la fonction :
    def blink_led():
        led.on()
        time.sleep(0.2)
        led.off()
        time.sleep(0.2)
Enfin, voici comment initialiser le GPIO 2 pour faire fonctionner la LED :
import machine
import time

#LED controls
led = machine.Pin(2, machine.Pin.OUT)
Nous importons la machine pour interagir avec la broche GPIO. Comme vous pouvez le voir dans la variable dirigéNous voulons que le Pico W alimente le GPIO 2.
Nous importons temps de sorte que nous puissions avoir une pause de 0,2 seconde en blink_led().
3. LED RVB sur Pico W
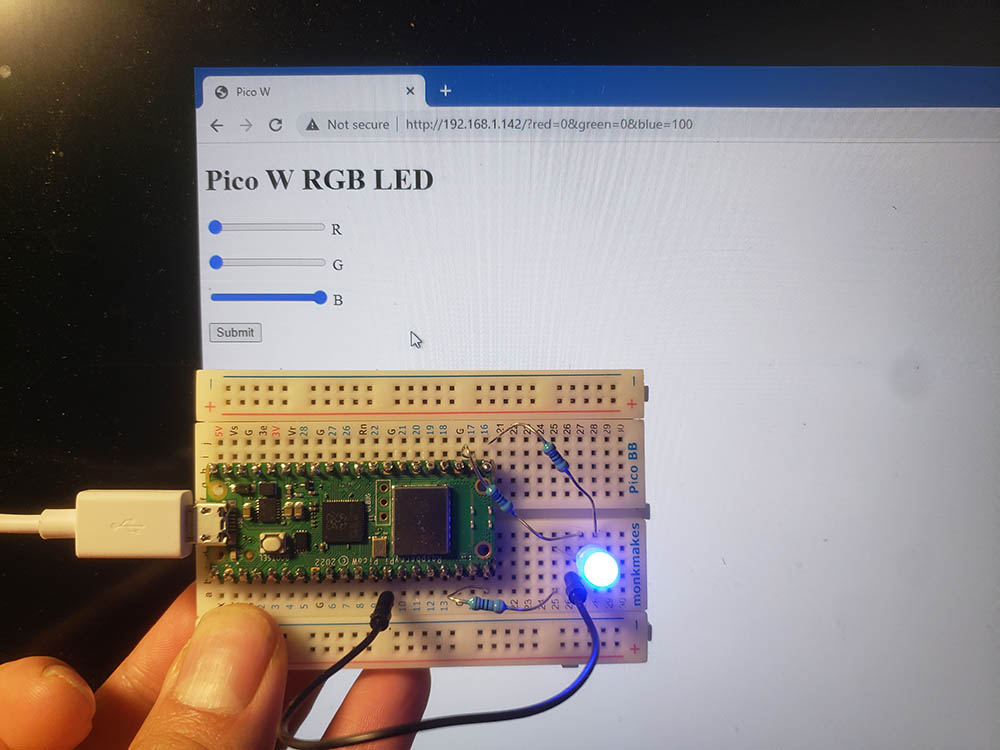
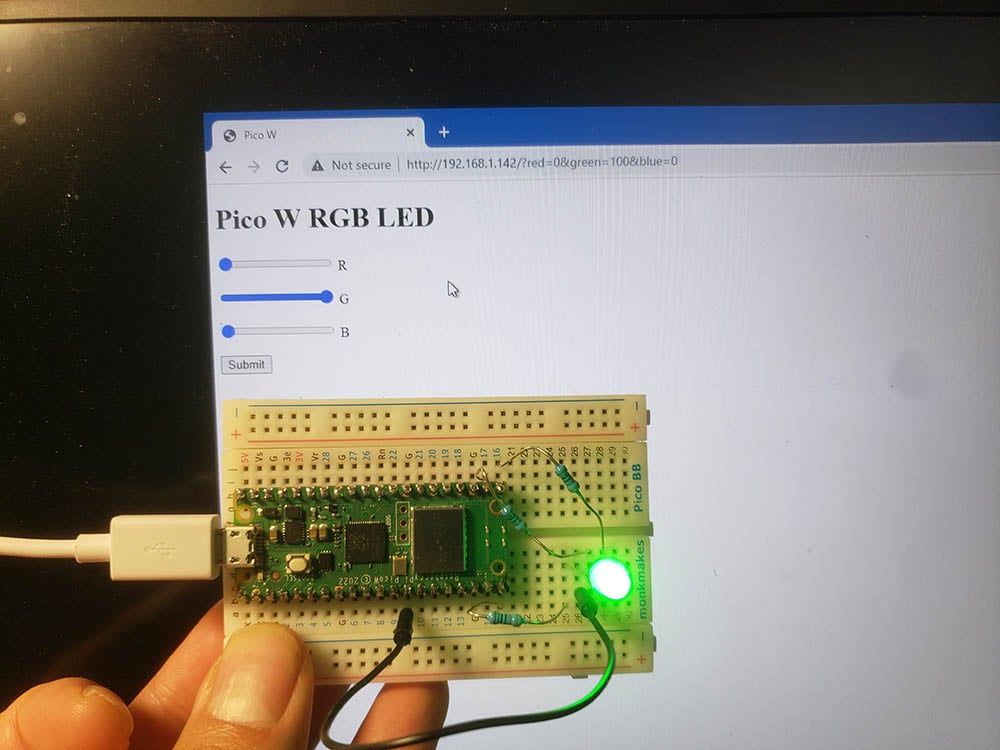
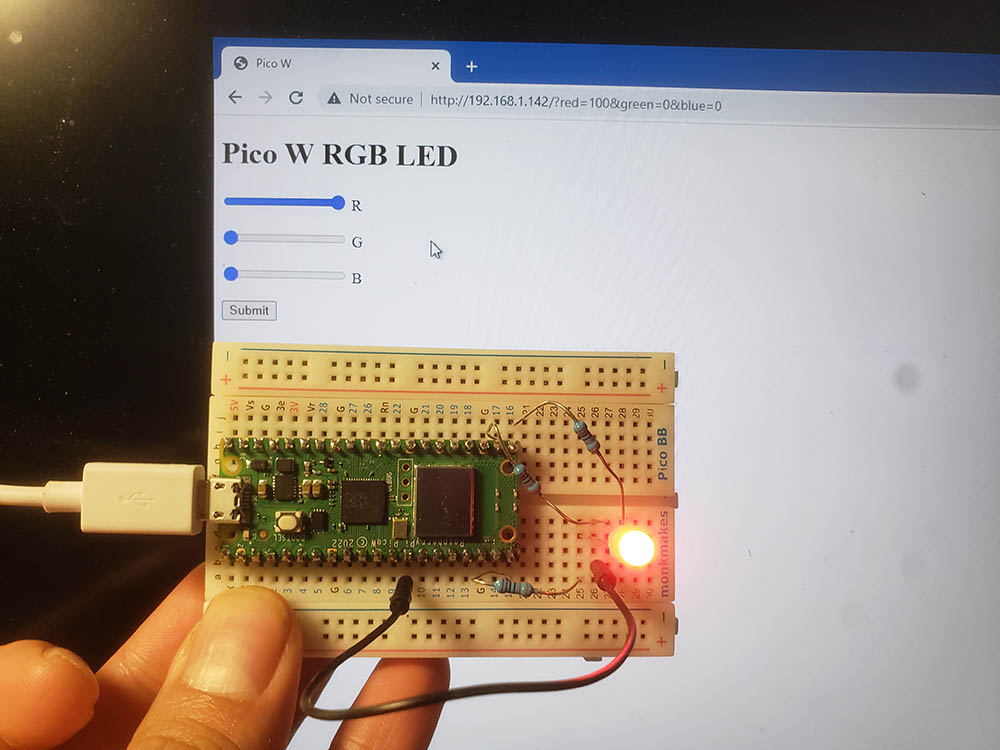
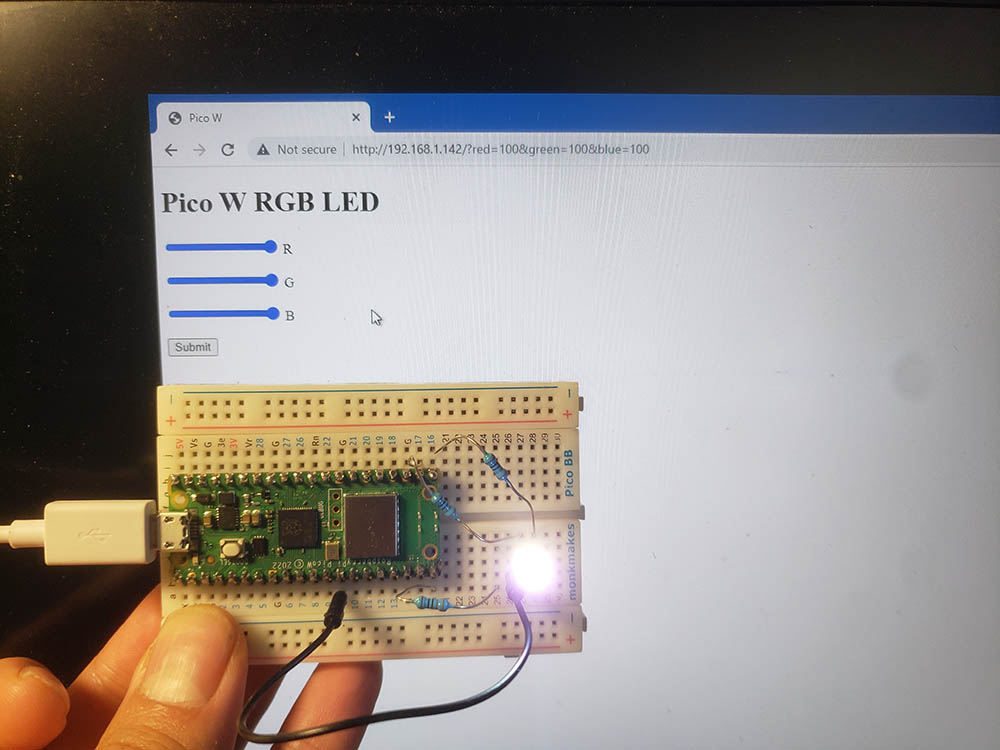
Pour allumer votre LED RVB, vous avez besoin de :
- Trois résistances de 330 ohms
- Une LED RVB
- Un fil de connexion
Sur la LED RVB, vous trouverez quatre pattes. L'une d'entre elles est la plus longue. Il s'agit soit d'une cathode (négative), soit d'une anode (positive). Ma DEL RVB avait une cathode partagée, voici donc la connexion :

- GPIO 15 -> résistance de 330 ohms -> LED rouge
- GPIO 17 -> résistance -> LED verte
- GPIO 16 -> résistance -> LED bleue
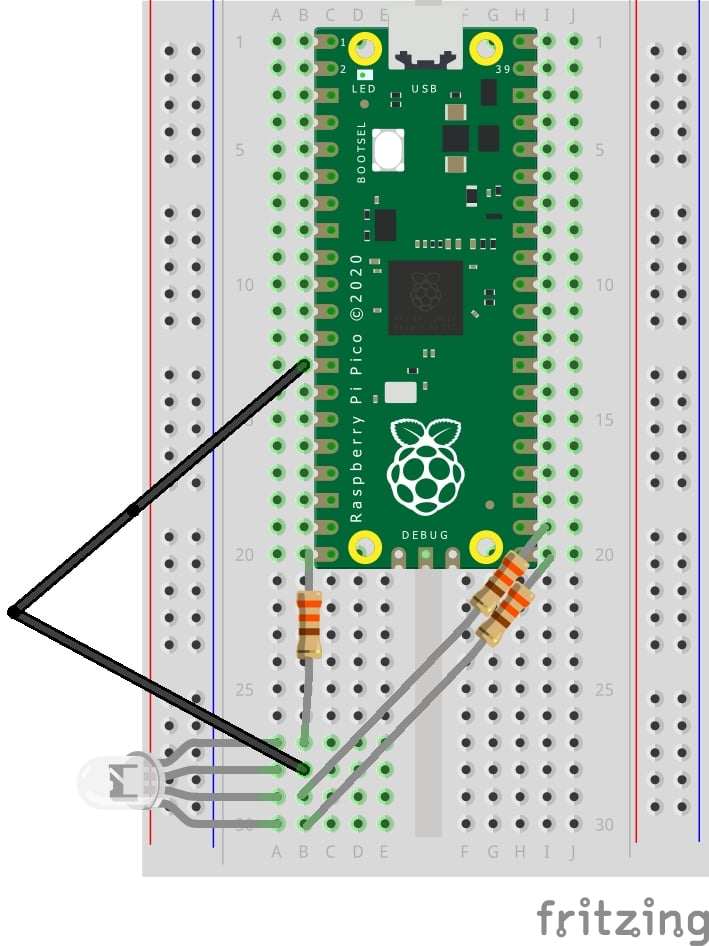
Voici un peu de code pour voir si vous avez bien câblé :
import machine

red_led = machine.PWM(machine.Pin(15))
green_led = machine.PWM(machine.Pin(17))
blue_led = machine.PWM(machine.Pin(16))

red_led.duty_u16(65534)
green_led.duty_u16(65534)
blue_led.duty_u16(65534)
Dans cet exemple, nous utilisons le PWM, qui permet de faire varier la luminosité des LED R, G, B.
Vous pouvez modifier les valeurs passées à [colour].duty_u16 pour une valeur comprise entre 0 et 65534. Théoriquement, vous devriez pouvoir passer 65535, mais cela ne semble pas fonctionner pour moi.
Si vous passez "0", cela signifie que vous voulez une luminosité de zéro pour cent. Si vous passez 65534, vous voulez une luminosité de 100 %.
Si vous faites 65534 pour une couleur et zéro pour les autres, vous serez en mesure de savoir si vous avez connecté les bonnes broches GPIO à la bonne couleur de LED.
Alors pourquoi utiliser le PWM ? Parce que cela vous permettra d'obtenir plus de couleurs. Si vous utilisez simplement une méthode "on-and-off", vous pouvez obtenir du rouge, du vert, du bleu, du blanc et aucune lumière. Avec la modulation de largeur d'impulsion, vous pouvez faire varier l'intensité des DEL R, G et B et créer autant de couleurs que vous pouvez l'imaginer.
Maintenant, créons quelque chose que vous pouvez contrôler sans fil !
index.html
Le principal changement est l'ajout d'un <form> qui comporte trois curseurs. Ces curseurs ont une valeur comprise entre zéro et 100.
L'utilisation de valeurs comprises entre zéro et 100 permet de visualiser la luminosité sous la forme d'un pourcentage. Cela permet également de réduire la quantité de code nécessaire pour analyser la valeur à partir des paramètres (voir plus loin dans la section main.py)
Lorsque vous avez défini les valeurs des DEL R, G et B, vous appuyez sur "submit" et ces données sont capturées par le Pico W.
<!DOCTYPE html>
<html>
    <head>
        <title>Pico W</title>
    </head>
      <body>
        <h1>Pico W RGB LED</h1>
        <form id="form">

            <input type="range" min="0" max="100" value="slider_value" name="red" id="red">
            <label for="red">R</p>

            <input type="range" min="0" max="100" value="slider_value" name="green" id="green">
             <label for="green">G</p>

            <input type="range" min="0" max="100" value="slider_value" name="blue" id="blue">
            <label for="blue">B</p>

            <input type="submit" id="submit">
        </form>
        <script>

            submit.addEventListener('click', function ()  {
                form.submit();
            }, false);

        </script>
</html>
main.py
from wifi import init_wifi
import socket
import machine
import time

init_wifi()

#LED controls
red_led = machine.PWM(machine.Pin(15))
green_led = machine.PWM(machine.Pin(17))
blue_led = machine.PWM(machine.Pin(16))

#Function to load in html page
def get_html(html_name):
    # open html_name (index.html), 'r' = read-only as variable 'file'
    with open(html_name, 'r') as file:
        html = file.read()
    return html

def find_intensity(color, request_str):
    index = request_str.find(color) + len(color)
    offset = 0
    if request_str[index].isdigit():
        offset = 1
        if request_str[index+1].isdigit():
            offset = 2
            if request_str[index+2].isdigit():
                offset = 3

    intensity = int(request_str[index:index+offset])
    return intensity


# HTTP server with socket
addr = socket.getaddrinfo('0.0.0.0', 80)[0][-1]

s = socket.socket()
s.bind(addr)
s.listen(1)

print('Listening on', addr)

# Listen for connections
while True:
    try:
        cl, addr = s.accept()
        print('Client connected from', addr)
        request = cl.recv(1024)

        request_str = str(request)

        #find intensity ONLY if the params exist in request
        if request_str.find('red') > -1 :
            #int = get rid of decimal
            #/100*65534 = find_intensity returns something 0 to 100,
            # so x/100 = proportion of 65534 that you want to send to LED
            # 65534 = max number you can use for PWM
            red_intensity = int(find_intensity('red=', request_str) /100 * 65534)
            green_intensity = int(find_intensity('green=', request_str) /100 * 65534)
            blue_intensity = int(find_intensity('blue=', request_str) /100 * 65534)

            #print('r=' + str(red_intensity))
            #print('g=' + str(green_intensity))
            #print('b=' + str(blue_intensity))

            red_led.duty_u16(red_intensity)
            green_led.duty_u16(green_intensity)
            blue_led.duty_u16(blue_intensity)

        response = get_html('index.html')
        cl.send('HTTP/1.0 200 OK\r\nContent-type: text/html\r\n\r\n')
        cl.send(response)
        cl.close()

    except OSError as e:
        cl.close()
        print('Connection closed')
Lorsque vous appuyez sur la touche d'envoi du index.html le Pico W prendra les paramètres et les traitera.
Examinons quelques points clés du code, mis en gras dans le bloc de code ci-dessus.
fonction find_intensity
Cette fonction prend deux paramètres : couleur et demande_str. couleur prend "rouge", "vert" ou "bleu" et trouve la valeur après le signe égal (=).
Par exemple, votre URL après l'envoi du formulaire est "http://192.168.1.142/?red=89&green=50&blue=50".
Si vous passez "red" à find_intensity, il renverra 89.
analyseur d'intensité
Le deuxième bloc de code en gras représente le code qui indique au GPIO de la Pico W la luminosité souhaitée pour chaque LED.
Tout d'abord, nous devons nous assurer que les paramètres existent dans l'URL. C'est ce que fait la fonction si déclaration request_str.find('red') > -1. J'ai simplement utilisé rouge parce que les paramètres contiendront la chaîne "red" si vous utilisez le formulaire.
Si vous visitez l'adresse IP de votre Pico W (par exemple http://192.168.1.142/) pour la première fois, vous n'aurez pas les paramètres, et le programme se plantera si vous lancez find_intensity.
Si des paramètres existent, nous trouvons l'intensité pour chaque LED en fonction des valeurs soumises. Jetons un coup d'œil à intensité_rouge.
red_intensity = int(find_intensity('red=', request_str) /100 * 65534)
...
red_led.duty_u16(red_intensity)
find_intensity renvoie un nombre entier compris entre zéro et 100. Nous le divisons par 100 pour obtenir un pourcentage. Ce pourcentage divise la valeur maximale que le devoir_u16 peut prendre.
Cependant, nous avons besoin d'un int pour envelopper ceci parce que vous pouvez parfois obtenir un flottant et que la fonction devoir_u16 a besoin d'un int. Par exemple, si vous voulez 41% de luminosité - 41% de 65534 est 26 868,94. Vous ne pouvez pas passer cette valeur flottante, car le programme se bloquerait.
4. Fonctionnement du buzzer sur le Pico W
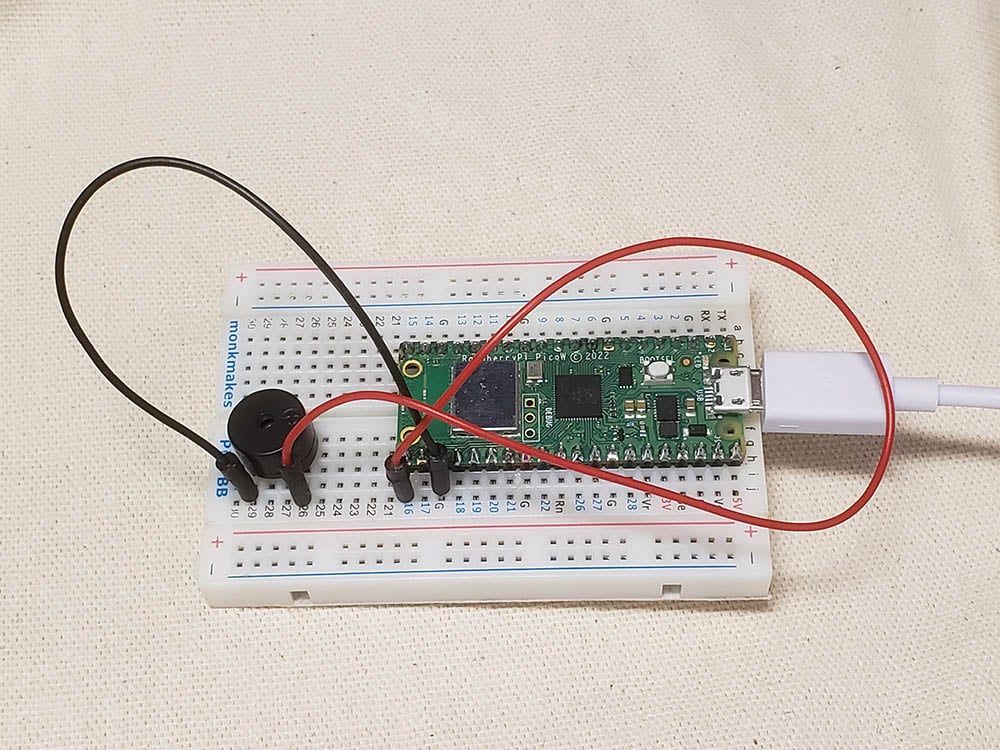
Un buzzer est un composant assez important pour les notifications de base, tout comme une LED peut vous indiquer l'état de quelque chose, un buzzer vous donne une notification auditive.
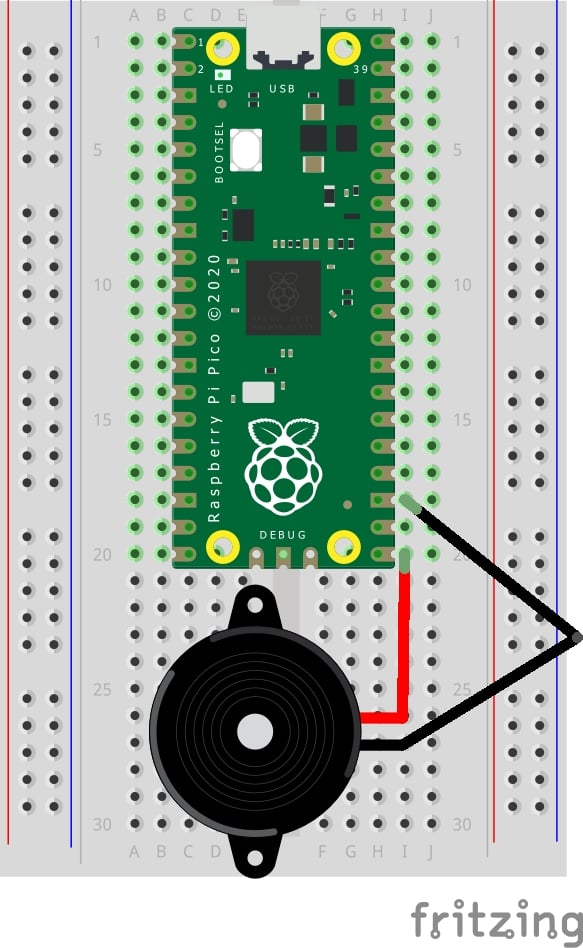
Plutôt que d'implémenter mon propre code, j'ai choisi d'utiliser La mise en œuvre de Giuseppe Cassibba. Si vous avez exécuté ce code sur le Pico W, vous entendrez des bips sur votre buzzer.
Mais comme ce code est destiné au Pico, il n'aura pas de fonctions d'interactivité sans fil.
Alors, sortons la fourchette !
Tout d'abord, modifions le fichier index.html pour mettre en œuvre les boutons. Imaginons un bouton pour "ON", "OFF", "SCALE", "MUSIC".
Les deux premiers boutons sont explicites. Le troisième bouton joue une gamme de do et le dernier joue un morceau de musique.
<!DOCTYPE html>
<html>
<head>
<title>Pico W</title>
</head>
<body>
<h1>Pico W Buzzer</h1>
<p>Control the buzzer</p>
<a href=\"?buzzer=on\"><button>ON</button></a>
<a href=\"?buzzer=off\"><button>OFF</button></a>
<a href=\"?buzzer=scale\"><button>SCALE</button></a>
<a href=\"?buzzer=music\"><button>MUSIC</button></a>
</body>
</html>Comme précédemment, nous créons quelques <button> étiquettes avec <a> qui les entourent. Lorsque l'on clique sur les boutons, l'URL comporte un paramètre tel que /buzzer=on. Le Pico W lit cette information et active le buzzer.
Voyons maintenant le code de Giuseppe pour le Pico :
from machine import Pin, PWM
from time import sleep

buzzerPIN=16
BuzzerObj=PWM(Pin(buzzerPIN))

def buzzer(buzzerPinObject,frequency,sound_duration,silence_duration):
    # Set duty cycle to a positive value to emit sound from buzzer
    buzzerPinObject.duty_u16(int(65536*0.2))
    # Set frequency
    buzzerPinObject.freq(frequency)
    # wait for sound duration
    sleep(sound_duration)
    # Set duty cycle to zero to stop sound
    buzzerPinObject.duty_u16(int(65536*0))
    # Wait for sound interrumption, if needed
    sleep(silence_duration)


# Play following notes by changing frequency:
#C (DO)
buzzer(BuzzerObj,523,0.5,0.1)

#D (RE)
buzzer(BuzzerObj,587,0.5,0.1)

#E (MI)
buzzer(BuzzerObj,659,0.5,0.1)

#F (FA)
buzzer(BuzzerObj,698,0.5,0.1)

#G (SOL)
buzzer(BuzzerObj,784,0.5,0.1)

#A (LA)
buzzer(BuzzerObj,880,0.5,0.1)

#B (SI)
buzzer(BuzzerObj,987,0.5,0.1)

#Deactivates the buzzer
BuzzerObj.deinit()
Son code joue une échelle C lorsqu'il est exécuté à l'aide de la fonction buzzer()qui prend en compte quatre paramètres : Objet du buzzer, fréquence en Hertz, durée du son et durée de la pause avant de jouer le son suivant.
Modifions le code afin d'activer la fonction ON, OFF, SCALE et MUSIQUE.
Voici comment nous intégrons le code de Giuseppe dans notre main.py:
from wifi import init_wifi
import socket
import machine
import time

init_wifi()

# Buzzer
buzzerPIN = 16
BuzzerObj = machine.PWM(machine.Pin(buzzerPIN))


def buzzer(buzzerPinObject, frequency, sound_duration, silence_duration):
    # Set duty cycle to a positive value to emit sound from buzzer
    buzzerPinObject.duty_u16(int(65536*0.2))
    # Set frequency
    buzzerPinObject.freq(frequency)
    # wait for sound duration
    time.sleep(sound_duration)
    # Set duty cycle to zero to stop sound
    buzzerPinObject.duty_u16(int(65536*0))
    # Wait for sound interrumption, if needed
    time.sleep(silence_duration)

# Function to load in html page


def get_html(html_name):
    # open html_name (index.html), 'r' = read-only as variable 'file'
    with open(html_name, 'r') as file:
        html = file.read()

    return html


# HTTP server with socket
addr = socket.getaddrinfo('0.0.0.0', 80)[0][-1]

s = socket.socket()
s.bind(addr)
s.listen(1)

print('Listening on', addr)

# Listen for connections
while True:
    try:
        cl, addr = s.accept()
        print('Client connected from', addr)
        request = cl.recv(1024)

        request = str(request)
        buzzer_on = request.find('?buzzer=on')
        buzzer_off = request.find('?buzzer=off')
        buzzer_scale = request.find('?buzzer=scale')
        buzzer_music = request.find('?buzzer=music')

        if buzzer_on > -1:
            BuzzerObj.duty_u16(int(65536*0.2))
            BuzzerObj.freq(440)

        if buzzer_off > -1:
            BuzzerObj.duty_u16(0)

        if buzzer_scale > -1:
            #C (DO)
            buzzer(BuzzerObj, 523, 0.5, 0.1)

            #D (RE)
            buzzer(BuzzerObj, 587, 0.5, 0.1)

            #E (MI)
            buzzer(BuzzerObj, 659, 0.5, 0.1)

            #F (FA)
            buzzer(BuzzerObj, 698, 0.5, 0.1)

            #G (SOL)
            buzzer(BuzzerObj, 784, 0.5, 0.1)

            #A (LA)
            buzzer(BuzzerObj, 880, 0.5, 0.1)

            #B (SI)
            buzzer(BuzzerObj, 987, 0.5, 0.1)

            BuzzerObj.deinit()

        if buzzer_music > -1:
            pass

        response = get_html('index.html')
        cl.send('HTTP/1.0 200 OK\r\nContent-type: text/html\r\n\r\n')
        cl.send(response)
        cl.close()

    except OSError as e:
        cl.close()
        print('Connection closed')
Dans la mise en œuvre ci-dessus, nous n'avons pas écrit le code pour MUSIQUE.
Le code est très similaire à celui du tutoriel sur la LED rouge ci-dessus, où le Pico W capture les paramètres après son adresse IP. Si les paramètres buzzer=ON, il jouera un son de 440Hz. Si buzzer=échelleil jouera la gamme tirée du code de Giuseppe.
Qu'en est-il de l'implémentation de la musique ? L'implémentation de la musique est un peu plus compliquée, nous devrions donc créer un nouveau fichier appelé constants.py et ajouter quelques lignes dans notre main.py.
Ce code est un dérivé de Le code Arduino de Rowan Packard.
constants.py
A3F = 208  # 208 Hz
B3F = 233  # 233 Hz
B3 = 247  # 247 Hz
C4 = 261  # 261 Hz MIDDLE C
C4S = 277  # 277 Hz
E4F = 311  # 311 Hz
F4 = 349  # 349 Hz
A4F = 415  # 415 Hz
B4F = 466  # 466 Hz
B4 = 493  # 493 Hz
C5 = 523  # 523 Hz
C5S = 554  # 554 Hz
E5F = 622  # 622 Hz
F5 = 698  # 698 Hz
F5S = 740  # 740 Hz
A5F = 831  # 831 Hz
main.py (ajouts en gras)
from wifi import init_wifi
import socket
import machine
import time
from constants import *

init_wifi()

# Buzzer
buzzerPIN = 16
BuzzerObj = machine.PWM(machine.Pin(buzzerPIN))


def buzzer(buzzerPinObject, frequency, sound_duration, silence_duration):
    # Set duty cycle to a positive value to emit sound from buzzer
    buzzerPinObject.duty_u16(int(65536*0.2))
    # Set frequency
    buzzerPinObject.freq(frequency)
    # wait for sound duration
    time.sleep(sound_duration)
    # Set duty cycle to zero to stop sound
    buzzerPinObject.duty_u16(int(65536*0))
    # Wait for sound interrumption, if needed
    time.sleep(silence_duration)

# Function to load in html page


def get_html(html_name):
    # open html_name (index.html), 'r' = read-only as variable 'file'
    with open(html_name, 'r') as file:
        html = file.read()

    return html


# HTTP server with socket
addr = socket.getaddrinfo('0.0.0.0', 80)[0][-1]

s = socket.socket()
s.bind(addr)
s.listen(1)

print('Listening on', addr)

# Listen for connections
while True:
    try:
        cl, addr = s.accept()
        print('Client connected from', addr)
        request = cl.recv(1024)

        request = str(request)
        buzzer_on = request.find('?buzzer=on')
        buzzer_off = request.find('?buzzer=off')
        buzzer_scale = request.find('?buzzer=scale')
        buzzer_music = request.find('?buzzer=music')

        if buzzer_on > -1:
            BuzzerObj.duty_u16(int(65536*0.2))
            BuzzerObj.freq(440)

        if buzzer_off > -1:
            BuzzerObj.duty_u16(0)

        if buzzer_scale > -1:
            #C (DO)
            buzzer(BuzzerObj, 523, 0.5, 0.1)

            #D (RE)
            buzzer(BuzzerObj, 587, 0.5, 0.1)

            #E (MI)
            buzzer(BuzzerObj, 659, 0.5, 0.1)

            #F (FA)
            buzzer(BuzzerObj, 698, 0.5, 0.1)

            #G (SOL)
            buzzer(BuzzerObj, 784, 0.5, 0.1)

            #A (LA)
            buzzer(BuzzerObj, 880, 0.5, 0.1)

            #B (SI)
            buzzer(BuzzerObj, 987, 0.5, 0.1)

            BuzzerObj.deinit()

        if buzzer_music > -1:
            pause = 0.05
            # pauses between notes
            t = 0.125
            # time that music note plays

            music_notes = [B4F, B4F, A4F, A4F,
                           F5, F5, E5F, B4F, B4F, A4F, A4F, E5F, E5F, C5S, C5, B4F,
                           C5S, C5S, C5S, C5S,
                           C5S, E5F, C5, B4F, A4F, A4F, A4F, E5F, C5S,
                           B4F, B4F, A4F, A4F,
                           F5, F5, E5F, B4F, B4F, A4F, A4F, A5F, C5, C5S, C5, B4F,
                           C5S, C5S, C5S, C5S,
                           C5S, E5F, C5, B4F, A4F, A4F, A4F, E5F, C5S, C5S]

            rhythm = [1, 1, 1, 1,
                      3, 3, 6, 1, 1, 1, 1, 3, 3, 3, 1, 2,
                      1, 1, 1, 1,
                      3, 3, 3, 1, 2, 2, 2, 4, 8,
                      1, 1, 1, 1,
                      3, 3, 6, 1, 1, 1, 1, 3, 3, 3, 1, 2,
                      1, 1, 1, 1,
                      3, 3, 3, 1, 2, 2, 2, 4, 8, 4]

            for i in range(len(music_notes)):
                buzzer(BuzzerObj, music_notes[i], rhythm[i]*t, pause)

        response = get_html('index.html')
        cl.send('HTTP/1.0 200 OK\r\nContent-type: text/html\r\n\r\n')
        cl.send(response)
        cl.close()

    except OSError as e:
        cl.close()
        print('Connection closed')
Comme vous pouvez le voir, il y a deux tableaux, notes_musicales et rythme. Vous devez ensuite exécuter une boucle for pour placer ces valeurs dans le fichier buzzer() . En outre, au début du code, nous importons toutes les variables de constants.py.
Le site buzzer() La fonction utilise également deux nouvelles variables - t et pause. Ces deux variables permettent d'accorder le tempo de la musique. t définit la durée de jeu de chaque note et pause définit la durée du silence entre les notes.
5. Pico W et capteur ultrasonique HC-SR04
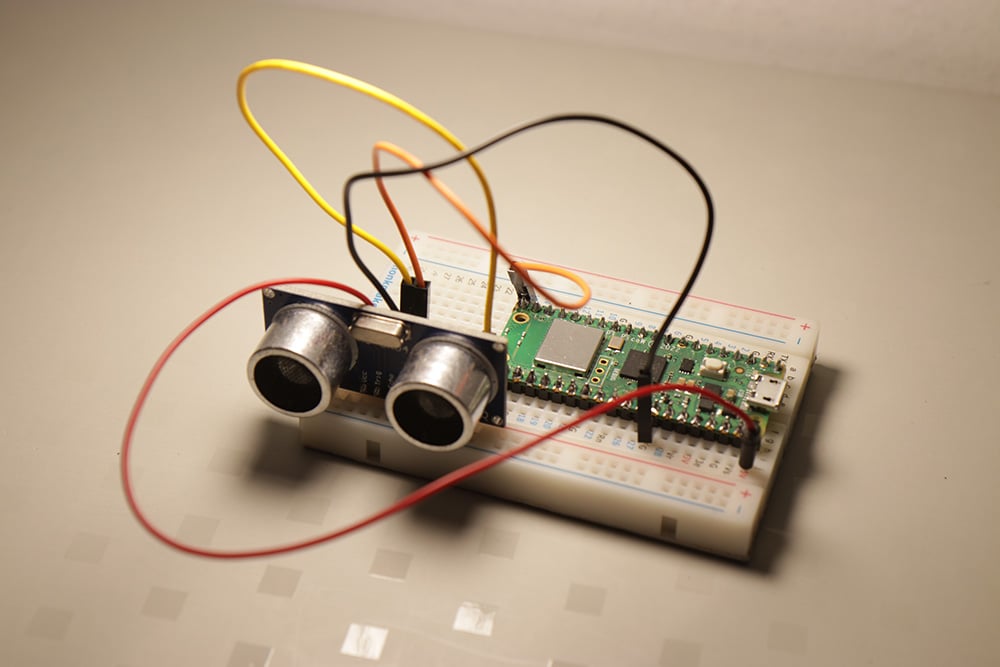
Dans les tutoriels précédents, nous avons utilisé le Pico W pour envoyer des commandes aux LED et aux buzzers.
Mais qu'en est-il si nous utilisons le Pico W pour recevoir des informations ?
Dans ce cas, il s'agit du capteur de distance à ultrasons HC-SR04.
Lorsque vous branchez votre capteur à ultrasons, assurez-vous de savoir s'il s'agit d'un composant de 5V ou de 3,3V. J'ai branché ma version 5V sur la broche 3,3V et je n'ai obtenu aucune réponse du programme, que je vais partager ci-dessous. Une fois que j'ai déplacé la source d'alimentation sur la broche 5V, j'ai immédiatement obtenu une réponse.
Apparemment, certaines versions plus récentes du HC-SR04 peuvent prendre à la fois 3,3V et 5V. Il est peut-être préférable d'essayer d'abord la broche 3,3V et de voir si vous obtenez un résultat. Si ce n'est pas le cas, essayez le 5V.
Voici les schémas et le programme que vous pouvez exécuter dans Thonny. Si vous obtenez une réponse, cela signifie que vous avez tout branché correctement, y compris la tension.
Câblage
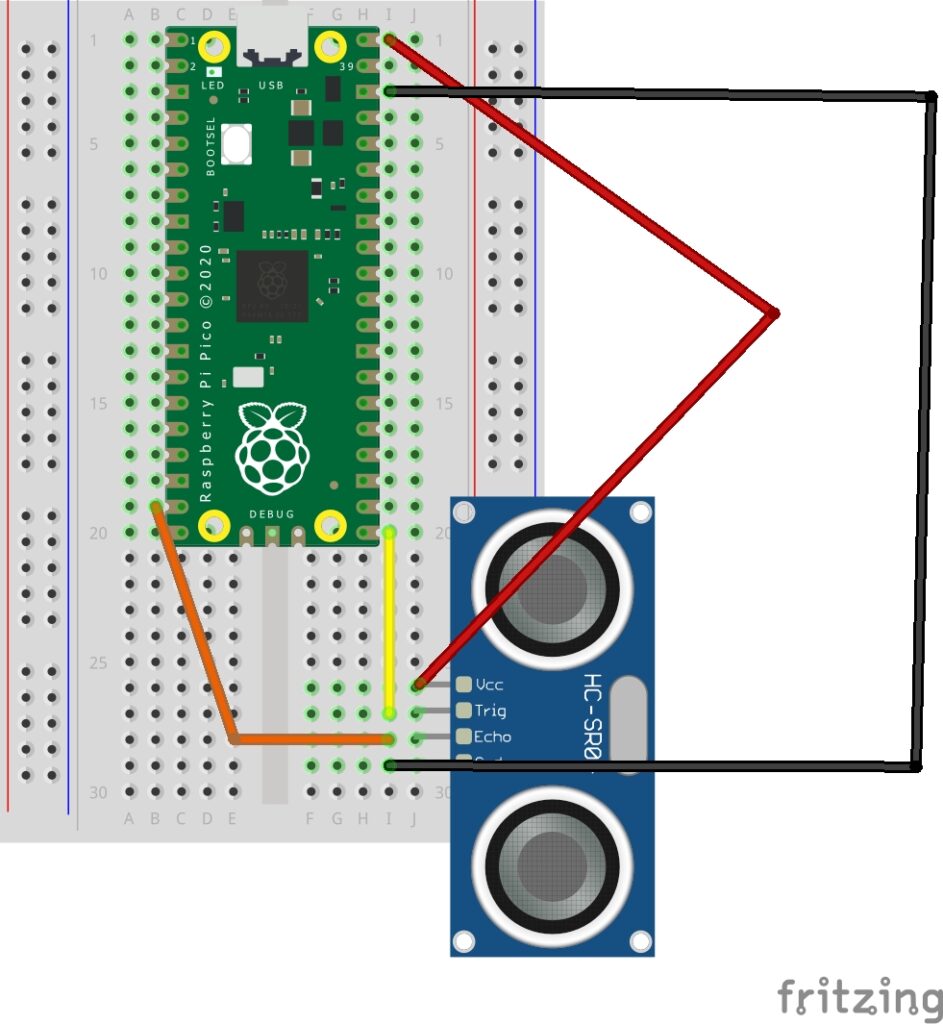
Le câblage des broches étiquetées des capteurs HC-SR04 est le suivant :
- VCC à 3,3V ou 5V pin (en cas de doute, essayez d'abord 3,3V)
- TRIG vers GPIO 16
- ECHO vers GPIO 15
- GND à GND
Programme de test pour HC-SR04
Afin de vérifier si votre câblage est correct, essayez ce code qui imprimera la distance sur le Thonny Shell.
from machine import Pin
import time
trigger = Pin(16, Pin.OUT)
echo = Pin(15, Pin.IN)
def ultrasonic():
   trigger.low()
   time.sleep_us(1)
   trigger.high()
   time.sleep_us(10)
   trigger.low()
   while echo.value() == 0:
       signaloff = time.ticks_us()
   while echo.value() == 1:
       signalon = time.ticks_us()
   timepassed = signalon - signaloff
   distance = (timepassed * 0.0340) / 2
   print("Distance = ",distance,"cm")
while True:
   ultrasonic()
   time.sleep(1)
Votre résultat devrait être le suivant :
Distance =  9.707001 cm
Distance =  9.707001 cm
Distance =  8.619 cm
Distance =  8.415001 cm
Distance =  8.551001 cm
Distance =  8.551001 cm
Distance =  8.619 cm
Si le programme s'exécute et se termine sans aucune sortie, vous avez probablement mal câblé quelque chose. Lorsque j'ai branché le capteur sur une broche de 3,3V au lieu de 5V, le programme s'est arrêté sans réponse.
Obtenir les données envoyées à votre navigateur
Reprenons les fichiers que nous avons utilisés pour servir une page web et modifions-les de manière à ce que nous puissions voir les valeurs de distance.
Voici le code final :
main.py
from wifi import init_wifi
import socket
from machine import Pin
import time

init_wifi()

# ultrasonic sensor pins and functions
trigger = Pin(16, Pin.OUT)
echo = Pin(15, Pin.IN)


def ultrasonic():
    trigger.low()
    time.sleep_us(1)
    trigger.high()
    time.sleep_us(10)
    trigger.low()
    while echo.value() == 0:
        signaloff = time.ticks_us()
    while echo.value() == 1:
        signalon = time.ticks_us()
    timepassed = signalon - signaloff
    distance = (timepassed * 0.0340) / 2
    return distance

# Function to load in html page

def get_html(html_name, distance):
    # open html_name (index.html), 'r' = read-only as variable 'file'
    with open(html_name, 'r') as file:
        html = file.read()
    content = html.replace(
        "<h2 id=\"ultrasonic\"></h2>", f"<h2 id=\"ultrasonic\">{distance}cm</h2>")

    return content


# HTTP server with socket
addr = socket.getaddrinfo('0.0.0.0', 80)[0][-1]

s = socket.socket()
s.bind(addr)
s.listen(1)

print('Listening on', addr)

# Listen for connections
while True:
    try:
        cl, addr = s.accept()
        print('Client connected from', addr)
        request = cl.recv(1024)
        print(ultrasonic())
        response = get_html('index.html', ultrasonic())
        cl.send('HTTP/1.0 200 OK\r\nContent-type: text/html\r\n\r\n')
        cl.send(response)
        cl.close()

    except OSError as e:
        cl.close()
        print('Connection closed')
index.html
<!DOCTYPE html>
<html>
    <head>
        <title>Pico W</title>
    </head>
      <body>
        <h1>Pico W Ultrasonic Distance</h1>
        <h2 id="ultrasonic"></h2>
        <script>
            setInterval(() => location.reload(), 500)
        </script>
</html>
Examinons quelques extraits du code pour comprendre ce qui se passe.
Code pour obtenir la distance ultrasonique
def ultrasonic():
    trigger.low()
    time.sleep_us(1)
    trigger.high()
    time.sleep_us(10)
    trigger.low()
    while echo.value() == 0:
        signaloff = time.ticks_us()
    while echo.value() == 1:
        signalon = time.ticks_us()
    timepassed = signalon - signaloff
    distance = (timepassed * 0.0340) / 2
    return distance
Le bloc de code ci-dessus déclenche l'émission d'une onde ultrasonique. Le bloc de code ci-dessus déclenche l'émission d'une onde ultrasonique. temps.sommeil entre les basses et les hautes sont nécessaires au fonctionnement du capteur à ultrasons.
Pour mesurer le temps qui s'écoule entre l'émission de l'onde ultrasonore et le temps de retour de l'onde sonore, on utilise temps.ticks_us pour mesurer le temps d'émission et le temps de détection de l'écho.
temps.ticks_us est un nombre arbitraire, nous devrons donc soustraire signalon de désactivation du signal pour faire passer le temps.
Pour obtenir la distance, nous utilisons la formule suivante distance = (temps passé * vitesse du son)) / 2. La vitesse du son est de 340 m/s, soit 0,0340.
La raison pour laquelle nous devons le diviser par deux est que l'onde sonore se déplace vers l'objet et revient.
Code pour afficher une page web avec la valeur de la distance
def get_html(html_name, distance):
    # open html_name (index.html), 'r' = read-only as variable 'file'
    with open(html_name, 'r') as file:
        html = file.read()
    content = html.replace(
        "<h2 id=\"ultrasonic\"></h2>", f"<h2 id=\"ultrasonic\">{distance}cm</h2>")

    return content

...

response = get_html('index.html', ultrasonic())
Cette fonction a été légèrement modifiée par rapport aux tutoriels précédents, en prenant un paramètre supplémentaire distancequi s'exécute ultrasonique().
La fonction ouvre le index.html normalement mais utilise le fichier remplacer pour trouver le <h2> et insère le distance variable.
index.html envoie un ping au serveur toutes les 500 ms pour obtenir la nouvelle valeur.

La page web principale reçoit une fonction qui recharge la page web toutes les 500 ms. À chaque rechargement, le Pico W est interrogé pour obtenir la nouvelle valeur de la distance ultrasonique.
    <script>
            setInterval(() => location.reload(), 500)
        </script>
6. Données ultrasoniques, mais utilisons AJAX pour réduire la charge utile.
Le tutoriel précédent fonctionne en demandant au Raspberry Pi Pico W d'envoyer un tout nouveau index.html à chaque fois qu'il y a une connexion.
Cela fonctionne, mais c'est incroyablement inefficace, car l'ensemble de la index.html est renvoyée alors qu'il suffit de mettre à jour les données relatives à la distance ultrasonique.
Nous voulons obtenir les mêmes résultats que dans le tutoriel précédent, mais sans la lourdeur de la méthode précédente.
Nous devons donc faire en sorte que le client (votre téléphone ou votre PC) envoie un signal ping à un point d'extrémité qui ne répondra qu'avec les données ultrasoniques.
La nouvelle méthodologie est la suivante : si les internautes visitent l'URL racine, par exemple 192.168.1.119, ils se verront proposer l'adresse suivante index.html.
index.html contiendra un code JavaScript qui interrogera le serveur /données qui déclenche l'obtention par la Pico W de données sur la distance ultrasonique et y répond.
Ensuite, index.html recevra ces données et mettra à jour la page web.
Épissage de la demande du client
Rappelons que dans la main.pyIl y a toujours une ligne qui dit requests = cl.recv(1024). L'objet de la demande ressemble un peu à ceci :
b'GET /data HTTP/1.1
Host: 192.168.1.119
Connection: keep-alive
Cache-Control: max-age=0
Upgrade-Insecure-Requests: 1
User-Agent: Mozilla/5.0 (Windows NT 10.0; Win64; x64) AppleWebKit/537.36 (KHTML, like Gecko) Chrome/107.0.0.0 Safari/537.36
Accept: text/html,application/xhtml+xml,application/xml;q=0.9,image/avif,image/webp,image/apng,*/*;q=0.8,application/signed-exchange;v=b3;q=0.9
Referer: http://192.168.1.119/data
Accept-Encoding: gzip, deflate
Accept-Language: en-US,en;q=0.9,es;q=0.8,zh-TW;q=0.7,zh-CN;q=0.6,zh;q=0.5
Tout d'abord, nous devons filtrer ce mur de texte.
Nous utilisons le trouver() pour savoir si le demande a "/data". Si c'est le cas, elle répond avec les données relatives à la distance ultrasonique. S'il n'y a pas de "/data", répondre par index.html.
Avant
request = cl.recv(1024)
        print(ultrasonic())
        response = get_html('index.html', ultrasonic())
Après
 request = cl.recv(1024)
        request = str(request)
        print (request.find('/data'))
        if (request.find('/data') > -1):
            #if string is found, respond with data.
            response = str(ultrasonic())
        else:
            response = get_html('index.html', ultrasonic())
Si vous visitez /data dans votre navigateur, vous verrez la valeur de la distance imprimée, comme ci-dessous.

Auparavant, le backend s'occupait de presque tout. La distance ultrasonique a été modifiée avant d'être servie comme index.html.
Aujourd'hui, index.html récupère les données du capteur de la Pico W, nous devons donc apporter quelques modifications au JavaScript qui se trouve dans le fichier HTML. Les modifications sont mises en évidence en gras.
<!DOCTYPE html>
<html>
    <head>
        <title>Pico W</title>
    </head>
      <body>
        <h1>Pico W Ultrasonic Distance</h1>
        <h2 id="ultrasonic"></h2>
        <script>
            //instead of hardcoding, use address which browser accessed Pico W.
            const PicoAddress = window.location.href

            const getData = async () => {
                //there is a slash at the end of PicoAddress, so don't use "/data". use "data"
                const data = await fetch(`${PicoAddress}data`);
                //response is just a string, so use data.text() to decode the Response's body
                const distance = await data.text();
                //target ultrasonic id and change its inner HTML
                ultrasonic.innerHTML = `${distance} cm`;
                //run getData() again.
                setInterval(getData,100)
                //you can run getData() but it seems more optimized if you give it some time to breathe
            };

            getData();

        </script>
</html>
L'élément central de ce code est la fonction API Fetch et les dernières async/await syntaxe ici.
La fonction getData() envoie un ping au point d'extrémité /data de la Pico W, et la Pico W répond. Nous nous assurons que le programme ne saute pas avant d'avoir reçu une réponse complète lui demandant de attendre.
Fetch devient un objet Response que vous devrez utiliser avec la méthode Response.text() pour accéder au corps de la réponse. D'où les lignes const distance = await data.text() ;
Une fois que nous disposons des données ultrasoniques, nous changeons le <h2 id="”ultrasonic”"> de l'élément HTML interne, qui commence par être vide, avec les données relatives à la distance. Vous pouvez cibler un élément avec un id directement sans utiliser l'option getElementById() ou querySelector() des méthodes.
Une fois que tout le code est terminé, nous voulons exécuter à nouveau getData(). Pourquoi ai-je utilisé un setInterval pour définir un intervalle de 100 ms ?
J'ai constaté que si vous appelez getData() sans intervalle, vous obtiendrez plus de pauses entre les sorties. Vous obtiendrez une séquence de mises à jour rapides, puis une pause. Avec l'intervalle de 100 ms, la Pico W fonctionne un peu mieux et les mises à jour semblent toujours plus ou moins en temps réel.
Si vous voulez comprendre ce qui se passe sous le capot, reportez-vous à la rubrique Documentation sur l'API Fetch et le async/await la documentation.
7. Pimoroni Ouf pour un code plus propre
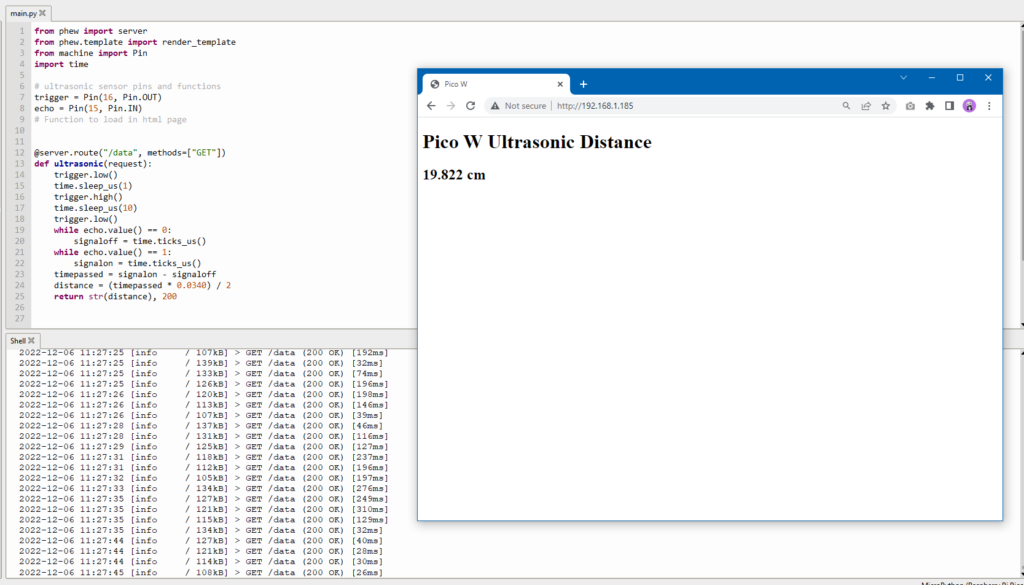
Dans la dernière section, nous avons abordé la méthode AJAX de mise à jour des données du capteur d'ultrasons.
Mais existe-t-il un moyen encore plus efficace d'y parvenir ?
Pimoroni's Phew est une bibliothèque qui vous permet d'effectuer facilement de nombreux travaux de mise en réseau, car vous pouvez éviter de nombreuses opérations fastidieuses.
Les objectifs sont les mêmes :
- Obtenir des données ultrasoniques et les afficher sur index.html
- La charge utile doit être aussi faible que possible.
Voici comment main.py ressemble à.
from wifi import init_wifi
from phew import server
from phew.template import render_template
from machine import Pin
import time

init_wifi()

# ultrasonic sensor pins and functions
trigger = Pin(16, Pin.OUT)
echo = Pin(15, Pin.IN)


# Function to load in html page

@server.route("/data", methods=["GET"])
def ultrasonic(request):
    trigger.low()
    time.sleep_us(1)
    trigger.high()
    time.sleep_us(10)
    trigger.low()
    while echo.value() == 0:
        signaloff = time.ticks_us()
    while echo.value() == 1:
        signalon = time.ticks_us()
    timepassed = signalon - signaloff
    distance = (timepassed * 0.0340) / 2
    return str(distance), 200


@server.catchall()
def catchall(request):
    return render_template("index.html")


server.run()
Comme vous pouvez le constater, le code est beaucoup plus lisible car vous pouvez définir des points de terminaison et les relier à des fonctions qui renvoient des données spécifiques.
Au lieu d'utiliser du code pour faire fonctionner les sockets, il suffit d'appeler une fonction de la bibliothèque de Phew.
Les points forts de Phew sont les suivants :
- Il n'est plus nécessaire d'utiliser demande.trouver() pour créer un point d'accès
- Plus d'informations get_html() pour ouvrir la fonction index.html il suffit d'utiliser le fichier render_template()
- main.py est beaucoup plus facile à lire, avec un minimum d'effort supplémentaire !
- Phew ajoute également une fonctionnalité de journalisation qui vous permettra de déboguer votre code plus facilement.
Le seul inconvénient est que Phew est encore "un projet très récent et doit être considéré, au mieux, comme une phase alpha". Il se peut donc que vous rencontriez parfois des obstacles inattendus.
Les tutoriels précédents expliquaient comment interagir avec votre Pico W à partir de votre PC/téléphone portable.
Allons plus loin et faisons en sorte que le Pico W interagisse avec un service en nuage.
Pour cela, fabriquons un enregistreur de température et d'humidité avec un capteur DHT22 qui envoie des données à Google Sheets via IFTTT.
8. Installation du capteur de température et d'humidité DHT22 sur le Pico W

Toutes ces étapes fonctionnent pour le DHT11 et le DHT22. La principale différence entre les deux est la précision des relevés. Le DHT11 est de couleur bleue tandis que le DHT22 est de couleur blanche.
Si vous avez un DHT11, notez que les références au DHT22 dans le code doivent être remplacées par le DHT11. Par exemple, les références au DHT22 dans le code doivent être remplacées par le DHT11,
import dht
#dht22 = dht.DHT22(Pin(16))
#should be
dht11 = dht.DHT11(Pin(16))
En regardant le diagramme ci-dessous, de haut en bas du DHT22, vous devez connecter 3,3V à la première broche.
La deuxième broche est la broche de données. Vous devez l'alimenter. Connectez donc une résistance de 10K ohm entre le rail d'alimentation et cette broche, puis connectez un autre fil de liaison au GPIO 16 du Raspberry Pi Pico.
GND est relié à GND.
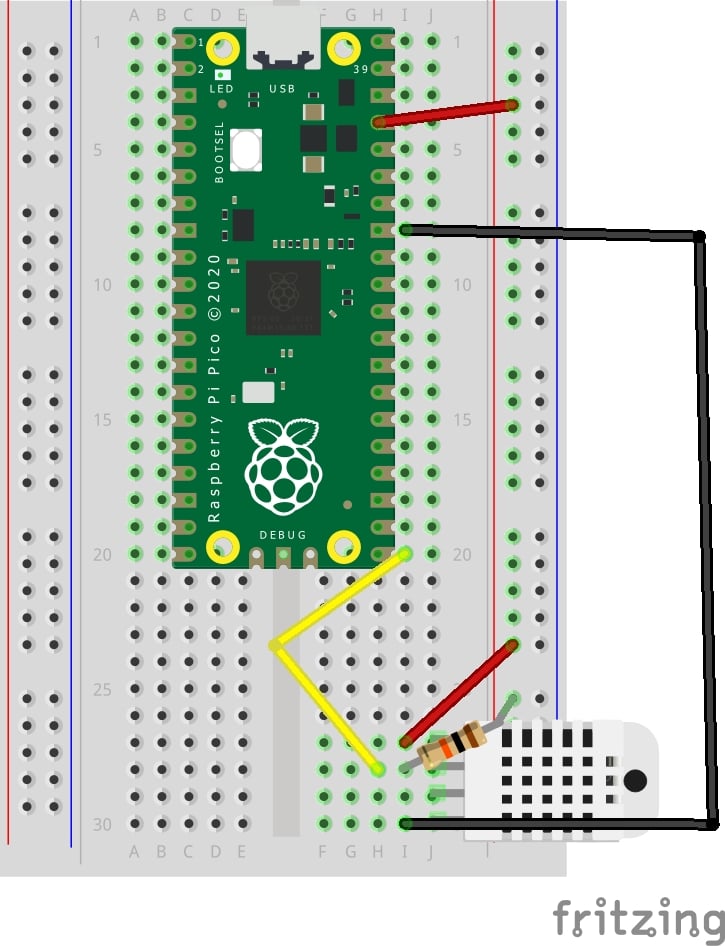
Pour tester le capteur, exécutez la procédure suivante :
from machine import Pin
import dht

# ultrasonic sensor pins and functions
dht22 = dht.DHT22(Pin(16))

print(dht22.measure())
print(dht22.temperature())
print(dht22.humidity())
Si vous obtenez OSError : [Errno 110] ETIMEDOUT signifie que vous exécutez le script trop tôt. Le DHT22 a besoin d'une pause de deux secondes avant de pouvoir renvoyer une autre valeur. Le DHT11 a besoin d'une seconde.
Connecter IFTTT et Google Sheets

Le moyen le plus simple de transférer les données de la Pico W vers Google Sheets est d'utiliser IFTTT.
D'abord, créer un compte IFTTT.
Cliquez ensuite sur le bouton "Créer" pour créer l'applet.
L'écran suivant s'affiche :
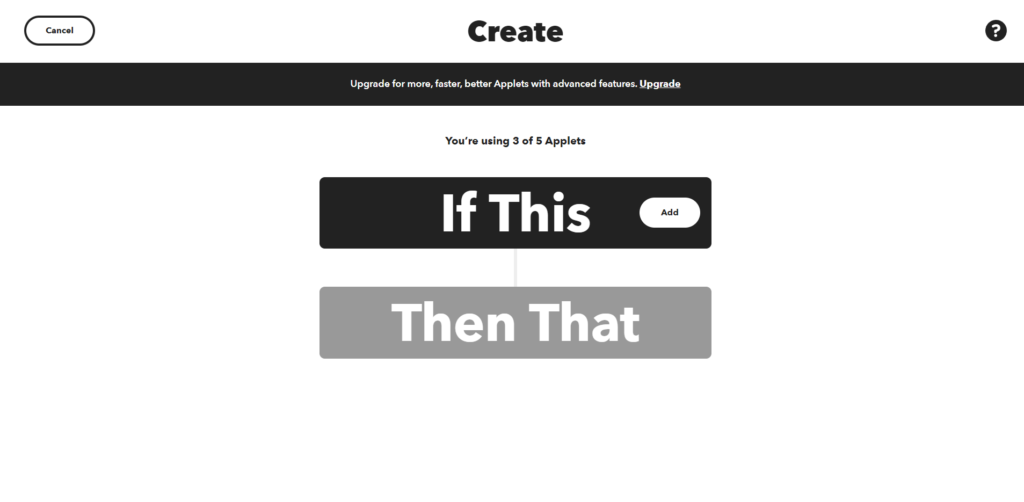
Cliquez sur "If This" et recherchez Webhooks. Cliquez sur "Receive a web request". Ne choisissez pas la requête JSON. Nommez l'événement "dht22". Le nom de l'événement est essentiel car c'est ainsi que IFTTT sait quelle applet doit être déclenchée.

Ce que vous faites ici, c'est créer un point de terminaison que vous pouvez envoyer par ping avec les données du capteur du DHT22.
Cliquez ensuite sur "Then That". Choisissez "Google Sheets". Choisissez ensuite "Ajouter une ligne à la feuille de calcul". Vous devez relier votre compte Google Sheets.
Modifiez le "Nom de la feuille de calcul" et le "Chemin du dossier du lecteur" comme vous le souhaitez. La seule chose critique ici est la "ligne formatée", où vous voudrez qu'elle soit
{{OccurredAt}} ||| {{Value1}} ||| {{Value2}}
Maintenant, vous devez aller chercher le point de terminaison vers lequel la Pico W peut envoyer les données du capteur.
Tête à https://ifttt.com/maker_webhooks et cliquez sur "Documentation".

La documentation vous indiquera votre clé, le point d'accès auquel vous devez envoyer les données et comment structurer le corps JSON.
Puisque vous avez utilisé "dht22" comme nom d'événement, votre point d'arrivée est :
ttps://maker.ifttt.com/trigger/dht22/with/key/[your_key_here]Vous devez également structurer votre corps JSON de la manière suivante :
{'value1': *** temperature data *** , value2': *** humidity data *** }Coder le Pico W pour obtenir des données DHT22 et les envoyer à IFTTT
Voici comment.
from machine import Pin
from wifi import init_wifi
import urequests
import ujson
import dht
import time

init_wifi()

dht22 = dht.DHT22(Pin(16))


def send_data():
    #tell dht22 to take a reading
    dht22.measure()
    #find temp & humidity data and then jsonify data.
    dht_data = {'value1': str(dht22.temperature()),
                'value2': str(dht22.humidity())}
    post_data = ujson.dumps(dht_data)
    request_url = 'https://maker.ifttt.com/trigger/dht22/with/key/[your_key_here]'
    res = urequests.post(request_url, headers={
                         'content-type': 'application/json'}, data=post_data)
    #log response from IFTTT.
    print(res.text)
    #sleep for a minute before running send_data again
    time.sleep(1*60)
    send_data()


send_data()
Si vous copiez ce code, veillez à remplacer [votre_clé_ici] dans le request_url variable.
Vous devriez obtenir un nouveau relevé toutes les minutes, qui sera enregistré dans Google Sheet, comme indiqué ci-dessous.

Notez que la température enregistrée est en Celcius. Si vous souhaitez l'exprimer en Fahrenheit, voici la formule :
fahrenheit = dht22.temperature() * 1.8000 + 32.00Si vous souhaitez que les données soient enregistrées plus (ou moins) fréquemment, modifiez la valeur du champ temps.sommeil().
Utiliser IFTTT pour vous avertir en cas d'erreur
Bien entendu, ce code reste assez fragile.
Imaginons que quelque chose ne se passe pas bien. Par exemple, votre chat a tiré sur le fil de liaison de 3,3 V pendant que vous vous posiez sur le sol pour enregistrer la température.
Le programme s'arrêtera, mais vous n'en serez pas informé jusqu'à ce que vous remarquiez que vos données ne sont pas enregistrées.
Comment résoudre ce problème ?
IFTTT vous envoie une notification lorsque cela se produit !
Vous avez besoin de l'application IFTTT sur votre téléphone. Téléchargez-la.
Ensuite, vous créez une nouvelle applet.
Pour les "Si cela" partie, Choisir Webhooks -> Recevoir une requête web. Nommez votre événement "erreur".
Pour le "Alors ceci" choisir "Notifications" et "Envoyer une notification depuis l'application IFTTT".
J'ai fait en sorte que le message soit simple
Error: {{Value1}}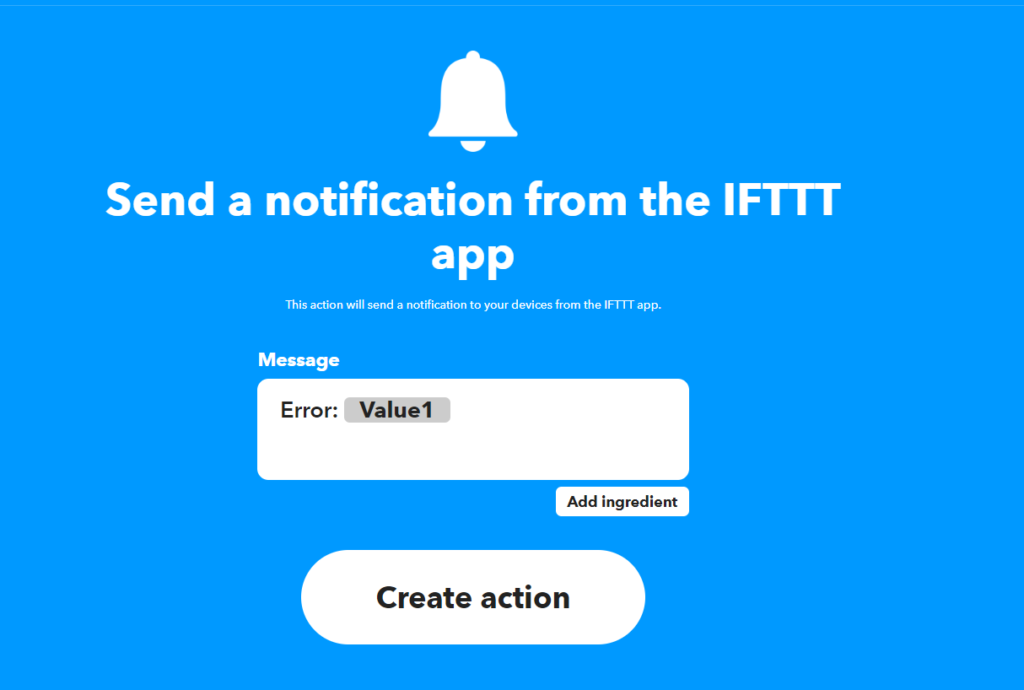
Construisons maintenant les blocs essai-erreur.
from machine import Pin
from wifi import init_wifi
import urequests
import ujson
import dht
import time

init_wifi()

dht22 = dht.DHT22(Pin(16))


def send_data():
    # tell dht22 to take a reading
    dht22.measure()
    # find temp & humidity data and then jsonify data.
    dht_data = {'value1': str(dht22.temperature()),
                'value2': str(dht22.humidity())}
    post_data = ujson.dumps(dht_data)
    request_url = 'https://maker.ifttt.com/trigger/dht22/with/key/[your-key-here]'
    res = urequests.post(request_url, headers={
                         'content-type': 'application/json'}, data=post_data)
    # log response from IFTTT.
    print(res.text)
    # sleep for a minute before running send_data again
    time.sleep(1*60)
    send_data()


try:
    send_data()
except Exception as e:
    print(e)
    request_url = 'https://maker.ifttt.com/trigger/error/with/key/[your-key-here]'
    post_data = ujson.dumps({"value1": str(e)})
    urequests.post(request_url, headers={
        'content-type': 'application/json'}, data=post_data)
Essayez-le. Débranchez le fil 3.3V de votre DHT22 et vous recevrez une notification en ce sens :

9. Construire une télécommande Spotify physique avec le Raspberry Pi Pico W
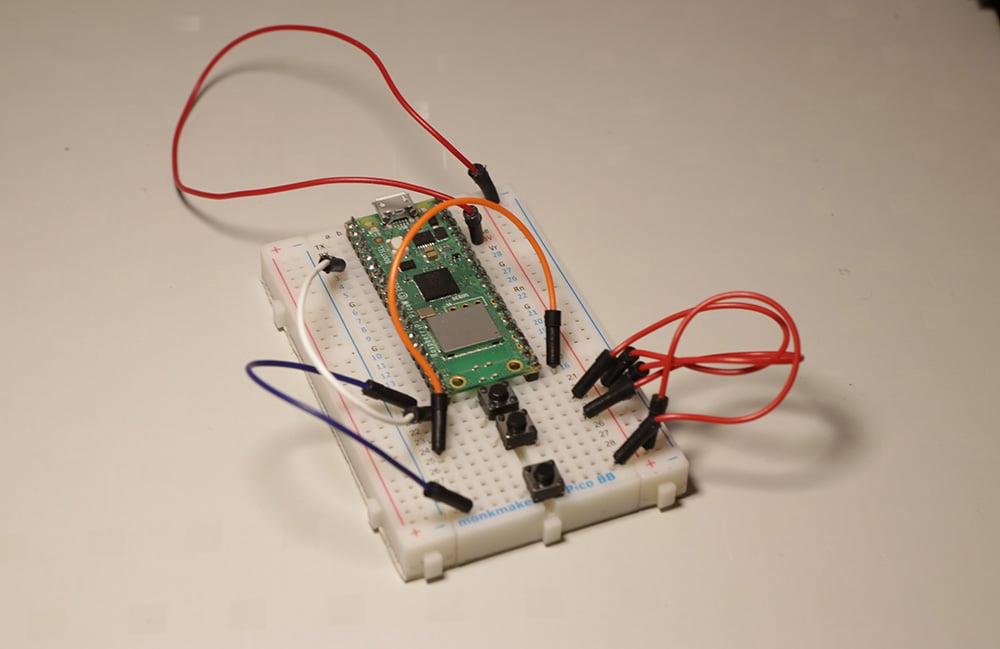
En nous appuyant sur le projet précédent, nous allons utiliser IFTTT pour contrôler Spotify.
Nous allons créer un appareil doté d'un bouton de lecture, de pause et de saut de piste.
Le principal avantage d'utiliser IFTTT pour contrôler votre Spotify est sa simplicité.
L'inconvénient est qu'il faut avoir un compte Spotify payant et que les réponses sont lentes. Cela signifie que si vous appuyez sur le bouton "skip", vous devrez attendre un certain temps avant de voir le résultat.
L'avantage d'avoir une télécommande Spotify dédiée est que vous pouvez changer de musique sans avoir à transporter votre téléphone ou à ouvrir l'application Spotify.
Si vous avez déjà conduit une voiture moderne, vous savez à quel point il est agréable d'avoir des commandes au volant.
Câbler un contrôleur Spotify à distance
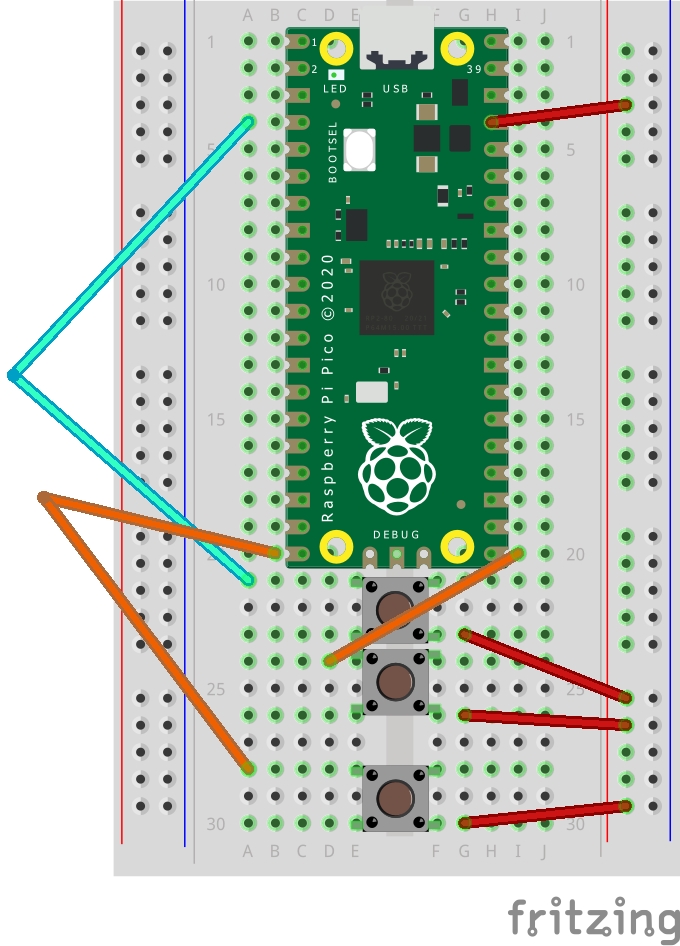
Vous aurez besoin de...
- 7x fils de connexion
- 3x boutons
- Raspberry Pi Pico W
- Compte payant Spotify
Il y a beaucoup de fils qui s'entrecroisent sur l'image, alors voici une explication textuelle.
Les boutons poussoirs sont comme des interrupteurs. Vous devez connecter la broche 3V3 à chacun d'entre eux, ce qui signifie utiliser la colonne positive sur la planche à pain. C'est pourquoi :
3V3 -> Colonne positive de la planche à pain -> Bouton poussoir (d'un côté de la gouttière de la planche à pain) -> GPIO (de l'autre côté)
Mon code utilisera le GPIO 16 pour le bouton de lecture, le GPIO 2 pour le bouton de pause et le GPIO 15 pour le bouton de saut de piste.
Configurer IFTTT pour contrôler Spotify
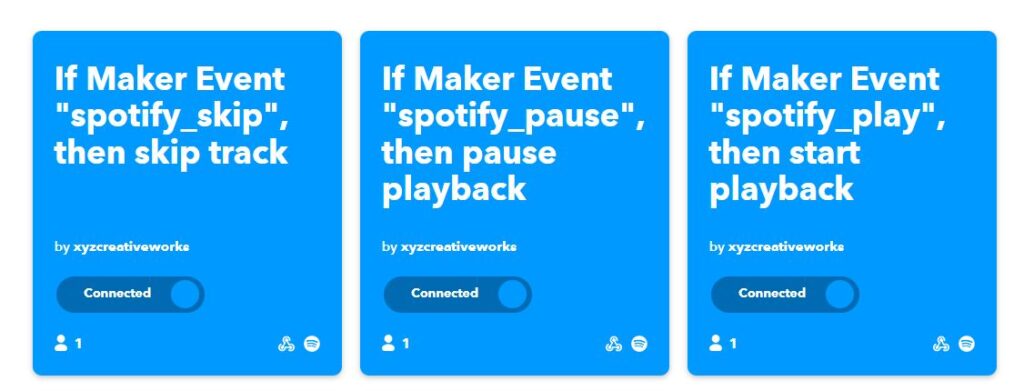
Nous devons créer trois applets, une pour la lecture, une pour la pause et une pour le saut.
Si vous avez la version premium d'IFTTT, vous pourriez probablement utiliser les filtres JavaScript pour tout regrouper dans une seule application. Mais comme ce n'est pas le cas, nous avons besoin d'une applet chacun.
Une fois connecté, cliquez sur "Créer" en haut à droite du menu principal.

Dans la barre "If This", cliquez dessus et recherchez Webhooks.

Ensuite, cliquez sur "Recevoir une requête web" (pas l'autre option qui contient "avec une charge utile JSON").
Pour le nom de l'événement, tapez spotify_skip.
Vous devrez répéter cette étape deux fois de plus pour spotify_pause et spotify_play une fois la création de l'applet terminée.
Une fois que c'est fait, allez dans la section "Ensuite, cela"et cliquez dessus. Recherchez "Spotify".
Vous devrez autoriser IFTTT à se connecter à Spotify une fois.
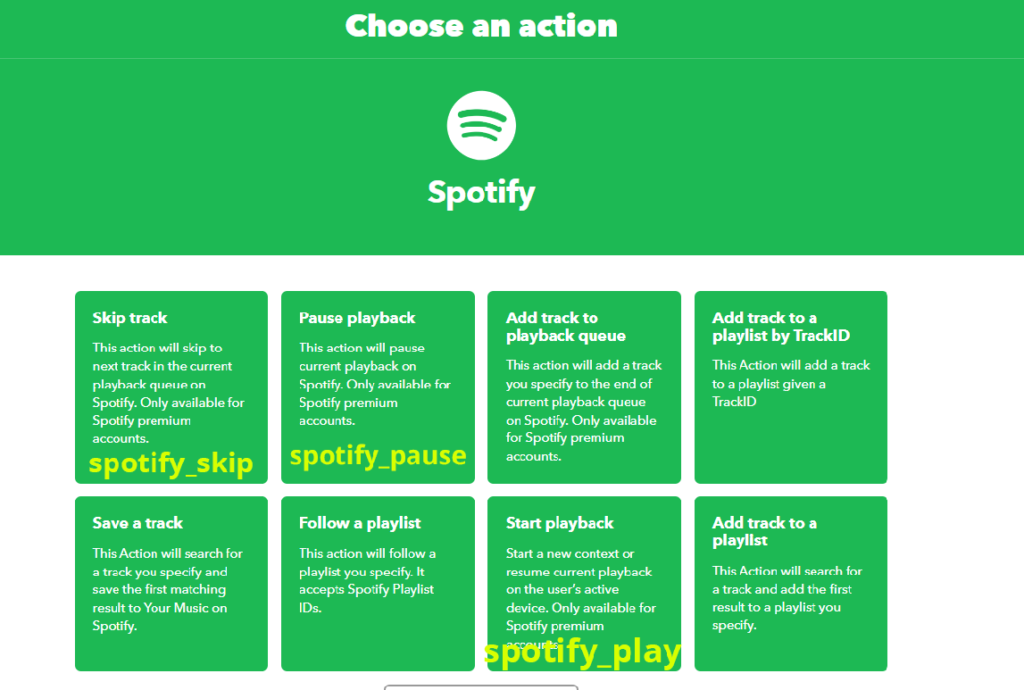
Si vous faites le spotify_skip vous voudrez cliquer sur "Sauter la piste". Mais si vous créez une applet pour effectuer une autre action, l'image ci-dessus vous indiquera laquelle utiliser.
Une fois que vous avez créé les trois applets, il est temps de coder !
Coder la télécommande Spotify pour le Pico W
Tout d'abord, vous devez connaître le point d'arrivée que vous devez atteindre.
Aller à cette page et cliquez sur l'icône Documentation.
Vous y verrez votre clé. Si vous avez suivi toutes les étapes ci-dessus, la différence entre votre point final et le mien est votre clé. D'où l'importance de la clé,
Point d'arrivée du jeu: https://maker.ifttt.com/trigger/spotify_play/with/key/[votre_clé_ici]
Pause: https://maker.ifttt.com/trigger/spotify_pause/with/key/[votre_clé_ici]
Sauter: https://maker.ifttt.com/trigger/spotify_skip/with/key/[votre_clé_ici]
Code
from machine import Pin
from wifi import init_wifi
import urequests
import time

init_wifi()

play_btn = Pin(16, Pin.IN, Pin.PULL_DOWN)
pause_btn = Pin(2, Pin.IN, Pin.PULL_DOWN)
skip_btn = Pin(15, Pin.IN, Pin.PULL_DOWN)


def play():
    request_url = 'https://maker.ifttt.com/trigger/spotify_play/with/key/[your_key_here]'
    res = urequests.post(request_url)
    # print response from IFTTT.
    print(res.text)


def pause():
    request_url = 'https://maker.ifttt.com/trigger/spotify_pause/with/key/[your_key_here]'
    res = urequests.post(request_url)
    # print response from IFTTT.
    print(res.text)


def skip():
    request_url = 'https://maker.ifttt.com/trigger/spotify_skip/with/key/[your_key_here]'
    res = urequests.post(request_url)
    # print response from IFTTT.
    print(res.text)


try:
    while True:
        if play_btn():
            print('play btn')
            play()
            time.sleep(0.25)
        if pause_btn():
            print('pause btn')
            pause()
            time.sleep(0.25)
        if skip_btn():
            skip()
            print('skip')
            time.sleep(0.25)

except Exception as e:
    print(e)
    request_url = 'https://maker.ifttt.com/trigger/error/with/key/[your_key_here]'
    post_data = ujson.dumps({"value1": str(e)})
    urequests.post(request_url, headers={
        'content-type': 'application/json'}, data=post_data)
Passons en revue le code.
Notez que vous devrez remplacer [votre_clé_ici] avec votre clé réelle, telle qu'elle est obtenue par l'intermédiaire du Documentation lien.
Tout d'abord, nous déclarons des variables pour les boutons-poussoirs.
play_btn = Pin(16, Pin.IN, Pin.PULL_DOWN)
pause_btn = Pin(2, Pin.IN, Pin.PULL_DOWN)
skip_btn = Pin(15, Pin.IN, Pin.PULL_DOWN)
Actuellement, si vous n'appuyez pas sur le bouton, votre variable aura une valeur de 0. Si vous appuyez dessus, il devient 1. C'est ce que nous utiliserons pour déclencher la fonction play() , pause() et sauter() fonctions.
Ensuite, nous créons des fonctions pour les points finaux de lecture, de pause et de saut. Le modèle général est le suivant :
def play():
    request_url = 'https://maker.ifttt.com/trigger/spotify_play/with/key/[your_key_here]'
    res = urequests.post(request_url)
    # print response from IFTTT.
    print(res.text)
C'est assez simple. Si cette fonction est exécutée, elle enverra une requête POST à IFTTT. L'envoi d'une requête GET ne fonctionnera pas.
Ensuite, nous avons le bloc try/except.
try:
    while True:
        if play_btn():
            print('play btn')
            play()
            time.sleep(0.25)
        if pause_btn():
            print('pause btn')
            pause()
            time.sleep(0.25)
        if skip_btn():
            skip()
            print('skip')
            time.sleep(0.25)

except Exception as e:
    print(e)
    request_url = 'https://maker.ifttt.com/trigger/error/with/key/[your_key_here]'
    post_data = ujson.dumps({"value1": str(e)})
    urequests.post(request_url, headers={
        'content-type': 'application/json'}, data=post_data)
Si l'on appuie sur un bouton, le code exécute la fonction correspondante. Par exemple, si l'on appuie sur le bouton "skip", la fonction suivante est exécutée sauter().
A temps.sleep(0.25) interrompt la fonction pendant 250 ms. Sans cela, même une courte pression peut surcharger et faire planter le Pico W.
Le site sauf est optionnel, mais je l'ai fait parce que j'avais déjà une applet "error" sur IFTTT. Si vous avez suivi le tutoriel précédent, vous l'avez peut-être utilisée.
En principe, il envoie le message d'erreur, eà IFTTT, de sorte que vous receviez le message d'erreur sous la forme d'une notification de l'application téléphonique.
Pourquoi cela ne fonctionne-t-il pas ?
Utiliser IFTTT pour contrôler votre Spotify est facile, mais il y a quelques inconvénients.
Vous devez d'abord lancer la musique de la manière habituelle
Si vous avez essayé d'appuyer sur le bouton de lecture de votre Pico W et que vous vous attendiez à ce que la musique commence à jouer... eh bien, rien ne se passe.
La solution consiste à lancer la musique sur votre ordinateur ou votre téléphone normalement. Vous devez aller dans votre application et appuyer sur play.
Je pense que cela permet de déclarer quel est l'appareil actif. Une fois que vous avez fait cela, vous pourrez utiliser la télécommande Spotify de votre Pico W.
Des réponses lentes
Il faut quelques secondes entre la pression du bouton et la réponse. Malheureusement, c'est ainsi que les choses se passent.
Vous pourriez payer pour une mise à niveau d'IFTTT afin d'obtenir des vitesses de réponse plus rapides. Du moins, c'est ce qu'ils promettent pour votre argent.
Existe-t-il un moyen direct de se connecter à Spotify ?
Oui ! Spotify a une API à laquelle vous pouvez vous connecter.
Il vous donne beaucoup plus de contrôle. Vous pouvez ajouter un encodeur rotatif pour contrôler le volume. Vous pouvez ajouter un écran LCD pour afficher ce qui est en cours de lecture. Consultez la console de Spotify ici.
Incroyable, mais aussi beaucoup plus difficile à programmer, surtout sur un Pico W.
IFTTT rend tout cela facile parce qu'il s'occupe de tout. Si vous voulez faire le gros du travail, consultez le flux d'authentification.
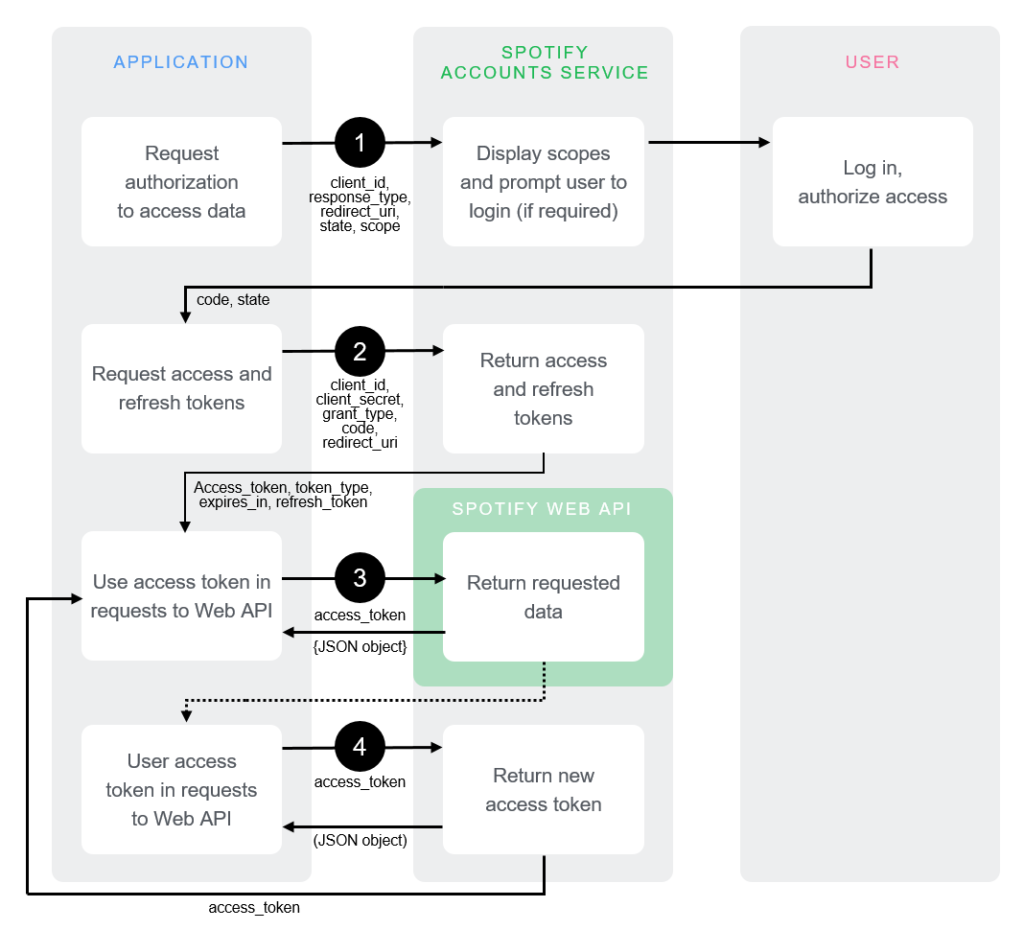
Bien sûr, nous sommes des passionnés de Raspberry Pi. Quelqu'un le fera. Est-ce vous ? Ou moi ? Commentez ci-dessous.
Contrôlez votre Pico W sans fil avec PiCockpit !
Vous pouvez contrôler et obtenir des données de votre Pico W sans fil en utilisant PiCockpit.
PiCockpit vous permet d'obtenir des valeurs, de contrôler et d'utiliser le PWM à travers une interface graphique via son applet GPIO.
Vous pouvez également voir les statistiques de votre Pico W grâce à l'applet PiStats.
L'intégration de PiCockpit dans votre Pico W est très simple.
Écrire encore moins de code avec PiCockpit et le Pico W
PiCockpit vous permet de contrôler facilement vos broches GPIO sans avoir à écrire le moindre code.
Si vous regardez tutoriel numéro 2Remarquez la quantité de code nécessaire pour faire basculer une LED.
Grâce à notre nouvelle intégration du Pico W, PiCockpit vous facilite grandement la tâche puisque vous n'avez pas à programmer quoi que ce soit. Pas même la configuration du WiFi, qui est effectuée par notre assistant de configuration.
10. Contrôle simple des LED avec PiCockpit et Pico W
Si vous avez configuré votre LED exactement comme je l'ai fait dans le tutoriel n°2, il ne vous reste plus qu'à la configurer sur PiCockpit.
Si vous codifiez, vous déclarerez sur quelle broche se trouve votre LED en utilisant led = machine.Pin(2, machine.Pin.OUT)
Sur PiCockpit, vous devez aller dans votre applet GPIO, et faire défiler jusqu'à "GPIO Output (On/Off)".
Choisissez BCM02 dans le menu déroulant car votre LED est sur GPIO 2.

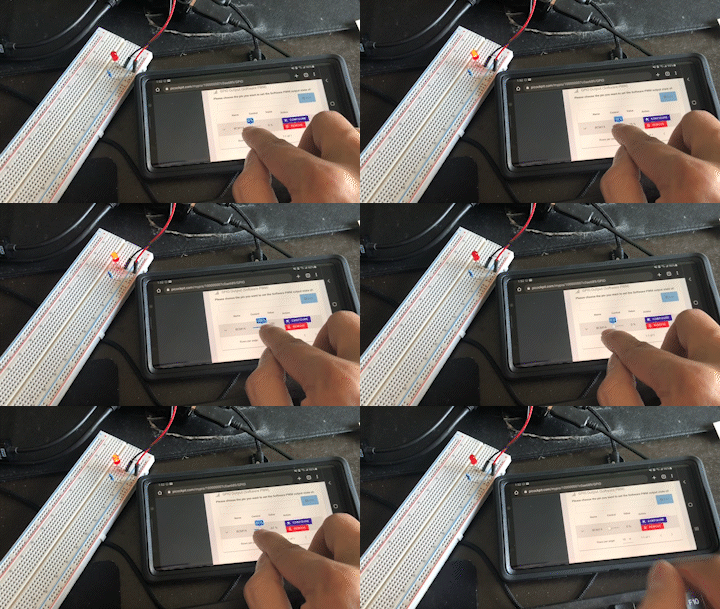
Ensuite, dans la colonne "Contrôle", basculez l'interrupteur pour allumer la LED.

Vous pouvez aussi facilement utiliser la section PWM du logiciel ci-dessous pour contrôler la luminosité de votre LED.
Notez que vous devrez supprimer le paramètre précédent car vous ne pouvez pas avoir deux sorties sur le même GPIO.

Lorsque vous faites basculer le curseur "Contrôle", vous remarquerez que la luminosité de la LED change.
11. Pico W, ventilateur 5V et un transistor, contrôlé par PiCockpit
Essayons quelque chose d'un peu plus complet mais en utilisant la même bascule de sortie GPIO.
Pour illustrer certains cas d'utilisation réels, je vais alimenter un ventilateur 5V en utilisant PiCockpit.
Il s'agit d'un ventilateur 5V à faible puissance provenant de mon Raspberry Pi 4, ce qui correspond bien aux capacités de sortie du Raspberry Pi Pico W.
Cela dit, comme il s'agit d'un ventilateur 5V, je ne peux pas utiliser une broche GPIO. Pour les composants moins gourmands en énergie, comme une LED, vous pouvez faire en sorte que le GPIO fasse double emploi en alimentant le composant et en étant le "commutateur" qui l'allume et l'éteint.
Mais le ventilateur 5V nécessiterait une tension trop élevée. Donc, la meilleure solution suivante est de mettre un transistor au milieu.
Cela me permet de fournir 5V au ventilateur, tout en m'assurant que je peux l'allumer et l'éteindre.
Encore une fois, grâce à PiCockpit, je n'ai fait aucune programmation. Je n'ai fait que le matériel, qui est câblé comme suit :
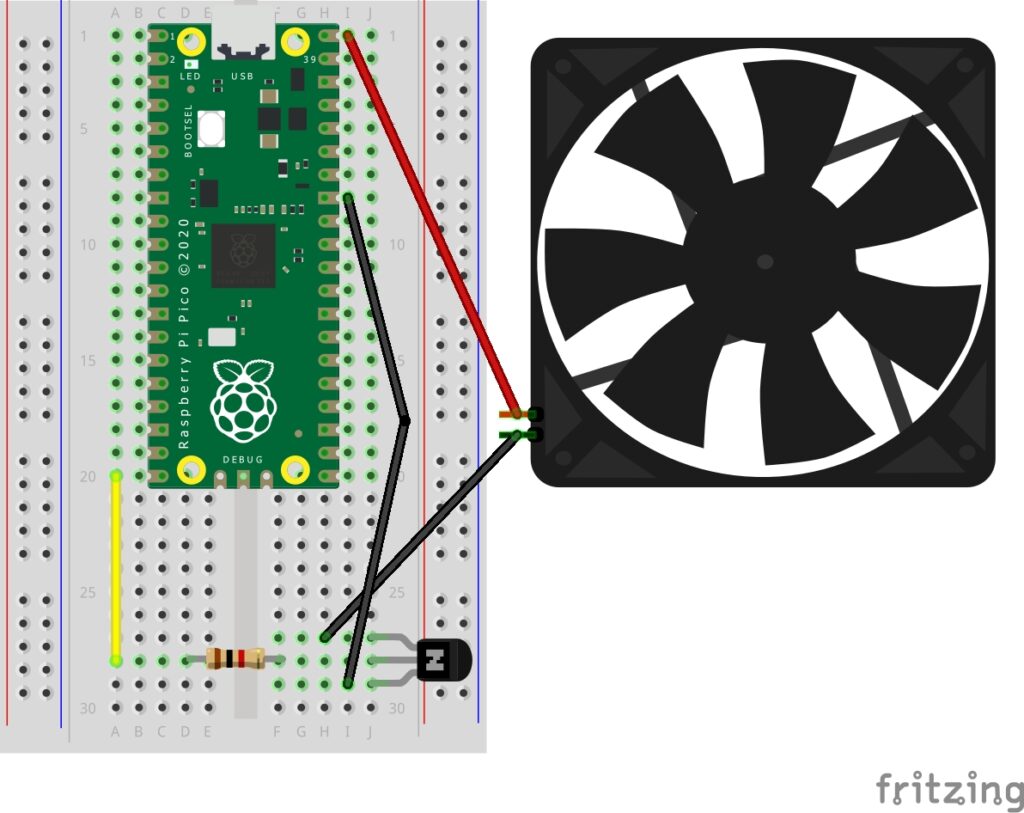
Le ventilateur est un ventilateur 5V/0.12A, connecté à 5V sur l'extrémité positive (fil rouge), et le fil négatif va à la patte émettrice du transistor.
Le transistor est un transistor PN2222 (NPN), ce qui signifie qu'il s'allume lorsqu'il reçoit un signal élevé.
De gauche à droite, la partie en demi-cercle étant tournée vers l'extérieur, les jambes sont l'émetteur, la base et le collecteur.

La patte Base est connectée à une résistance de 1K, puis connectée à GPIO 15.
La branche du collecteur est connectée à la masse.
Configuration de PiCockpit pour travailler avec un transistor
Encore une fois, super facile.

Allez dans le menu déroulant de la section GPIO Output et ajoutez BCM15.
Une fois qu'il est en place, vous pouvez cliquer sur la flèche vers le bas et changer les noms d'état en "ventilateur éteint" et "ventilateur allumé".
Basculez l'interrupteur de commande et vous devriez voir le ventilateur se mettre en marche.
Vous pouvez également utiliser PiStats pour voir la baisse des températures sur votre carte.

Photorésistance d'affichage utilisant MQTT et Node-RED avec Pico W.
L'objectif principal de ce tutoriel est de présenter MQTT.
Dans les tutoriels précédents, je vous ai montré comment vous pouviez utiliser votre Pico W pour transmettre des données, mais que faire si vous souhaitez disposer d'un référentiel central de données dans le nuage ?
HiveMQ Cloud est un service gratuit que nous pouvons utiliser pour atteindre cet objectif. En utilisant les ordinateurs de quelqu'un d'autre, nous pouvons également alléger la charge du Pico W.
En outre, MQTT présente des avantages majeurs par rapport aux méthodes utilisées précédemment. Tout d'abord, il est beaucoup plus efficace pour l'envoi de petites données. Les en-têtes du protocole MQTT ont une taille de 2 octets. HTTP est environ 4000 fois plus grand.
La réduction de la charge de traitement locale et de la charge réseau se traduit par une plus grande autonomie de la batterie de votre Pico W, ce qui est parfait pour les projets alimentés par batterie ou par énergie solaire.
Connexion de la photorésistance avec le Pico W
Une photorésistance (cellule photoélectrique) est très facile à connecter.
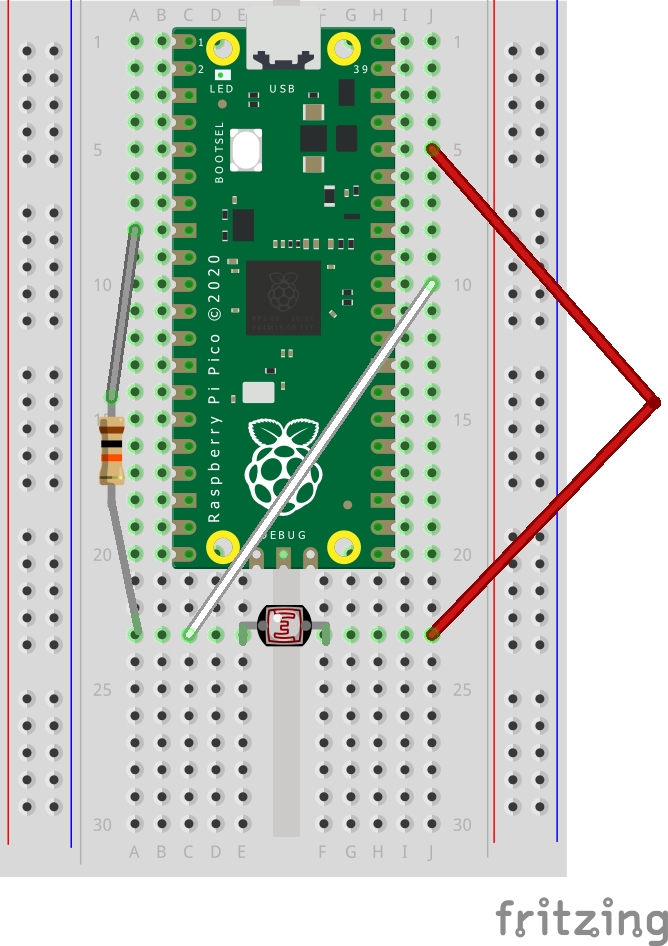
Placez la photorésistance en travers de la gouttière centrale de la planche à pain.
Connectez ensuite la broche 3V3 à l'un des côtés de la photorésistance.
Vous voudrez connecter une broche ADC de l'autre côté de la photorésistance, donc connecter GPIO 26.
Enfin, connectez une résistance de 10K ohms de la masse à la cellule photoélectrique.
HiveMQ Cloud et codage du Pico W
En premier lieu, Inscrivez-vous à HiveMQ Cloud ici.
Suivez la procédure d'installation et créez un cluster. Il vous sera demandé de choisir AWS ou Azure. En ce qui nous concerne, il n'y a pas de différence.
Cliquez ensuite sur "Manage Cluster".
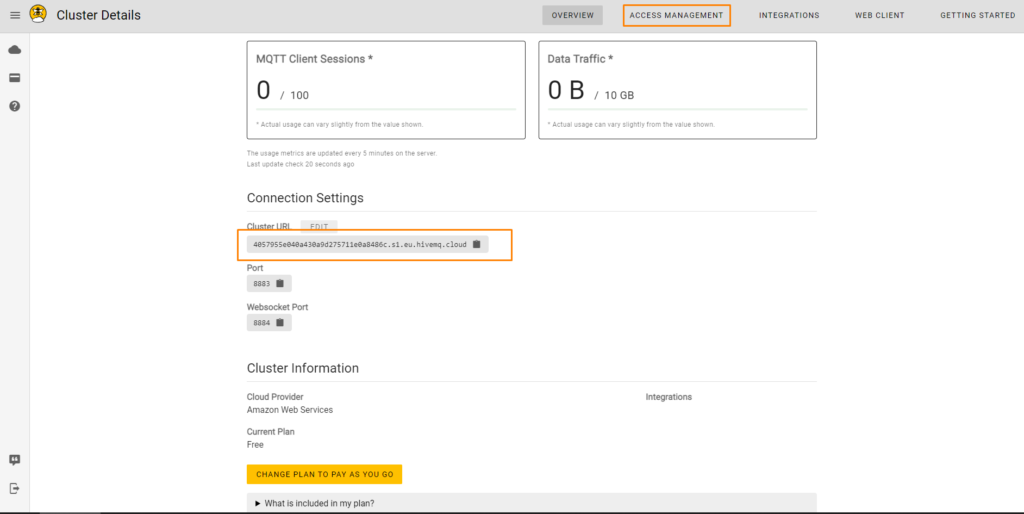
Notez l'URL de votre cluster et cliquez sur Gestion des accès pour créer un nouvel utilisateur. Suivez les étapes et créez un nouvel utilisateur.
Avec ces informations, vous pouvez maintenant programmer votre Pico W pour qu'il envoie des données à cet endroit.
Codage du Pico W pour recevoir les données des cellules photoélectriques et du MQTTClient
from machine import Pin, ADC
from wifi import init_wifi
import time
from umqtt.simple import MQTTClient

init_wifi()

photoresistor = ADC(Pin(26))


def readLight():
    light = photoresistor.read_u16()
    return light


# Connect MQTT

def connectMQTT():
    client = MQTTClient(client_id=b"[your_client_id]",
                        server=b"[your-host-name]",
                        port=0,
                        user=b"[your-user]",
                        password=b"[your-pw]",
                        keepalive=7200,
                        ssl=True,
                        ssl_params={
                            'server_hostname': '[your-host-name]'}
                        )

    client.connect()
    return client


client = connectMQTT()


def publish(topic, value):
    print(topic)
    print(value)
    client.publish(topic, value)
    print("data published")


while True:
    brightness = str(readLight()) #to publish, must send string

    print(brightness)

    publish('picow/brightness', brightness)

    time.sleep(0.1)
Commençons par mettre de l'ordre dans nos importations.
from machine import Pin, ADC
from wifi import init_wifi
import time
from umqtt.simple import MQTTClient
Le site wifi provient des tutoriels précédents.
Vous aurez besoin de la bibliothèque umqtt.simple, qui peut être téléchargée ici.
Une fois le fichier téléchargé, vous pouvez le télécharger sur votre tableau (guide ici).
Vous devriez avoir ces fichiers sur votre Pico W.

Ensuite, créez une fonction pour obtenir une lecture de la photorésistance :
photoresistor = ADC(Pin(26))

def readLight():
    light = photoresistor.read_u16()
    return light
Cette fonction renvoie une valeur allant jusqu'à 65535. Plus elle est claire, plus la valeur est élevée.
Connexion à HiveMQ
Pour se connecter à HiveMQ, il faut envoyer quelques paramètres à la classe MQTTClient.
# Connect MQTT

def connectMQTT():
    client = MQTTClient(client_id=b"[your_client_id]",
                        server=b"[your-host-name]",
                        port=0,
                        user=b"[your-user]",
                        password=b"[your-pw]",
                        keepalive=7200,
                        ssl=True,
                        ssl_params={
                            'server_hostname': '[your-host-name]'}
                        )

    client.connect()
    return client


client = connectMQTT()
Remplacez [votre-nom-d'hôte] par l'adresse qui se trouve sur votre tableau de bord. Vous devrez effectuer cette opération deux fois, une fois pour server et un autre pour server_hostname. Remplacez également [your_client_id] par le nom de votre appareil, par exemple "your_picow".

Remplacer ensuite [your-user] et [your-pw] avec l'utilisateur que vous avez créé dans la page Gestion de l'accès (capture d'écran de la page Gestion de l'accès ci-dessous).

Pour référence, cette fonction envoie des données à HiveMQ :
def publish(topic, value):
    print(topic)
    print(value)
    client.publish(topic, value)
    print("data published")
Appelons-le dans notre while boucle :
while True:
    brightness = str(readLight()) #to publish, must send string

    print(brightness)

    publish('picow/brightness', brightness)

    time.sleep(0.1)
Lors de la publication, vous devez envoyer des chaînes de caractères, c'est pourquoi brightness = str(readLight()) est là.
Si vous envoyez des entiers ou des flottants, le programme mourra.
Dans la fonction de publication, donnez un nom à votre sujet. Dites , picow/brightnesspuis ajoutez la valeur que vous souhaitez envoyer. Dans ce cas, nous voulons envoyer le relevé de la lumière stringifiée, brightness.
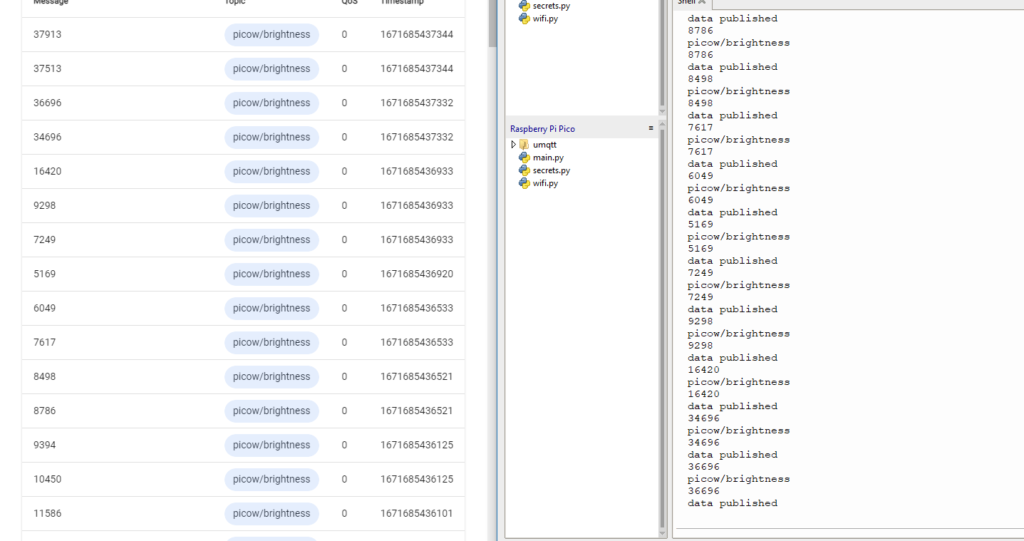
Vous devriez pouvoir voir les données publiées lorsque vous vous connectez à l'onglet Client Web.
Node-RED
Il ne s'agit que de chiffres en ligne qui peuvent sembler être du charabia. Et si vous vouliez accéder aux données sur HiveMQ Cloud et les présenter sous forme de graphiques ?
Plutôt que de créer votre propre système, vous pouvez utiliser Node-RED.
Node-RED vous permet d'extraire très facilement des données de HiveMQ et de les présenter à l'aide de représentations graphiques.
Nous allons créer une jauge en utilisant Node-RED.

Pour commencer, vous devez avoir nodejs. Consultez la documentation de HiveMQ pour savoir quelle version est recommandée.
Une fois Node installé, vous devez ouvrir une invite de commande/Terminal et lancer les commandes suivantes (excluez sudo si vous êtes sous Windows) :
sudo npm install -g --unsafe-perm node-redCeci utilisera le gestionnaire de paquets node (npm) pour installer Node-RED globalement.
Ensuite, lancez Node-RED en tapant node-red dans l'invite de Terminal/commande.

Ouvrez votre navigateur et rendez-vous sur http://127.0.0.1:1880 ou toute autre adresse figurant dans votre terminal.
Construisons le flux. Faites glisser un "mqtt in" sur le canevas. Vous pouvez le trouver sous l'onglet "network" dans la barre latérale gauche.

Nous allons devoir configurer l'onglet. Double-cliquez donc sur le rectangle et procédez comme suit :
Dans le champ "sujet", veillez à ajouter picow/luminositépuisque c'est ce que vous avez publié sur le Pico W.
Dans "serveur", ajoutez un nouveau serveur en cliquant sur l'icône du crayon et vous serez amené au menu suivant.

Mettez une nouvelle adresse de serveur et changez le port en 8883. Cochez "Use TLS" mais ne vous embêtez pas à ajouter une nouvelle configuration tls.
Ensuite, allez dans l'onglet sécurité et ajoutez vos identifiants de connexion.
Tous ces détails peuvent être trouvés dans votre code lorsque vous initialisez MQTTClient.
Ajout d'une jauge
Pour ajouter une jauge, vous devez disposer de l'option node-red-dashboard.
Dans la barre latérale gauche, si vous ne les voyez pas :

Allez ensuite dans le menu (bouton en haut à droite) -> Gérer la palette. Allez ensuite dans l'onglet Installer et recherchez node-red-dashboard. Cliquez sur "Installer".

Faites glisser et déposez une "jauge" à droite de l'écran d'affichage. mqtt en et les relier en faisant glisser une ligne de mqtt en à la jauge.

Double-cliquez sur le rectangle de la jauge et modifiez l'étiquette en "luminosité" et la "plage" maximale en 65535.
C'est parfait. Appuyons maintenant sur "Déployer".
Si vos paramètres sont corrects, vous verrez un cercle vert et "connected" sous le rectangle. Si ce n'est pas le cas, votre terminal vous donnera plus de détails sur la raison de l'erreur.
Maintenant que votre Pico W fournit des données au nuage HiveMQ, il est temps de consulter le tableau de bord. Visitez le site http://127.0.0.1:1880/ui et vous devriez voir la jauge mise à jour fréquemment.
Vos suggestions sont les bienvenues.
Laissez un commentaire dans la boîte de commentaires ci-dessous !

Bonjour,
Merci de partager vos connaissances avec nous.
Pourriez-vous nous dire si les exercices WiFi sont réservés au réseau ? Je n'ai pas pu accéder au Pico W si je suis sur un autre réseau WiFi. Si c'est le cas, avez-vous des exemples d'accès hors réseau ?
Nous vous remercions.
Oui, en raison de la nature des réseaux, des routeurs et des pare-feu, ces exercices ne fonctionnent qu'au sein du même réseau WiFi.
PiCockpit lui-même est une solution qui traverse les réseaux - vous pouvez accéder à votre Pico W depuis n'importe quel endroit de l'Internet.
Nous travaillons à l'ajout de nouvelles fonctionnalités à la plateforme.
Si vous voulez recréer quelque chose comme cela vous-même, vous devrez avoir une sorte de solution de tunnel sur votre réseau, ou un serveur de relais, ou quelque chose comme cela.
Nous proposons des services de conseil si vous souhaitez approfondir ce sujet.
Merci pour cet excellent tutoriel.
Malheureusement, cela ne fonctionne pas.
Je suis bloqué à la fin de la partie "1. Servez une page web qui dit "Hello World" sur le Pico"
Mes navigateurs Firefox et Chrome ne m'indiquent que "Erreur de connexion interrompue".
À Thonny, je vois
Connecté
ip = 192.168.188.198
Écoute sur ('0.0.0.0', 80)
Client connecté depuis ('192.168.188.100', 54025)
Connexion fermée
La connexion est fermée à plusieurs reprises.
Que puis-je modifier pour que mon Pico W fonctionne ?
Merci d'avance pour votre aide.
Salutations Pete
Lors de l'exécution de main.py, il y a un message d'erreur, comment puis-je le résoudre ?
Fichier "", ligne 1, dans
ImportError : aucun module nommé "wifi".
Merci d'avance.
Vous devez créer et ajouter wifi.py - qui est montré un peu plus haut sur la page. Sans wifi.py, le code ne fonctionnera pas.
Le "Tutoriel sur les composants du Raspberry Pi Pico W pour les débutants" est un guide fantastique pour ceux qui découvrent la plate-forme Raspberry Pi Pico W. Il est bien structuré et facile à suivre, ce qui en fait un outil idéal pour les débutants. Le tutoriel est bien structuré et facile à suivre, ce qui le rend idéal pour les débutants. Il couvre les composants essentiels et fournit des instructions claires, ce qui en fait un excellent point de départ pour tous ceux qui souhaitent explorer cette technologie. L'inclusion d'explications détaillées et d'images améliore l'expérience d'apprentissage, permettant aux lecteurs de saisir rapidement les concepts. Dans l'ensemble, ce didacticiel est une ressource précieuse pour ceux qui souhaitent commencer à utiliser le Raspberry Pi Pico W et ses composants.