PiCockpit v2.6.5 – Support for the Pico W (part 2)
As you probably all know the Raspberry Pi Foundation designed their own microcontroller three years ago – the Raspberry Pi Pico. Well here, we’re going to tell you about our new support for the Pico W through PiCockpit!
We were immediately intrigued, especially by its low price (Starting at $4) and low energy consumption, combined with its wide range of possible applications – from personal experiments and projects up to industrial use cases that require hundreds or even thousands of them.
But in its first iteration the Pico wasn’t exactly easy to connect to the internet (Or some kind of intranet). You needed an extension card to give it LAN, WiFi or some other kind of networking capability.
At the beginning of this year Raspberry Pi released the Pico W, the same board but with an included WiFi chip that makes connecting it to the internet a breeze. In addition to this hardware refresh the support of Micropython was getting better and better.
Micropython? It is an implementation of the Python programming language that is optimized to run on a microcontroller (Basically a small computer without an operating system). As some of you might already know, Python and as a result Micropython are very beginner friendly languages, allowing to write both small and complex programs without hassle and with great performance, thanks to a very well optimized environment. In addition to that there is a very friendly and vibrant community extending the language and helping newcomers with advice and tips.
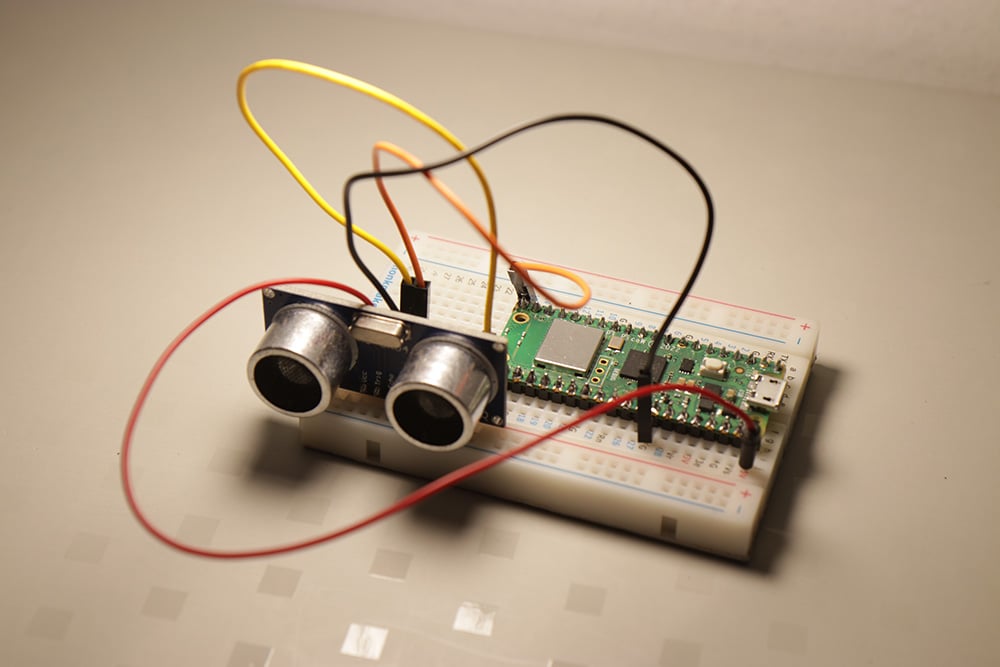
So we finally did it! PiCockpit is now able to run on the Pico! You can use our web-interface to monitor your Pi with the PiStats App. Our CO2 Sensor is also supported and allows remote monitoring of your environment! But in my personal opinion the highlight is the remote use of the GPIO pins.
We support reading the state of the input pins, setting output pins and even use PWM to control whatever external devices you have attached.
And we are currently working on even more cool features which are going to release rapidly thanks to Micropython making development fast and testing even faster!
And the best thing? It is as trivial and convenient as using a USB-Stick. Something like five clicks and you have your Pico W up and running! Interested? I’ll show you how to do it!
Installation guide
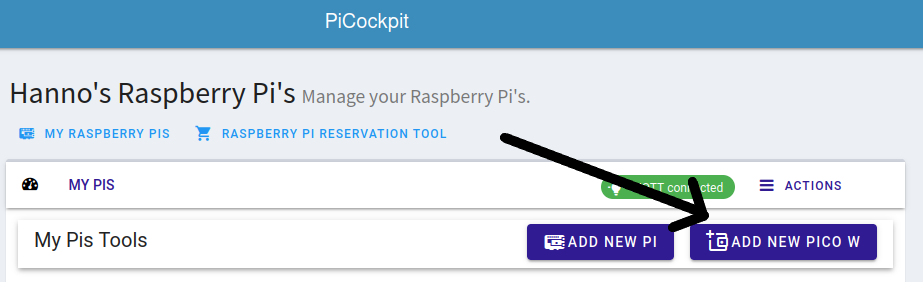
First login to your account on picockpit.com. On your PiCockpit homepage you should see a new button called ‘Add new Pico W’. Click it!
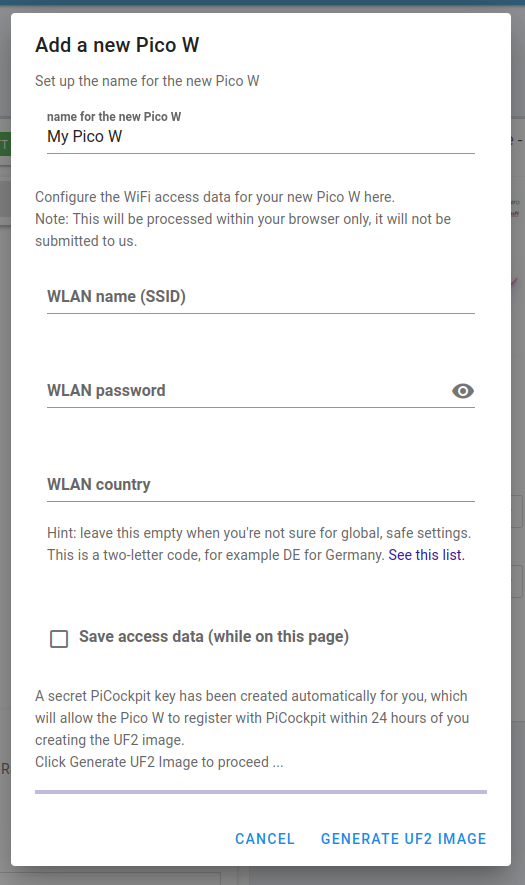
After confirming your password you can enter a name for your Pico, your WLAN credentials and the country you are using your Pi in – if you aren’t sure what code to use you can currently leave it empty as well. Click on ‘Generate uf2 Image‘ and we will edit our uf2 image to contain your credentials and let you download it. The best thing? This will be processed locally within your browser, it will not be submitted to us. So your credentials are safe and won’t be shared over the internet!
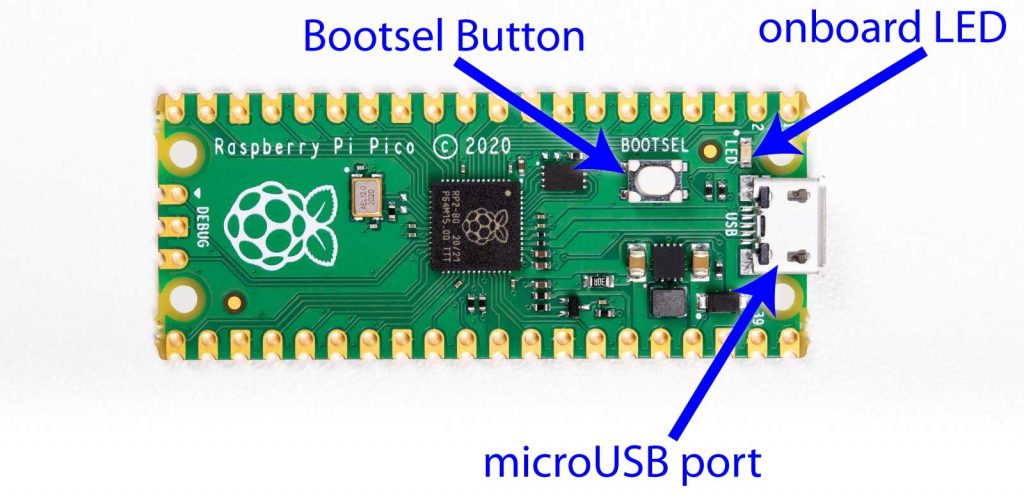
Afterwards you simply press the BOOTSEL button to tell the Pico to mounts itself as a mass storage volume and connect it to your computer just like you are connecting a USB-Stick or something similar. Depending on your operating system it should just pop up as an external volume!
Next make sure the Pico is set to its factory settings. Should your Pico W be brand new you can simply ignore this step. Otherwise simply download this Flash Nuke uf2 and copying it onto the Pico. Simply drag and drop the downloaded file onto the volume.
Afterwards just wait something like 10 seconds and the Pico will disappear and then reappear. It should pop up as a volume, just like before.
Now simply drag your downloaded uf2 file (picockpit-picow-v2.5.0.uf2) onto the volume. That is it!
The only thing left to do is to wait. Do not disconnect the Pico! Simply wait about a minute (or two!). First the Pico’s LED should turn on. After a while the onboard LED should start blinking rapidly. At this point the Pico will turn up in the PiCockpit interface – and you are able to use it just like you are used to with the full size Pis. Done!

Upcoming
This is obviously our first release of the Pico PiCockpit Client. There are still some kinks to work out – if you should run into any trouble please consult this page – On there you will find more detailed instructions to get you up and running! I’ll also add known bugs (And hopefully how to circumvent them). In addition to that feel free to send us an E-Mail! Whether it be any problems you encounter or maybe an idea you would like us to look at? We are always excited to receive any kind of feedback!
As you can probably hear, we are very, very excited about this release. Working with the Pico W can be a little daunting for beginners, and a little fiddly for more experienced developers. We are hoping to streamline this for everybody, allowing easy access to Raspberry’s newest (And in my personal opinion maybe their coolest!) product yet.
And those cool upcoming features I mentioned? The next thing you can look out for is a version of PiControl that will allow you to run your custom Micropython scripts from the convenience of our web-interface. Just think about it! That GPIO script you wrote back in the day? One click. Your little web-app that pings your server to see if it is still online? One click!
So there you have it – PiCockpit support for the Pico W!
Do you want to try it out but don’t own a Pico W? We sell them in our store for as little as 8€ a piece! You can also find a large number of accessories and the maker kit is a great place to start. There is also a version with soldered headers, so there is no need to do any soldering yourself. Take a look around!
Ich nutze einen iMac mit der Version 10.13.6 (High Sierra).
Leider wird mein Pico W im PiCockpit nicht angezeigt. die OnBoard-LED ist zunächst an und blinkt nach einer Weile jeweils 4mal. Der Pico W meldet sich im WLAN an und lässt sich auch anpingen. In Thonny wird das hier angezeigt:
Traceback (most recent call last):
File “main.py”, line 70, in
File “main.py”, line 68, in __init__
File “setup.py”, line 246, in setupfunc
File “core.py”, line 427, in error_blink
File “core.py”, line 444, in blink
KeyboardInterrupt:
MicroPython v1.19.1-789-ga322ebafc on 2023-03-10; Raspberry Pi Pico W with RP2040
Type “help()” for more information.
>>>
Wir haben vor kurzem ein neues Release gemacht – das die Stabilität weiter verbessert hat, bitte probieren Sie es aus – es sollte bei Anlage eines neuen Pico W automatisch als UF2 heruntergeladen werden. Bitte löschen Sie den alten Pico W dafür.