Ελέγξτε το Raspberry Pi σας εξ αποστάσεως

Υπάρχουν πολλοί τρόποι για να ελέγξετε το Raspberry Pi από απόσταση.
Θέλετε να μπορείτε να το ελέγχετε σαν να βρισκόσασταν μπροστά από το Raspberry Pi σας;
Ή μήπως θέλετε να ελέγξετε τις ακίδες GPIO;
Ο τηλεχειρισμός μπορεί να σημαίνει ότι χρησιμοποιείτε το Raspberry Pi σαν να βρίσκεστε στην ίδια τη συσκευή. Με άλλα λόγια, βρίσκεστε στον υπολογιστή που προτιμάτε και θέλετε να χρησιμοποιήσετε το Raspberry Pi σας ως απομακρυσμένη επιφάνεια εργασίας. Θέλετε να ελέγχετε εξ αποστάσεως το ποντίκι, το πληκτρολόγιο και να βλέπετε την οθόνη από αυτόν τον κύριο υπολογιστή.
Αν αυτό είναι που θέλετε, τότε ψάχνετε για απομακρυσμένο έλεγχο SSH ή VNC του Raspberry Pi σας.
Από την άλλη πλευρά, μπορεί να θέλετε το Raspberry Pi σας να κάνει κάτι όταν λαμβάνει ένα σήμα από το διαδίκτυο ή κάποια άλλη μορφή εισόδου, όπως ένα IR signal. Μπορεί να θέλετε το Raspberry Pi σας να σβήνει τα φώτα ή να ανοίγει έναν ανεμιστήρα κ.λπ.
Σε αυτή την περίπτωση, δεν θα θέλατε να χρησιμοποιήσετε λειτουργίες απομακρυσμένης επιφάνειας εργασίας για να επιτύχετε αυτόν τον στόχο. Υπάρχουν πολλοί πιο άμεσοι τρόποι για να το κάνετε αυτό και ένας από αυτούς είναι μέσω της εφαρμογής PiCockpit.
Ας δούμε τους διάφορους τρόπους τηλεχειρισμού του Raspberry Pi.
Απομακρυσμένος έλεγχος μέσω SSH (γραμμή εντολών)
Πιθανότατα ο πιο βασικός τρόπος για να ελέγξετε το Raspberry Pi από απόσταση είναι μέσω SSH.
Ακολουθούν μερικά πράγματα που μπορείτε να κάνετε με το SSH:
- Εκτέλεση εντολών
- Εγκατάσταση λογισμικού
- Παίξτε μουσική
- Επανεκκίνηση/διακοπή λειτουργίας
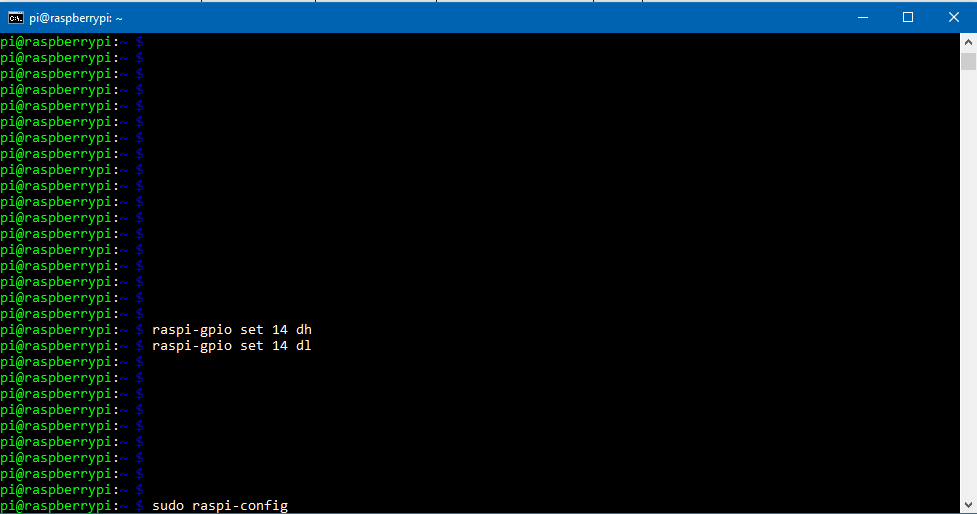
- Εναλλαγή GPIO
Η γνώση της χρήσης του SSH είναι μια θεμελιώδης δεξιότητα στην εργαλειοθήκη ενός χρήστη Linux. Αν έχετε ποτέ διαχειριστεί έναν εικονικό ιδιωτικό διακομιστή στο Amazon EC2 ή στα Droplets της DigitalOcean, η χρήση του SSH για τον έλεγχο του Raspberry Pi σας είναι λίγο-πολύ η ίδια.
Αν αυτό είναι που επιδιώκετε, μπορείτε να μάθετε πώς να δημιουργήσετε ένα "ακέφαλο" που έχει στηθεί εδώ.
Το μειονέκτημα αυτού του τρόπου είναι ότι δεν έχετε γραφικό περιβάλλον χρήστη. Ενώ μπορείτε να προγραμματίσετε και να εκτελέσετε προγράμματα με αυτόν τον τρόπο, γίνεται πολύ κουραστικό και αργό.
Το επόμενο βήμα είναι η χρήση του VNC για να αποκτήσετε μια απομακρυσμένη επιφάνεια εργασίας.
ΚΛΙΚ ΕΔΩ: Play-by-play προοπτικές αποθεμάτων από έναν εγκεκριμένο μεταπωλητή στη Γερμανία
/
Απομακρυσμένη επιφάνεια εργασίας μέσω VNC (Virtual Network Computing)
Η δυνατότητα απομακρυσμένου ελέγχου του Raspberry Pi σας δίνει τη δυνατότητα να κάνετε πολλά περισσότερα.
Για παράδειγμα, θα μπορείτε να χρησιμοποιήσετε το τερματικό. Έτσι, βασικά, μπορείτε να κάνετε όλα όσα αναφέρονται στην ενότητα SSH παραπάνω.
Ένα ακόμη μεγαλύτερο πλεονέκτημα εδώ είναι ότι μπορείτε να χρησιμοποιείτε προγράμματα με το γραφικό περιβάλλον χρήστη τους. Εάν προγραμματίζετε, αυτό βοηθάει πραγματικά, επειδή θα μπορείτε να βλέπετε τις επισημάνσεις σύνταξης και να κάνετε αυτόματα τον κώδικά σας να ομορφύνει. Μπορείτε επίσης να χρησιμοποιήσετε το Thonny ή το VS Code αντί για το nano στη γραμμή εντολών.
Το μειονέκτημα είναι ότι η εγκατάσταση ενός συστήματος απομακρυσμένης επιφάνειας εργασίας στο Raspberry Pi απαιτεί περισσότερο χρόνο από ό,τι το SSH.
Ας το θέσουμε ως εξής: Αυτό σημαίνει ότι μπορούν να συνδεθούν μέσω SSH στο Raspberry Pi σας από το κουτί.
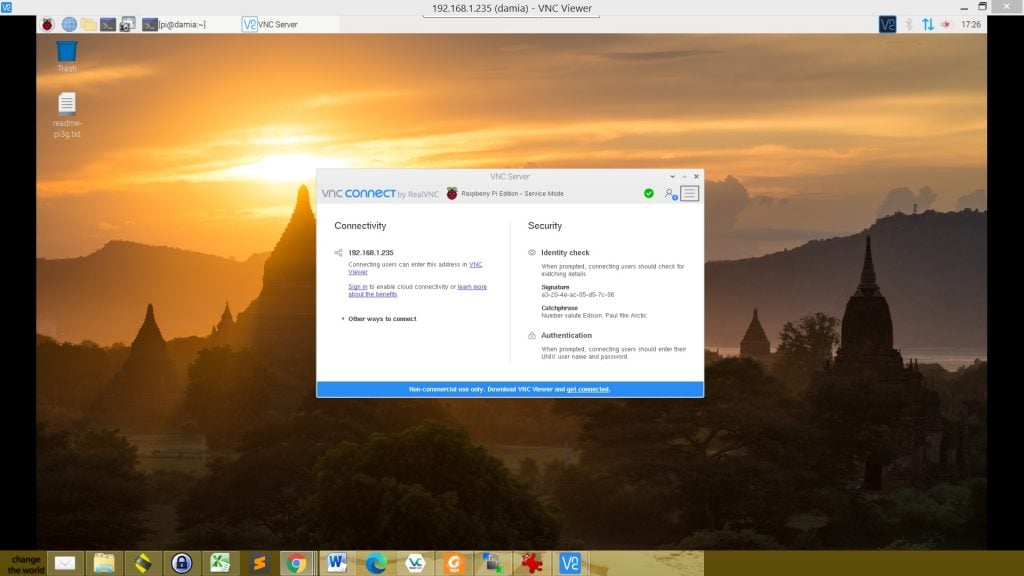
Ωστόσο, για να λειτουργήσει το VNC πρέπει να το ενεργοποιήσετε και να κατεβάσετε ένα πρόγραμμα προβολής VNC στον υπολογιστή σας.
Το άλλο μειονέκτημα είναι ότι το VNC απαιτεί μεγαλύτερο εύρος ζώνης. Σπάνια αποτελεί πρόβλημα, εκτός αν χρησιμοποιείτε ένα ανεπαρκής δρομολογητής, όπως όταν χρησιμοποίησα το hotspot του smartphone μου ως δρομολογητή περιαγωγής.
Έχουμε έναν οδηγό για το πώς μπορείτε να το ρυθμίσετε μέσω του RealVNC. Είναι εξαιρετικά απλό.
ΚΛΙΚ ΕΔΩ: Μάθετε πώς να ρυθμίζετε το VNC στο Raspberry Pi σας εδώ.
PiCockpit: απομακρυσμένος έλεγχος GPIO, απομακρυσμένα διαγνωστικά
Ενώ θα μπορούσατε να κάνετε τα πάντα μέσω SSH και VNC, ίσως να θέλετε κάτι πιο απλό και άμεσο.
Το PiCockpit είναι ιδιαίτερα χρήσιμο επειδή σας επιτρέπει να ελέγχετε το Raspberry Pi σας μέσω του διαδικτύου. Αν θέλατε να το κάνετε αυτό μέσω SSH ή VNC, θα έπρεπε να ρυθμίσετε προώθηση θυρών στο δρομολογητή σας ή να δημιουργήσετε ένα είδος σήραγγας. Αυτό είναι μια ταλαιπωρία.
Με το PiCockpit, μπορείτε να εκτελείτε διάφορες επαναλαμβανόμενες εργασίες εύκολα μέσω του προγράμματος περιήγησης στο κινητό σας ή στο desktop. Ας ρίξουμε μια ματιά σε μερικές από τις περιπτώσεις χρήσης.
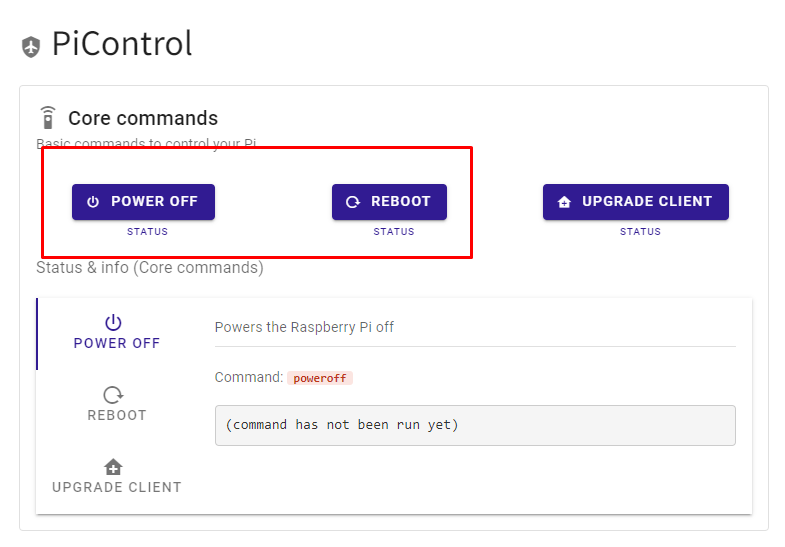
Επανεκκίνηση και τερματισμός λειτουργίας του Raspberry Pi εξ αποστάσεως
Διαπιστώνω ότι όταν τα πράγματα πάνε στραβά, η επανεκκίνηση μπορεί να λύσει αρκετά προβλήματα.
Ας πούμε ότι ένα πρόγραμμα που γράψατε καταρρέει πάντα μετά από ώρες λειτουργίας. Το πρόγραμμα τρέχει κατά την εκκίνηση.
Δεν είστε σίγουροι γιατί καταρρέει μετά από μερικές ώρες, αλλά πρέπει να τρέξει τώρα. Ένας εύκολος τρόπος είναι να επανεκκινήσετε τον υπολογιστή σας.
Εδώ είναι ένα demo:
Στην πραγματικότητα, το καλύτερο πράγμα για το PiControl είναι ότι μπορείτε να γράψετε τις δικές σας εντολές για να κάνετε ακριβώς αυτό που χρειάζεστε.
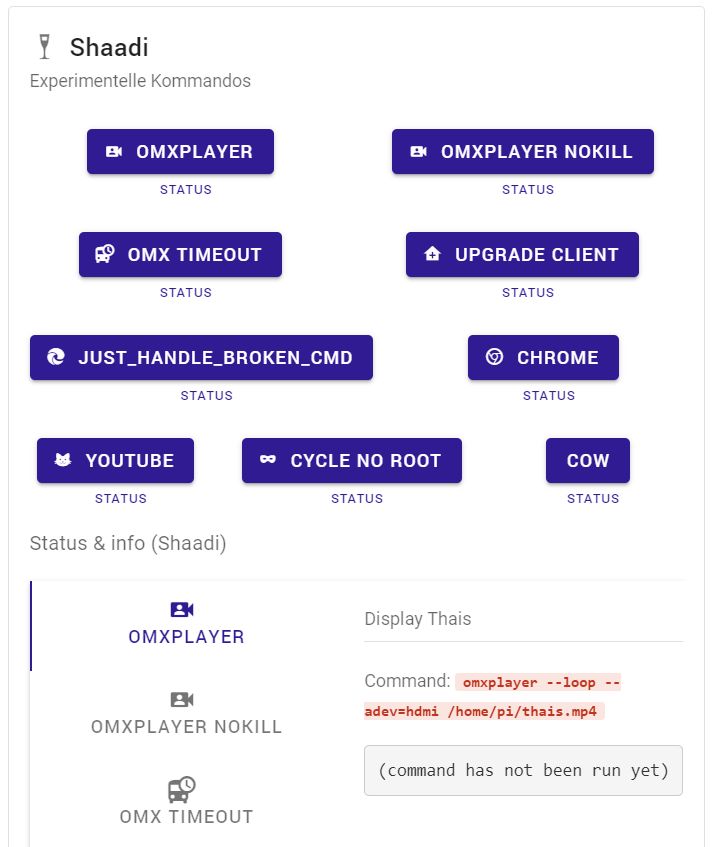
Οι δυνατότητες ενός τέτοιου προσαρμόσιμου εργαλείου είναι απεριόριστες. Ακολουθούν ορισμένες περιπτώσεις χρήσης που μπορείτε να κατασκευάσετε:
- Τραβήξτε ένα στιγμιότυπο χρησιμοποιώντας μια φωτογραφική μηχανή
- Εκκινήστε τον διακομιστή Minecraft του Raspberry Pi και σταματήστε τον επίσης.
- Αναπαραγωγή ενός βίντεο χρησιμοποιώντας το omxplayer (ιδανικό για καταστήματα)
- αφύπνιση ενός τοπικού υπολογιστή στο ίδιο δίκτυο με το Raspberry Pi με τη λειτουργία Wake on LAN
- αναπαραγωγή ήχου
- να ανοίξει μια πόρτα - για παράδειγμα μια γκαραζόπορτα, εκδίδοντας τις κατάλληλες εντολές ελέγχου μέσω Z-Wave κ.λπ.
- εκκινήστε την υπηρεσία SSH στο Raspberry Pi και κλείστε την
- ενεργοποίηση και απενεργοποίηση ενός ρελέ (θα χρειαστούν δύο κουμπιά, ή μπορεί να γίνει με ένα κουμπί "εναλλαγής")
- έλεγχος της τηλεόρασης (εναλλαγή καναλιών, αλλαγή έντασης ήχου, ...) με τη χρήση ενός IR LED, για παράδειγμα για να προσομοιώσετε δραστηριότητα ενώ ταξιδεύετε
- Εκτοξεύστε έναν πύραυλο από τη διεπαφή web
ΚΛΙΚ ΕΔΩ: Μάθετε πώς μπορείτε να δημιουργήσετε τις δικές σας εντολές στο PiControl.
Τηλεχειριστήριο GPIO
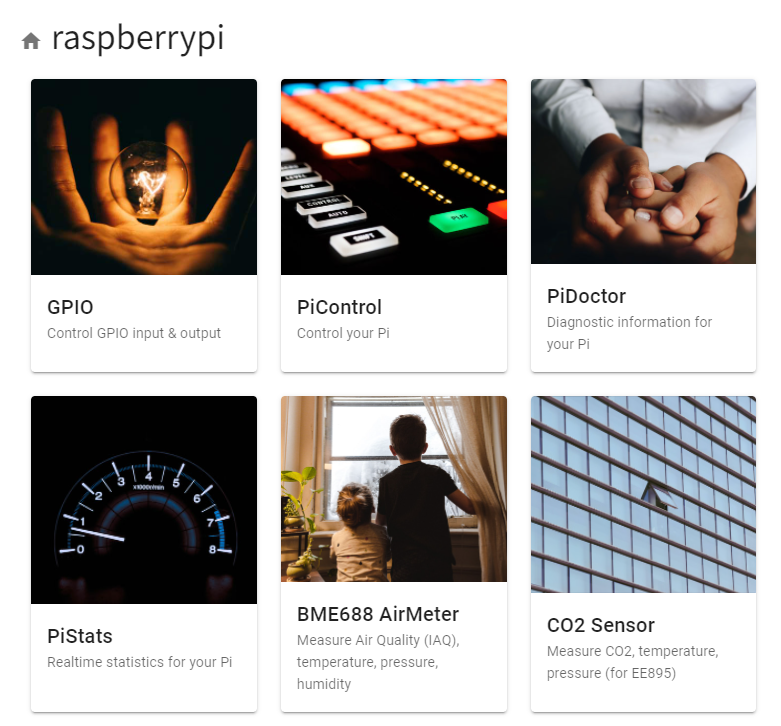
Η εφαρμογή GPIO στην εργαλειοθήκη PiCockpit κάνει τα πράγματα πραγματικά ενδιαφέροντα για την κατασκευή πρωτοτύπων και πραγματικών έργων.
Η εφαρμογή GPIO έχει τέσσερις πτυχές:
- Είσοδος GPIO
- Έξοδος GPIO (On/Off)
- Έξοδος GPIO (λογισμικό PWM)
- I2C
Ας κάνουμε ένα μικρό έργο "Hello World" όπου θα προσπαθήσουμε να ανάψουμε ένα LED χρησιμοποιώντας την εφαρμογή PiCockpit GPIO. Μόλις το κατακτήσετε αυτό, οι δυνατότητες είναι ατελείωτες.
Απαιτήσεις
- Κόκκινο LED
- Αντίσταση 220 ohm
- Καλώδια βραχυκυκλώματος
- Το PiCockpit εγκαταστάθηκε
Σχηματικά
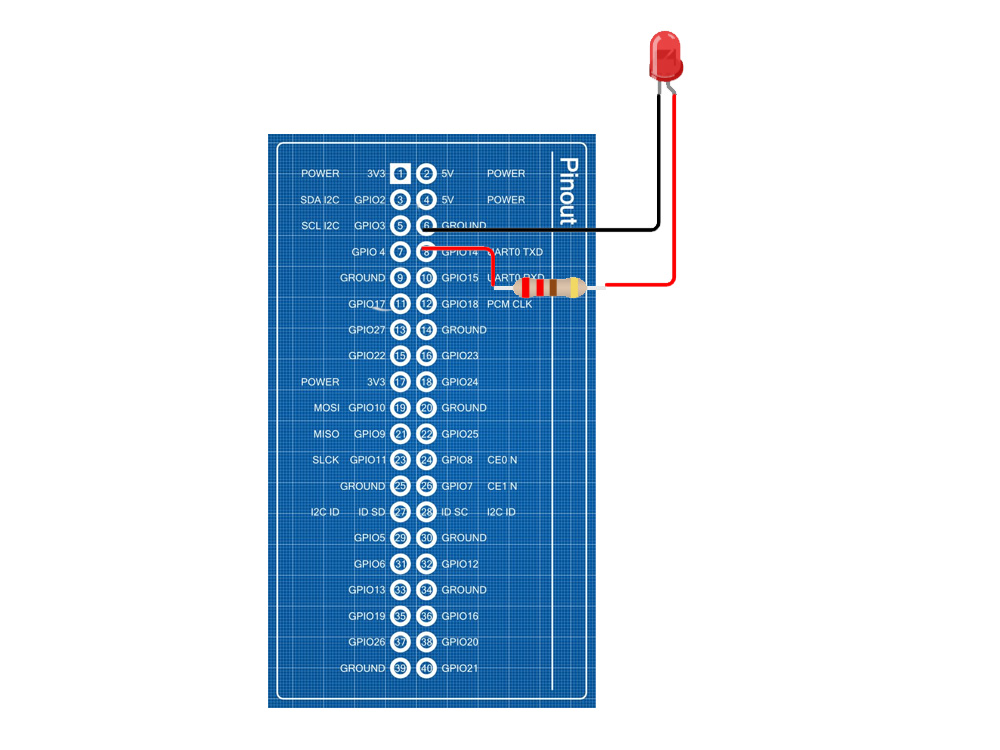
Η παραπάνω εικόνα δείχνει τη διάταξη ακροδεκτών για ένα Raspberry Pi 4 και στο παράδειγμά μας, θα συνδέσουμε την άνοδο στο GPIO 14, το οποίο είναι το τέταρτο pin στη δεξιά στήλη από πάνω.
Η κάθοδος συνδέεται στον ακροδέκτη γείωσης που είναι ο τρίτος ακροδέκτης από πάνω, ακριβώς πάνω από το GPIO 14.
Αν δεν ξέρετε ποιο μέρος της λυχνίας LED είναι το θετικό και ποιο το αρνητικό, το μεγαλύτερο από τα δύο σκέλη της λυχνίας LED είναι το θετικό.
Ρύθμιση του PiCockpit για τηλεχειρισμό του LED
Ακούστε τι πρέπει να κάνετε.
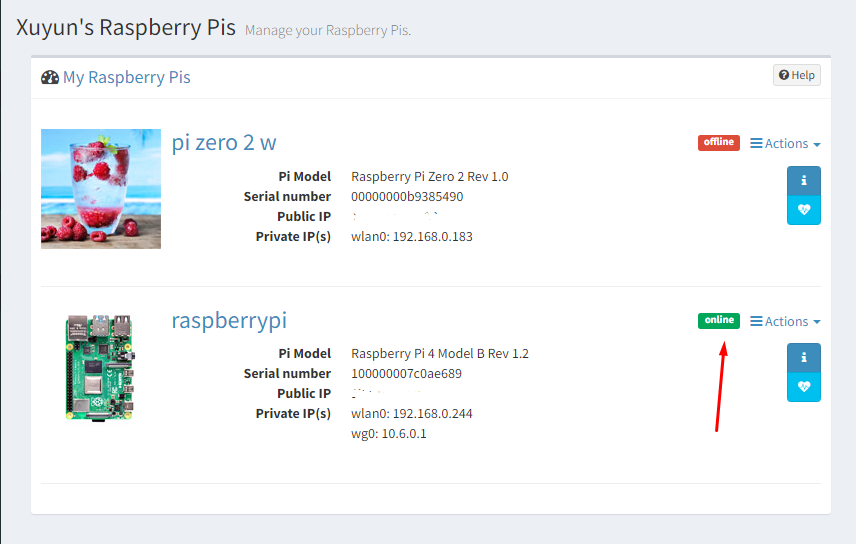
Στο ταμπλό του PiCockpit, μεταβείτε στο Raspberry Pi σας. Για μένα, ήταν εύκολο να το εντοπίσω επειδή ήταν το μοναδικό Raspberry Pi που είναι συνδεδεμένο.
- Επιλέξτε το Raspberry Pi σας.
- Κάντε κλικ στην εφαρμογή GPIO.
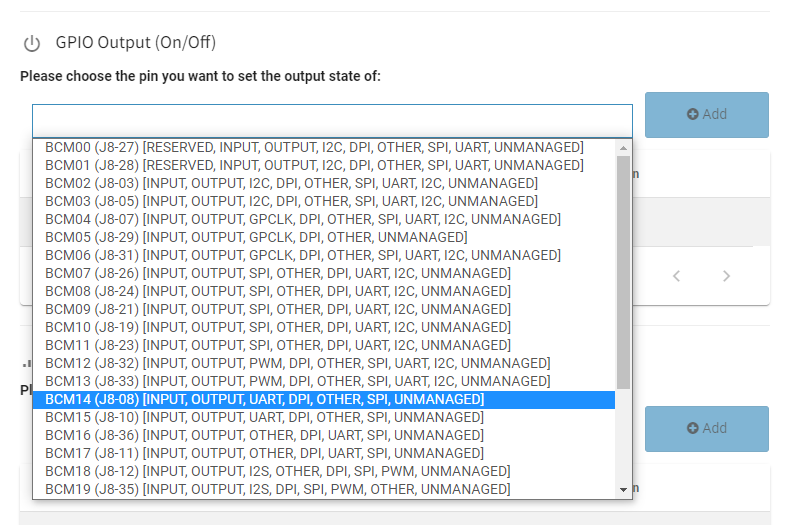
- Μετακινηθείτε προς τα κάτω στην επιλογή "GPIO Output (On/Off").
- Κάντε κλικ στο πτυσσόμενο πλαίσιο επιλογής δίπλα στο κουμπί "Προσθήκη".
- επιλέξτε BCM14.
- Πατήστε "Προσθήκη"
Αυτή τη στιγμή, θα δείτε έναν διακόπτη εναλλαγής κάτω από τη στήλη "Έλεγχος". Κάντε κλικ σε αυτόν.
Και κάπως έτσι, μόλις ενεργοποιήσατε το LED σας εξ αποστάσεως.
Λογισμικό PWM για τον τηλεχειρισμό των LED. Ανεβάστε το επίπεδο!

Οι παραπάνω οδηγίες σας επιτρέπουν να ενεργοποιήσετε ή να απενεργοποιήσετε μια λυχνία LED σε πλήρη φωτεινότητα. Τι γίνεται όμως αν θέλετε να μπορείτε να ρυθμίζετε τη φωτεινότητά του;
Ας δοκιμάσουμε το λογισμικό PWM. Είναι εξαιρετικά εύκολο και ένα γρήγορο βήμα προς τα πάνω από το παραπάνω βασικό έργο.
- Μεταβείτε στην εφαρμογή GPIO στην ενότητα "Έξοδος GPIO (PWM λογισμικού)".
- Επιλέξτε BCM14 από το αναπτυσσόμενο μενού επιλογής.
- Κάντε κλικ στο "Προσθήκη"
- Μετακινήστε το ρυθμιστικό κάτω από τη στήλη "Έλεγχος". Παρατηρήστε πώς διαμορφώνεται η φωτεινότητα των LED.
Εγκατάσταση του PiCockpit
Εάν έχετε πειστεί ότι το PiCockpit μπορεί να σας βοηθήσει να ελέγξετε από απόσταση το Raspberry Pi σας, τότε ακολουθήστε αυτόν τον σύνδεσμο για τις οδηγίες εγκατάστασης.
ΚΛΙΚ ΕΔΩ: Αποκτήστε έναν λογαριασμό PiCockpit εδώ