Raspberry Pi Overclocker

Use this interactive tool to overclock your Raspberry Pi.
How to overclock your Raspberry Pi using this tool
First, please read this quote by Dom, to see what you can expect:
“Remember that no overclock is 100% guaranteed on all chips with all temperatures and use cases.
If it were we would have have increased the default clock frequency.I think the best you can do is say a medium overclock should work on, perhaps, 90% of chips.”
Dom, Raspberry Pi Engineer, posted as “dom” in the Raspberry Pi Forum Post on Overclocking
This web-based tool allows you to quickly choose overclocking settings for your Raspberry Pi 4, Raspberry Pi 400 or Raspberry Pi 3.
Please be sure to read through the entire page before applying the settings to your Raspberry Pi.
There are also instructions what to do in case your Raspberry Pi will not boot after overclocking (which is a real risk). Also, you’ll need to make sure that the settings are long-term stable, and that your Raspberry Pi has adequate cooling.
Quick Tip: Turn your Raspberry Pi so that it sits vertically – on a Pi 4, the ARM Cortex-A72 CPU will be able to dissipate more heat this way, simply due to physics.
Follow these step-for-step instructions to use this tool:
Step 1: Choose your Raspberry Pi Model
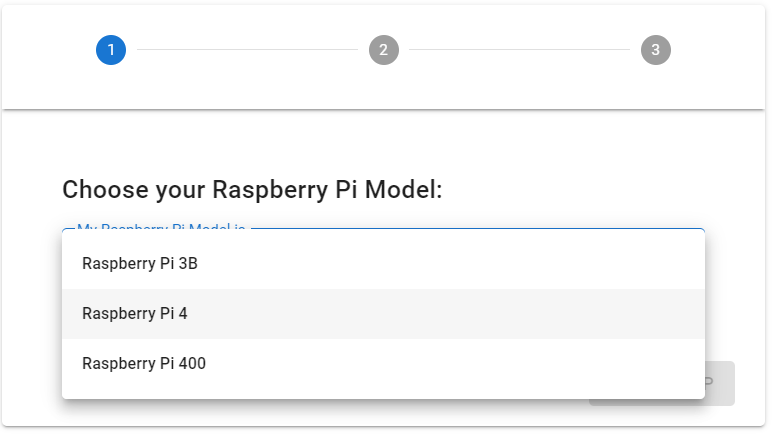
Select the appropriate Raspberry Pi model you would like to overclock, and click on “Next Step“.
Note, Raspberry Pi 3B is the Raspberry Pi 3B – we currently do not support overclocking Raspberry Pi 3B+ (see below for the reason).
Step 2: Choose the overclock preset
You have a choice between “medium booster” and “maximum performance”.
Be sure to provide adequate cooling to your Raspberry Pi, especially with “maximum performance” – when it overheats, the Raspberry Pi will reduce the clock frequency to protect the circuitry!

As you can see, we recommend to use at least a heatsink (or FLIRC case) for medium booster, and active cooling for maximum performance.
Click on “Next Step“, to see the results.
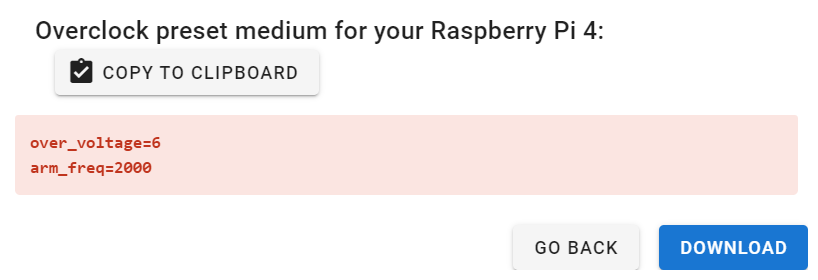
Step 3: Download or copy preset
You will see a result screen. In case you have selected the maximum performance overclocking preset, you’ll also have to acknowledge that the preset will void your warranty by setting a special bit inside your Raspberry Pi:
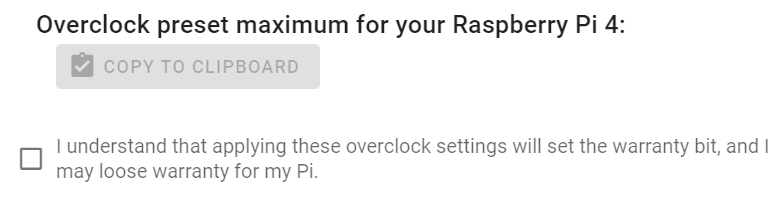
Tick the checkmark box to access the preset in this case. In case you are worried about your warranty, we recommend to try the medium overclock preset instead.
Using the button “Copy to clipboard“, you can copy the preset to your computer’s clipboard. Alternatively, you can also click on “Download” to download the overclock preset as a text file.

Step 4: Add your new settings to Raspberry Pi’s config.txt
You’ll have to add these new settings to your Raspberry Pi to actually overclock it.
Edit config.txt for this purpose, and paste these lines at the bottom. Here is an example, using the command line editor nano:
sudo nano /boot/config.txt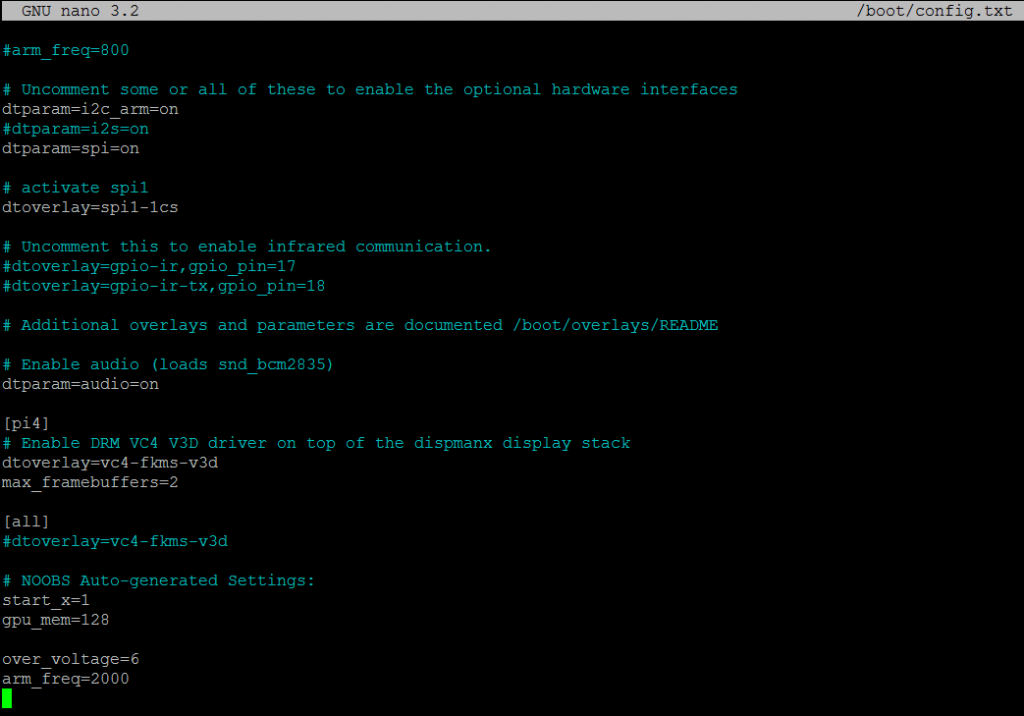
Note: the overclock settings should be below an [all] statement, or – even better – below the appropriate selector for your Raspberry Pi, e.g. [pi4]. This way, if you share the microSD card between your Pis, the overclocking settings will only be applied to a Pi which can actually use them. In the screenshot, I’ve pasted the overclocking settings at the end of the file, they are applied to (all) Pis.
Alternatively, you can also put the overclock.txt in the same folder as the config.txt (FAT partition “boot”, topmost folder), and include it by adding the following line into config.txt:
include overclock.txt
This way, you can keep your settings apart (or even create both medium and high overclocking settings, and switch between them by editing the include line.)
Step 5: Reboot your Raspberry Pi
Now your overclocking settings should be applied, and you should feel that the system is snappier & reacts faster.
Stress-test your Raspberry Pi to see if it will perform appropriately with the new settings!
Especially with the maximum overclocking settings, there might be instability or even problems booting your Raspberry Pi.
Not all Raspberry Pi silicon chips are built alike, and while the stock clock speed settings will work for every Pi, your results might vary when overclocking.
Monitoring the overclocking stability using PiCockpit
PiCockpit is a remote Raspberry Pi monitoring & control web interface. You can add up to five Raspberry Pis free of charge to it.
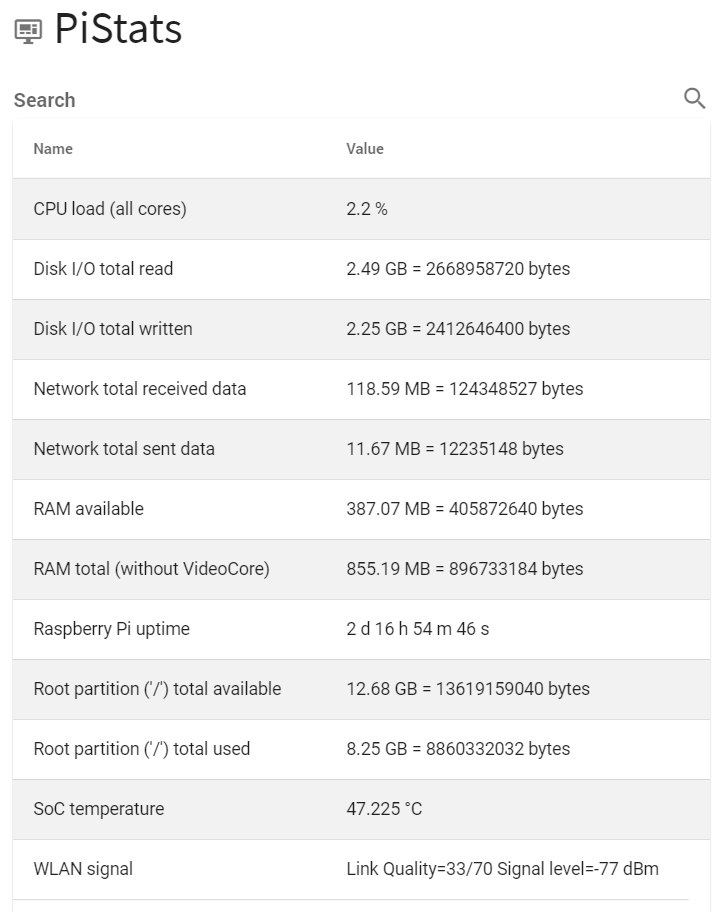
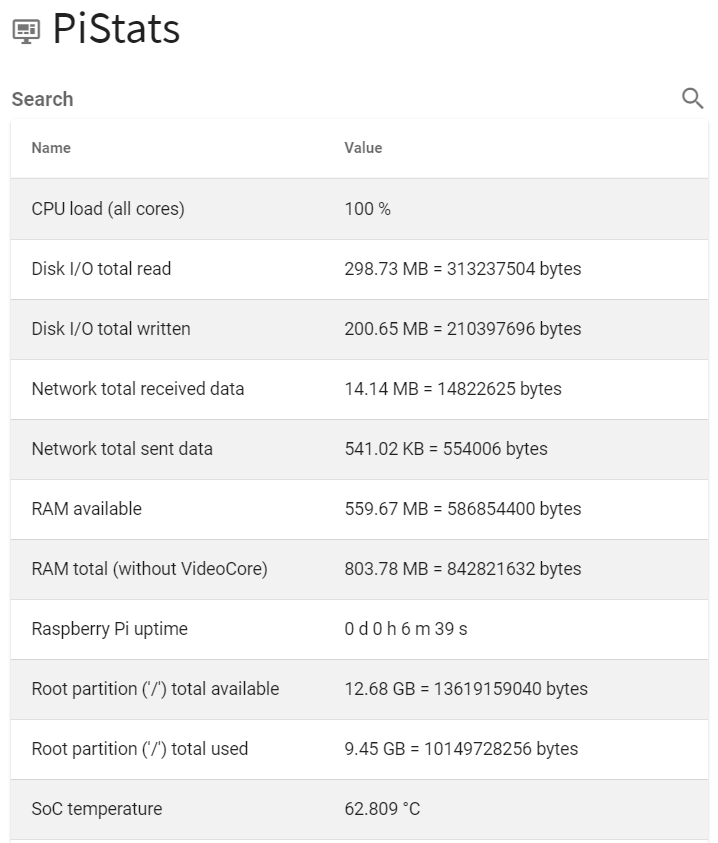
Using PiCockpit, you can monitor important statistics, relevant for overclocking – like CPU load and SoC temperature. Use the PiStats app for this purpose:
Another very valuable app is PiDoctor, which allows you to run health checks on your Raspberry Pi. In PiDoctor’s system module, you’ll see the SoC temperature, the current CPU frequency, and voltage (showing you whether your overclocking settings are applied correctly, or if the Pi is operating at reduced speed, as in the screenshot below):
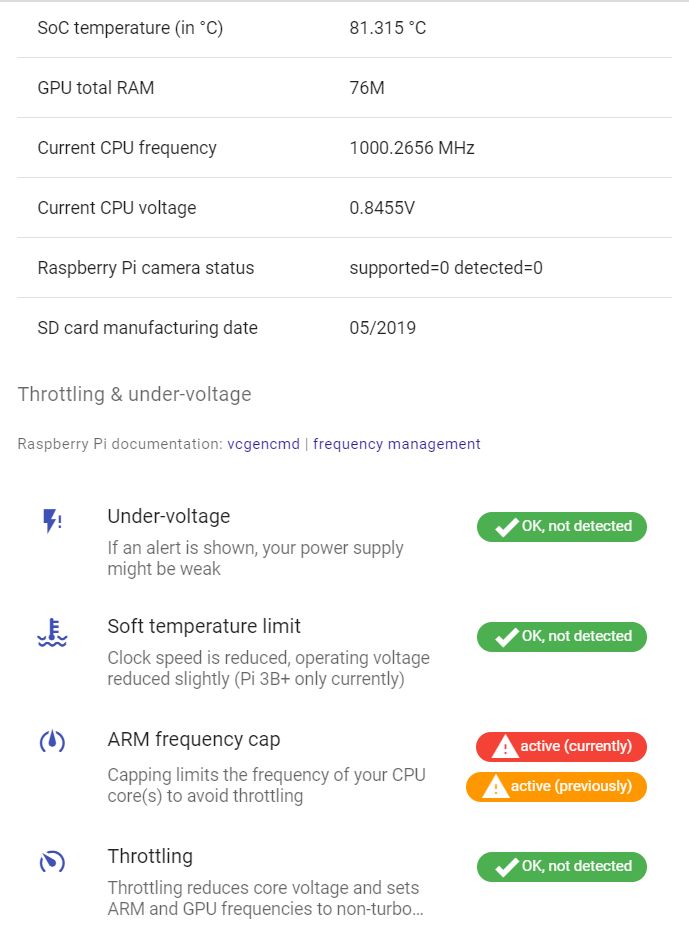
It will also show you whether your power supply is too weak (under-voltage).
A power supply which might be just good enough for normal operation might not “cut” it anymore for overclocking, since a faster CPU will draw more power.
Quick tips for overclocking your Raspberry Pi
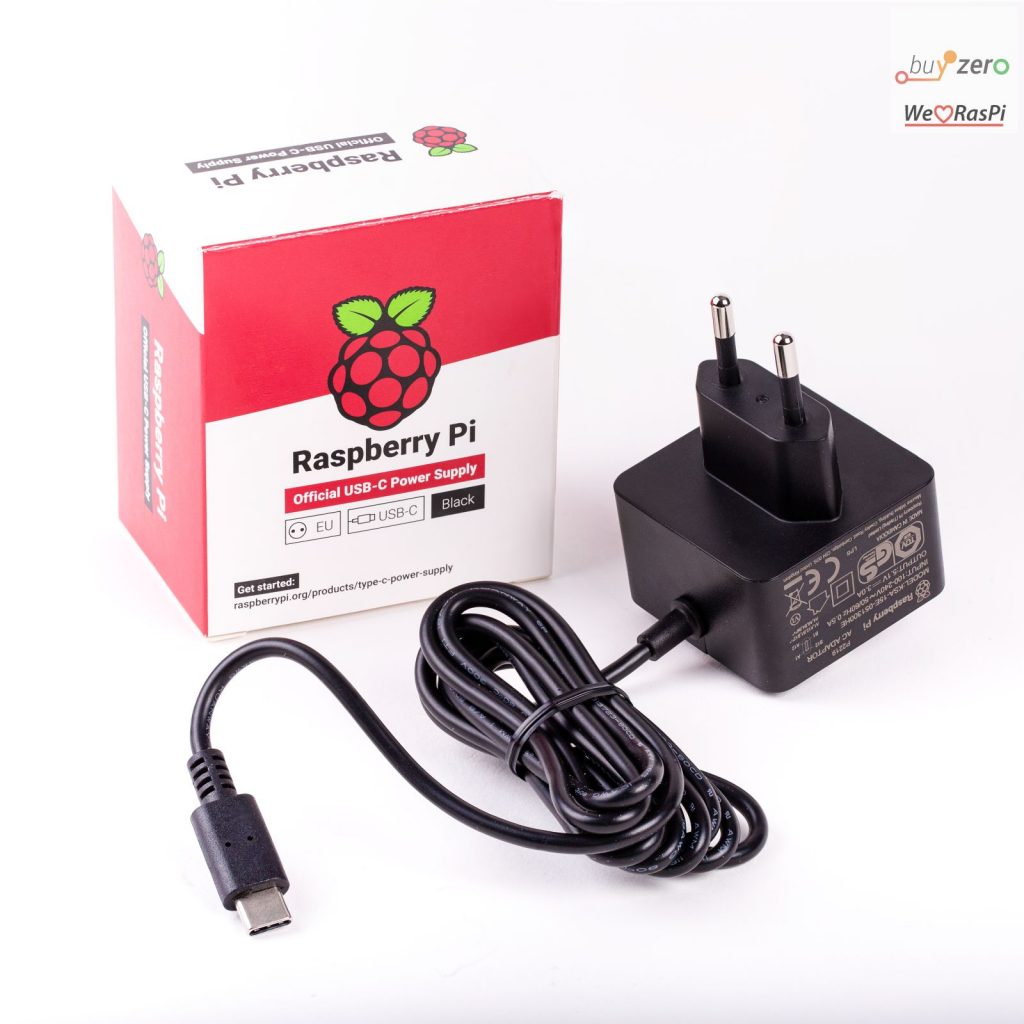
- use a good power supply – we recommend the official Raspberry Pi power supplies (they are available as both 3 A USB C for Pi 4 / Pi 400 and 2,5 A microUSB for other Raspberry Pi boards)
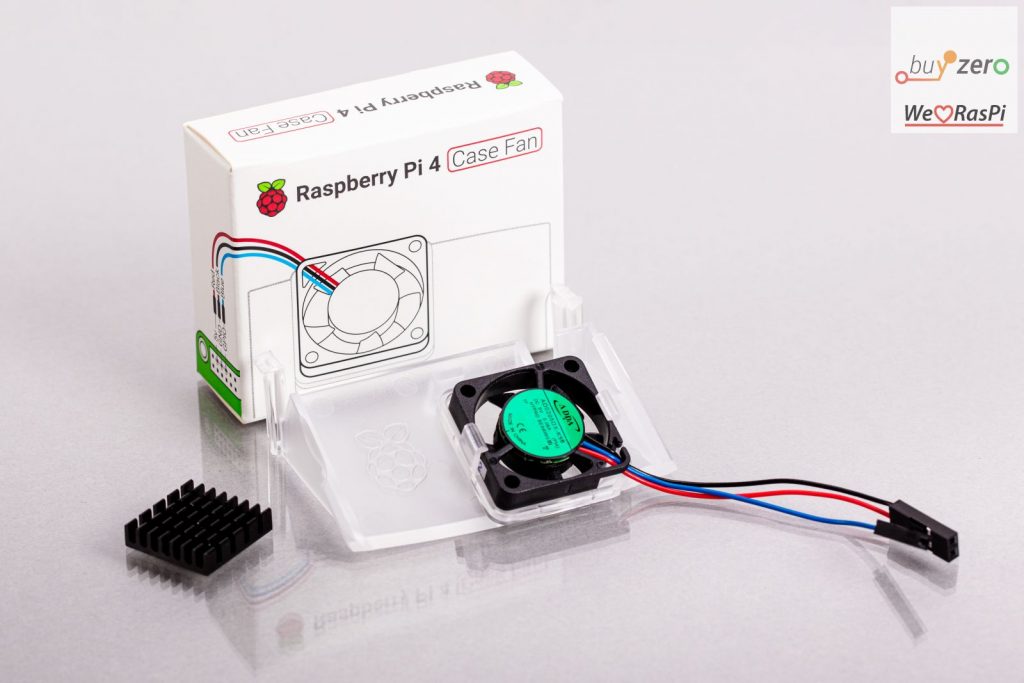
- cool your Raspberry Pi using a heatsink, a FLIRC case, or even active cooling
- Test your overclock settings for stability (see below for instructions)
Testing your overclocking settings
It is important to test how stable your Raspberry Pi overclocking settings are.
Testing memory stability
You can test your Raspberry Pi’s memory using memtester:
sudo apt-get update
sudo apt-get install memtester
Then run memtester as appropriate for your memory size:
memtester 1024M(Note: On 32-bit systems, you can only access up to 4095M of RAM from a single application, 4096 will fail with “memory argument too large”). In the case of the Pi 4/8 GB, you probably should test with a 64-bit OS.
The memtester will try to reserve up to this amount of memory, and test the actual maximum amount it will get from the operating system.
Note: The amount of memory will always be lower than the total specified, due to the operating system requiring some memory, and also due to the fact that there is some memory reserved entirely for VideoCore.
Linpack
Linpack is a mathematical test, loading your Raspberry Pi’s CPU cores with solving linear equations.
Note: Even on stock Raspberry Pi clock settings, Linpack might lead to instability (as observed with the Pi 3). Some users used over_voltage to fix this problem. See below for more details.
Work in progress – instructions below may not work!
The following instructions are for Pi 3, on 32 bit OSes: Download the binary, provided by Professor Weaver here, and install the necessary libraries.
mkdir ~/linpack
cd ~/linpack
wget http://web.eece.maine.edu/~vweaver/junk/pi3_hpl.tar.gz
tar -xzf pi3_hpl.tar.gz
sudo apt-get update
sudo apt-get install gfortran libmpich-dev
Note: There is currently a segmentation fault trying to start xhpl.
CPU Burn (for Cortex-A53 based cores – Pi 3B / 3B+)
Use these instructions from jahboater in the Raspberry Pi Forums to run cpuburn:
mkdir ~/cpuburn
cd ~/cpuburn
wget https://raw.githubusercontent.com/ssvb/cpuburn-arm/master/cpuburn-a53.S
gcc -o cpuburn-a53 cpuburn-a53.S
./cpuburn-a53
This uses NEON instructions (arithmetic) to put your CPU cores under load. The Raspberry Pi should heat up quickly (when not cooled appropriately). According to jahboater, if your overclock settings cannot run this for an hour, they fail and you should continue to tweak them.
Note that he suggests in this post that CPU burn is meant for Cortex-A53 based cores mainly – these are in the Pi 3B / Pi 3B+ / Pi 2 v1.2. It will run on the Pi 4 / Pi 400’s Cortex-A72, but will not be as effective a test. It will probably not run on previous Pis (Pi Zero W / Pi 1 / Pi 2 v1.1).
stress-ng
stress-ng allows you to stress-test your system and its different subsystems (memory, CPU, etc.) in various pre-defined ways.
Install stress-ng using:
sudo apt-get update
sudo apt-get install stress-ng
With the following code, you can run all CPU stress methods in sequence (albeit with a very long time preset of 1 day):
stress-ng --cpu 4Run the CPU stress methods for one hour:
stress-ng --cpu 4 --cpu-method all -t 1hRun just the fft method (4096 sample Fast Fourier Transform):
stress-ng --cpu 4 --cpu-method fftRefer to the stress-ng manpage for more options.
For example, running stress-ng –cpu 4 looks like this:
Of course, you need to let it run for a longer time. To terminate the stress test, press Ctrl+C.
The results of running stress-ng will show up in PiStats as 100 % CPU load and increasing SoC temperature over time:
FAQ
How do I disable overclocking if my Pi does not boot?
When overclocking, there is a risk of your Raspberry Pi not booting. As the famous saying goes, “Not all silicon is created equal”. There are tolerances in manufacturing. The stock settings will account for these tolerances, with overclocking you can find the maximum settings your Pi will perform at.
In case your Raspberry Pi doesn’t boot after applying the overclock settings, hold down the SHIFT key on your keyboard during the next boot. This will disable overclocking – you can boot into your system and adjust (or permanently disable) the overclocking.
Which applications will benefit from overclocking?
Typical applications which require a lot of processing power usually include web-browsing, compiling, games.
What does overclocking actually mean/what does it actually do?
The Raspberry Pi’s SoC, which includes the CPU, consists of many millions of transistors. These transistors need to be synchronized with each other, in order to be able to “move in unison”. A common clock speed is applied to this – the clock “ticks” are like commands to little soldiers: “move”, “hold”, “move”, etc. They mark the transition between operating states (for example individual commands being executed on the CPU). This is a gross oversimplification, to give you a rough idea of what is happening.
With overclocking, we ask these transistors to do their work in less time – to switch faster between the individual states. There are physical limits to this, since we’re talking about real atoms which have to perform the work for us.
Furthermore, as electric signals travel at finite speeds, synchronisation between transistors (or on a higher level, functional units) needs to happen across the SoC – if the clock speed is too fast, these signals can’t propagate properly, the individual functional units aren’t synchronized, the CPU crashes.
Imagine this as a very long trail of soldiers which are marching in a parade. If there are some in the back which march a bit faster, and they don’t get to synchronize, they will bump into the rows ahead of them eventually, disrupting the whole parade. Or if they march slower than the ones ahead, they will loose touch with their comrades – the whole parade will become chaotic. Therefore, you have to find a clock speed (marching speed) that works for all soldiers (all functional blocks).
In reality, this is a bit more complex, since functional blocks on the Raspberry Pi SoC are somewhat independent, and can even operate at their own clock speeds. There are further constraints: for example, HDMI 4K output will require different speeds on the Pi 4.
Which config.txt settings are available for overclocking?
This Raspberry Pi page has all the details for overclocking options in config.txt.
Here’s an excerpt of the most important ones:
- arm_freq – the frequency you would like the CPU to run at. If you don’t enable force_turbo, this is simply the top frequency the CPU will perform at – it will reduce the frequency dynamically, if no heavy workload is placed on it. The top frequency you can overclock your Raspberry Pi to will vary by model, and by the actual Raspberry Pi you’re using – some will allow more overclocking, some will allow less
- over_voltage – this will increase voltage to the CPU/GPU core. It will be in the range of [-16, 8], which maps to [0.8V, 1.4V (actual CPU voltage)] with 0.025V steps. Note – negative values will not under voltage your CPU, but actually over voltage it. Values above 6 are only allowed if force_turbo is specified; setting over_voltage and force_turbo together sets the warranty bit.
- temp_limit – overheating protection. It is set to the maximum, 85°C by default. When the Raspberry Pi CPU hits that temperature, the clocks and voltages will be set back to their default values to protect your Raspberry Pi. Adjust this to lower values if you feel uncomfortable with your Pi running too hot.
- force_turbo – will force the top frequency, even when it is not required as per the ARM core’s workload. Usually, you’ll find this in the maximum performance overclock settings. Setting this together with over_voltage will set the warranty bit, and may void your Raspberry Pi’s warranty.
Why are there no overclocking settings for the Pi 3B+ in this tool?
The Raspberry Pi 3B+ uses the same SoC as the Pi 3B, but with better thermal packaging, and can run at a higher clock rate. Basically there is not much leeway anymore in overclocking the Pi 3B+ – instead we recommend cooling it appropriately, again for example using a FLIRC case (be sure to purchase the one compatible with Pi 1B+/Pi 2 /Pi 3 / Pi 3B+, not the Pi 4 version!).
You can, however, look into raising the temp_soft_limit value from it’s default of 60 to a maximum of 70, if you have good heat dissipation (e.g. FLIRC case). This temp_soft_limit applies only to Raspberry Pi 3A+/3B+ models. It doesn’t work with the Raspberry Pi 4.
temp_soft_limit=70Why are there no overclocking settings for Raspberry Pi Zero W / other Raspberry Pis in this tool?
We will add more settings over time. In case you would like to share your settings, please contact us.
What can I do if the overclocking settings do not work for my Pi?
- If your Pi does not boot, press and hold Shift during boot (and keep it pressed) to disable overclocking settings.
- If you tried to apply the maximum performance overclocking settings, try the medium booster ones instead.
- Try increasing the over_voltage a little (e.g. to 2, 3 or 4)
- Try decreasing the overclock frequency
For Raspberry Pi 4, the DVFS firmware will break some overclocked configurations, specifically with gpu_freq overclocking (you’ll need to tune your overclock configuration again!). You can revert to firmware versions prior to the DVFS by doing:
sudo rpi-update afbea38042fbb73149ad8c5688c011742fb3ff8aor simply try to remove the gpu_freq overclock setting that you already set up.
There’s a wonderful deep explanation here:
“DVFS (dynamic voltage and frequency scaling) needs to reallocate clocks and PLLS – therefore it is no longer possible to overclock the GPU.”
JamesH65