Everything about Bluetooth on the Raspberry Pi Pico W
The Raspberry Pi Foundation recently announced Bluetooth support with the release of the C/C++ SDK version 1.5.1 with a new release of the C/C++ SDK and of Micropython on the Pico W.
And guess what! If you have a Pico W, you don’t need to purchase a new one.
And if you don’t have a Pico W yet, then you can purchase one here.
We already have an article covering everything you need to know about the Pico W. Furthermore, if you’re a beginner with the Pico W, you can check out this article.
But here, we’re covering everything you need to know about Bluetooth on the Raspberry Pi Pico W.
Table of Contents
Pico W Background
Let’s first get into some of the specs of the Pico W.
The Pico W has wireless capabilities thanks to the CYW43439 wireless chip.
At the heart of each Pico W is the RP2040, which is Raspberry Pi’s first silicon chip.
The Infineon CYW43439 supports IEEE 802.11 b/g/n WLAN (Wi-Fi) and Bluetooth 5.2. At launch, only Wi-Fi was supported by the firmware and software.
The CYW43439 supports BLE and a single antenna shared between Wi-Fi and Bluetooth.
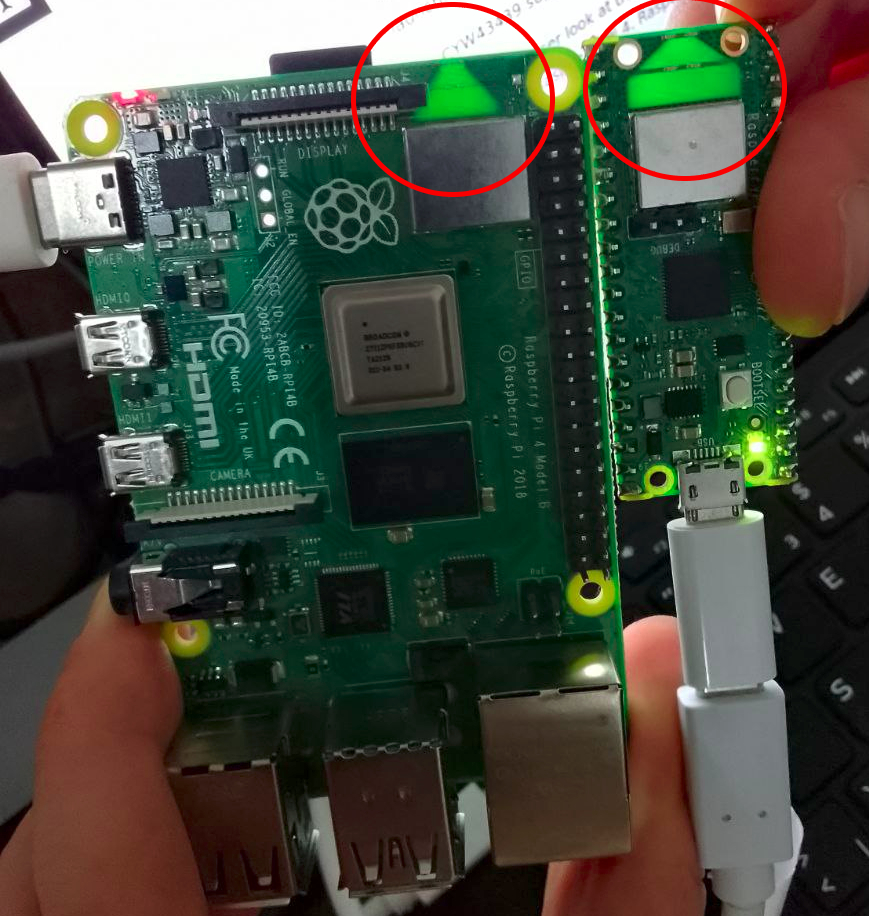
If you take a closer look at the Pico W, you will notice the triangle shaped PCB antenna similar to the Raspberry Pi 4. Raspberry Pi uses an onboard antenna licensed from ABRACON.
That means that no additional antenna is needed. The wireless interface is connected via SPI to the RP2040.
The official datasheet also suggests that for best wireless performance, you should not put any metal under or close to the antenna. However, adding grounded metal to the sides of the antenna can improve the antenna’s bandwidth.
The onboard LED is controlled via the WL_GPIO0 Pin of the Infineon 43439 chip. On the Pico, the LED was connected to GPIO Pin 25.
Furthermore, the SWD debug pins were moved towards the center of the board, to create space for the PCB antenna. You can find them between the RP2040 and the CYW43439 and the order from left to right is still SWCLK, GND, SWDIO.
With the Pico W, you can program in C/C++ and MicroPython.
Bluetooth Classic & BLE
The Pico W works with both Bluetooth Classic and Bluetooth Low Energy. Bluetooth Classic and Bluetooth Low Energy (BLE) are two different ways for devices to communicate within the Bluetooth specification.
Bluetooth Classic, also known as Bluetooth Basic Rate/Enhanced Data Rate (BR/EDR), is the original version of Bluetooth. It was designed for high-speed data transmission, audio streaming, and device pairing. Bluetooth Classic is commonly used for applications like wireless audio speakers, keyboards, mice, and file transfer between devices.
Bluetooth Low Energy (BLE), also known as Bluetooth Smart, is a power-efficient variant of Bluetooth. BLE was introduced as part of the Bluetooth 4.0 specification and is optimized for low-power devices that require long battery life, such as fitness trackers, smartwatches, home automation devices, and wireless sensors.
The Pico W can function as both a central device and a peripheral device.
Getting started with Bluetooth on the Pico W
Let’s get started with a quick project to ensure that you’ve got Bluetooth working properly.
We’ll run a classic program to get the on-board LED on the Pico W to turn on, but with Bluetooth.
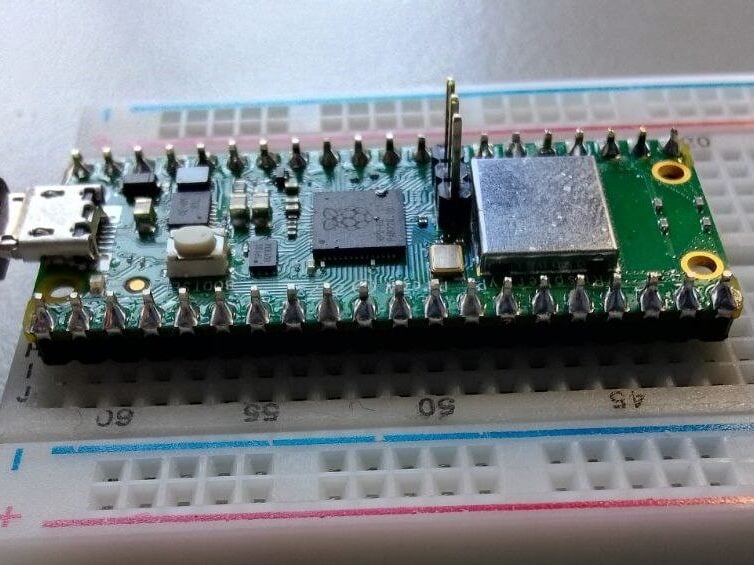
For this, you’ll need a Pico W, a micro-USB cable, and a breadboard.
STEP ONE
The first thing you’ll need is to download Thonny IDE, if you don’t have it already.
Thonny is a super easy way to program MicroPython onto the Pico W.
You also need to download this UF2 file, which has both Wi-Fi and BLE support. Once you’ve got it downloaded, hold down the BOOTSEL button on the Pico W and connect your it to your computer via USB. Let go of the BOOTSEL button after about 3 seconds.
A remote drive will appear called “RPI-RP2”. Move the UF2 file to this drive.
Then the drive will disappear.
STEP TWO
You can now disconnect and reconnect your Pico W (this time, don’t hold down the BOOTSEL button).
Open up Thonny.
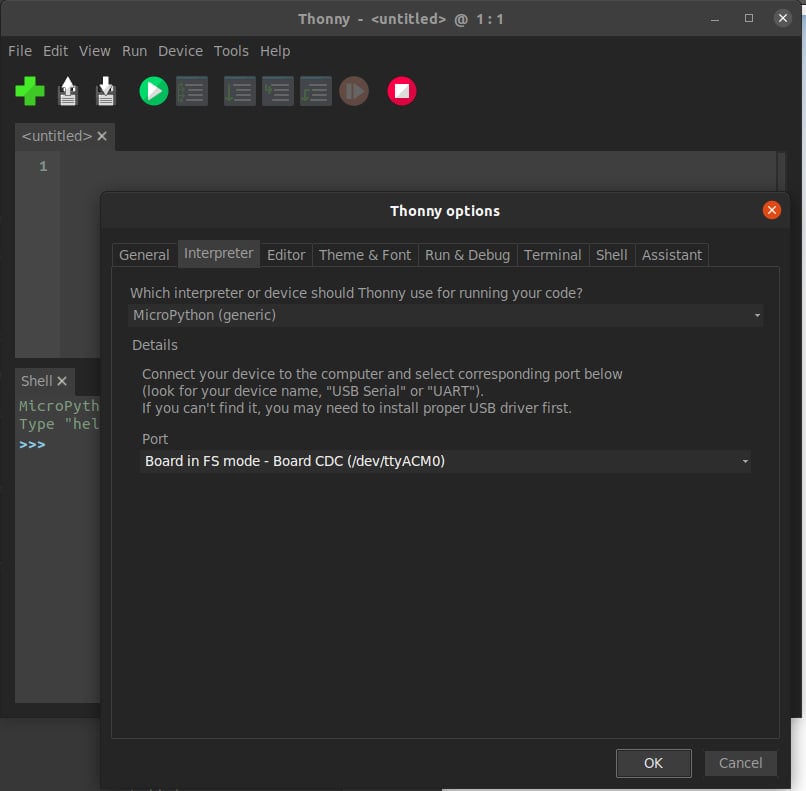
After you’ve got Thonny open, go to Tools > Options > Interpreter and then make sure that the interpreter is set to Micropython and that the Port is your Pico W. Here’s an example:
Your Pico W might appear under a different name.
Once you’ve done that, click OK and you’re ready to go.
Now, copy the following code and paste it into <untitled> section:
from micropython import const
import struct
import bluetooth

_ADV_TYPE_FLAGS = const(0x01)
_ADV_TYPE_NAME = const(0x09)
_ADV_TYPE_UUID16_COMPLETE = const(0x3)
_ADV_TYPE_UUID32_COMPLETE = const(0x5)
_ADV_TYPE_UUID128_COMPLETE = const(0x7)
_ADV_TYPE_UUID16_MORE = const(0x2)
_ADV_TYPE_UUID32_MORE = const(0x4)
_ADV_TYPE_UUID128_MORE = const(0x6)
_ADV_TYPE_APPEARANCE = const(0x19)

def advertising_payload(limited_disc=False, br_edr=False, name=None, services=None, appearance=0):
    payload = bytearray()

    def _append(adv_type, value):
        nonlocal payload
        payload += struct.pack("BB", len(value) + 1, adv_type) + value

    _append(
        _ADV_TYPE_FLAGS,
        struct.pack("B", (0x01 if limited_disc else 0x02) + (0x18 if br_edr else 0x04)),
    )

    if name:
        _append(_ADV_TYPE_NAME, name)

    if services:
        for uuid in services:
            b = bytes(uuid)
            if len(b) == 2:
                _append(_ADV_TYPE_UUID16_COMPLETE, b)
            elif len(b) == 4:
                _append(_ADV_TYPE_UUID32_COMPLETE, b)
            elif len(b) == 16:
                _append(_ADV_TYPE_UUID128_COMPLETE, b)

    if appearance:
        _append(_ADV_TYPE_APPEARANCE, struct.pack("<h", appearance))

    return payload


def decode_field(payload, adv_type):
    i = 0
    result = []
    while i + 1 < len(payload):
        if payload[i + 1] == adv_type:
            result.append(payload[i + 2 : i + payload[i] + 1])
        i += 1 + payload[i]
    return result


def decode_name(payload):
    n = decode_field(payload, _ADV_TYPE_NAME)
    return str(n[0], "utf-8") if n else ""


def decode_services(payload):
    services = []
    for u in decode_field(payload, _ADV_TYPE_UUID16_COMPLETE):
        services.append(bluetooth.UUID(struct.unpack("<h", u)[0]))
    for u in decode_field(payload, _ADV_TYPE_UUID32_COMPLETE):
        services.append(bluetooth.UUID(struct.unpack("<d", u)[0]))
    for u in decode_field(payload, _ADV_TYPE_UUID128_COMPLETE):
        services.append(bluetooth.UUID(u))
    return services


def demo():
    payload = advertising_payload(
        name="micropython",
        services=[bluetooth.UUID(0x181A), bluetooth.UUID("6E400001-B5A3-F393-E0A9-E50E24DCCA9E")],
    )
    print(payload)
    print(decode_name(payload))
    print(decode_services(payload))


if __name__ == "__main__":
    demo()
Save that file onto the Raspberry Pi Pico W as “ble_advertising.py”. This file is designed make it possible for the Pico W to read and be read by other devices.
Next, open up a new file in Thonny and paste the following code into it:
# PiCockpit.com

import bluetooth
import random
import struct
import time
from machine import Pin
from ble_advertising import advertising_payload

from micropython import const

_IRQ_CENTRAL_CONNECT = const(1)
_IRQ_CENTRAL_DISCONNECT = const(2)
_IRQ_GATTS_WRITE = const(3)

_FLAG_READ = const(0x0002)
_FLAG_WRITE_NO_RESPONSE = const(0x0004)
_FLAG_WRITE = const(0x0008)
_FLAG_NOTIFY = const(0x0010)

_UART_UUID = bluetooth.UUID("6E400001-B5A3-F393-E0A9-E50E24DCCA9E")
_UART_TX = (
    bluetooth.UUID("6E400003-B5A3-F393-E0A9-E50E24DCCA9E"),
    _FLAG_READ | _FLAG_NOTIFY,
)
_UART_RX = (
    bluetooth.UUID("6E400002-B5A3-F393-E0A9-E50E24DCCA9E"),
    _FLAG_WRITE | _FLAG_WRITE_NO_RESPONSE,
)
_UART_SERVICE = (
    _UART_UUID,
    (_UART_TX, _UART_RX),
)


class BLESimplePeripheral:
    def __init__(self, ble, name="mpy-uart"):
        self._ble = ble
        self._ble.active(True)
        self._ble.irq(self._irq)
        ((self._handle_tx, self._handle_rx),) = self._ble.gatts_register_services((_UART_SERVICE,))
        self._connections = set()
        self._write_callback = None
        self._payload = advertising_payload(name=name, services=[_UART_UUID])
        self._advertise()

    def _irq(self, event, data):
        if event == _IRQ_CENTRAL_CONNECT:
            conn_handle, _, _ = data
            print("New connection", conn_handle)
            self._connections.add(conn_handle)
        elif event == _IRQ_CENTRAL_DISCONNECT:
            conn_handle, _, _ = data
            print("Disconnected", conn_handle)
            self._connections.remove(conn_handle)
            self._advertise()
        elif event == _IRQ_GATTS_WRITE:
            conn_handle, value_handle = data
            value = self._ble.gatts_read(value_handle)
            if value_handle == self._handle_rx and self._write_callback:
                self._write_callback(value)

    def send(self, data):
        for conn_handle in self._connections:
            self._ble.gatts_notify(conn_handle, self._handle_tx, data)

    def is_connected(self):
        return len(self._connections) > 0

    def _advertise(self, interval_us=500000):
        print("Starting advertising")
        self._ble.gap_advertise(interval_us, adv_data=self._payload)

    def on_write(self, callback):
        self._write_callback = callback


def demo():
    led_onboard = Pin("LED", Pin.OUT)
    ble = bluetooth.BLE()
    p = BLESimplePeripheral(ble)

    def on_rx(v):
        print("RX", v)

    p.on_write(on_rx)

    i = 0
    while True:
        if p.is_connected():
            led_onboard.on()
            for _ in range(3):
                data = str(i) + "_"
                print("TX", data)
                p.send(data)
                i += 1
        time.sleep_ms(100)


if __name__ == "__main__":
    demo()
Now, just as before, save the file onto the Pico W and this time, you can call it “led_peripheral.py”. While the advertising file enables the Pico W to communicate with other devices, the peripheral file enables it to function as a peripheral device. In this case, that function will be turning the LED on.
Now hit “Run current script” in the Thonny toolbar.
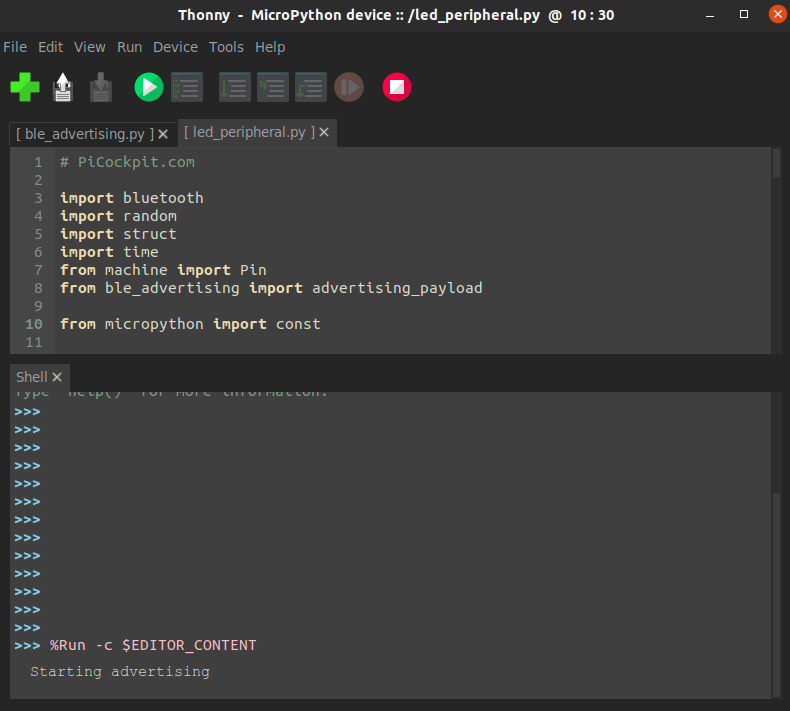
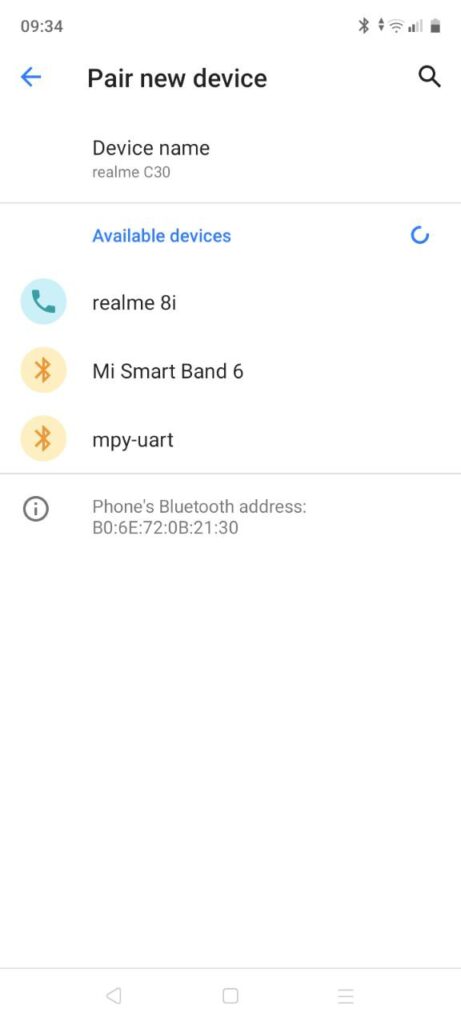
As you can see in the picture, the console will output “Starting advertising”. At this point, you can connect with a Bluetooth device such as your phone. Find and pair with “mpy-uart”.
Once you pair the two, the Pico W’s LED will turn on and the Thonny console will begin to count how long the two are counted:
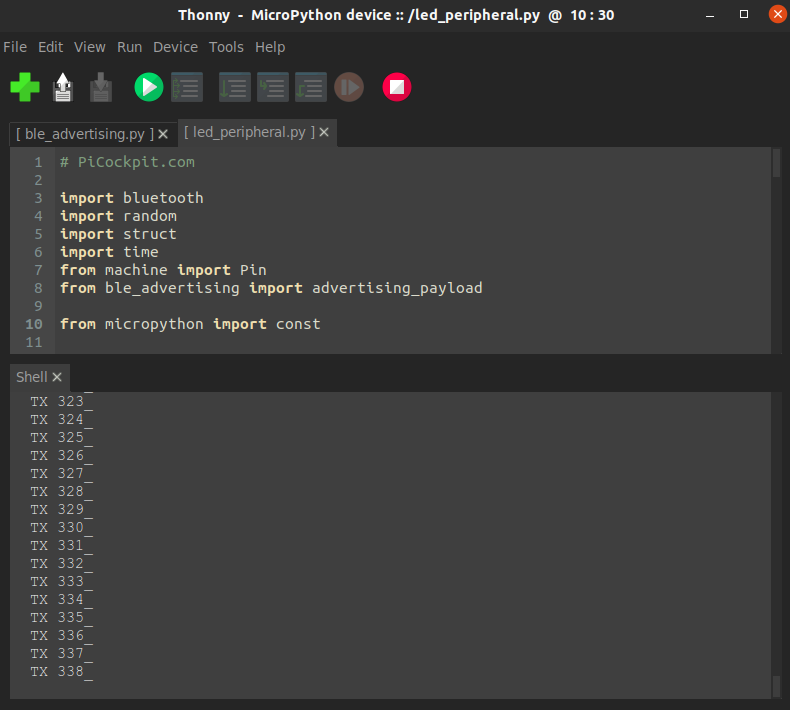
Congratulations! You’ve now confirmed that your Pico W’s Bluetooth is working and you can now begin to focus on your next project!
Pico W Bluetooth Projects
When beginning your next Pico W project, you can turn to some of the projects that others have done. Since the Pico W just received official Bluetooth support, new projects are just beginning to pop up.
Here is a (growing) list of some of the projects that have appeared so far:
- Pico W Bluetooth Remote Control
- Pico W Bluetooth Robot
- Pico W Bluetooth Mouse
- Pico W Bluetooth Lights
- Pico W USB to Bluetooth Audio Adapter
- Pico W Bluetooth PicoDRO (digital readout)
FAQ
Can I use Bluetooth Classic with the Pico W?
Absolutely, the Pico W supports Bluetooth Classic and BLE!
Can I connect multiple devices to the Pico W simultaneously?
Yes, the Pico W can act as a central device and connect to multiple Bluetooth peripherals simultaneously. You can also use Bluetooth Classic and BLE simultaneously. So you can create ultra-complex systems where the Pico W communicates with a bunch of sensors or controls multiple devices at once.
What is the Bluetooth range on the Pico W?
Typically up to 30 meters (98 feet) in open space. However, the range may vary depending on environmental factors such as obstacles, interference, and signal strength.
Can I use the Pico W as a Bluetooth peripheral device?
The Pico W can function as a central or a peripheral device. So it allows other Bluetooth central devices (such as smartphones, tablets, or computers) to connect to it. All of this works beautifully with PiCockpit, by the way!
How do I program Bluetooth functionality on the Pico W?
You can program Bluetooth functionality on the Pico W using the Raspberry Pi Pico SDK version 1.5.1. The SDK provides libraries and examples specifically for Bluetooth development. It allows you to implement Bluetooth services, characteristics, and handle communication protocols.
What are the power requirements for Bluetooth on the Pico W?
Bluetooth is designed to be power-efficient. So the Pico W consumes minimal power during idle periods and you can optimize your code further by using techniques like sleep modes and low-power states. The specific power requirements depend on the application and usage scenario, obviously.
Hola puedo adaptar la pico w a scoppy osciloscopy.agrdeceria su respuesta y como lo haria
Después de unos segundos el dispositivo indica un error y se desconecta al querer vincularlo
¿En qué momento?
Como comentaba, al momento de darle en el móvil a “vincular” en solicitud de enlace por medio de bluetooth observo que sí, RPI pico W envía una serie de números propios del programa en la tarjeta “TX 1_, TX 2_ …” , sin embargo después de varios segundos el celular o tablet (lo intenté con 3 dispositivos) me indica que hubo un error al intentar vincular y se desconecta el bluetooth del móvil aparece el mensaje “Disconected 64”, y bajo esa línea nuevamente aparece “Starting advertising” y tengo que darle en conectar de nuevo.
Me pasa lo mismo
Can you have a wifi connection open at the same time as a bluetooth connection on pi pico W? If not can you switch between them in real time?
Me pasa lo mismo…. ya lo intenté de varios dispositivos y aplicaciones. No funcionó.
How to setup the kitronik mini Pico controller to pair with, and control the kitronik Pico robotic board ?
Hi. I followed your instructions but can’t find the mpy-uart on my iPhone under Bluetooth.
I have a Pico W connected via USB to my computer.
I flashed your UF2
I copied your code and saved the files as named on the pico W through Thonny
I’m running Thonny and the bottom right corner is the factory named MicroPython (Raspberry Pi Pico) {dot. like there is hovering dot} Board CDC @ COM3
I run led_peripheral.py
The Shell outputs “Starting advertising”
Can’t see it on the iPhone
Any thoughts?
Thanks for contributing to the cause.
Hey, facing the same issue here. Were you able to figure this one out?
Hi can not pair via iPhone but download microblue app from snappyxo.io and you can connect to pico.
Rather than BT link with a phone, I have an Arduino GPS module which transmits its coordinates over Bluetooth, is there a way to pair with and read that signal with a Pico W?