Everything about Sound Output Using the Pico W

The Raspberry Pi Pico W is a powerful microcontroller board built around the Raspberry Pi’s very own microcontroller chip, the RP2040. You can check out a selection of RP2040-based microcontroller boards here or keep reading to find out everything you need to know about sound output using the Pico W.
Have you ever considered making a music player, creating an audio spectrum analyzer, or building a beatbox, but ran into problems playing audio using your microcontroller? Well look no further, this is the article for you!
Here, I will introduce you to the universe of Pulse-Width Modulation (PWM), communication protocols for the Pico W, and how take advantage of the Pico W’s wireless connectivity.
Pulse-Width Modulation
One way to play sound on the Pico W (or any other microcontroller for that matter) is through Pulse-Width Modulation, or PWM, for short.
PWM is a technique used to control analog devices using a digital signal. Although a microcontroller’s digital output can only ever be on or off (0 or 1), with PWM, we can mimic an analog signal. (It is worth mentioning that PWM is not a true analog signal.) PWM achieves this by rapidly switching the power state between on and off and thereby controlling the current.
You can learn more about PWM here!
And check out our video:
Because PWM is super efficient, loses very little power, and extremely precise, this is the technique used in many applications to create different audio effects.
Every pin on the Pico W is capable of PWM. It’s just a matter of coding!
Let me go over an example so that you can see PWM in action.
Project
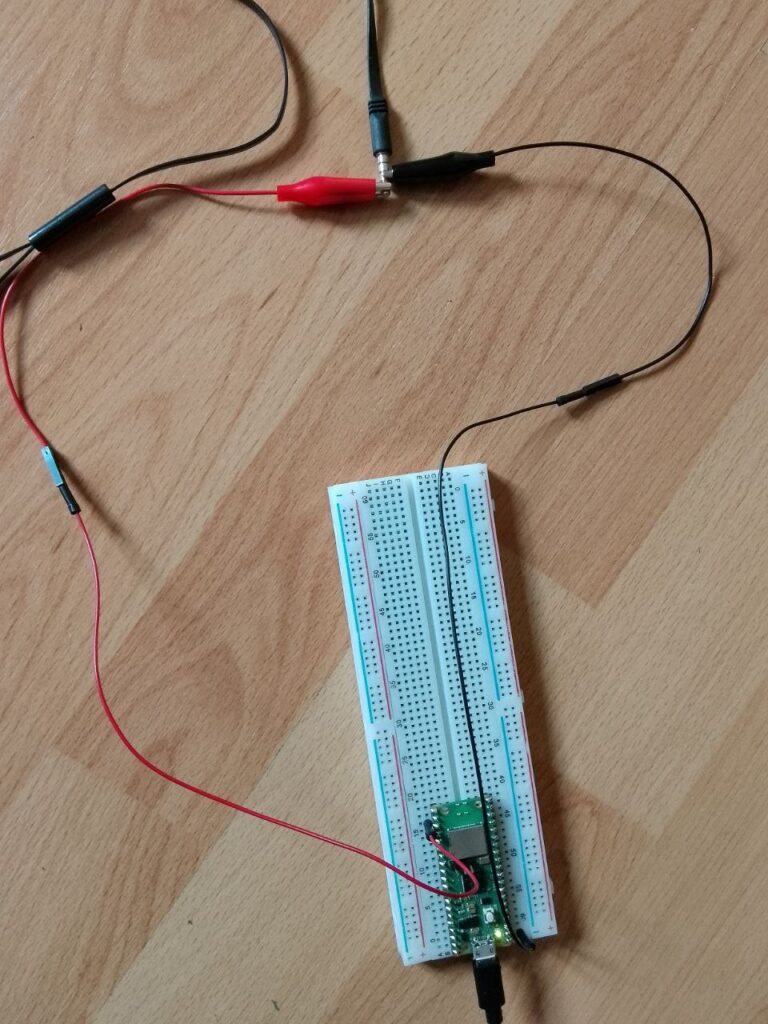
To demonstrate generating audio with PWM from the Pico W, I used 2 alligator cables with male endings, a breadboard, and headphones.
Alternatively, if you want to avoid soldering, you can try clipping the other end of the alligator cables directly on your headphones or stereo plug (I strongly recommend not using headphones, just to protect your eardrums!).
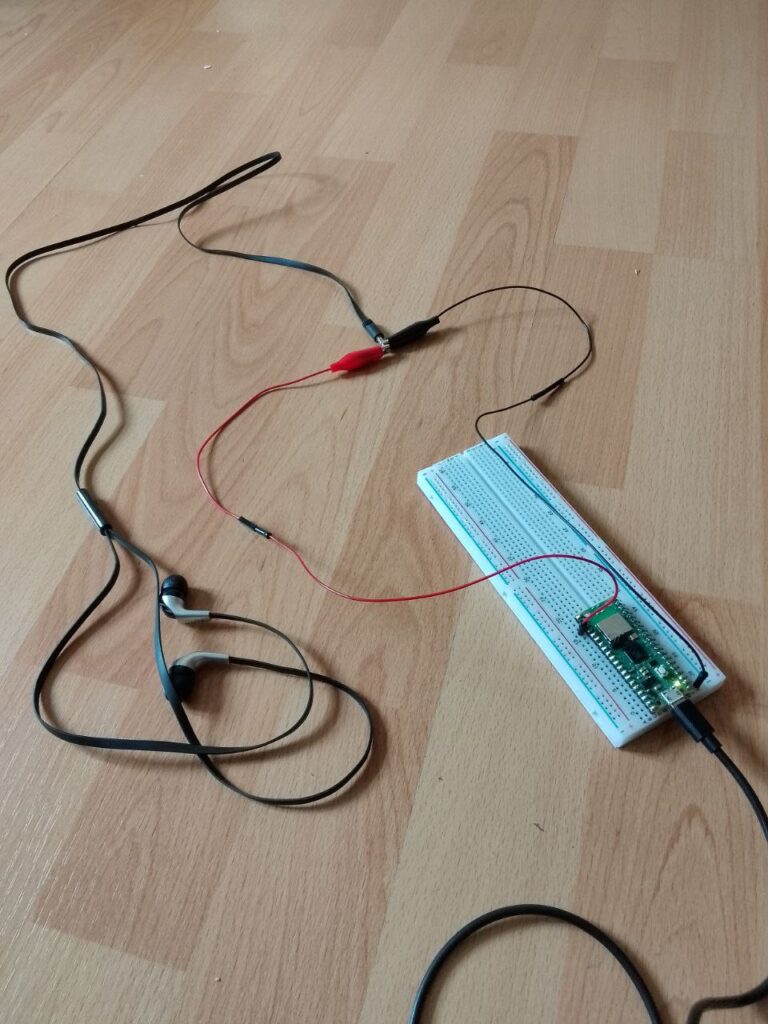
I plugged the red alligator cable into the 23rd pin, which is a ground pin (any ground pin will do). And PWM can be generated through any of the GP pins. As you can see in the photo above, I’m using GP0.
Any modern headphone set or stereo jack has three or four sections – with the outer two being left audio and right audio. I therefore clipped the red alligator cable to the left and the black alligator cable to the right.
If you follow this set up, be careful to ensure that your alligator cables don’t touch.
Once you are done with the physical setup, the next step is to download audio files.
If you’re using .wav files, make sure they match the following specifications:
1. channel: mono (not stereo)
2. bit rate: 22 kHz or lower
3. sampling: 16 bit
Here is a code example to generate audio with .wav using CircuitPython:
# PiCockpit.com
# audio output via digital PWM

import board
# loads a wav file for audio playback
from audiocore import WaveFile
# the audiopwmio module contains classes to provide access to audio ID
from audiopwmio import PWMAudioOut

# outputs an analog audio signal by varying the PWM duty cycle under the hood
audio_out = PWMAudioOut(board.GP0)

def play_wave(filename):
    with open(filename, "rb") as wave_file:
        sample = WaveFile(wave_file)
        audio_out.play(sample, loop=True)
# outputs an analog audio signal by varying the PWM duty cycle under the hood
audio_out = PWMAudioOut(board.GP0)

def play_wave(filename):
    with open(filename, "rb") as wave_file:
        sample = WaveFile(wave_file)
        audio_out.play(sample, loop=True)

        while audio_out.playing:
            pass

# audio will loop until program interruption
play_wave("meditation-music.wav")
If you’re using .mp3 files, which need to meet the same specifications as the .wav file, you could refer to this code example:
# PiCockpit.com
# audio output via digital PWM

import board
# loads an mp3 file for audio playback
from audiomp3 import MP3Decoder
# the audiopwmio module contains classes to provide access to audio IO
from audiopwmio import PWMAudioOut

# outputs an analog audio signal by varying the PWM duty cycle under the hood
audio_out = PWMAudioOut(board.GP0)

mp3 = MP3Decoder("meditation-music.mp3")

audio_out.play(mp3)
while audio_out.playing:
    pass
One additional thing to pay attention to with .mp3 files is the constant bit rate. If the audio sounds distorted, try lowering the sample rate and the bit rate further. The highest bit rate I could get was 192 kbps.
If you’re using MicroPython rather than CircuitPython, you can turn to the following code example, which generates 3 distinct tones with PWM by setting the duty cycle and varying the frequency.
# PiCockpit.com

from machine import Pin, PWM
from utime import sleep

# lower right corner with USB connector on top
SPEAKER_PIN = 16

# create a PWM object on this pin
speaker = PWM(Pin(SPEAKER_PIN))

# the time each tone will be on
ON_TIME = .25
# the time between tones
OFF_TIME = .1

# low tone
speaker.duty_u16(1000)
speaker.freq(300)
sleep(ON_TIME)
speaker.duty_u16(0)
sleep(OFF_TIME)

# high tone
speaker.duty_u16(1000)
speaker.freq(800)
sleep(ON_TIME)
speaker.duty_u16(0)
sleep(OFF_TIME)

# medium tone
speaker.duty_u16(1000)
speaker.freq(400)
sleep(ON_TIME)

# turn off the PWM
speaker.duty_u16(0)
Communication Protocols
In order for the Pico W and external parts to communicate with one another, there are a number of different protocols available. If you have ever worked with the machine library in MicroPython, you know that the standard communication protocol for the GPIO pins on the Pico W is the GPIOZero library, which provides a simple interface for controlling and monitoring the GPIO pins. Additionally, the Pico W also supports other communication protocols.
Here, I want to talk a bit about UART, SPI, I2C, and I2S, as they all offer certain advantages and disadvantages in working with audio on the Pico W.
First, the Universal Asynchronous Receiver/Transmitter protocol, or UART, is theoretically simple to implement, requires only 2 wires, and is highly reliable. However, UART has limited range, limited bandwidth, and can only support communication with one other device.
Furthermore, throughout my research, I found that UART is not suitable playing sound on the Pico W. If you’ve used UART on the Pico W for audio output, please let me know in the comments!
SPI
Whereas UART does not get the job done, the Serial Peripheral Interface, or SPI, offers high data transfer rates and is extremely reliable. Its biggest disadvantages revolve around the fact that SPI only allows for one controller and uses 4 wires. I was able to get it working using the following code:
# PiCockpit.com
# registers addresses for the PCM5102A module
REG_POWER_CONTROL = 0x02
REG_MODE_CONTROL = 0x03
REG_DAC_CONTROL = 0x0A
REG_DAC_VOLUME = 0x0B

# powers on the PCM5102A module
cs_pin.value(0)
spi.write(bytes([REG_POWER_CONTROL, 0x08]))
cs_pin.value(1)

# sets the mode to I2S
cs_pin.value(0)
spi.write(bytes([REG_MODE_CONTROL, 0x04]))
cs_pin.value(1)

# sets the DAC control bits
cs_pin.value(0)
spi.write(bytes([REG_DAC_CONTROL, 0x00]))
cs_spin.value(1)

# sets the DAC volume
cs_pin.value(0)
spi.write(bytes([REG_DAC_VOLUME, 0x88]))
cs_pin.value(1)

# generates a sine save for testing
sample_rate = 44100
frequency = 440
duration = 5
samples = int(sample_rate * duration)
amplitude = 0x7FFF
sine_wave = bytearray(samplex * 2)
for i in range(samples):
    value = int(amplitude * math.sin(2 * math.pi * frequency * i / sample_rate))
    sine_wave[i*2] = value & 0xFF
    sine_wave[i*2+1] = (value >> 8) & 0xFF

# writes the sine wave to the PCM5102A module
cs_pin.value(0)
spi.write(sine_wave)
cs_pin.value(1)

# Waits for the sound to finish playing
utime.sleep(duration)

# Powers off the PCM5102A module
cs_pin.value(0)
spi.write(bytes([REG_POWER_CONTROL, 0x00]))
cs_pin.value(1)
I2C
The third protocol I want to touch on is the Inter-Integrate Circuit, or I2C, which only needs 2 wires is simple to implement, and requires low power. Like UART, I2C has limited range and limited bandwidth, but unlike UART, I2C can communicate with multiple devices. Most importantly, however, I am able to get I2C working with the following code:
# PiCockpit.com

import machine
import utime

# I2C bus
i2c = machine.I2C(0, sda=machine.Pin(0), scl=machine.Pin(1), freq=400000)

# I2C address of the PCM5102A module
i2c_address = 0x4C

# register addresses for the PCM5102A module
REG_POWER_CONTROL = 0x02
REG_MODE_CONTROL = 0x03
REG_DAC_CONTROL = 0x0A
REG_DAC_VOLUME = 0x0B

# powers on the PCM5102A module
i2c.writeto_mem(i2c_address, REG_POWER_CONTROL, b'\x08')

# sets the mode to I2S
i2c.writeto_mem(i2c_address, REG_MODE_CONTROL, b'\x04')

# sets the DAC controls
i2c.writeto_mem(i2c_address, REG_DAC_CONTROL, b'\x00')

# sets the DAC volume
i2c.writeto_mem(i2c_address, REG_DAC_VOLUME, b'\x88')

# generates a sine wave to test
sample_rate = 44100
frequency = 440
duration = 5
samples = int(sample_rate * duration)
amplitude = 0x7FFF
sine_wave = bytearray(samples * 2)
for i in range(samples):
    value = int(amplitude * math.sin(2 * math.pi * frequency * i / sample_rate))
    sine_wave[i*2] = value & 0xFF
    sine_wave[i*2+1] = (value >> 8) & 0xFF

# writes the sine wave to the PCM5102A module
i2c.writeto(i2c_address, sine_wave)

# waits for the sound to finish playing
utime.sleep(duration)

# power of the PCM5102A module
i2c.writeto_mem(i2c_address, REG_POWER_CONTROL, b'\x00')
Based on the fact that I2C is less complex and supports multiple devices on a single bus, it is probably the better choice for simpler audio applications that require lower data transfers. However, SPI may be more suitable for higher quality audio playback, since it supports faster data transfer rates.
I2S
The fourth and final protocol I want to discuss is Inter-Integrated Sound, or I2S, which is a protocol that has been optimized for tranporting audio data. I2S is by far the ideal protocol for generating audio from the Pico W, because it provides high-fidelity audio, it transfers data quickly, it is extremely reliable, and it is easy to use. Furthermore, there is a wide selection of hardware components that support I2S, such as the Pimoroni Pico Audio Pack.
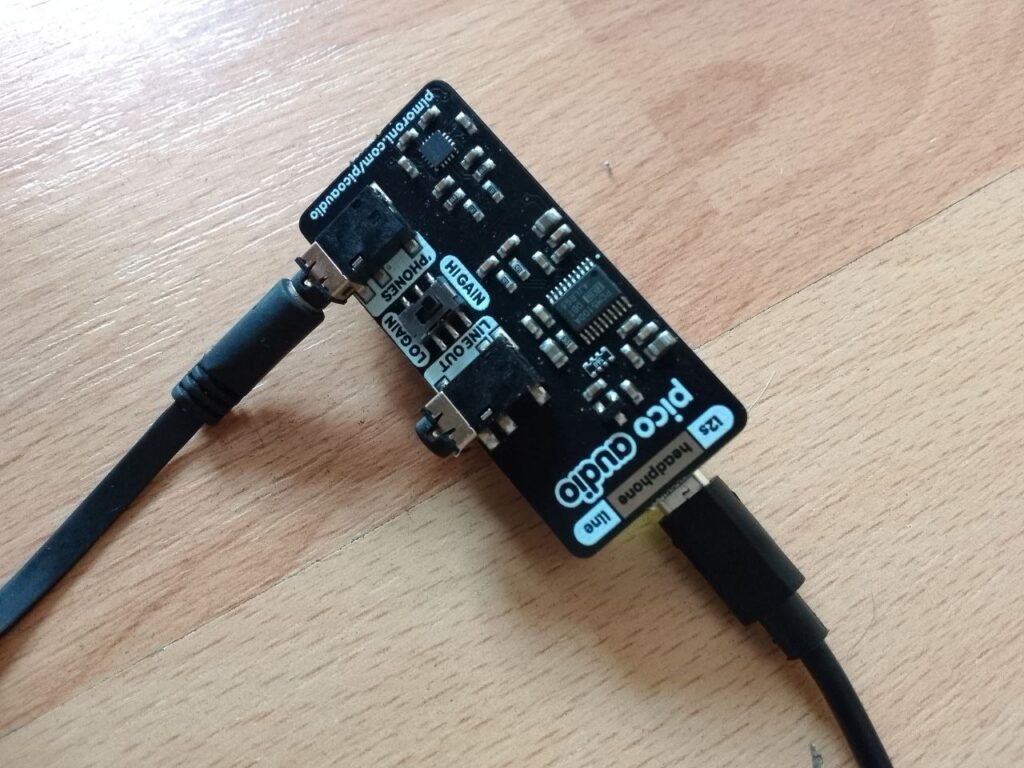
In order to hear what I2S sounds like, I have to switch from MicroPython to CircuitPython, as I2S in not yet supported in MicroPython. But you can gently push the Pico Audio Pack onto the Pico W’s headers, making sure the ‘USB’ side of the Audio Pack is facing the direction of the Pico W’s micro USB.
Connect your headphones, or another device you’d like, and that’s it!
One more thing: you might want to turn your volume down a little for this one (You will thank me later!)
And here’s the sample code:
# PiCockpit.com

import audiobusio
import audiocore
import board
import array
import time
import math

# sets up I2S, pointing at the correct pins
i2s = audiobusio.I2SOut(board.GP10, board.GP11, board.GP9)

# generates one period of sine wave
# calculates sine wave's length with floor division based on the sample rate and frequency
length = 8000 // 400

# creates an array of signed 16-bit integers based on the length
sine_wave =array.array("H", [0] * length)

for i in range(length):
# calculates sample value with the sin function
    sine_wave[i] = int(math.sin(math.pi * 2 * i / length) * (2 ** 14) + 2 ** 14)

# creates a raw audio sample buffer in memory using the audiocore library
sine_wave = audiocore.RawSample(sine_wave, sample_rate=8000)

i2s.play(sine_wave, loop=True)
time.sleep(1)
i2s.stop()
Wi-Fi
Since the Pico W is showcasing wireless capabilities, let me show you something that makes use of wireless connectivity.
This code grabs an .mp3 from a URL and then plays it from a file once the download is complete:
# PiCockpit.com

import adafruit_requests
import wifi
import socketpool
import ssl
import board
import audiomp3
import audiobusio
import os

# sets up I2S for sound output
audio = audiobusio.I2SOut(board.GP10, board.GP11, board.GP9)

# url for the mp3 file to download, 1 minute mp3
mp3_url = 'https://codeskulptor-demos.commondatastorage.googleapis.com/descent/background%20music.mp3'

# chunk size for downloading the mp3 file in parts
chunk_size = 1024

# connects to SSID
wifi.radio.connect(os.getenv('WIFI_SSID'), os.getenv('WIFI_PASSWORD'))

pool = socketpool.SocketPool(wifi.radio)
requests = adafruit_requests.Session(pool, ssl.create_default_context())

# requests the url and writes the mp3 to a file
try:
    doc = requests.get(mp3_url)
    # opens the file in binary write mode
    with open('sound.mp3', 'wb') as f:
    # writes the file in chunks
    for chunk in doc.iter_content(chunk_size=chunk_size):
        f.write(chunk)
except Exception as e:
    print("Connection error:\n", str(e))

# plays the mp3 file from flash memory
try:
    # creates an mp3 object
    mp3 = audiomp3.MP3Decoder(open("sound.mp3", "rb"))
    # optimizes the sample rate for your setup before playing
    mp3.sample_rate=24000
    # mp3.bits_per_sample=50
    audio.play(mp3)

    while audio.playing:
        pass

    print("Done playing!")
except Exception as e:
    print("Error in creating mp3 or playing audio:\n", str(e))
settings.toml:
# PiCockpit.com
# SSID is your network name
# replace myssid with your wi-fi name
WIFI_SSID = "myssid"

# replace mypassword with your wifi password
WIFI_PASSWORD - "mypassword"
Note that downloading the .mp3 might take longer than the actual length of the audio. For this to work, I also had to enable write permissions and increase the memory for the download by garbage collection in boot.py:
# PiCockpit.com

import gc
import storage

gc.collect(150000)
storage.remount("/", False)
Add external storage, whip out some buttons, and try to stream music from some online radio stations. Nothing can then stop you from enjoying your favorite music with the Raspberry Pi Pico W.
Conclusion
The Pico W holds a number of different options for producing sound, just be sure to take care regarding the limited space that the Pico W offers.
This post is based on an article originally written by Zita B.
I have been able to use the UART to send sound bites over USB. You can get almost 6Mbps with the Pico USB. https://github.com/earlephilhower/arduino-pico/discussions/1765
This is super helpful! You cover all the methods, rather than just a ‘favourite’. Just what I needed for teaching my class on Advanced Analog Electronics, where I use the PICO somewhere for most experiments. Basic tones in PWM all the way through to high quality I2S function! I hope others see my comment!
What about Bluetooth?