The Best Raspberry Pi Zero 2 Projects
Anything that you can do on the original Raspberry Pi Zero, you can do on the Raspberry Pi Zero 2.
It’s a one-to-one replacement on many projects because both the Raspberry Pi Zero 2 and the original Zero are the same form factor.
That said, certain fun projects are much more viable on the Raspberry Pi Zero 2 because of its increased computing power. So let’s look at those examples where the Pi Zero 2 stands out against the bigger Pis and the original Pi Zero.
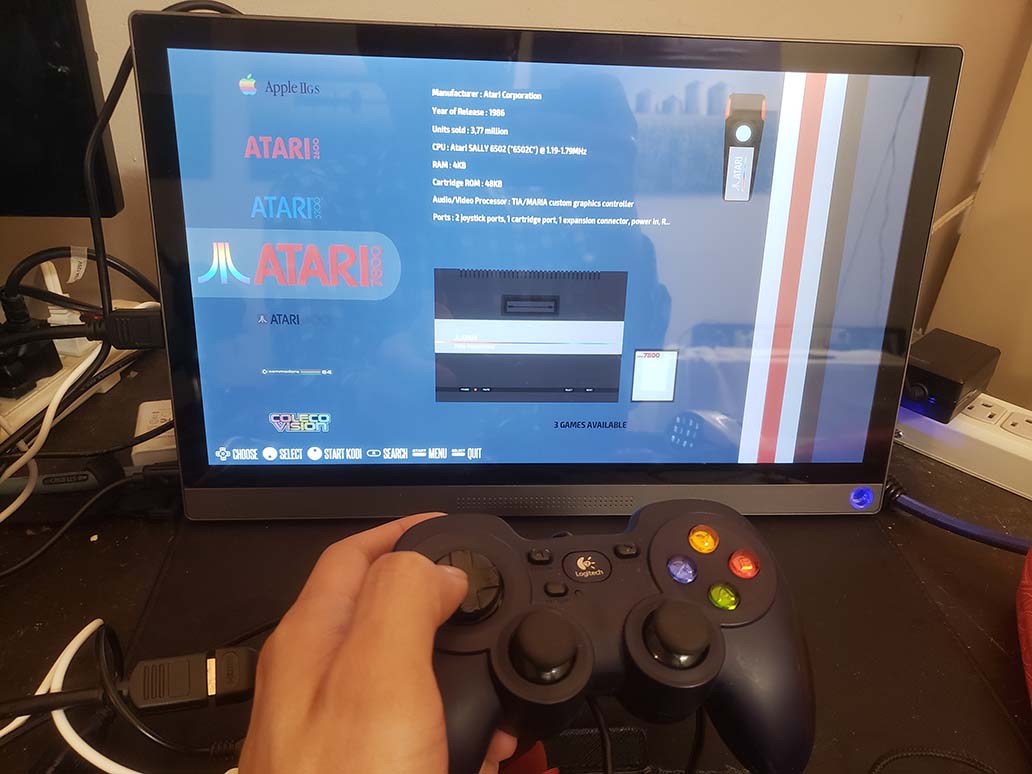
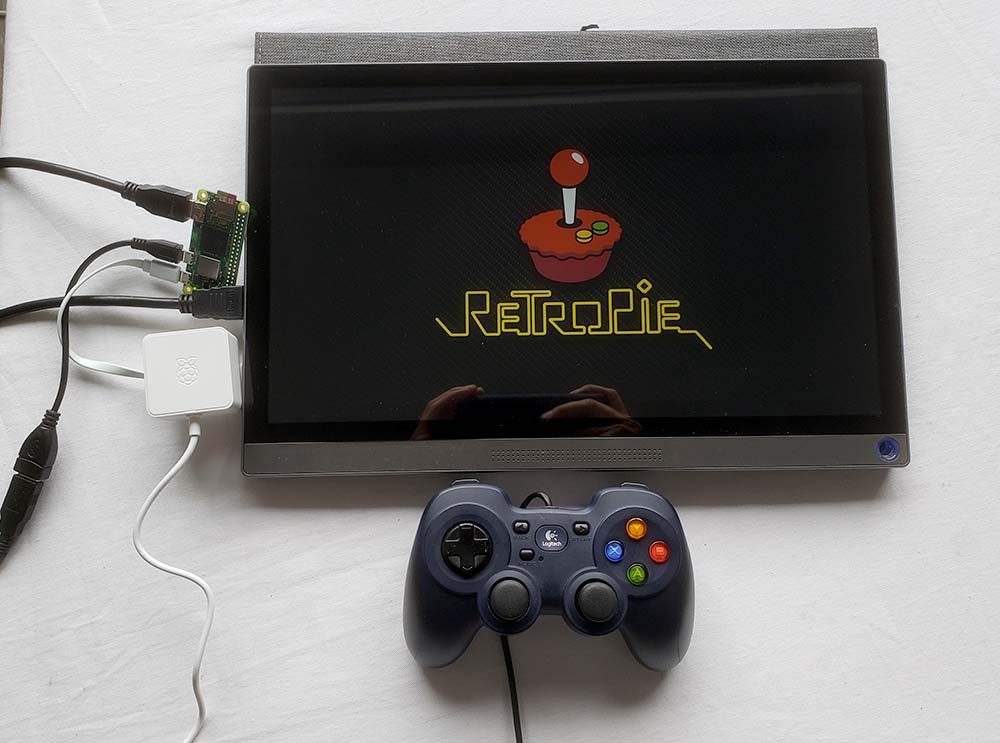
Retro game emulation
Using a Pi Zero 2 W will instantly give you a big performance boost to your emulators and so this is a prime example of a project that will specifically suit the Raspberry Pi Zero 2 W.
So, if you want to play games from the SNES, Gameboy and even PlayStation or Dreamcast, you will have much more success on the Pi Zero 2 W.
Notably, the Pi Zero 2 can be used with the Retroflag GPi Case as a 1:1 swap with the old Raspberry Pi Zero.
Software:
Retropie: as of December 2021, you need to use the weekly release for the Pi 2/3.
Recalbox: (works with the Zero 2 as of January 2022)
Hardware kits:
mintyPi (put a Pi Zero into an Altoids tin)
Bare minimum setup
To build a retro gaming system, you’ll need these components:
- Pi Zero 2 W
- Monitor
- Power supply
- microUSB to USB OTG
- Gamepad
- SD card
- miniHDMI cable to your display’s port
Everything you need is included in our Raspberry Pi Zero 2 W Retrogaming kit
Easy retro gaming with Recalbox
Recalbox is compatible with the Raspberry Pi Zero 2 so it’s the better option.
The best part is that installation is super easy.
Just download the Raspberry Pi Imager and under Operating System -> Emulation and game OS -> choose Recalbox – Raspberry Pi Zero 2.
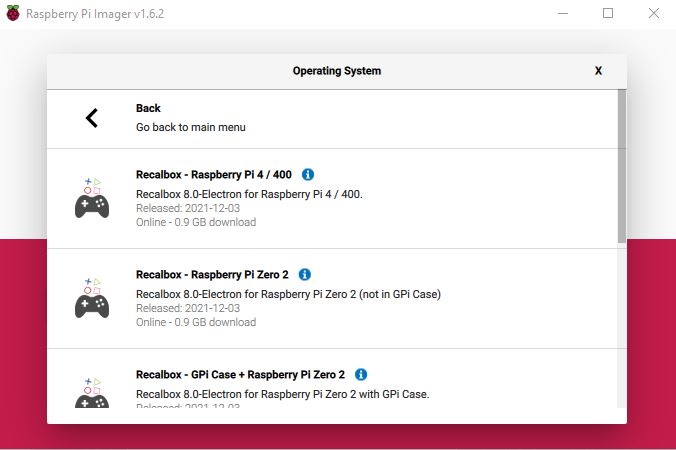
Make sure you have plugged in your microSD card into your computer, and choose it under the Storage option.
Put your SD card into your Pi Zero 2, plug in your gamepad and you’re done.
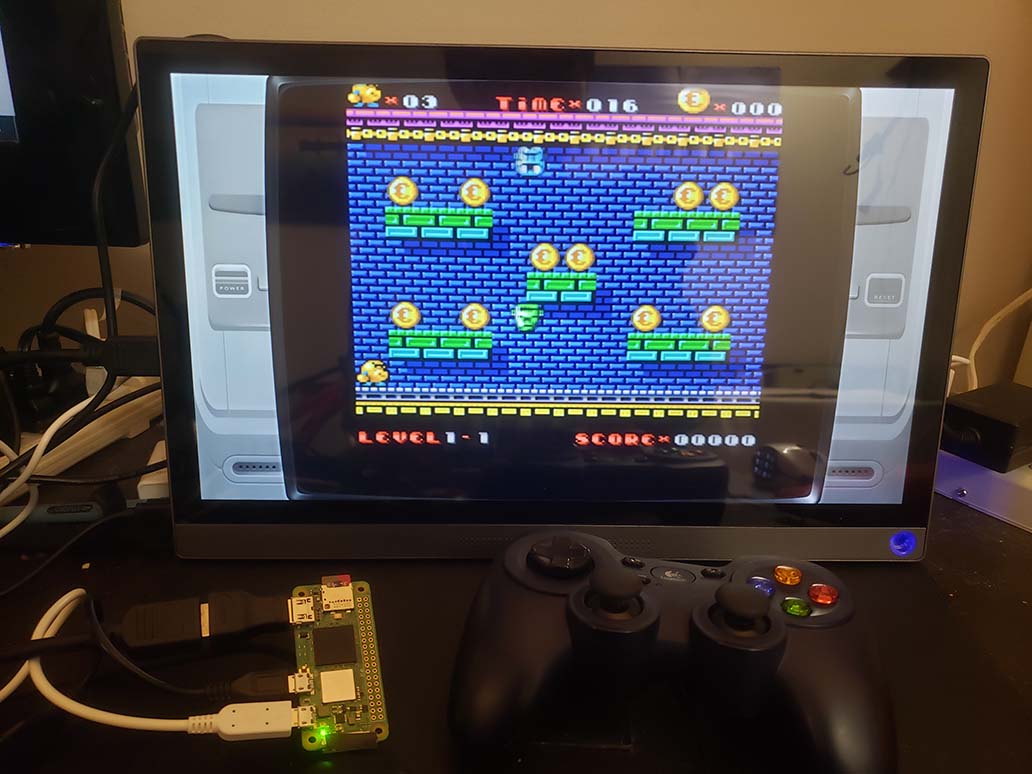
Does RetroPie work with the Zero 2?
I used the RetroPie Weekly build with file name retropie-buster-4.7.19-rpi1_zero.img.gz and it booted up on my Pi Zero 2 W. RetroPie does not officially support the Raspberry Pi Zero 2.
MagicMirror² on the Pi Zero 2
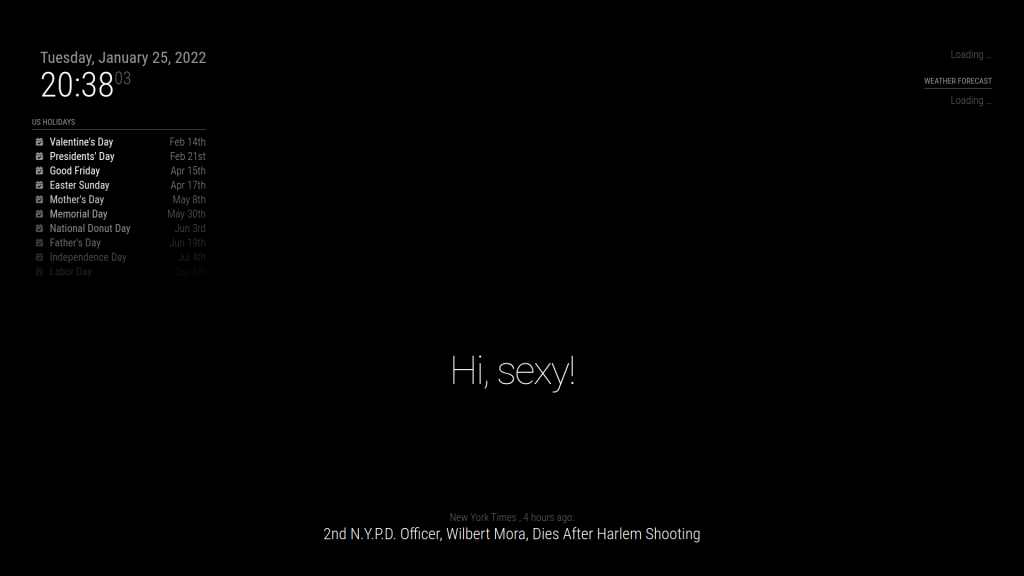
MagicMirror² is the open-source software that allows you to display information on a mirror.
You can display alerts, calendars, clocks, compliments, current weather, news, weather information and more via third-party modules.
The Pi Zero 2 W is particularly suited for this project because it’s small and uses little power, which means that it can run off your display’s USB port or even a battery. This is the advantage it has over running it with a power-hungry Pi 4 or other regular-sized boards.
The Pi Zero 2 W is also better suited than the original Pi Zero because the MagicMirror runs on Electron, which uses the Chromium rendering engine and the Node.js runtime. In other words, MagicMirror is a web app that runs in a browser with special privileges to your computer.
Chromium runs poorly on the Pi Zero 2, but a little trick has cut down my load times by a third. I wrote a how-to here and would recommend you do this.
Installing MagicMirror
The easiest way is to use a MagicMirror installation script that packages all the necessary components.
- Open a Terminal
- Run: bash -c “$(curl -sL https://raw.githubusercontent.com/sdetweil/MagicMirror_scripts/master/raspberry.sh)”
This script takes a while to install, but there will be two prompts:
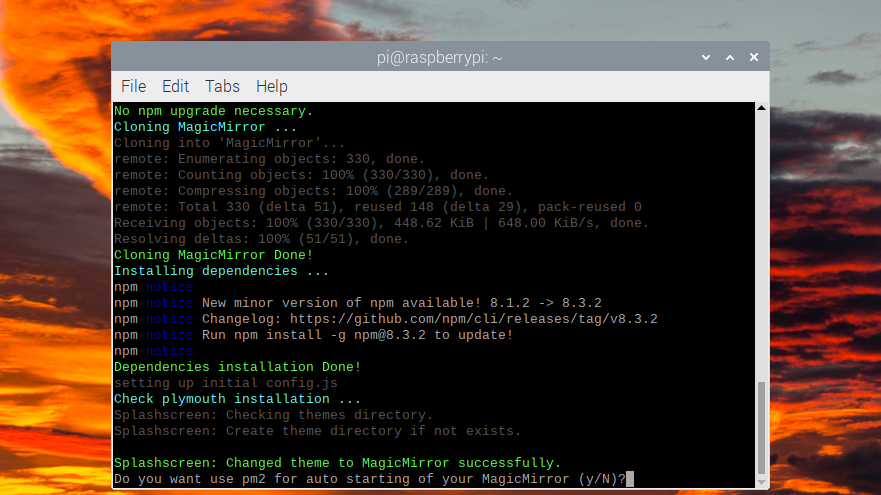
- Use pm2 for auto starting?
- If you say yes, then pm2 will run MagicMirror upon boot. If no, you will have to manually start MagicMirror every time you boot.
- Disable the screen saver?
The following instructions assumes you said yes to both.
Alternatively, if you have concerns about running a script, you can do it in six steps as spelled out in the official docs.
Configuring MagicMirror
The first time I ran MagicMirror, it did not display information that was relevant to me. It displayed American holidays and news from The New York Times.
Here’s how to change it.
- Exit MagicMirror (CTRL+Q)
- Stop MagicMirror from popping up again by running pm2 stop MagicMirror
- Go to /home/pi/MagicMirror/config
- Edit config.js
Within this file, you can edit the modules’ parameters.
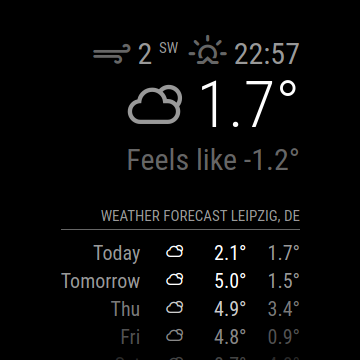
For example, to edit the weather, I modified the parameters within the key-value pair module: “weather” and,
- Type in your location (e.g. Leipzig, Germany or Amsterdam, Netherlands or Paris, France)
- Alternatively, use a locationID.
- Enter your API key (sign up for an openweathermap.org account then go here to get an API key.
- Save the file. Run MagicMirror. If it’s still stuck on “Loading”, restarting your Pi might help.
See the documentation for further instructions on all the other modules.
Once you are done, you can restart MagicMirror by rebooting (if you enabled auto restart) or you can open a Terminal and run pm2 start MagicMirror.
I rebooted… and found out that the auto restart feature doesn’t work.
MagicMirror doesn’t auto restart with pm2
This left me on a scramble to find a solution.
And luckily I found one.
For some reason, the script that comes bundled with the installer above doesn’t work. However, there’s a separate script on the script writer’s Github specifically to run pm2’s autostart function.
I ran this and MagicMirror started on boot:
bash -c “$(curl -sL https://raw.githubusercontent.com/sdetweil/MagicMirror_scripts/master/fixuppm2.sh)”
Drones
Although the following were based on the original Pi Zero, having more power available from the new Pi Zero 2 allows you more room for customization. For example, you could add a functionality to record videos or to play music.
ZeroBot: a land-roaming 3D-printed robot
If you are looking to build a FPV robot, consider building the ZeroBot.
The ZeroBot is based on the Raspberry Pi Zero W form factor, so the 3D printed components will fit on the newer Zero 2 W.
The robot uses cheap and easy to find components and can be controlled by any computer or smartphone via a web browser.
Parts needed
- Raspberry Pi Zero 2 W
- 2x ICR18650 lithium cell 2600mAh
- Raspberry camera module
- ZeroCam
- Mini DC dual motor controller
- DC gear motors
- ADS1115 ADC board
- TP4056 USB charger
- MT3608 boost converter
- Raspberry CPU heatsink
- Micro SD card (8GB or more)
- 2x LED
- BC337 transistor (or any other NPN)
- 11.5 x 6mm switch
- 4x M3x10 screws and nuts
Easiest way to setup Zerobot
The easiest way to setup the ZeroBot is by flashing an SD card with an image, but it doesn’t seem to be working, according to a commenter on the Hackaday project page.
What worked for commenter Gary Scott was to:
- Install Raspberry Pi OS Buster (not the latest Bullseye)
- Follow the instructions under the header “Headless Setup”
- On the next step, follow Gary’s instructions instead.
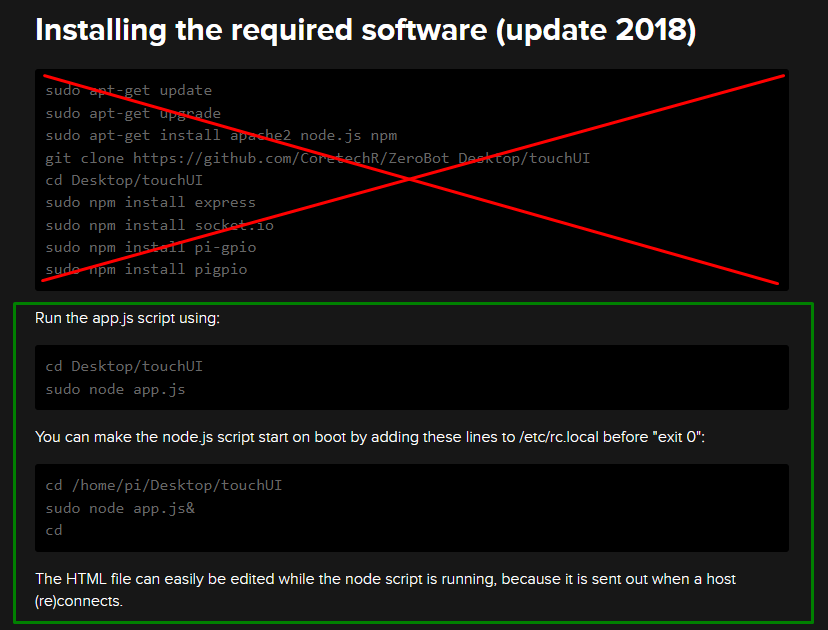
Run the following commands instead of what’s in the crossed-out area:
sudo apt-get update

sudo apt-get upgrade
sudo apt install apache2 -y
curl -sL https://deb.nodesource.com/setup_17.x | sudo -E bash -
sudo apt install -y nodejs
git clone https://github.com/CoretechR/ZeroBot Desktop/touchUI
cd Desktop/touchUI
sudo npm install express
sudo npm install socket.io
sudo npm install pi-gpio
sudo npm install pigpio
Gary also mentioned that he had to “remove the required module lines in the “app.js” file because I could not get the model for the ADS1115 to load on the Pi Zero W 2 for some reason.”
Then, follow the rest of the instructions, highlighted in the green area, and the remaining steps on the instructions page.
To wire up the hardware, follow these instructions.
I don’t have a 3D printer, where can I find one?
It might seem very out of place to go buy a 3D printer just for this project and I get it.
What I also found is that in larger cities, there are collaborative maker spaces which might have a 3D printer that you can pay-per-use.
These spaces go by many names but usually have a few keywords in their name including:
- Maker
- Hacker
- Hack
- Labs
- Space
Another place where you can find a 3D printer is in your local library.
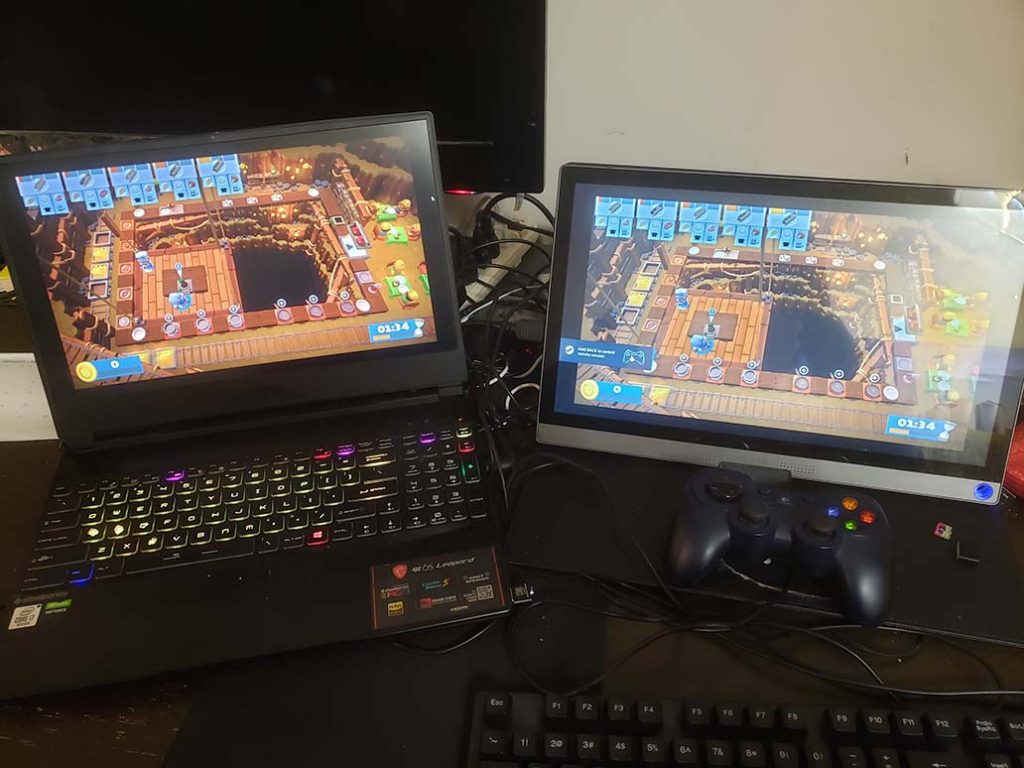
Steam Link on Raspberry Pi Zero 2 W
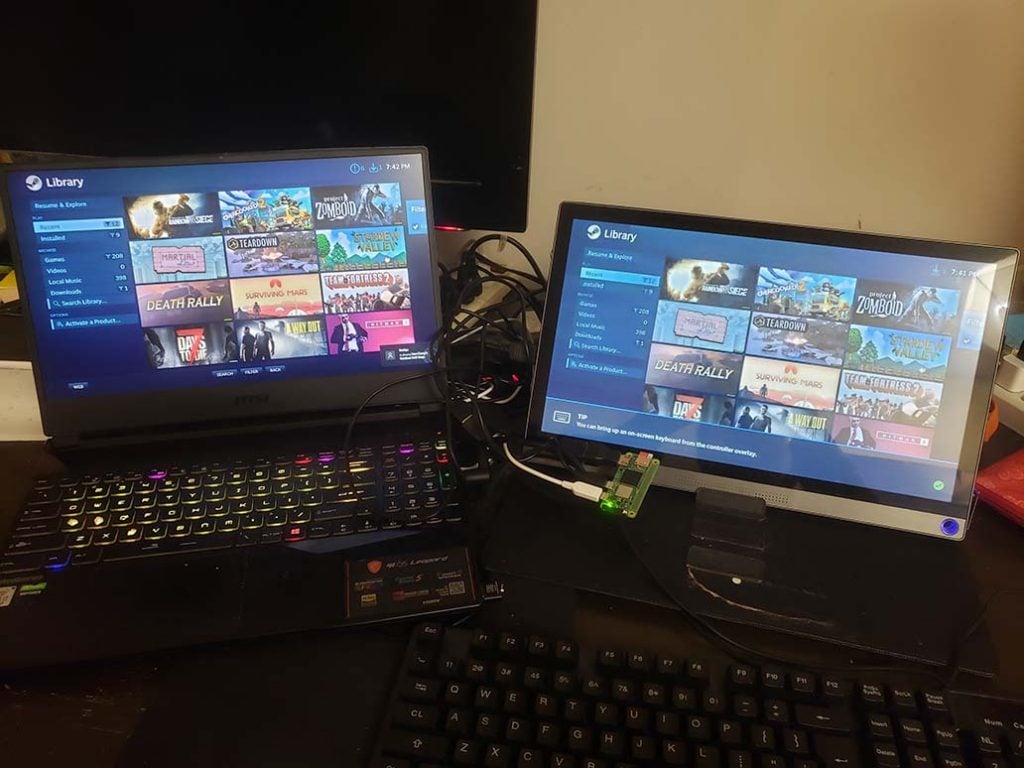
It works!
You can play PC games on your Raspberry Pi Zero 2 W via Steam Link.
Although Steam Link does not Raspberry Pi Zero 2 not officially supported, I managed to get it running.
And I was very impressed by the results. If playing on the PC would be full marks, then Steam Link would get 4/5 points on the Raspberry Pi Zero 2.
Pros & Cons of using Pi Zero 2 with Steam Link
Pros
The Raspberry Pi Zero 2 W is very small and easy to hide behind your TV or display, keeping things neat and clean.
You might also be able to power your Pi Zero 2 with the USB on your TV, reducing the need for another long cable to a power outlet. If you aren’t sure if your device’s USB can support the Raspberry Pi, PiCockpit’s PiDoctor module can help you diagnose it.
And the Pi Zero 2 W is cheap. It’s a 16€ computer versus Steam Link’s recommended minimum Pi 3B which is 38€.
Cons
The Pi Zero 2 is not officially supported by Steam Link and it does not come with an ethernet port.
Steam specifically recommends that you plug both the broadcasting PC and the Raspberry Pi into wired ethernet.
Parts needed
Here’s what you need:
- A PC with Steam
- Raspberry Pi Zero 2 W (or a Retrogaming Set which has everything)
- SD Card
- Wireless controller (optional, but ideal for TV setups)
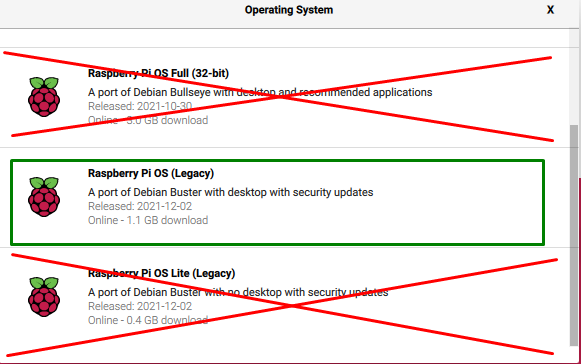
Make sure to flash your SD card with a Raspberry Pi OS Legacy image (Buster). It will not work with the latest Bullseye image.
Open a Terminal and run these commands:
sudo apt update
sudo apt install steamlink
You might get an error saying that you don’t have enough video memory. In order to fix this, go to the top left menu (Raspberry Pi logo), then go to Preferences -> Raspberry Pi Configuration -> Performance -> GPU Memory and set it to 128MB.
Then, either use the desktop icon or type steamlink into Terminal to launch Steam Link.
Steam Link will scan your network and find a computer with Steam on it. It will then ask you to enter a verification code on the computer.
Then it will test your network connection. Finally, you will see your full list of games.
Conclusion
So there you have it, folks! Those are a collection of our favorite Raspberry Pi Zero 2 projects. I hope this list has inspired you!
If you’re interested in finding more projects, check out our series called “Paragon Projects”, where we constantly feature new Raspberry Pi projects.
Just click on this button:
And, if you haven’t yet, be sure to subscribe to the PiCockpit Newsletter to stay up-to-date with all the exciting developments in the world of Raspberry Pi!
What are your favorite Raspberry Pi Zero 2 projects? Let us know in the comments below!