All about SD card health on the Raspberry Pi
The SD card is – next to the power supply – a critical additional component of the Raspberry Pi. Monitoring it’s health is really important to ensure a smooth operation of your Raspberry Pi operating system, and a good user experience. This article will show you several ways how to check and monitor the health of your microSD card.
First, I’ll give an in-depth overview of how memory cards work, so you can understand the possibilities and limitations of checking the health state of your SD card.
Then I’ll explain how to protect your microSD card by reducing common problems Raspberry Pi users experience. We’ll also go into the best microSD card brands for Raspberry Pi we recommend.
If you want, you can also skip down further, to just get the Linux commands to check the current microSD card state.
Basics: Inside the microSD card

The microSD card contains a flash memory chip (on the left of the picture), and a micro-controller (on the right of the picture, usually ARM-based).
Flash
Flash memory stores information by “trapping” electrons, which are “injected” using high voltage through a non-conductor into a so-called floating gate(**). The electrons are thus part of a transistor that may or may not allow a connected current to flow, depending on the charge of the floating gate. Theoretically, they cannot flow away, because the floating gate is electrically isolated. This means that the information stays put even after the current supply is switched off.
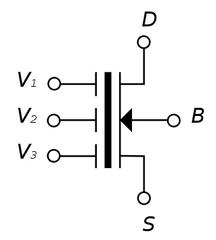
The information is always read between source (S) and drain (D). Electrons introduced into the floating gate increase e.g. the threshold voltage of the transistor, starting from which current would flow. The transistor then blocks at a normal read voltage (does not conduct).
For programming the floating gate, significantly higher electrical voltages (e.g. 10 V) are necessary than for the normal read operation (e.g. 3.3 V). To do this, additionally the control gate (V1/V2/V3) plays a key role.
To erase everything, the control gate drives electrons out of the floating gate by applying a high negative voltage.
NAND flash components used in microSD cards group the individual memory transistors into pages, and several of the pages into blocks. A page has between 512 and 8192 bytes, a block can contain up to 256 pages (thus a total of 2048 kB with 8kB page size).
Writing (for a logical “1”) can be done bitwise or at least byte/wordwise. Erasing (for a logical “0”) can only be done blockwise. If there’s any unaltered information, it has to be programmed in again.
Flash memories have a limited lifetime due to programming and erasing, which we calculate in erase cycles.
The reason for the limited lifetime is damage to the insulating oxide layer, which protects the floating gate from charge leakage, caused by the high voltages. As soon as this layer becomes conductive, the memory cell can’t hold more information.
Aside: Multi-level cell memory cells
Initially, there were only two charge states (1 bit of information) per memory cell. Now, thanks to several floating gates per transistor, multi-level cell memory cells store different charge states and thus several bits per memory transistor. During readout, the system evaluates how the applied current is conducted differently by the transistor.
On the one hand, this makes it possible to increase the density of the memory cells significantly, but on the other hand, readout is slower and the memory cells react much more sensitively with bit errors to charge losses. With single-level cells, 100,000 to 1,000,000 write-erase cycles are possible, with TLCs (triple-level cells with three bits per memory cell) approx. 1000 write-erase cycles.
This is the reason that industrial SD cards usually have lower memory densities, and use SLC (single level cells), for better data integrity.
The Controller
The task of the controller is to manage the flash, and in particular to perform wear leveling and read error correction. The performance and longevity of the microSD card depends decisively on the algorithms used in the controller.
Flash memory cannot be rewritten as often as required due to damage to the insulating oxide layer of the floating gates as described above. To avoid damage to individual areas that are used particularly frequently, the controller varies the physical allocation to the blocks that can be addressed logically by the file system (= wear leveling).
This variation of the physical allocation is also the reason that write-testing the SD card (by writing & reading with bad block tools, etc.) will actually not identify the real bad blocks & allow you to avoid them on the operating system / file system level! Only the flash memory controller inside the microSD card knows which block is written to / read from at any given moment, and as discussed this can change over time.
Defective blocks (bad blocks) are already present in brand-new flash memory. These defective blocks are marked in a special area of the flash memory.
Error correction information for individual blocks is also managed so that read errors can be corrected by checksums. The controller adds blocks with clustered read errors to the list of bad blocks, and shifts the actual physical allocation of the logical block.
The microSD card typically has – depending on the manufacturer – about 10% spare capacity to exchange the bad blocks with good “reserve blocks”.
Dirty little secrets: Flash memory problems
Deletion is only blockwise
Data can only be erased block by block. Erasing stresses the memory cells, and shortens their lifetime – new bad blocks are created.
Defective blocks from the factory
Flash memories are already shipped with defective blocks. In the course of operation, further defective blocks (bad blocks) are added. The controller therefore tries to write / erase blocks as evenly distributed as possible by wear-leveling.
MLC and TLC particularly sensitive
Multilevel cell memory cells (MLCs) reduce the number of erase cycles and thus long-term reliability.
Read Disturb
A phenomenon not yet mentioned by me, but particularly perfidious, is Read Disturb. Even when only reading from the card, it can – just by reading – cause neighboring memory cells in the same block to change their programming. The probability of this happening increases sharply after a few 100,000 reads.
To avoid Read Disturb the controller therefore logs the number of accesses to a block in order to copy it in one piece to a new location when a threshold is exceeded, and to delete the original block. After that, the block can be re-used again.
All these are things a controller has to compensate for in order to pretend to us that it is a “perfect memory card” on the outside, while it looks anything but perfect on the inside!
Last but not least, bits written by X-rays could be erased unintentionally. Here, only an X-ray-safe design of the card can ensure that the data remains intact.
Manufacturer & selection of a good card
Both micro-controller and flash device and the finished microSD card can come from different manufacturers – the Panasonic SD card in the example photo has Samsung flash. The controller was made in Japan.
There are four manufacturers that produce NAND flash devices:
- Samsung <- market leader
- Toshiba
- IM Flash Technologies (Micron Technology & Intel joint venture)
- Hynix in cooperation with Numonyx
Toshiba and Samsung produce the majority of all chips.
SanDisk (recommended)
SanDisk and Toshiba have a joint venture for flash manufacturing. However, in 2009, SanDisk transferred the rights to the fabs to Toshiba to become a fabless flash memory manufacturer. They still work together regarding memory development. SanDisk and Toshiba, along with Matshushita, are the founders of the SD standard, introduced in 1999. SanDisk also created the microSD standard.
We have been relying on the SanDisk brand for a long time, and have had very good experiences with it so far.
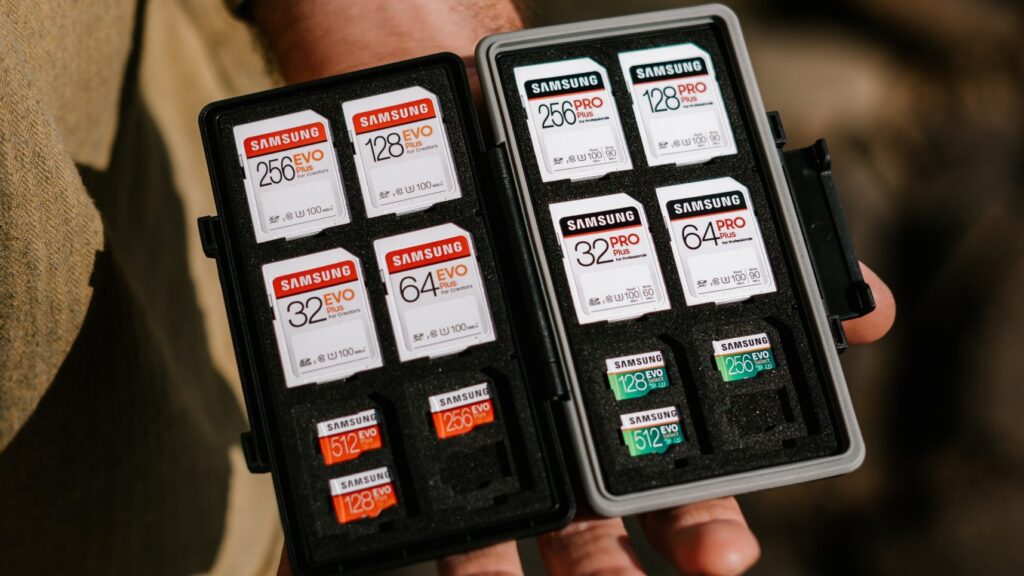
Samsung (recommended)
We also recommend Samsung memory cards. As the market leader in the NAND flash sector, Samsung can match all components of the SD card perfectly to each other, and has all the necessary information for a solid product.
Kingston (NOT recommended)
We had a bad experience with the reliability of 128 GB Kingston cards in a critical project. Kingston does not have its own fabs and buys excess capacity from other flash manufacturers. As a result, there’s no guarantee of consistent performance.
The following article by Bunny Huang is also interesting in this context.
Toshiba
Toshiba, as the #2 in the worldwide DRAM market, also sells its own memory card products. SanDisk and Toshiba, together with Matshushita, are the founders of the SD standard, introduced in 1999. We have no experience with Toshiba cards so far.
Transcend / Silicon Power
We have also used Transcend and Silicon Power cards, especially in the low-cost range. The cards are basically good, but we have seen higher returns / defects with Transcend than with SanDisk. For critical projects, I would therefore rather recommend SanDisk / Samsung.
Choosing a good memory card
In order to select a good memory card, the first thing to do is to choose the manufacturer. We recommend Samsung or SanDisk, and possibly Toshiba, for the shortlist.
Next, the memory class is important. This class indicates the fastest write speed block by block. It is not the write speed for scattered random access writes, which is more meaningful in real-world applications.
A higher class is more expensive, but recommended due to the significant performance increase. We usually ship Class 10 cards.
In this overview on eLinux.org, you can check a suitable memory card for compatibility with your Raspberry Pi. Important note: they constantly modify the Raspberry Pi firmware for better compatibility with memory cards and to avoid data corruption.
You should order from trustworthy sources – for example, we get our SanDisk microSD cards directly from Raspberry Pi Trading, and reputable, large German distributors. On Amazon, be sure to order directly from Amazon, not from a Marketplace retailer.
Certain information (cid, csd, date, manfid, oemid, serial) of the microSD card can be read with Linux to check that you have received the correct manufacturer. Examples with a Transcend card:
cd /sys/class/mmc_host/mmc?/mmc?:*
echo "man:$(cat manfid) oem:$(cat oemid) name:$(cat name) hwrev:$(cat hwrev) fwrev:$(cat fwrev)"
man:0x000074 oem:0x4a60 name:USD hwrev:0x1 fwrev:0x0
echo "serial:$(cat serial) mdt:$(cat date)"serial:0x401e39f2 mdt:03/2017
The Manufacturer ID (manfid) is assigned by SD-3C LLC, as well as the OEM / Application ID (oemid). The oemid identifies the OEM of the card and/or the content of the card.
The product name (name) is 5 characters long (ASCII). hwrev is the hardware revision, and fwrev the firmware revision. Together they are the product revision (hwrev.fwrev).
The serial is the serial number of the microSD card, it is a 32bit field that reads as an unsigned integer.
The mdt (Manufacturing Date) indicates when the card was manufactured – year and month.
You can compare the values with websites to detect fraud by fake microSD cards. I recommend reading Bunny’s blog article (one) and this article (two).
Stable man/oem combinations of a brand indicate a well-controlled and consistent supply chain. For example, SanDisk has the following combination for all entries in the eLinux.org Wiki: man:0x000003 oem:0x5344. Other brands, such as Transcend, vary their suppliers, so consistent quality isn’t a sure-thing.
Avoid data corruption during operation
The microSD card is the Raspberry Pi’s “hard drive”. With a normal Linux configuration, it works like a normal hard drive – both read and write accesses occur. Linux logs information to many log files, and among other things, updates file access times. Data thus frequently changes. This is something microSD cards were never designed for in the first place.
Tip #1: Shutdown Raspberry Pi properly & use a good power supply
You wouldn’t just unplug a Windows computer either. With Linux computers, and especially the microSD card-supported Raspberry Pi’s, it’s only a matter of time before data corruption occurs during powercuts.
Linux has read-write caches to speed up file operations. When you just unplug power from the Pi, you may lose the information in the write caches that have not made it to the microSD.
As mentioned earlier, the microSD controller is actively shifting data at runtime at runtime for wear-leveling, and avoiding read disturb. This happens without the Linux system’s knowledge (“transparent”). And depending on the manufacturer, more or less conservatively. Also here – especially during write operations! – data damage and losses can occur.
So you should make sure that, after shutting your Pi down, the ACT-LED of the Raspberry Pi stops blinking, and only then pull the power.
A bad power supply can also lead to problems due to brownouts (undervoltage). If in doubt, use the power supply recommended / supplied by Raspberry Pi Trading.

Tip #2 Read-Only System with Overlays
A read-only system does not protect the SD card from read disturb, and thus from aging due to the necessary erase cycles. However, this happens much slower than when actively writing.
A read-only file system also has other advantages, for example fewer file system checks at startup.
Especially embedded systems – i.e. systems that serve a specific purpose in an application (e.g. digital signage) do not necessarily need the possibility to constantly install new software and to keep precise logs on site. You can send the logs over the network to a central server (delayed if necessary), and for system updates the system can be put into maintenance mode to apply the updates.
Here is some information from the Debian project on which Raspbian is based: https://wiki.debian.org/ReadonlyRoot.
Using RAM disk overlays (in tmpfs), a system can still write log files, or make changes to files. You can synchronize the RAM disk overlays periodically with specially designated partitions on the SD card. You should be careful with the RAM disk so that it does not overflow (due to the log files), and there is of course less RAM memory available for normal activities.
We use this technique with our product Anonymebox, where it must be assumed that users simply unplug it from the socket.
Are you looking for a partner to realized a solid read-only solution for your embedded Raspberry Pi project? We (as pi3g e.K.) offer consulting & development services, for hardware and software.
Tip #3 Reduction of write operations
Especially with older kernels, Linux updates the access time for each file access, according to the POSIX standard. This means that every read operation automatically results in a write operation. There is the possibility to explicitly set noatime in /etc/fstab if you haven’t already set it (Raspbian seems to set it automatically).
More information about relatime and noatime
Disable system log using mask:
systemctl mask systemd-journald.serviceCreated symlink from /etc/systemd/system/systemd-journald.service to /dev/null.
sudo systemctl mask rsyslog.serviceCreated symlink from /etc/systemd/system/rsyslog.service to /dev/null.
Other logs created by other applications, and the consequences of disabling these services (for example, certain services no longer starting) should of course be examined in detail.
Swap file:
If there is not enough RAM, Linux moves individual RAM areas into a SWAP file. (Consider using a Raspberry Pi 4 with enough RAM, for example the Pi 4 / 4 GB or the Pi 4 / 8 GB for your use case.) With the following command, you can check the status of the SWAP file:
sudo systemctl status dphys-swapfile● dphys-swapfile.service - LSB: Autogenerate and use a swap file Loaded: loaded (/etc/init.d/dphys-swapfile) Active: active (exited) since Sat 2017-07-01 19:11:57 UTC; 8min ago Process: 498 ExecStart=/etc/init.d/dphys-swapfile start (code=exited, status=0/SUCCESS)
You can use the following command to disable SWAP:
sudo systemctl disable dphys-swapfileConclusion
microSD cards in continuous use put the long-term reliability of Raspberry Pi-based systems to a severe test.
By using the right power supply, read-only systems with overlays, consistent reduction of write operations, and selecting a good SD card by a well-known brand, you can increased stability in the long run.
Notes
(*) Note: the Raspberry Pi 3, 3B+ and 4 can boot from USB media, or over network (Ethernet), without microSD card.
Especially for a boot over network, we recommend installing a microSD card with a special firmware, because a timeout bug in the boot code prevents a stable boot (Raspberry Pi 3B).
The explanations above about the structure of flash memory also apply to USB sticks, since they also rely on flash memory.
(**) Note: an increasingly used alternative to floating gates are charge trapping flash memories, the functional principle remains the same. The charge trapping flash cell enables higher memory densities.
If you’d like to learn more about SD cards with your Raspberry Pi, check out our many articles covering the topic here.
Hi,
is there a way to check the controller in the SD card how many bad plocks are present?
By checking this periodically I would like to build a trend chart.
Thank you for the work.
Regards,
Peter
that would be impossible for normal consumer grade SD card unless you have the MP tool for the specific used controller, which is never available.
It would be possible if the card is industrial grade and have SMART info available (specified in their respective datasheet), and then you can write some code to read out the SMART data.
But this is just the beginning of the PITA. There’s no industrial standard for SD card health monitoring so every manufacturer implement the protocol differently and it’s not always published.
Some manufacturer’s SMART report only gives you a percentage number of remaining life time of the card, some provide more detailed information including reserved blocks, initial bad blocks, later bad blocks, max/min/avg erase count, P/E life time, etc.
Currently I’ve been able to read health statistics of cards from Lexar, ADATA, ATP, Sandisk, Apacer, Metorage, Delkindevices, SiliconePower, Swissbit and some more.
My motivation is to crack the SMART info from dirt cheap second hand industrial card produced by Foresee, for now I’ve been able to crack the MPS/M9M/M9H/D7D/X52/X53 series card and I’m still working on some more models.
I hope there’s a industrial standard for SD card smart info soon enough. Also I found it amusing that some SD card have higher TBW life than many SSDs lmao
oh, I forgot to mention that majority(but not all of them, shit.) of the cards gives SMART info via sending CMD56 command to the card w/ a 32bit int argument, you’ll need to find that magic number from the datasheet and respective data format to read the data. If you got the datasheet, then you’re basically done, check out sdmon tool on github for example code.
If the datasheet isn’t out or the magic number is not published, you’ll have to iterate the entire 31bit(the lowest bit is always 1) space of int to crack it by force, and it may take 12hours to half a month depending on your luck. I hope there’s no evil manufacturer that start their magic number with 0xF_______. For now all the magic number i’ve managed to crack/collect starts with 0x1_______.
Some cards requires a more complex routine to read out the SMART info, like Apacer, but good thing they provided necessary info in the datasheet. Apacer makes OEM card for some other brands too so the same routine applies.
[…] SD card health (includes best practices on taking care of your SD card!) […]
[…] All about SD card / microSD card health on the Raspberry Pi […]