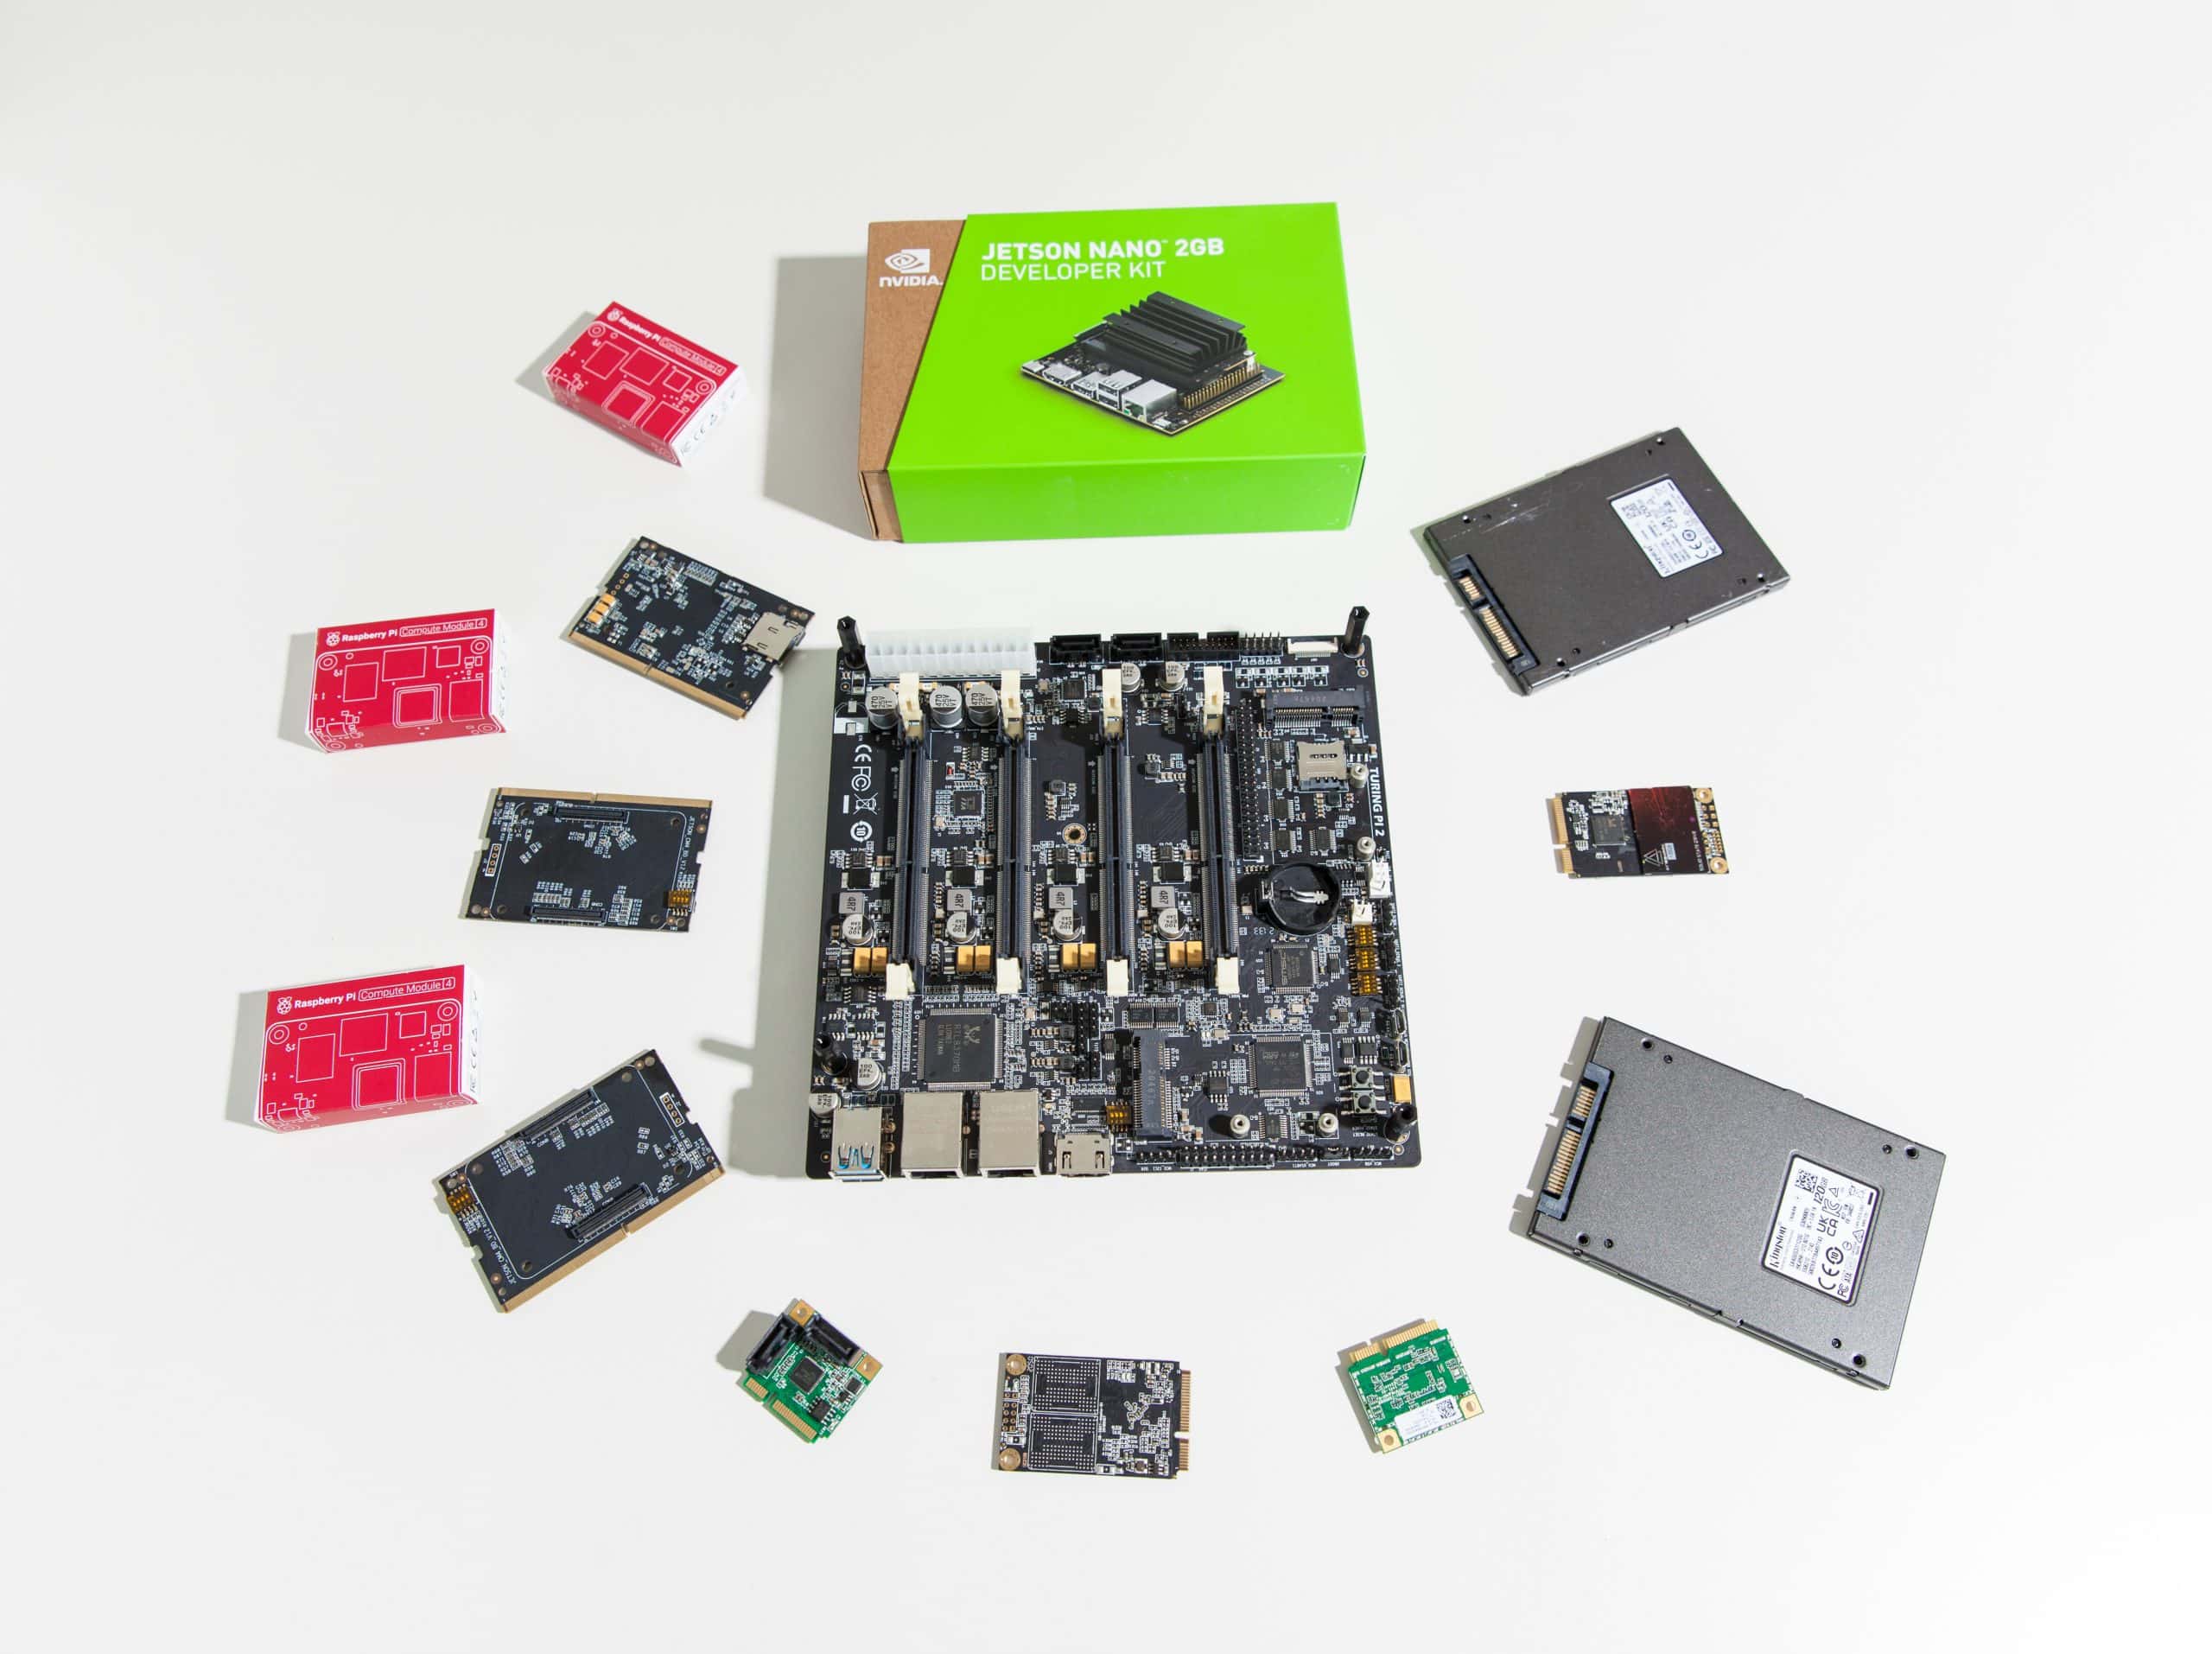
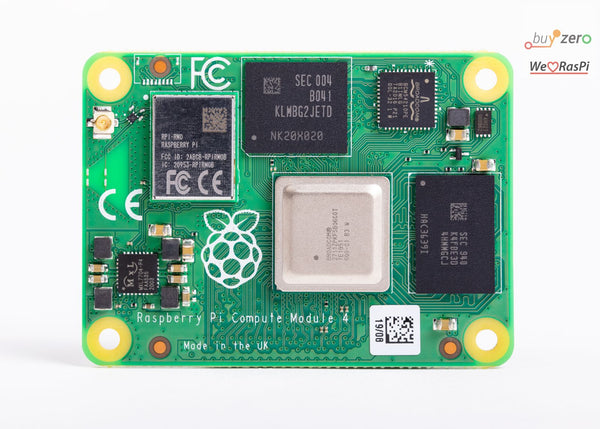
What is the Raspberry Pi Compute Module 4 (CM4)?
If you’re new to the Raspberry Pi series of microcomputers, you might be wondering if the Raspberry Pi Compute Module 4 (CM4) will suit your use case.
What is the Raspberry Pi CM4?
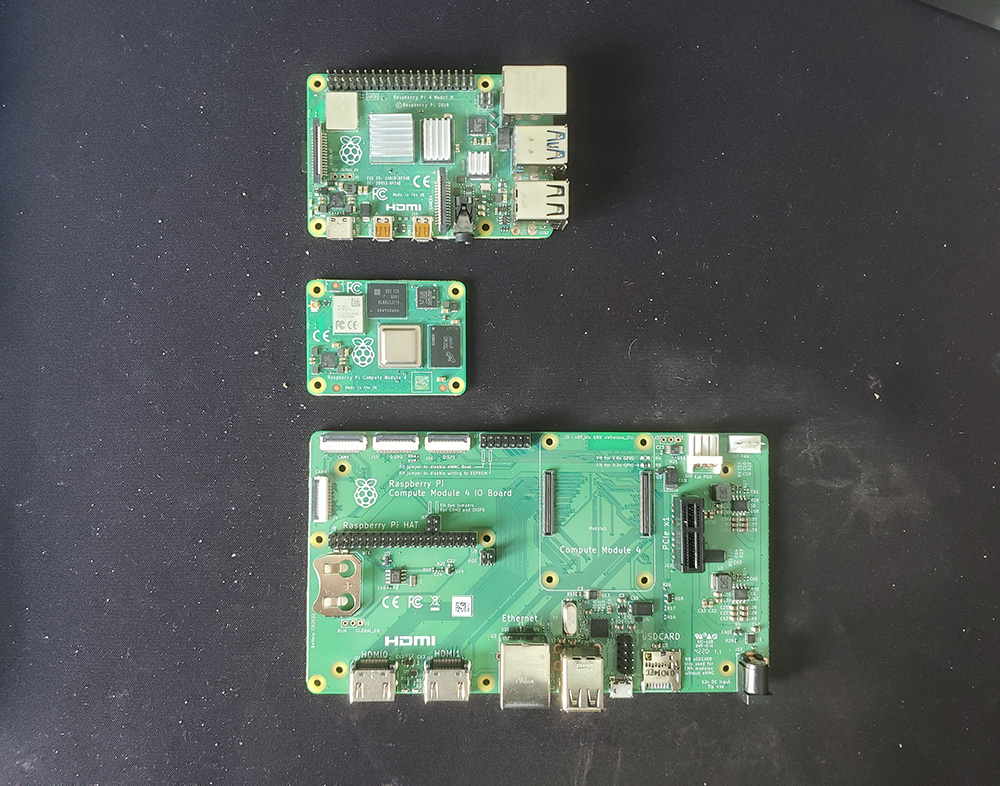
The Raspberry Pi Compute Module 4 is very much like the Raspberry Pi 4.
Unlike the Pi 4, the CM4 is really meant as a basis for building embedded applications. You can think of it as the guts of the Raspberry Pi 4 without any unnecessary features.
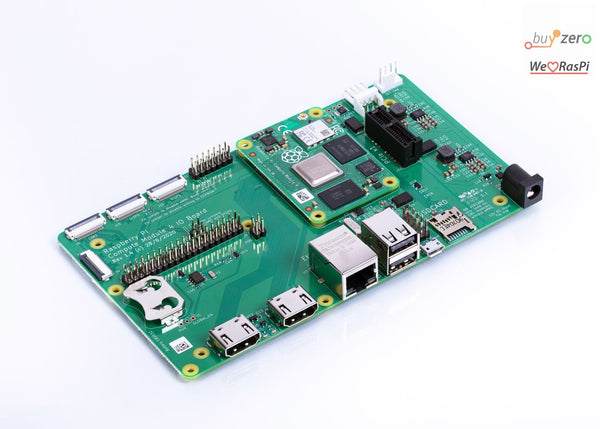
If you want to build a prototype quickly, you can use the Raspberry Pi CM4 IO board, which exposes all the interfaces available on the Raspberry Pi CM4, including a PCI Express Gen 2 slot which you won’t get on the Raspberry Pi 4.
Ultimately, the whole purpose of a CM4 is for you to embed it into projects as simple as digital signage to remote desktops (thin clients), automation and robots.
Industrial users are one of the biggest target markets for the CM4, however, even small businesses and home users can benefit from it.
Raspberry Pi 4 vs Compute Module 4
The key to this is customization.
You know how some people like Macs because they just work? You can’t customize it much, but you will have the confidence that it will work. On the other hand, others like to build their own PC with parts from different manufacturers.
The analogy explains the difference between the Pi 4 vs CM4.
When you buy a Raspberry Pi 4, you are stuck with having 4x USB 3.0, ethernet ports, CSI connectors and USB-C for power among many other aspects that are preset by the Pi 4. However, this combination works seamlessly.
With the Compute Module 4, you can buy a carrier board that enables you to power it using different methods, such as a barrel connector or a USB-C connector, depending on what you buy. In some situations, USB-C on the Pi 4 might not cut it — for example, if you have a high-amperage setup.
One big difference with the Raspberry Pi 4 is the ability to buy a carrier board that exposes the PCIe slot which opens up much more customizability.
Storage-wise, while the CM4 already has eMMC on most of the boards, which is much more reliable than the microSD card on the Pi 4, you can take this further by adding a SSD with the help of a suitable carrier board.
Why does industry love the Pi CM4 so much?
In the end, it comes down to customizability.
Let’s go back to the argument that the CM4 and the Pi 4 are both very similar.
So why does the CM4 triumph over the regular Pi 4?
For one, it’s package of ports and features are really meant for home use. For example, if you use the Pi 4 to run a plant watering system at home, and the microSD card fails… well, that’s just one plant down.
On the other hand, industrial customers could be running a critical component in a power plant. You can’t just run a power plant off a microSD. In fact, this is where the CM4 comes in stronger because of its ability for industrial users to build their own board with storage redundancies, a higher heat tolerance, standard industrial mounting options while benefiting from the low power and small size of the CM4.
Certifications are generally one of the biggest expense of getting a system approved for use, and that’s one reason why the CM4’s customizability makes things very attractive for industrial users.
And perhaps another small reason is the community that the CM4 has over its competitors. The Raspberry Pi community works together to keep different software aspects of the kernel working so that everyone in the industrial community can benefit.
Contrast that to its single-board competitors, where it took much more effort to get something to work on that specific single-board computer. With the Raspberry Pi CM4, there is community support and continuity.
Raspberry Pi CM4 specifications
Highlights from Raspberry Pi:
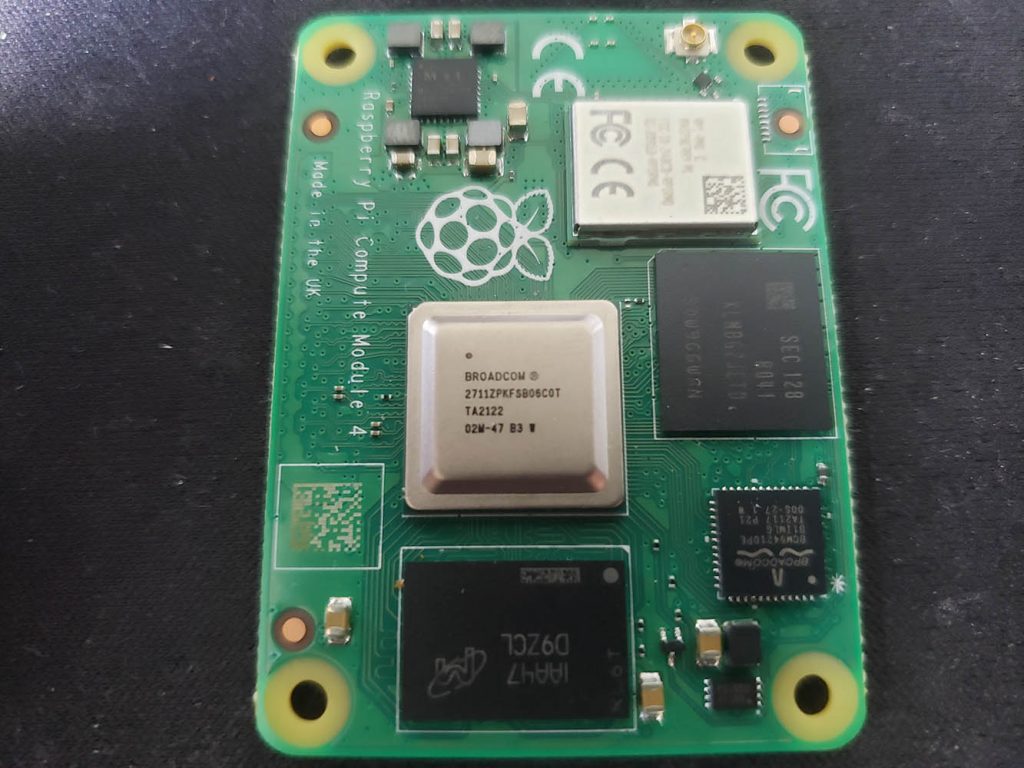
- Broadcom BCM2711 quad-core Cortex-A72 (ARM v8) 64-bit SoC @ 1.5GHz
- H.265 (HEVC) (up to 4Kp60 decode), H.264 (up to 1080p60 decode, 1080p30 encode)
- OpenGL ES 3.1, Vulkan 1.0
- Options for 1GB, 2GB, 4GB or 8GB LPDDR4-3200 SDRAM (depending on variant)
- Options for 0GB (“Lite”), 8GB, 16GB or 32GB eMMC Flash memory (depending on variant)
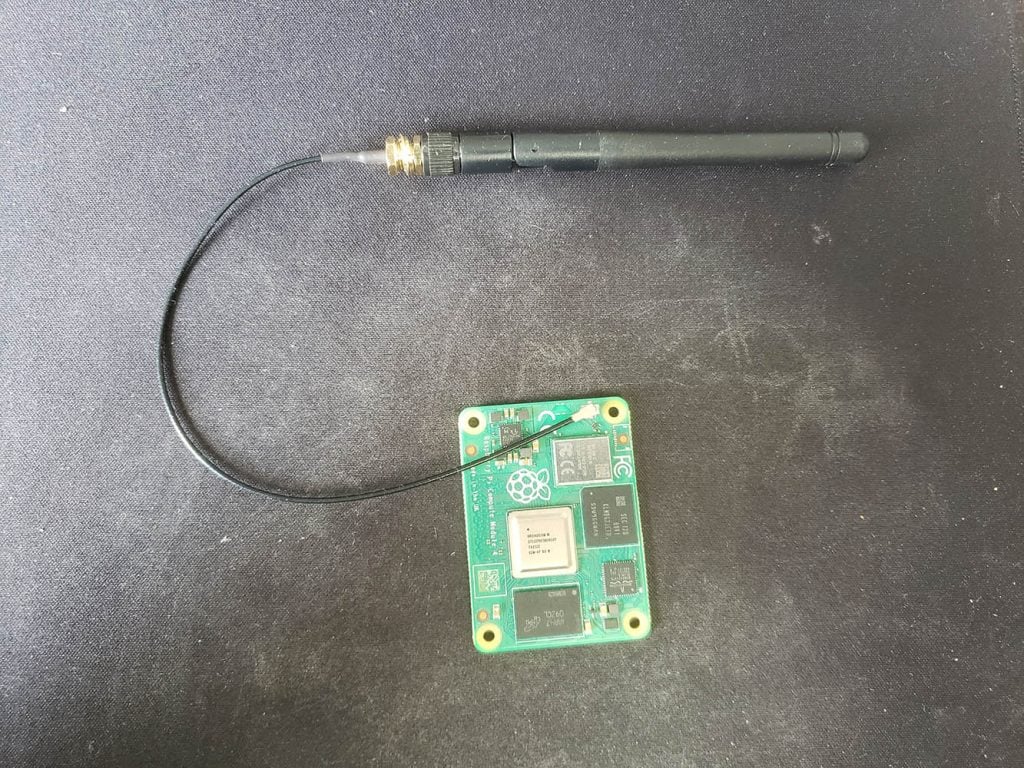
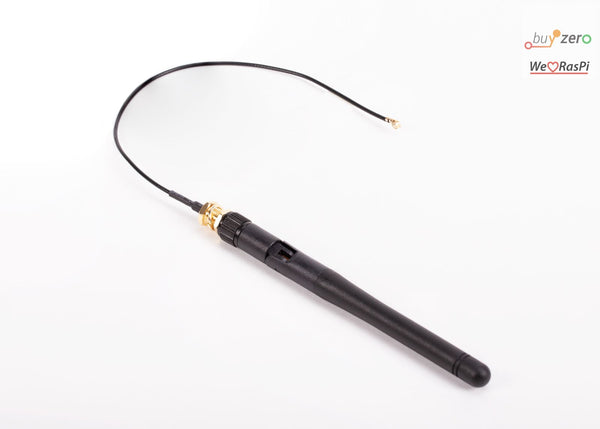
- Option for fully certified radio module:
2.4 GHz, 5.0 GHz IEEE 802.11 b/g/n/ac wireless;
Bluetooth 5.0, BLE;
On-board electronic switch to select either external or PCB trace antenna.
32 variants of the Compute Module 4
The Raspberry Pi CM4 has 32 variants varying in RAM, WLAN option and storage capacity.
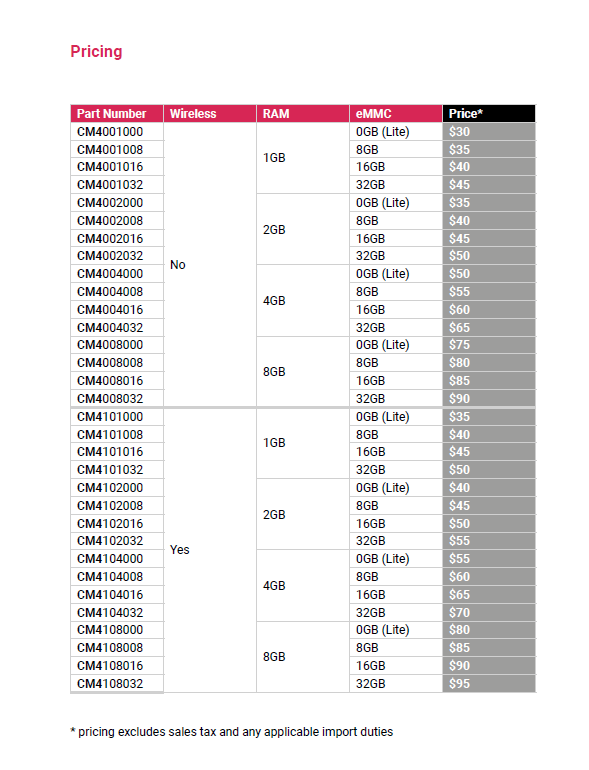
In fact, you can see the available combinations and corresponding prices (in Euros) on our shop.
Is the Raspberry Pi CM4 a replacement for the regular Pi?
For general use, you will be better off using a regular Raspberry Pi 4.
You can absolutely get the same things done with the Raspberry Pi CM4 plus the CM4IO board which gives you connectors such as HDMI, ethernet, USB, GPIO pins and many other connectors you’d find on the Raspberry Pi.
However, many things are easier on the Raspberry Pi 4 as compared to the CM4 plus IO board:
| Raspberry Pi CM4 | Raspberry Pi 4 | |
| Power | 5.5×2.1mm barrel connector or Berg connector | USB-C |
| Voltages | 5V, 12V or 7.5V to 26V (different voltages enable different features) | 5V via USB-C |
| Size | Larger with IO board | Smaller |
| Memory | eMMC or SD card (with Lite version) | SD card by default |
That said, there are other carrier boards that are more suited to making the CM4 a desktop computer.
In fact, this is where the CM4 shines. You can attach it to different boards depending on what ports and features you need.
For example, the Raspberry Pi CM4 to PI4B Adapter found on AliExpress can convert your CM4 into a Raspberry Pi 4 with the dual micro-HDMI, 4x USB 3.0, GPIO, CSI and ethernet.
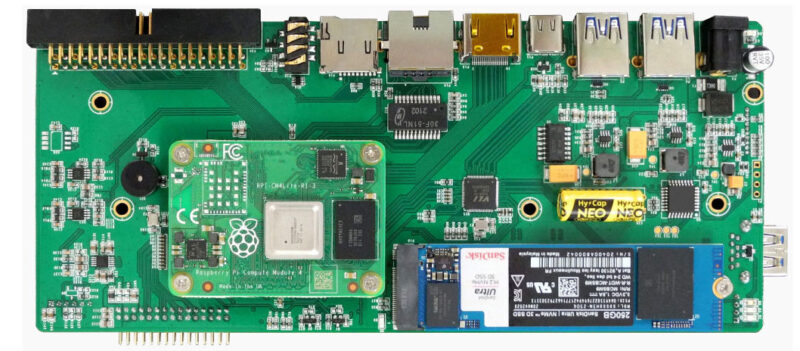
The Chipsee AIO-CM4-156 takes it one step further. The key addition here is the NVMe SSD slot which is even better as a storage solution than the eMMC on the Compute Module 4. Then there’s the standard ports you’d expect from a desktop: USB ports, USB-C OTG port, HDMI output, ethernet port, microSD slot, audio out and GPIO.
Powering the Raspberry Pi CM4 (with IO Board)
Powering the CM4 is a bit different from all other Raspberry Pis.
On the Raspberry Pi Zero, Pico and Pi 4, you’d power them via the microUSB or USB-C input.
On the CM4 IO Board, you have a bunch of choices as to how you’d like to power the board.
Connectors to power the Compute Module 4
First, let’s talk about connectors.
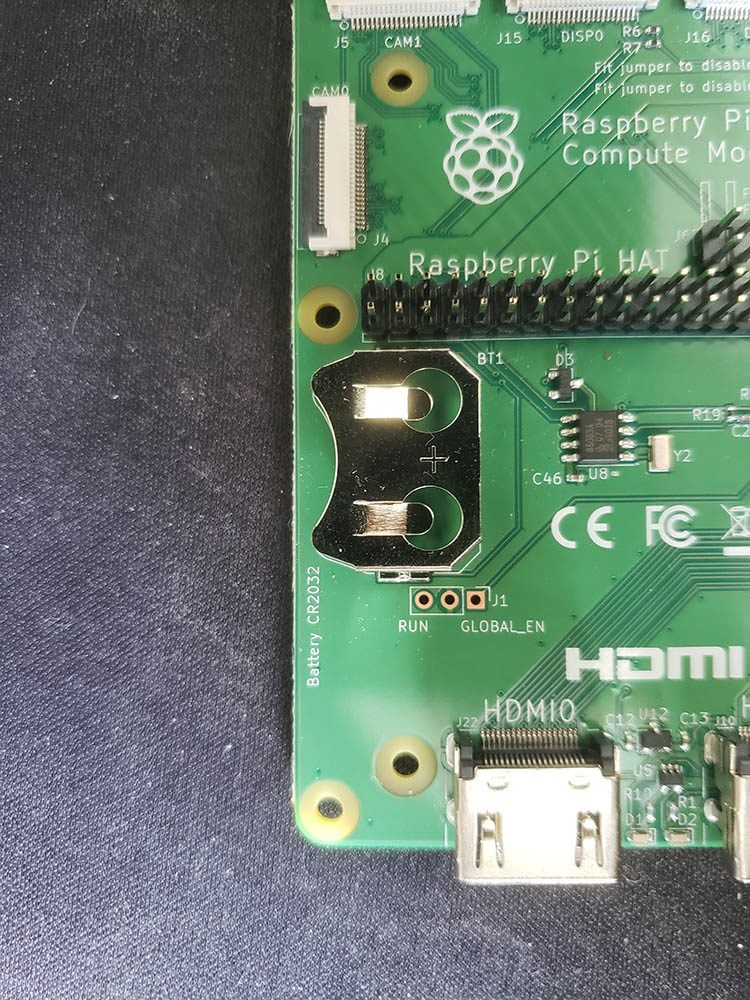
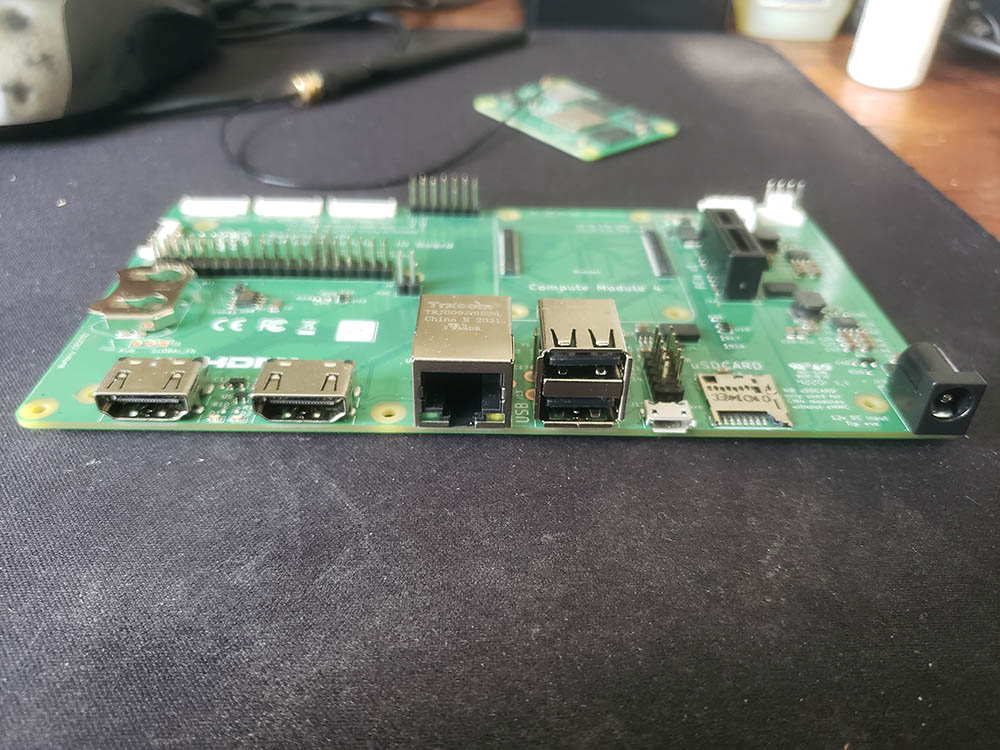
On the Raspberry Pi CM4 IO Board, there are two connectors marked as J19 and J20. Let’s talk about them separately.
Main PSU input: J19 barrel connector
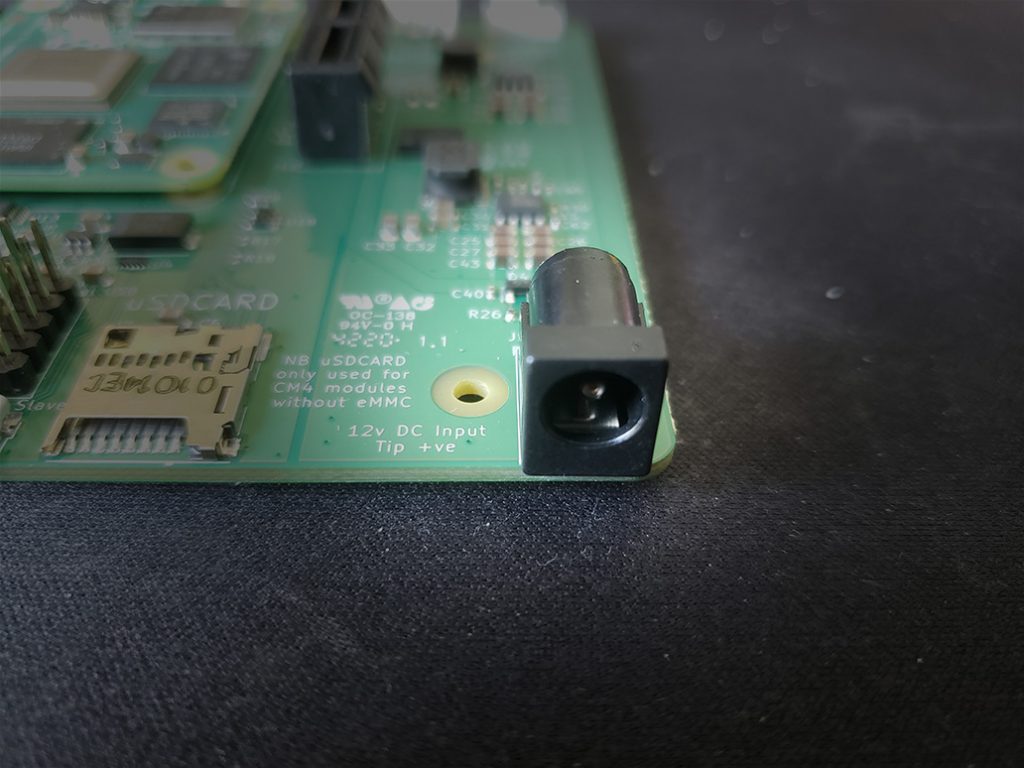
You can connect the Raspberry Pi IO board to a power supply through the barrel connector.
It accepts a 5.5×2.1mm DC barrel tip connector. These connectors are very commonly used on routers, laptops, chargers and many electronics.
You should supply 12V unless you are not planning to use the PCIe slot, external PSU connector, nor a 12V fan, in which case you can power it with 7.5V to 28V. Here’s the exact wording from the Raspberry Pi CM4 datasheet,
“The+12V input feeds the +12V PCIe slot, the external PSU connector and the fan connector directly. If these aren’t being used then a wider input supply is possible (+7.5V to +28V)”
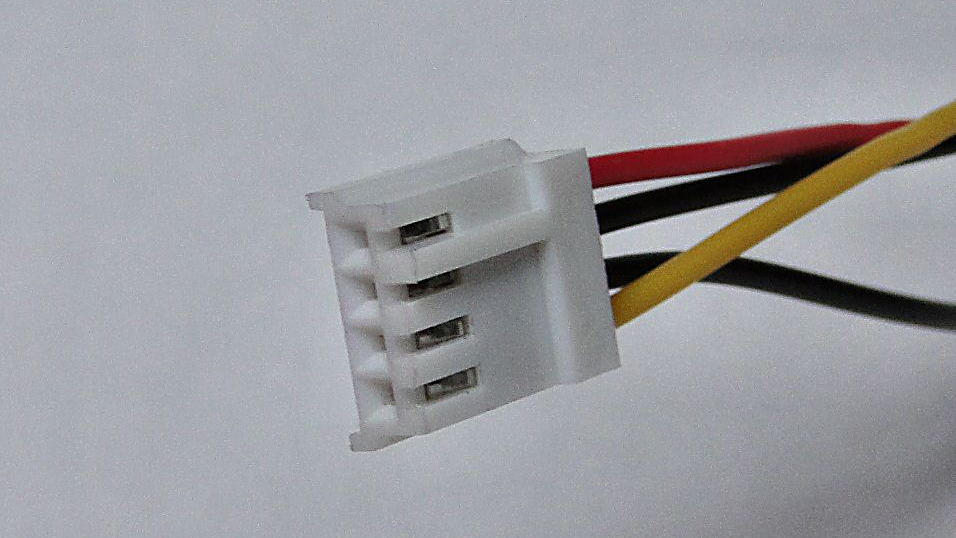
J20 “Berg” connector
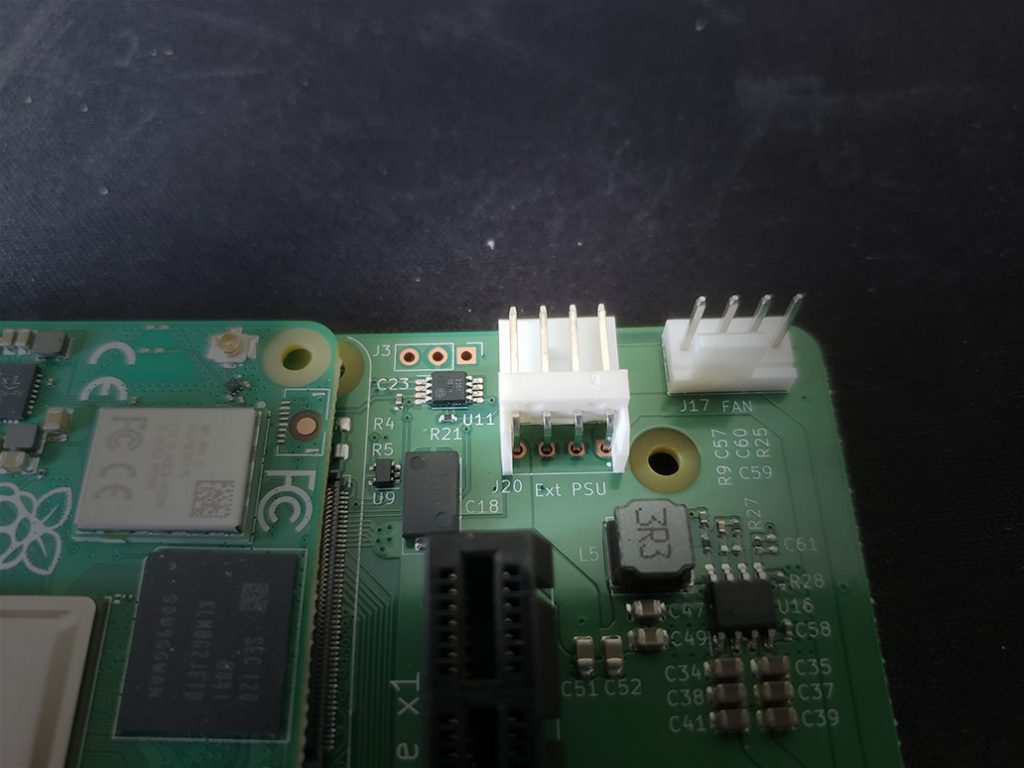
J20 uses the “Berg” connector, part number AMP/TE Connectivity 171822-4 or similar. You can also find these from old computer supplies that have a floppy disk power supply.
J20 serves two purposes. Let’s start with how you can power your CM4 with this connector.
You will need to supply 12V via the yellow wire. Do not supply 5V power to red.
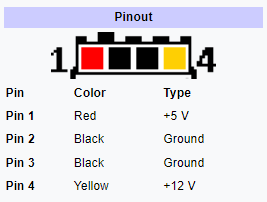
The other use for J20 is to act as a power supply for PCIe peripherals. As stated in the CM4 datasheet,
“With a +12V supply via the DC barrel jack, the external PSU connector (J20 with +5V and +12V) is ideal to connect to PCIe cards that require an external PSU. You should ensure that the PSUs aren’t overloaded”
How much current?
Raspberry Pi does not have a recommended power supply for the CM4 and IO board.
They suggest you budget 9W (at 12V) for the CM4 and then add some headroom for peripherals attached to the CM4.
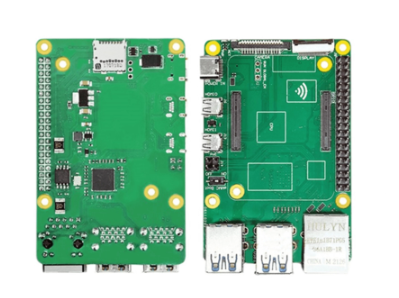
Inserting the CM4 into the IO board
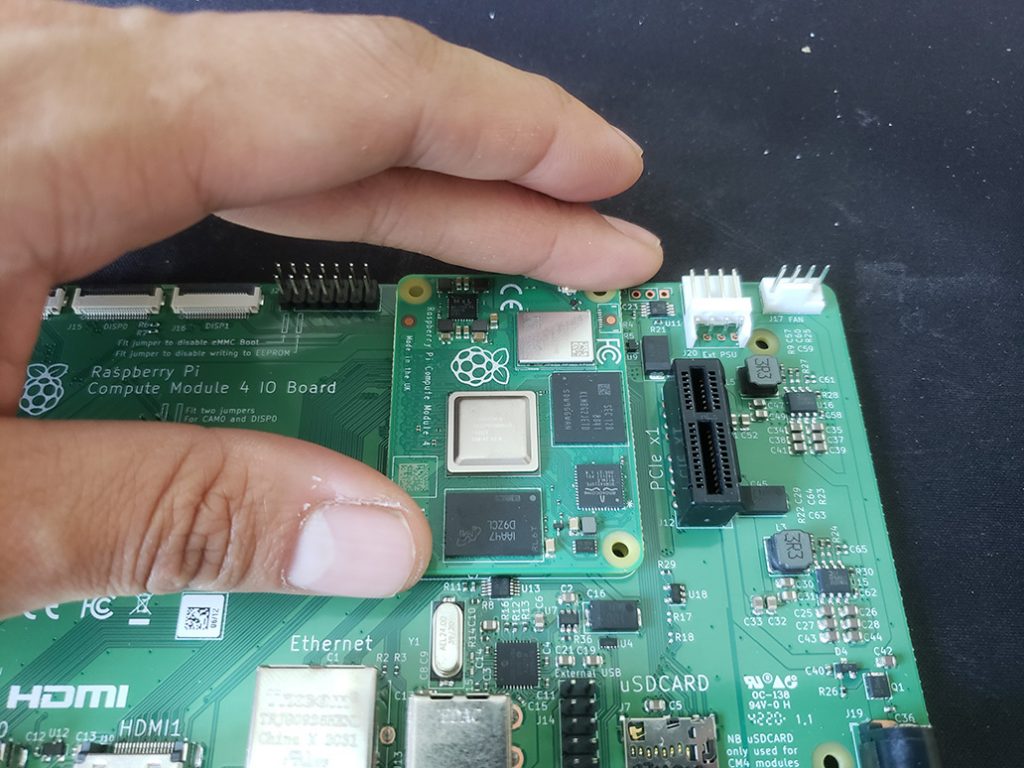
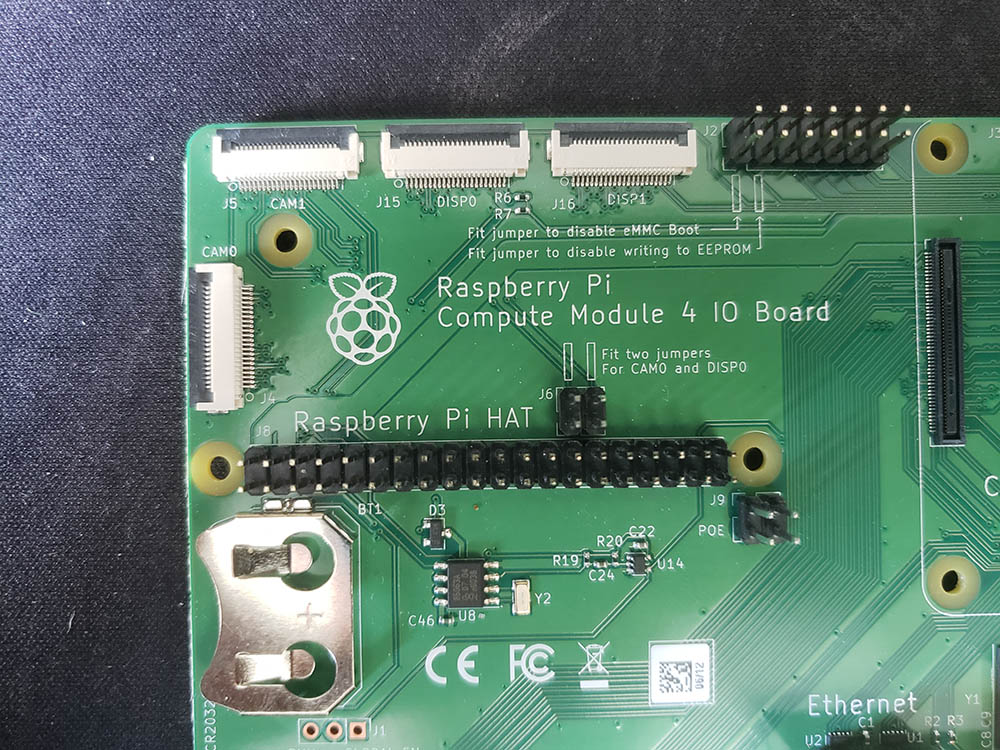
In order to insert your Raspberry Pi CM4 into the IO board, it will need to be in the right direction.
The image above shows how the Raspberry Pi CM4 would go into the IO board.
The key is to take note that the Raspberry Pi logo should be further away from the PCIe board. In other words, the UFL (external wireless antenna) port should be closer to the PCIe.
Press down on the Compute Module and you should hear two clicks indicating that both rails have been set.
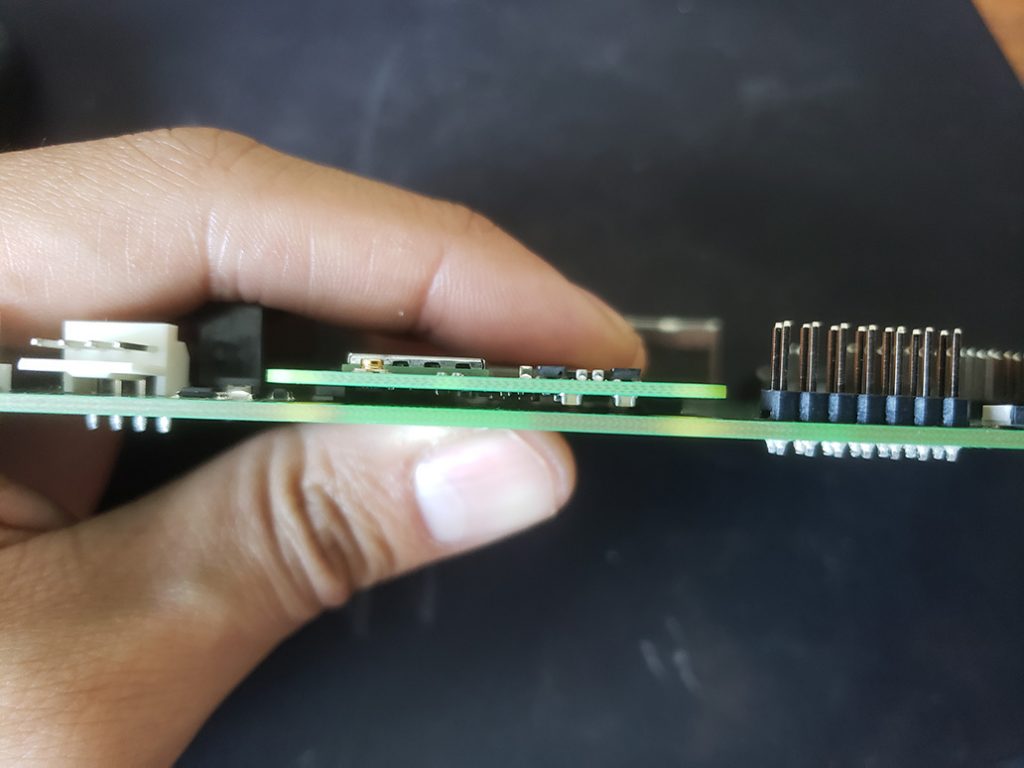
Observe the profile of the CM4 and IO board and ensure they’re parallel to each other. If they are not, that indicates one rail did not get pressed in properly.
Writing an OS to the CM4 with IO board
The IO board has a SD card slot… but the only time you will use this SD card slot is if you bought a CM4Lite with no integrated eMMC storage.
If you have the Lite version, it’s as easy as flashing a microSD card just like you would on a regular Raspberry Pi.
However, you might have the non-Lite version which requires a few more steps before you can mount the eMMC storage.
You will need:
- Jumper to short J2
- MicroUSB cable to connect to your PC
- Power supply
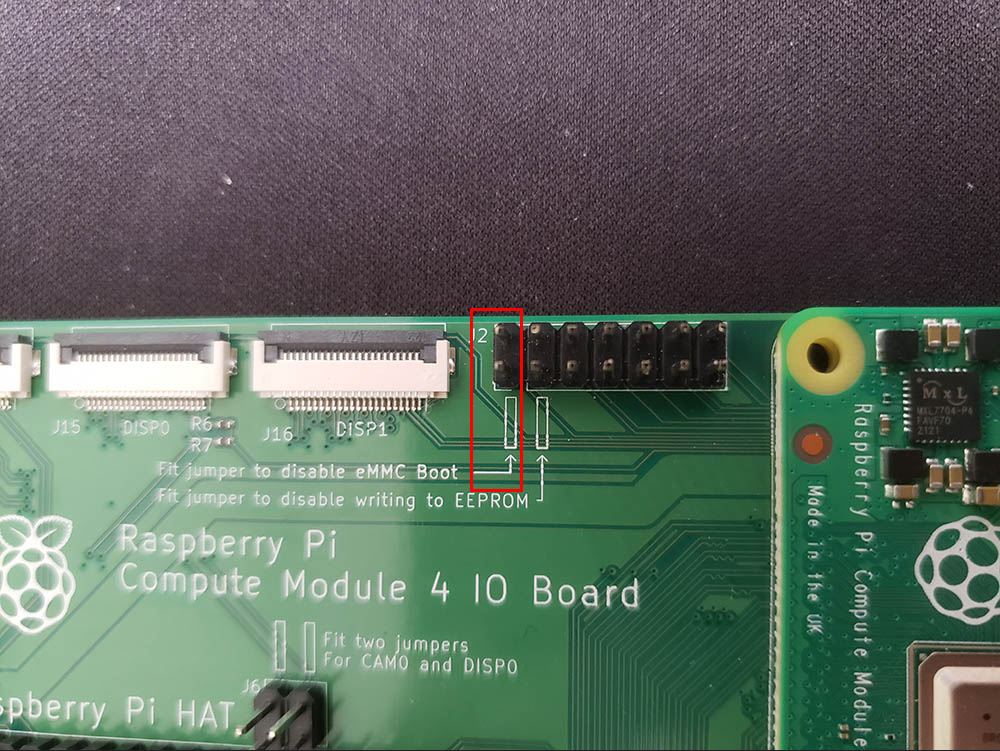
Disable eMMC boot
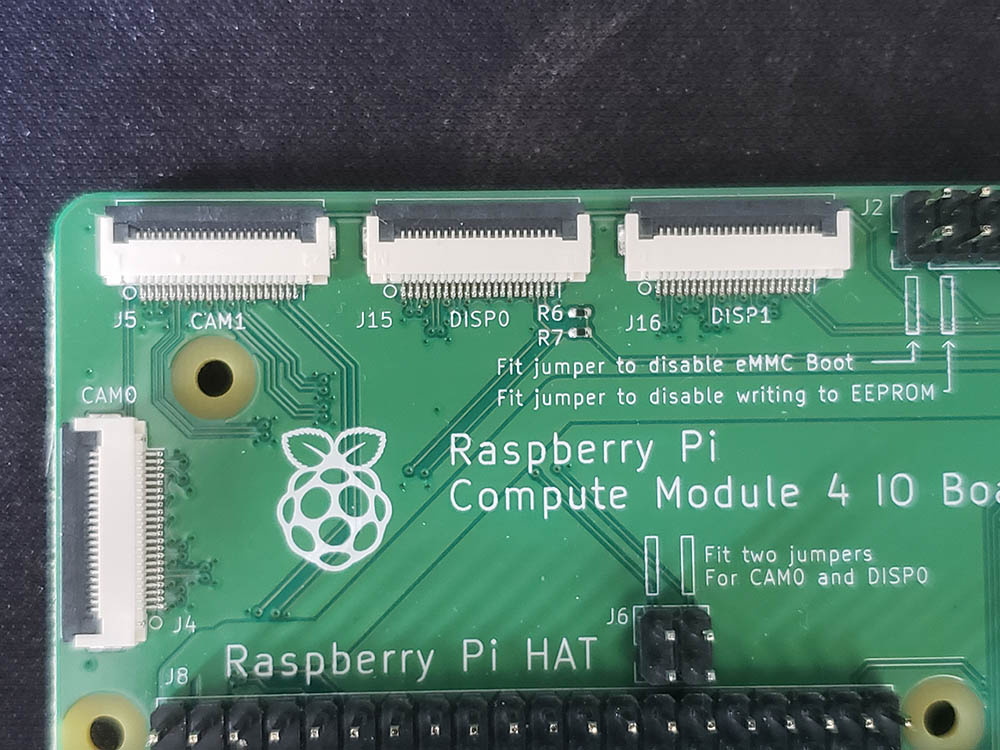
If you have an eMMC, you need to disable eMMC boot so that you can mount the CM4 as a removable disk. To do that, add a jumper on the first column of J2. J2 is located between the CM4 and the camera/display cable attachment points.

You can use a female-to-female jumper wire available in many starter kits or you can buy a “shorting jumper” just for this purpose.
Get rpiboot
When you flash a SD card, it’s super easy. You insert it into your computer and it’s done.
However, since we’re talking about the eMMC versions of the CM4s, you’ll need rpiboot, which allows your CM4 to be read as a removable drive.
The Github repo for rpiboot is here.
Mounting CM4 in Windows
If you have Windows, go ahead and download the rpiboot release here.
Then, extract the ZIP file and go to the win32 directory, and run rpiboot_setup.exe.
Windows Defender might pop up telling you that sideloaded software might be dangerous. Just bypass the warning.
If your CM4 power and microUSB (J11) isn’t plugged in, do it now, and connect the USB to your PC.
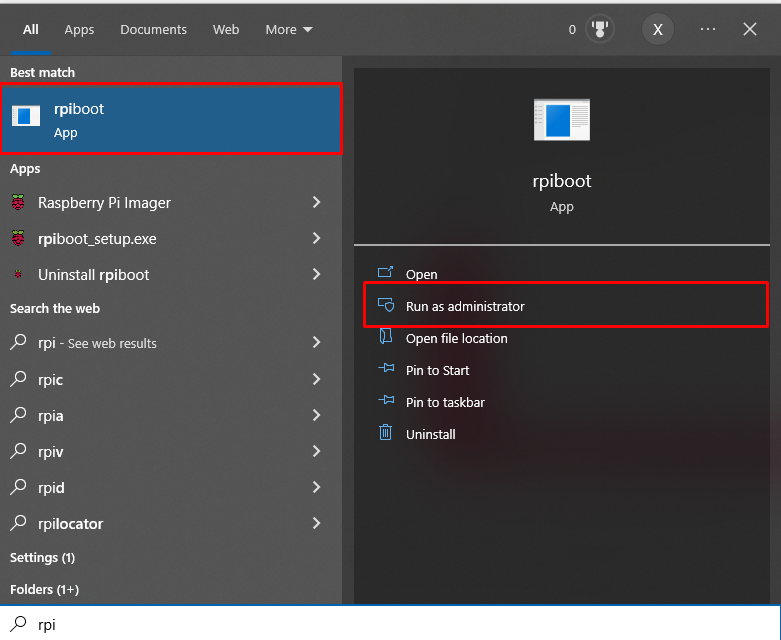
Run rpiboot. After the installer, you should be able to find it in your start menu.
Let it go through its steps where you will see this:
Waiting for BCM2835/6/7/2711...
Loading embedded: bootcode4.bin
Sending bootcode.bin
Successful read 4 bytes
Waiting for BCM2835/6/7/2711...
Loading embedded: bootcode4.bin
Second stage boot server
Loading embedded: start4.elf
File read: start4.elf
Second stage boot server done
It will auto-kill itself and you should see the CM4’s volume pop up.
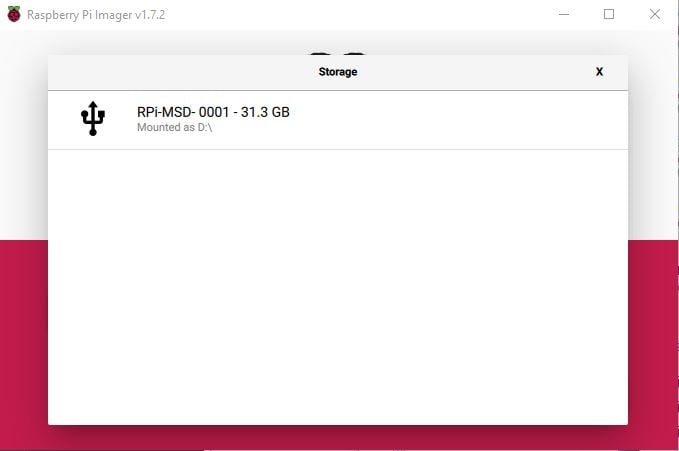
Here’s how it looks like in Raspberry Pi Imager.
Flash away, folks!
Mounting CM4 in Linux
The instructions on the rpiboot Github repo explains it clearly. Run:
sudo apt install git libusb-1.0-0-dev pkg-config
git clone --depth=1 https://github.com/raspberrypi/usbboot
cd usbboot
make
sudo ./rpiboot
Raspberry Pi suggests that you need to make sure the system date is set correctly or Git might throw an error.
CM4 on macOS
On a macOS, the steps are the same. According to the Github repo, here are the steps,
git clone --depth=1 https://github.com/raspberrypi/usbboot
cd usbboot
brew install libusb
brew install pkg-config
make
sudo ./rpiboot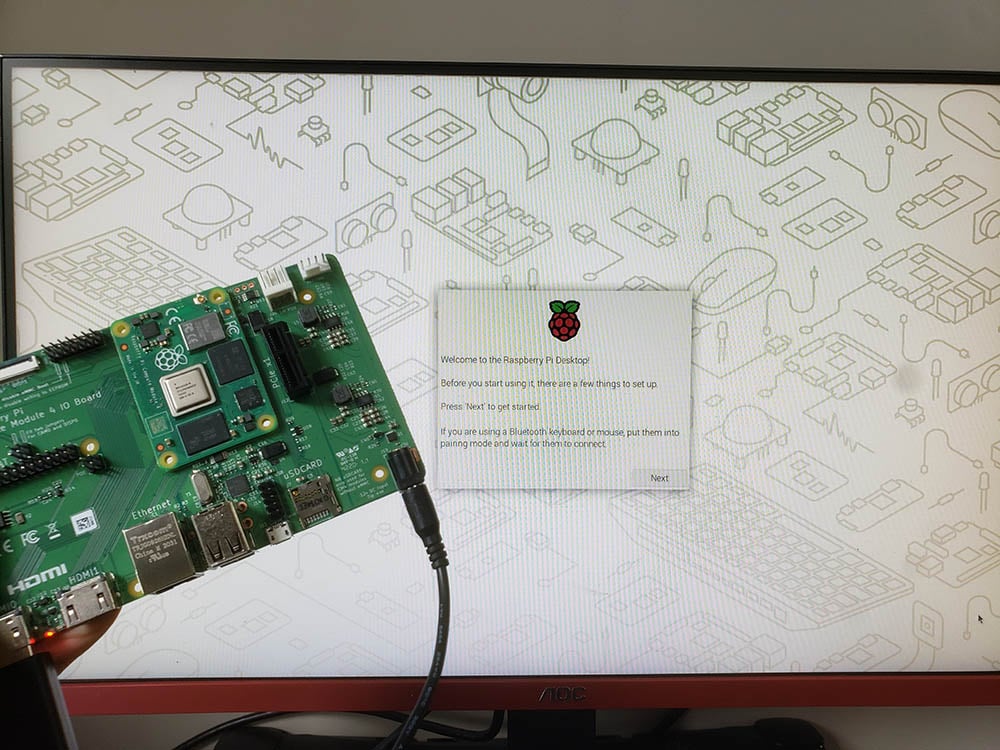
Raspberry Pi CM4 projects
The Raspberry Pi CM4 provides the brains for a project and people have used it for leisure and work purposes. Here are some projects.
Gaming: CM4 handheld
This reminds me of the Pi 400, but in handheld gaming console format.
The Raspberry Pi CM4 handheld comes from Daniel Juckett who nicknamed it “Aegis”.
On this handheld, Daniel demonstrated that you can play games such as Deus Ex: Mankind Divided and Doom 2016 with Moonlight via Retropie. You can also surf the web and watch YouTube videos.
Aegis is an open source project and you can view the Github here.
Using the CM4, Daniel was able to customize the layout of the ports (versus a Pi 4 with a fixed port layout). For the screen, he used the official Raspberry Pi 7″ display. For the controllers, he used Wii U buttons and joysticks. And finally, he also used speakers and rumble motors.
Personal computing: PiTray mini
If you like the Raspberry Pi 4 but prefer to have a more useable system, then you might consider using the PiTray mini, designed by Shengyuan Fang, Weihong Guan and sold by Sourcekit.
The size of the board is similar to the Raspberry Pi 4, but it’s not a 1:1 replacement for the Pi 4.
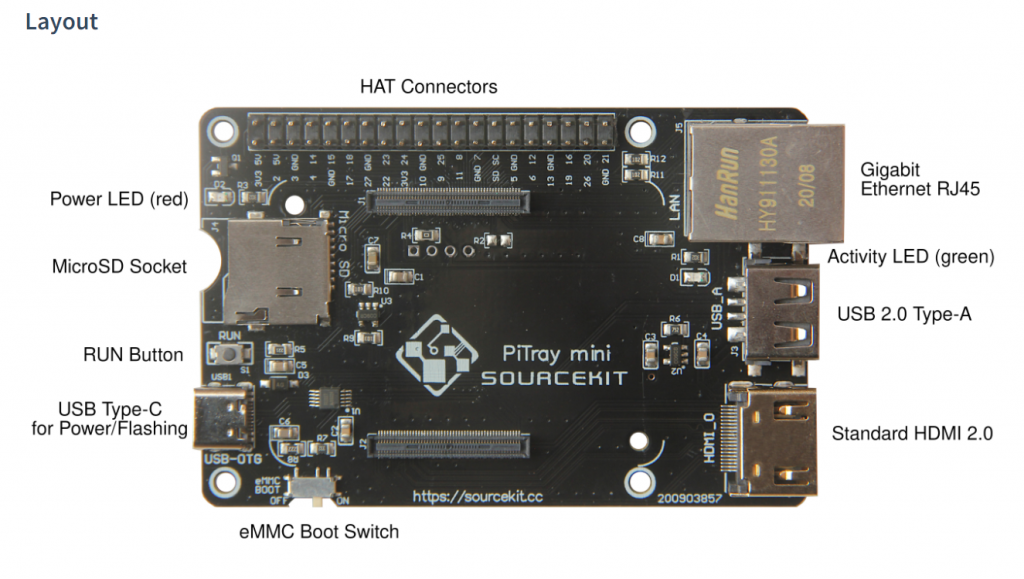
As you can see, there’s the good old GPIO, ethernet and microSD slot, but you only get a single USB port and a standard HDMI port (as opposed to 4 USB ports and 2 microHDMI on the Pi 4). You also do not get the DSI, CSI, audio jack or USB 3.0 hubs.
Some use cases for this is for cluster building and to exploit the advantages of the CM4’s eMMC over the Pi 4’s SD card for greater stability and speed.
The PiTray is a budget-oriented solution as compared to the official IO board as it comes in much cheaper.
Self-hosted server: Turing Pi 2
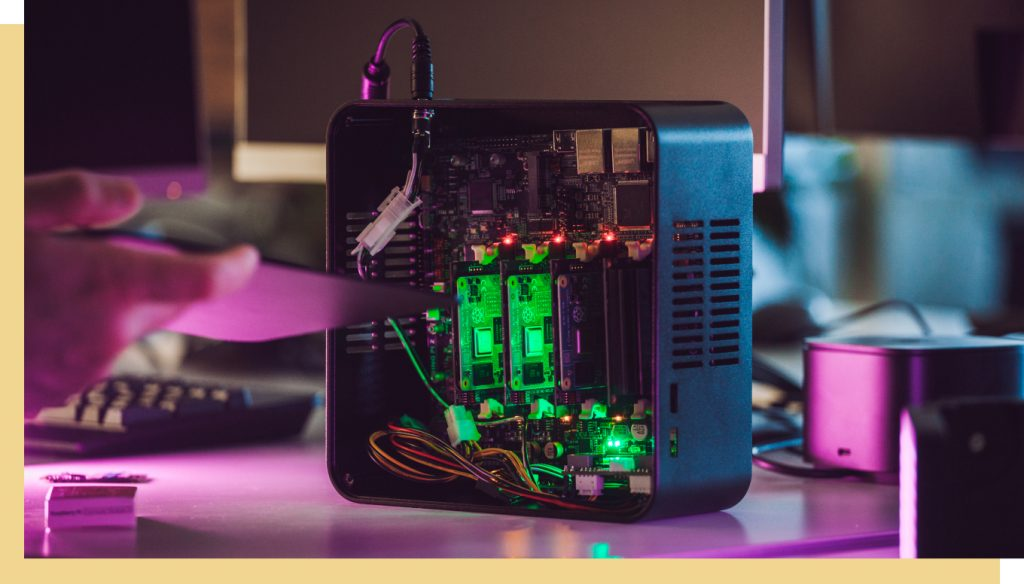
The Turing Pi 2 is a simple solution for people who want to host their own servers and run services such as a home assistant, media streaming, gaming servers, VPNs, IoT server, and much more.
Using the Raspberry Pi CM4, you can scale up or down depending on your server’s load. This has the benefit of ensuring your server is as equipped as it needs to perform its tasks, while ensuring that it’s not overloaded.
What can I do with the PCIe slot?
Theoretically, you can install any card that uses PCIe.
This includes graphics cards, storage cards via M.2, NVMe or SATA, WiFi cards, USB cards, and many more.
The limiting factor is the compatibility with the CM4, OS and driver availability.
For example, graphics cards are generally more difficult to run on the IO Board than something simpler like a USB card. The former almost always needs a driver and functionality is not guaranteed, whereas the latter does not require any drivers and you get full functionality.

A full list has been compiled by Jeff Geerling, available here. This website lists the following categories of PCIe cards:
- GPUs (Graphics Cards)
- USB cards
- M.2 and NVMe adapters
- Network cards (NICs) and WiFi Adapters
- Multimedia (A/V) and sound cards
- SATA cards and storage
- PCIe Switches and Adapters
- Other Cards (FireWire, time card, etc.)
Alternative carrier boards to the official IO Board
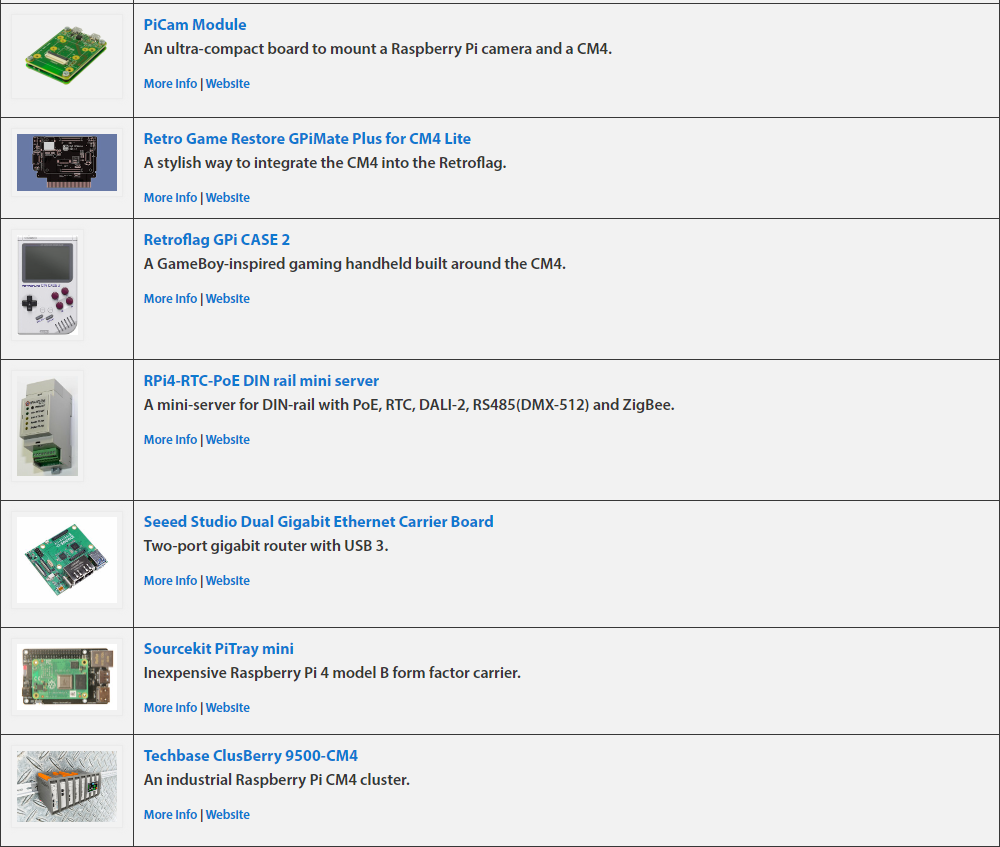
There are many carrier boards out there that provide different ports and functions to the IO Board.
You can find a compilation of carrier boards that might be better for your use case here.
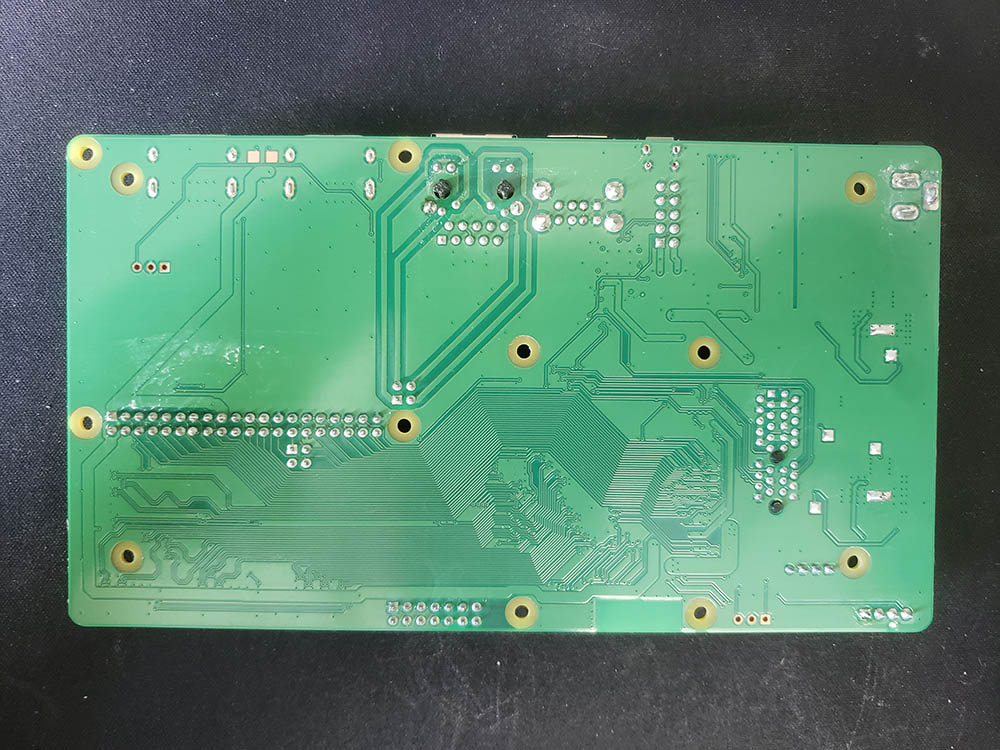
CM4 and IO Board gallery
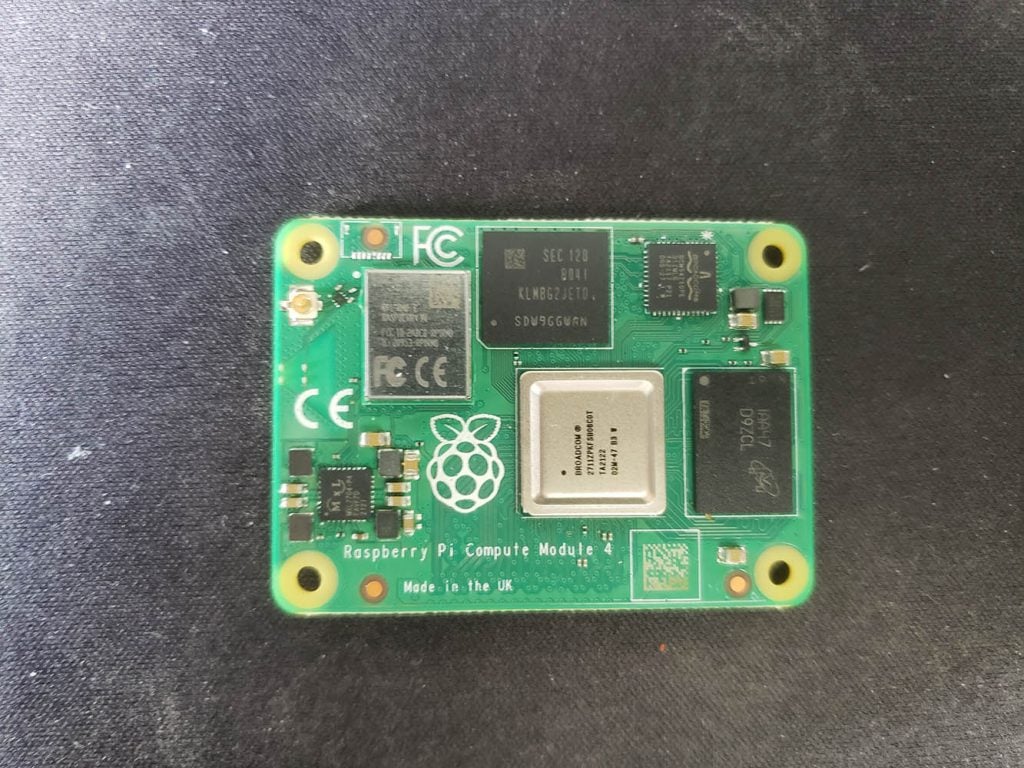
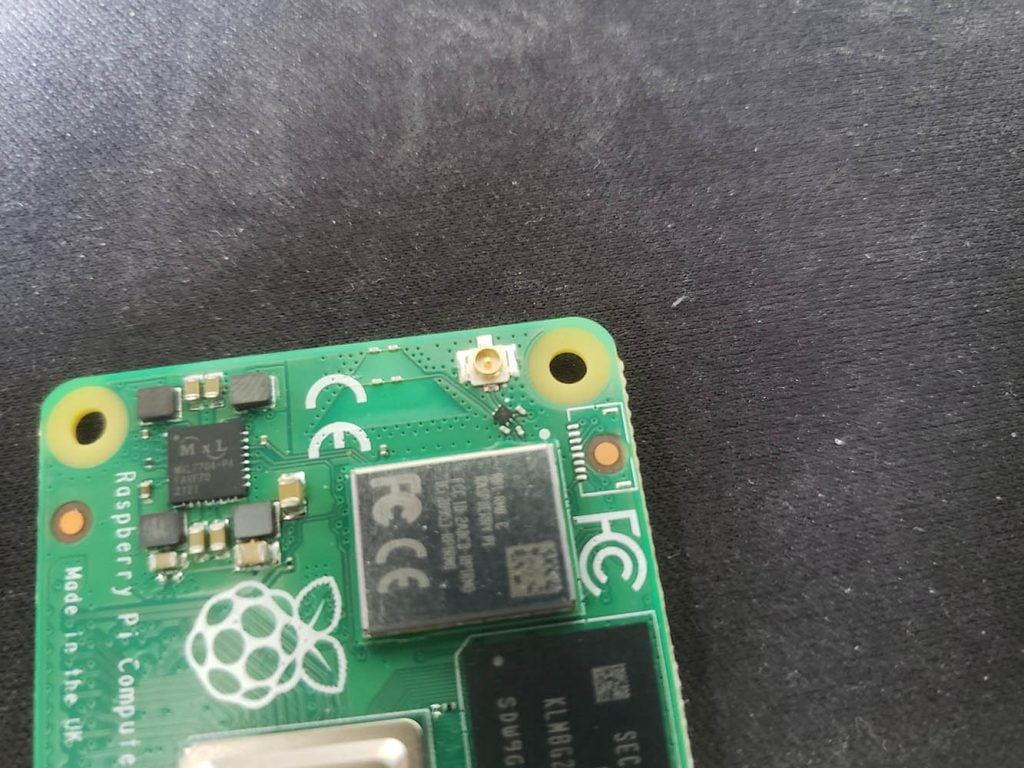
Official IO board
Where can I buy a CM4?
You can buy CM4 boards from our sister site, buyzero.de.
Industrial users: CM4 bulk orders and solutions
If you are an industrial user of the CM4 and need software and hardware solutions, you should contact us for bulk orders and advice.
We can design custom software and hardware solutions around the CM4.
In this era of shortage, we always allocate a portion of our CM4 stock for design and research purposes.
Want to learn about other Raspberry Pi products? Check out our article on the Raspberry Pi Pico W, here.
Ich vermisse zum CM4IO Board die Hinweise und Informationen zu den 2 steckbaren USB Anschlüssen. Man muss regelrecht nach diesen Adaptern suchen. Denn damit kann ich ohne äußere USB Brücke die Anschlüsse im Gehäuse unsichtbar verlegen.
Hi
I hope you are doing fine!
My name is Farah Bouali and I have completed my second computer engineering year.
Actually, I have been engaged in a project using a raspberry pi compute module 4 integrated in a waveshare board and I found some problems so I am writing you this mail hoping to get your kind supervision and guidance.
First, I couldn’t find a way to use the ADC Differential Inputs that already exist in my cm4. I want to get the values from an AKS 11 sensor (Temperature sensor) or any other sensor. In this case, how could I visualize the result? What should I put in my script? I am not even able to control GPIO inputs and outputs.
Second, while trying to read data from a mobile application. Though I was able to connect two devices (a Serial Bluetooth Terminal on my mobile and the Rpi) through “bluetoothctl” command and even able to visualize the data received through this command “minicom -b 9600 -o -D /dev/rfcomm0” but no script helped me reading this received data and use it to make specific orders (like turning on/off sensors)
All I want to do is get some information from any sensor and send it to a mobile app through ble protocol and if it’s possible to control this sensor functioning.
I would be very grateful if you could help me. I will be available on the phone(whatsapp) and mail for any question.
I have attached some links that I’ve worked with and I would be glad to hearing from you soon.
I am very thankful and looking forward to your response.
Waveshare configuration link: https://www.waveshare.com/wiki/Compute_Module_4_PoE_4G_Board#Isolation_GPIO.2FI2C
Project I want to start with: https://www.technologyrecipes.com/using-blueterm-app-to-communicate-over-ble-between-an-android-device-and-raspberry-pi/
Best regards,
—
Farah Bouali
2nd year computer engineering student at ENIS (National School of Engineers of Sfax)
(email address and phone number removed to protect Farah, the editor)
Dear Farah, as an engineering student you will need to study datasheets and talk to suppliers / manufacturers of your devices. It is part of your job as a student.
We can offer you paid consulting service to solve these problems, if you are interested.
According to RPiLocator.com, the CM4 (unlike the RPi model 4) is available. I have an Argon40 NAS enclosure that needs a RPi 4 to function; I have not been able to locate one after several months of attempts. So a RPi – CM4 board that emulates the RPi form factor but uses a CM4 to replace whatever RPi components are responsible for its scarcity might (in some cases, at least) solve the problem.
In your opinion, is this a practical approach to the RPi availability problem? Does such a board (to your knowledge) actually exist? Your site mentions a carrier board “Sourcekit PiTray Mini” which looks promising.
Thanks
Nick
Hi, dies the board come with jumpers to set the eMMC? Also, can it be powered by USB-C or do I need to purchase a barrel connecter charger?
If you are talking about the IO board, no, it doesn’t come with jumpers. I don’t think USB-C works with the IO board either because there’s no USB-C port. I used the barrel connector. Cost me $10 or so to buy one.
你好,请问一下如果CM4出现无法适配树莓派4B的镜像的问题,应该如何去解决
您能解释一下问题吗?
[…] last year, we published an article about the basics of the Compute Module 4 here. But so much has happened in the past year and a half, so we wanted to talk about the Compute […]
[…] What is the Raspberry Pi Compute Module 4 (CM4)? […]
[…] What is the Raspberry Pi Compute Module 4 (CM4)? […]