What You Can Do with a Compute Module 4
The Raspberry Pi Compute Module 4 (CM4) is a fantastic little board and a half-sibling of the Raspberry Pi 4 family that we talked about last week.
And last year, we published an article about the basics of the Compute Module 4 here. But so much has happened in the past year and a half, so we wanted to talk about the Compute Module 4 and everything you can do with it in 2023.
After all, Compute Modules are designed for people who want to make their own customized printed circuit board. And Raspberry Pi also produce official IO boards to help you get started in that endeavor!
A lot of people have written them off for makers and enthusiasts. They say things like, “Ahhh, Compute Modules are just for industry.” And that’s a reasonable take, of course, because makers and enthusiasts aren’t always making their own printed circuit boards.
But in this article I want to make the case that there’s still a lot that YOU can do with a Raspberry Pi Compute Module 4.
Admittedly, before we get started, I should say that Compute Module 4 projects aren’t typically very beginner-friendly. However, if you’ve got the determination, they will absolutely serve you well in a lot of projects!
History
First, it’s worth going over a quick history of the Compute Module offers from Raspberry Pi.
The initial Compute Module was unveiled in 2014 by Raspberry Pi Ltd.
As I mentioned above, the idea behind the Compute Module was to create something a little more customizable and a little more resilient. That way people and companies can create the PCBs they want and still get the computing power of the Raspberry Pi.
So you can use the hardware and software of the Raspberry Pi in your own system and form.
Furthermore, Compute Modules have extra input-output interfaces and can come with special flash memory.
After the Compute Module 1 came the Compute Module 3, and the Compute Module 3 Lite. The Compute Module 3+ and Compute Module 3+ Lite followed.
The 3+ corresponded to the update of the Raspberry Pi 3 B to the Raspberry Pi 3 B+. which primarily revolved around increasing the CPU clock from 1200 MHz to 1400 MHz and improving network capabilities.
And the Lite versions are modules that come without the eMMC flash memory.
And then, on October 19th, 2020, the Raspberry Pi Compute Module 4 was released.
The CM4 Specs
Much like the Raspberry Pi 4, the Compute Module 4 is super powerful, outperforming the Compute Module 3+ by virtually every metric.
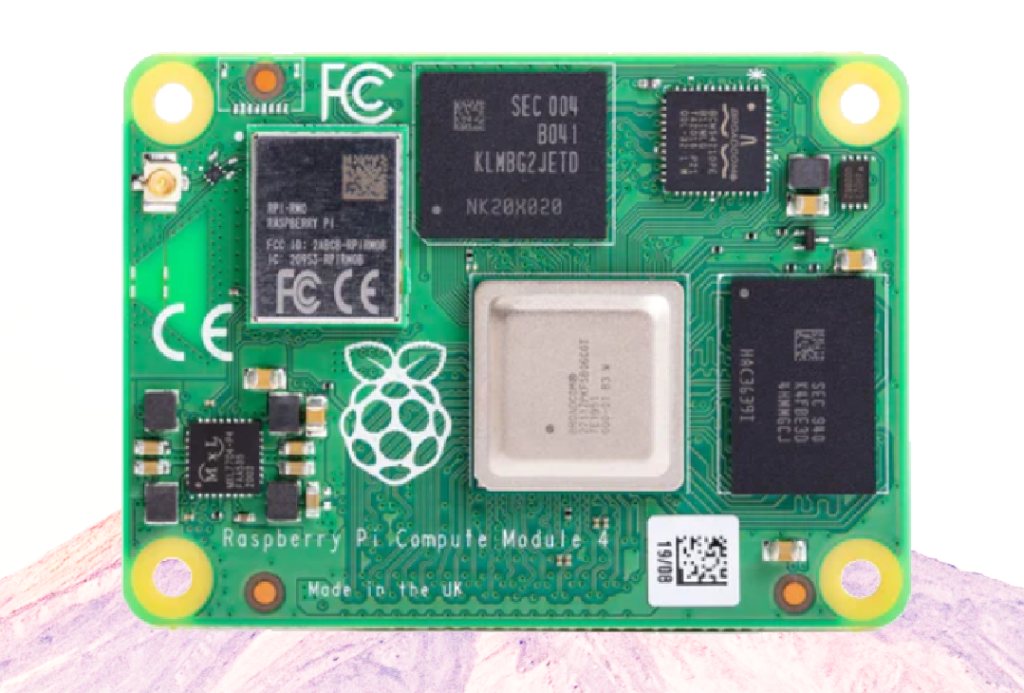
And just like the Raspberry Pi 4, it uses the Broadcom BCM2711 chip, with offers quad-core ARM Cortex-A72 (ARM v8) 64-bit System on a Chip (SoC) at 1.5 GHz.
It also shares the variations in LPDDR4-3200 SDRAM with ECC, meaning you could get one with 1GB, 2GB, 4GB, or even 8GB of RAM.
The Compute Module 4 can also carry a Cypress CYW43455 for WiFi and Bluetooth. So if you’re interested in 2.4 GHz or 5.0 GHz WiFi and Bluetooth 5.0 or BLE, then this is the option for you.
It takes a single +5V supply and then can supply peripheral devices 600mA at +3.3V and +1.8V.
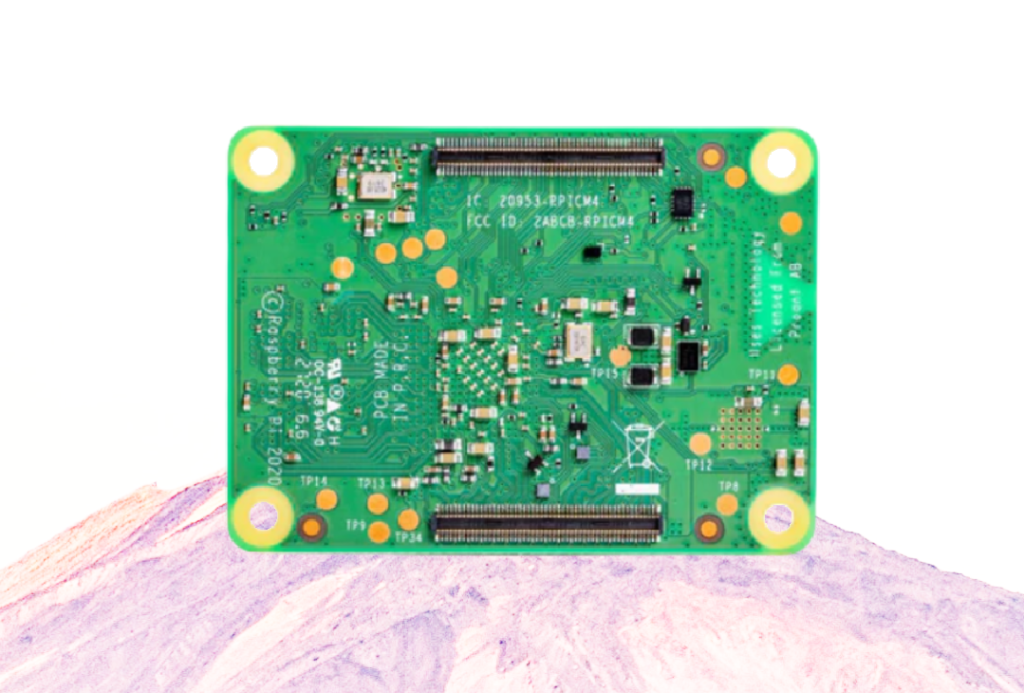
On the back of the CM4, you can see there are two 100 pin board-to-board connectors. These are the primary connections to hook up the CM4 to the printed circuit board of your choice.
And, one final thing to note is that the Compute Module 4 will be produced until at least January 2031. With the Raspberry Pi 4 only guaranteed production until January 2026, the difference in reliability is particularly obvious.
Compute Module vs. Raspberry Pi
What is the difference between a Raspberry Pi 4 and a Compute Module 4?
Isn’t a Compute Module just a Raspberry Pi without the ports?
Well, yes and no. There are three key things that a CM4 can offer you:
- eMMC flash memory
- a PCIe interface
- an external antenna hook-up
It’s worth briefly delving into all three of these.
eMMC stands for embedded MultiMediaCard. It is a type of non-volatile flash storage commonly used in small devices like smartphones, tablets, and single-board computers like the Compute Module 4.
The CM4 has a built-in eMMC storage chip that can vary in capacity. As I mentioned above, the Compute Module Lites do not come with any eMMC storage. But what’s important is that eMMC is way faster and more reliable than the micro SD cards you need for a typical Raspberry Pi.
PCIe stands for Peripheral Component Interconnect Express. It’s a high-speed interface to connect hardware components inside a computer. The Compute Module 4 supports PCIe through its GPIO (General-Purpose Input/Output) pins.
This means you can connect external PCIe devices to the CM4, such as SSDs (Solid State Drives), graphics cards, or other expansion cards. You can really get unbelievably high data transfer rates with PCIe.
Jeff Geerling’s PCIe GitHub repository
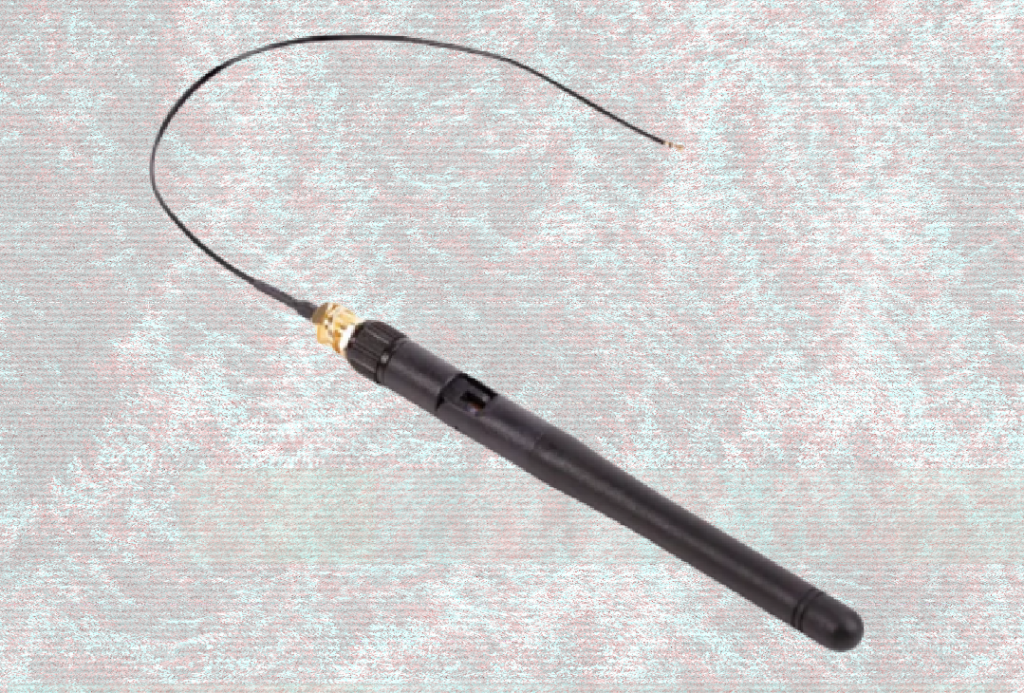
So now onto the external antenna, which can be connected to the CM4 to improve wireless communication capabilities.
Of course, some variants of the Compute Module 4 come with onboard Wi-Fi and Bluetooth functionality.
However, to enhance wireless connectivity and range, you can attach an external antenna to the CM4’s antenna connectors.
Aside from these three big distinctions, there are also two notable features that distinguish the Compute Module from a standard Raspberry Pi 4.
It’s also more temperature resistant. The operating temperature of the Raspberry Pi 4 is between 0°C and 50°C. The operating temperature of the Compute Module 4 is between -25°C and 80°C . That’s obviously a huge difference.
Although, if you want to test the CM4 at melting temperatures, I suppose you could check out the Waveshare CM4 Heatsink.
You might have also noticed from our article “Everything You Need to Know about the Raspberry Pi 4” that the Raspberry Pi 4 was upgraded from a default clock speed of 1.5GHz to 1.8GHz on November 9th, 2021.
That upgrade, however, did not apply to the CM4. As Eben clarified in the comments on the post:
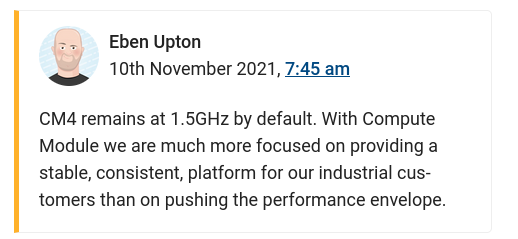
I should mention one thing that the CM4 is missing compared to the Raspberry Pi 4 and that is USB 3.0. Although the Raspberry Pi 4 has two USB 3.0 ports, you won’t get any with the CM4. So that is certainly a drawback.
CM4 Variations
One thing that stands out about the Compute Module 4 is that you can get 32 different variations of the board.
Depending on your needs, you can decide whether you want WiFi or not, how much RAM you want, and how much eMMC storage you want.
Do you want wireless connection? Yes or no?
How much RAM do you want? 1GB, 2GB, 4GB, or 8GB?
Do you want eMMC? If so, do you want 8GB, 16GB, 32GB?
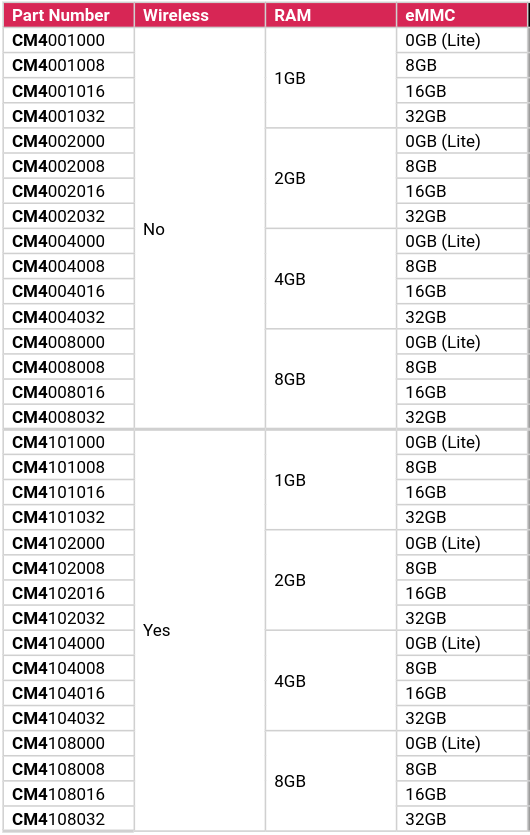
Again, that’s what’s so great about the CM4, you can really customize it to your exact specifications.
Compute Module Lite
At this point, you might be curious about the Compute Module Lite. If you don’t get a Compute Module 4 with eMMC, then what does it use for memory?
Well, in the case of the Compute Module 4 Lite, then you’re going to need to rely on a micro SD card. This is why the official I/O board for the Compute Module 4 has a micro SD card slot.
And if you want to hook up the CM4 to another board, you’re going to need to make sure that you can get a micro SD card into that as well.
The CM4IO Board
So now that we’ve cleared that up, let’s talk about the official I/O board – the CM4IO board.
The CM4IO board is an open-source breakout board that allows you to play with all the features and functions of the Compute Module.
So the idea here is that you can attach your CM4 to the board and then test out everything the Compute Module can do before you design your own printed circuit board.
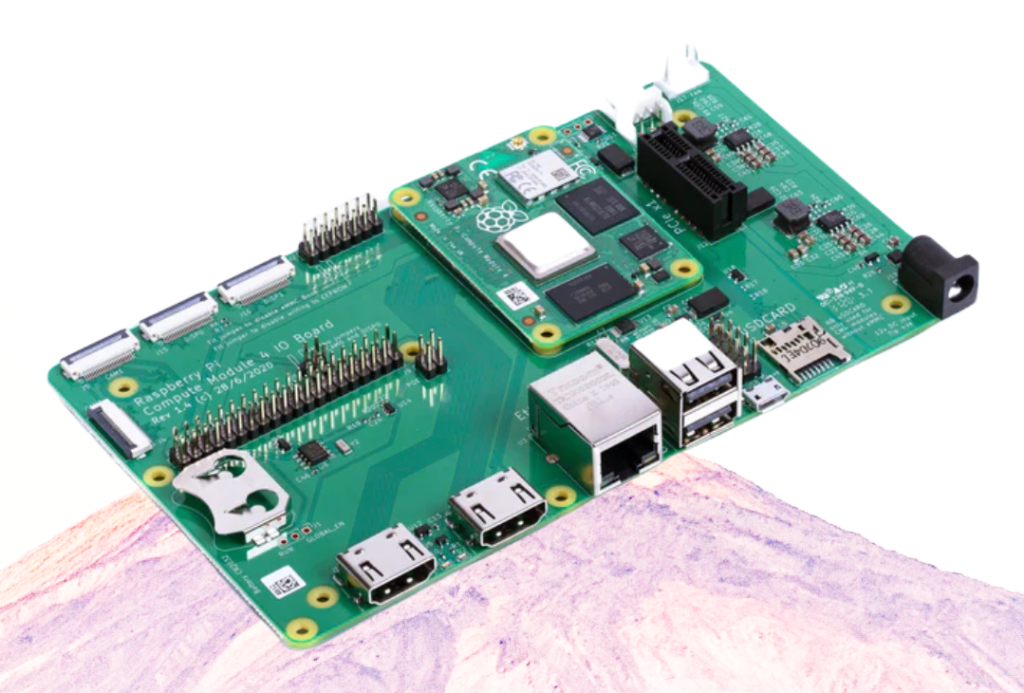
Let me cover the specifications of the CM4IO board, because it’s a lot.
First of all, you get an external power jack (+12V, +5V), along with two full-sized HDMI ports, two USB 2.0 ports, and Gigabit Ethernet RJ45 with Power over Ethernet (PoE) support.
You also get a Micro USB port, a standard fan connector, a Micro SD card slot (in case you went with the CM4 Lite), and a PCIe (Generation 2) Socket.
Additionally, the CM4IO board has two MIPI DSI display connectors and two MIPI CSI camera connectors. It is also set up perfect for standard Raspberry Pi HAT and has a Real-Time Clock with a battery socket.
I should mention here that it’s a rather large board, 160mm x 90mm, but that’s only because it has everything you could possibly want for an input-output board.
Raspberry Pi Ltd. has been gracious enough as well to make the board open-source, as I mentioned above. So, you can download the source files and edit them to meet your desired specifications (and also potentially make the board smaller!)
Projects
So now comes the million dollar question: What can you do with the Compute Module 4?
Obviously, if you’ve got a project that could benefit from eMMC storage, a PCIe interface, or a WiFi antenna, then it may make sense to use a Compute Module 4 rather than a Raspberry Pi 4, for instance.
But I want to show you nine really fantastic projects that others have already done specifically with the Compute Module 4.
Some of these projects are open-source and, unfortunately, some aren’t.
But all of them are guaranteed to pique your curiosity and inspire you to get building!
Project #1: A Compute Module 3D Printer
The first project is a 3D printer that uses the Compute Module 4 as a central controller. So the CM4 is hooked up to a printed circuit board that then controls all of the functions of the printer.
You can see an example of this with Pascal Wistinghausen’s Sigmoid S7P. A similar project is available over at element14.
One drawback of these is that neither of them are not open-source, so then you’re going to have to get creative and design your own printed circuit board. But you can at least turn to these for inspiration!
Project #2: Compute Module NAS
Network Attached Storage, or NAS, is a super common use-case for the CM4, primarily because of the single-lane PCIe 2.0 that I talked about above.
Again, the PCIe makes transferring data super quick and easy, so you can turn your Compute Module into your own personal Cloud.
Unlike the 3D printer examples, this project is freely available in this CM4 NAS repository on GitHub. And the repository includes the printed circuit board files. So you just need to download them to get yours from a PCB manufacturer.
Project #3: A Compute Module TV Stick
Do you use your Raspberry Pi as a media center or to play RetroPie games?
Then you should turn your Compute Module 4 into a TV Stick. You can get the same power you get with your Raspberry Pi and plug it directly into your monitor or TV.
Throw out that HDMI cable, because the board will hook it up for you. You can find an example here.
Unfortunately, this one also isn’t open-source. But this project is sure to get your brain juices flowing.
Project #4: A Compute Module Stereoscopic Camera
When it comes to open-source projects, though, this is a really fantastic one.
Using the Compute Module 4, you can create 3D photos, record stereoscopic videos, or even make robots with Robot Operating Systems onboard. All of this is done by the StereoPi along with the StereoPi v2 PoE Shield.
And the StereoPi isn’t that far away from another open-source stereo-microscope called the Stereo Ninja. This is what’s so valuable about having MIPI CSI camera access with the CM4.
You can really make use of it with stereoscopic cameras.
Project #5: A Compute Module Hardware Upgrade
One of my favorite companies is MNT for their commitment to open-source hardware. For example, they create laptops that are entirely open-source and freely available to modulate and customize.
To that end, they constantly share the ways in which people are transforming their products. And one device that some have turned to is the Compute Module 4. What the CM4 can offer you is a cheap and easy way to upgrade your hardware.
And, of course, you don’t need an MNT device to utilize the CM4.
But use this as inspiration for upgrading your device’s hardware!
Project #6: A Compute Module IoT Local Server
One thing you can do with a Compute Module 4 is use it in a home automation server. And here there’s probably nothing more well-known that Home Assistant Yellow. This very cool project began it’s life as a crowd-funded custom printed circuit board.
They offer an open-source home automation server that runs on the CM4. So you can check that out and use that as a jumping-off point.
Project #7: A Compute Module Cyberdeck
If you’re an avid reader of this blog, then you know that we at pi3g have a real passion for cyberdecks, which is why we’ve posted so many articles about awesome cyberdecks:
For the uninitiated, I should clarify that cyberdecks are typically portable computers that are designed to be both useful and aesthetically pleasing. Their sort of like cyberpunk laptops.
And while some people turn towards standard Raspberry Pis for their cyberdeck projects, some have shown that you can create a very cool cyberdeck with a Compute Module 4.
Project #8: A Compute Module Cluster
This is actually one of the most popular uses of Compute Modules.
If you’re looking to run multiple single-purpose Raspberry Pis simultaneously, then you could consider building a Compute Module Cluster. A cluster is a number of Raspberry Pis linked to one another.
Clusters can be used for a number of reasons – distributed computing, web servers, a Docker Swarm, a gateway for IoT, or you could use a Compute Module cluster as a NAS server. You could also use it for machine learning or application testing. Really, the options are limitless.
The most famous example of a Compute Module cluster is surely the Turing Pi, so you can check that out if you want more details.
Project #9: A Compute Module Modular Computer
My all-time favorite project with the Compute Module 4 is Pockit – a handheld modular computer. It centers around a board that you can then add magnetic modules to.
You can move these modules around to do things like create a handheld gaming console, an LED board, or even a multi-SSD NAS. It’s still a work-in-progress, but you can check out a demonstration video here:
Those are merely nine out of dozens and dozens of projects that you could create with the Raspberry Pi Compute Module 4. So now that you’re feeling inspired, you can go off and get started on your next CM4 project!
Where Can I Get One?
If you don’t have one already, then check out our sister company, buyzero.de.
There you can find Compute Modules and Raspberry Pis of every variety in stock.
Furthermore, we are an approved reseller of Raspberry Pis. So you’re getting a full guarantee on their authenticity and quality.
Conclusion
The big point I wanted to make with this article is that there are things that you can do with the Raspberry Pi Compute Module 4.
It isn’t just something for industry, but it’s also something that makers and enthusiasts can play with.
This little board is super useful and super powerful. It’s got the strength of a Raspberry Pi 4, but it’s way more durable and way more reliable.
In the end, the Compute Module 4 is a great device your next project!
None of the Cyberdeck projects use the CM4, which was disappointing.
The link for the cyberdeck projects that use the CM4 is at the end of that section: https://hackaday.io/project/186854-zeetwin-rpi-cyberdeck
Wenn die Dinger jetzt auch noch zu kaufen wären. Versuche seit Anfang Jahr Compute Module 4 zu bekommen. Kein Händler hat welche. Überall heisst es nur “derzeit nicht lieferbar”. Und wenn doch mal irgendwo ein paar auftauchen, dann sind es ausschliesslich welche ohne Funkchip.
Das CM4 bietet da in vielen Bereichen wirklich deutlich mehr Möglichkeiten, als der Pi4. Habe selbst seit einiger Zeit einen Webserver auf einem Pi laufen, vor allem weil es auch IO boards gibt, mit denen man NVMe SSDs benutzen kann ist es eigentlich für diesen Anwendungszweck perfekt (ich benutze das IO board von Andino https://youtu.be/KCN53lPlIiw )
Ja, und mit Raspberry Pi 5 hast Du jetzt neue Pläne?