C extension for MicroPython on Raspberry Pi Pico
This is a guide on how to write and run a basic C extension for MicroPython on the Raspberry Pi Pico. I will cover reasons for extending MicroPython, how to write the extension module, how to compile it and how to install it on the Pico. If you want to read more about this topic, please refer to https://docs.micropython.org/en/latest/develop/extendingmicropython.html
Introduction
Why extend MicroPython?
There can be multpiple reasons why you might want to extend MicroPython. Since it is a trimmed down version of Python, MicroPython is not performing very well when it comes to computationally heavy tasks (similar to Python). C on the other hand is really well suited for such tasks. A C extension for Micropython enables you to perform those computations through C language and use the results in MicroPython. This can speed up some processes by an order of magnitudes.
A second reason might be, that you want to interface some hardware which uses a C API from within MicroPython.
Types of MicroPython C extensions
There are to different ways to extend MicroPython : external C modules and native machine code in .mpy files.
To run an external C module you need to recompile it into the MicroPython firmware. This is a rather complicated process, which is why this guide will focus on the second alternative. If you are however interested in this approach, you can read more about it on these webpages: https://docs.micropython.org/en/latest/develop/cmodules.html https://www.raspberrypi.org/forums/viewtopic.php?t=300352
The .mpy is a file that stores compiled native machine code and can be linked dynamically. This makes it much more flexible since you don’t need to recompile the entire MicroPython firmware.
Write the extension module
Writing the extension module is the easiest part of extending MicroPython. I will show you how to do it by looking at a simple example. To start, we will create a new directory called factfib. Open a new terminal window, cd into the new directory and create a new file called factfib.c. If you created the directory on a Raspberry Pi under Dekstop, the command looks like this.
cd ~/Desktop/factfib

touch factfib.c
Open factfib.c in your favorite text editor and enter the following code:
#include "py/dynruntime.h

STATIC mp_int_t factorial_helper(mp_int_t x) {
   if (x < 1) {
      return 1;
   }
   return x*factorial_helper(x-1);
}

STATIC mp_obj_t factorial(mp_obj_t x_obj) {
   mp_int_t x = mp_obj_get_int(x_obj);
   mp_int_t rslt = factorial_helper(x);
   return rslt;
}

STATIC MP_DEFINE_CONST_FUN_OBJ_1(factorial_obj, factorial);

STATIC mp_int_t fibonacci_helper(mp_int_t x) {
   if (x <= 0) {
      return 0;
   }
   else if (x == 1) {
      return 1;
   }
   else {
      return (fibonacci_helper(x-1) + fibonacci_helper(x-2));
   }
}

STATIC mp_obj_t fibonacci(mp_obj_t x_obj) {
   mp_int_t x = mp_obj_get_int(x_obj);
   mp_int_t rslt = fibonacci_helper(x);
   return mp_obj_new_int(rslt);
}

STATIC MP_DEFINE_CONST_FUN_OBJ_1(fibonacci_obj, fibonacci);

mp_obj_t mpy_init(mp_obj_fun_bc_t *self, size_t n_args, size_t n_kw, mp_obj_t *args) {
   MP_DYNRUNTIME_INIT_ENTRY

   mp_store_global(MP_QSTR_factorial, MP_OBJ_FROM_PTR(&factorial_obj));
   mp_store_global(MP_QSTR_fibonacci, MP_OBJ_FROM_PTR(&fibonacci_obj));

   MP_DYNRUNTIME_INIT_EXIT
}
Let me explain the code above: In MicroPython and Python, every variable is an object. Therefore in C we represent them as mp_obj_t. But a C program can only work with C type variables, which is why we need to transform the object into a C type. This is called Marshalling and MicroPython provides functions to extract any C type from an object.
This webpage by Oliver Robson is really helpful for Marshalling https://mpy-c-gen.oliverrobson.tech/. Furthermore you can find Marshalling examples in the MicroPython documentation https://docs.micropython.org/en/latest/develop/natmod.html. I advise you to read this article if you need further explanation.
Build the extension
We build the extension into a .mpy file by using a Makefile. But we need to set up a few things first. Make sure your terminal is still opened in the factfib directory. Then clone the MicroPython GitHub repository.
sudo apt-get install build-essential libreadline-dev libffi-dev git pkg-config gcc-arm-none-eabi libnewlib-arm-none-eabi

git clone --recurse-submodules https://github.com/micropython/micropython.git

pip3 install 'pyelftools>=0.25'
These installations will take a while, if you want to save time and you know what you are doing, you only need to clone the /py and /tools directory from the micropython repository and put them inside a micropython folder inside the factfib folder (skip the second command).
While the installation is running we can use the time to write the Makefile. Simply execute
touch Makefileand open the newly created file in a text editor.
MPY_DIR = micropython

MOD = factfib

SRC = factfib.c

ARCH = armv7m

include $(MPY_DIR)/py/dynruntime.mk
You might have noticed that we set the ARCH variable to armv7m although the pico is armv6m. We have to do this because the armv6m architecture is (at the moment I’m writing this article) not supported by the dynruntime.mk tool.
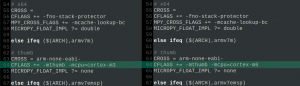
But luckily we can still compile a working extension for the Pico. We just need to modify the dynruntime.mk file, which should be located under micropython/py/dynruntime.mk. Open it and under Architecture configuration in armv7m find the CFLAGS variable (should be line 64). Change -mcpu=cortex-m3 to -mcpu=cortex-m0 and save the file.
Then after everything is installed execute
makeand the factfib.mpy file will be created.
Install and test the extension
The last step is installing and testing. For this we utilize the filesystem that Micropython creates on the Raspberry Pi Pico. First we need to flash the Pico with the MicroPython firmware. the easiest way to do this is to use the Thonny IDE (preinstalled on Raspbian/Raspberry Pi OS).
If you are not using a Raspberry Pi to programm your Pico or if you never used MicroPython on the Pico before then please refer to the getting started with MicroPython guide by Raspberry Pi https://www.raspberrypi.org/documentation/rp2040/getting-started/#getting-started-with-micropython
If you are using Windows you should check out this blog Post about the Raspberry Pi Pico and MicroPython on Windows https://picockpit.com/raspberry-pi/raspberry-pi-pico-and-micropython-on-windows/
Close Thonny after you have flashed your Pico with the MicroPython firmware and install rshell. We use rshell to access the filesystem from the command line.
sudo pip3 install rshell
rshell --version
This prints the rhsell version if everything is set up correctly. Then unplug the pico and plug it in again (without holding BOOTSEL button) to make sure nothing is trying to access the file system. Now we need to execute
rshell -p /dev/ttyACM0 --buffer-size 512

cp factfib.mpy /pyboard/factfib.mpy
To test the installation you could use either rshell or the Thonny IDE to save your .py files on the Pico but I will demonstrate how to use the MicroPython interpreter over the minicom.
So first press Ctrl+c to leave rshell and then install minicom via
sudo apt install minicomnow we can access the Picos REPL (Read-eval-print loop)
minicom -o -D /dev/ttyACM0The three closing angle brackets >>> indicate that the MicroPython interpreter is running. Now we can import our extension and work with it as usual.
>>> import factfib as ff

>>> ff.factorial(5)

>>> 120

>>> ff.fibonacci(7)

>>> 13
Congratulations! You have created your first MicroPython C extension for the Pico! The next step is to learn how to write and compile more complex modules. A good way to start is by testing how the Marshalling of lists and dicts works (see the Marshalling webpage from above).
If you have any questions regarding this post, feel free to write a comment.
Apart from the error in the c program it worked a treat. Thanks.
STATIC mp_obj_t factorial(mp_obj_t x_obj) {
mp_int_t x = mp_obj_get_int(x_obj);
mp_int_t rslt = factorial_helper(x);
return mp_obj_new_int(rslt);
}
Thank you for your feedback 🙂
How to configure joomla that can retrieve the data from mysql?
I tried to do the above, but various things dont work out as described:
– I followed the instructions above, got micropython, modified the makefile as described
– I do make (but I get a factfib.native.mpy file instead of factfib.mpy)
– I copy the factfib.native.mpy file to the pico as factfib.mpy
(I tried rshell but I got a “timed out or error in transfer to remote: b””, but I could copy it over using Thonny)
– I can import the module (in thonny or rshell – the same) without errors
– I try and run the “ff.fibonacci(5)” but then I get:
“Traceback (most recent call last):
File “”, line 1, in
AttributeError: ‘module’ object has no attribute ‘fibonacci'”
What do I do wrong?
Did you eventually get it to work?
Now you can compile to armv6 so just change this line in the Makefile and no need to change the micropython code
ARCH = armv6m
I had a few errors compiling the factfib.c, where are the fixes:
// missing the ” in the end.
#include “py/dynruntime.h”
// convert the return value to mp_obj_t
STATIC mp_obj_t factorial(mp_obj_t x_obj) {
mp_int_t x = mp_obj_get_int(x_obj);
mp_int_t rslt = factorial_helper(x);
return mp_obj_new_int(rslt);
}
Thank you for the information, Paulo!
I followed all the instruction and ended up with a built facfib.mpy file. I used
ARCH = armv6m
When loaded into the Pico I get this error:
ValueError: incompatible .mpy file
My Pico requires the following mpy values:
mpy version: 6
mpy sub-version: 2
mpy flags: -march=armv6m
Checking the first two bytes of the file give version 6 and sub-version 6.
Is there a way to correct this please?