Set up a VPN Server with Raspberry Pi

This article covers how to turn your Raspberry Pi into a VPN server.
I was inspired when one of my friends was going away on a long trip and wanted a VPN.
The benefit of having a VPN, he explained, was that it allowed him to access his home network and files.
That’s pretty standard.
He also mentioned that he’d have an easier time logging into banking apps and other services if he logs in through his home network.
Having an overseas IP address throws red flags and it would cause him to need to do Captcha tests and 2FAs.
So that made me think of whether the Raspberry Pi would work in this case.
Check your router first
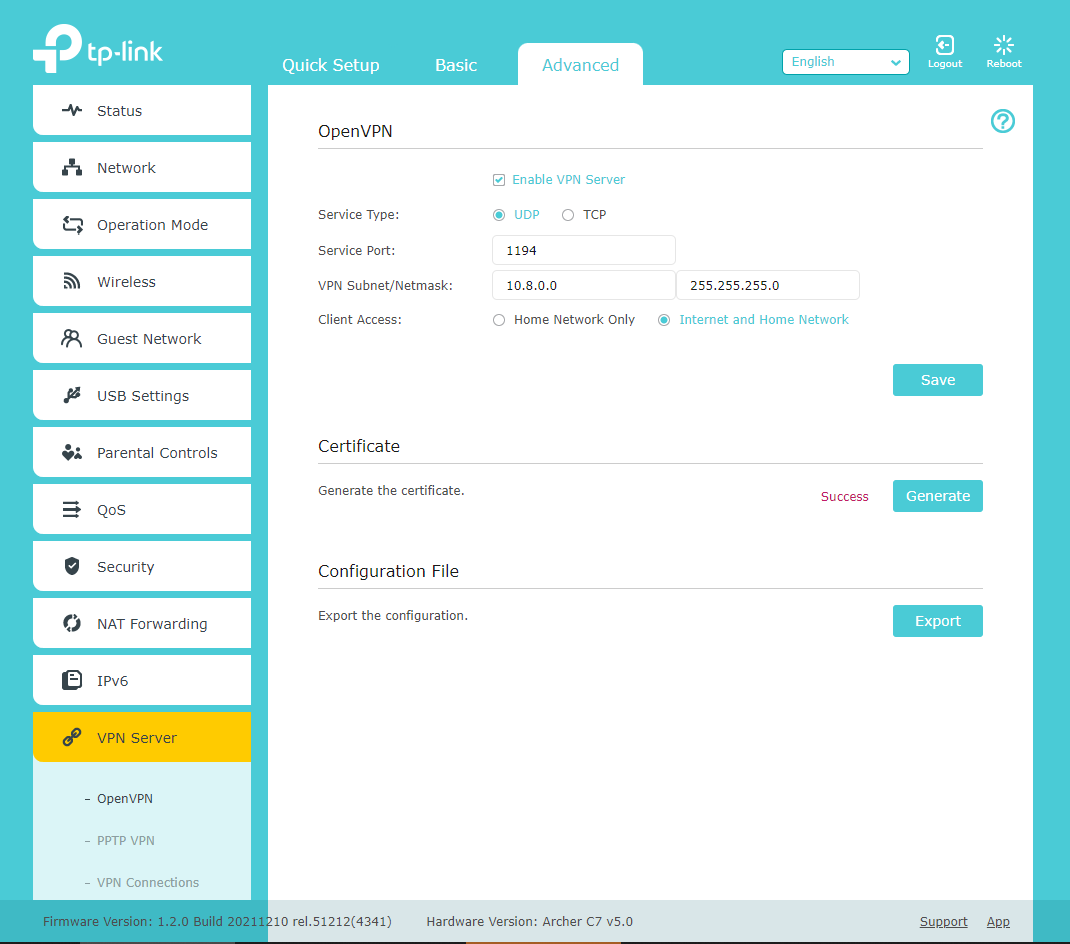
An important detail here is to check whether your router can act as a VPN server.
That would be the most reliable solution. Frankly, it was also the easiest and least tedious solution.
I have a TP-Link Archer C7 which has the ability to run a VPN server using OpenVPN or PPTP VPN. In less than five minutes, I followed the instructions and managed to get it running.
Then all I had to do was install OpenVPN on my devices and use the configuration file.
If, however, you have a router that doesn’t support VPN connections, then follow along…
What do I need to create a Raspberry Pi server?
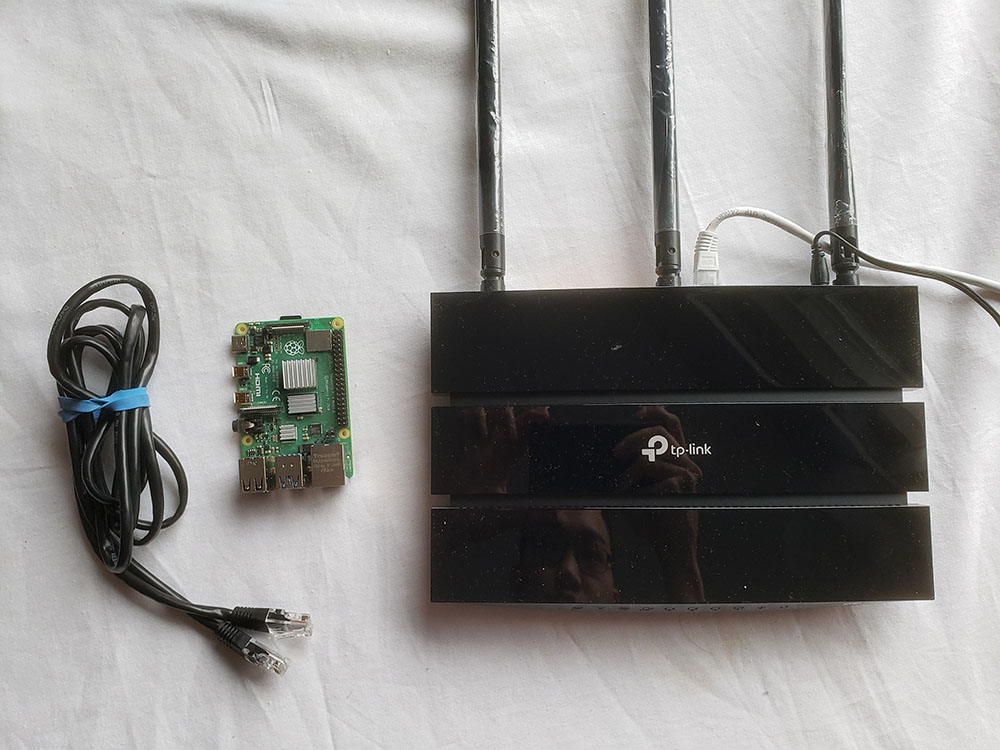
First and foremost, you will need a Raspberry Pi.
It would be ideal to have a Raspberry Pi with a wired ethernet connection such as the Raspberry Pi 4 for maximum reliability and speed.
If you choose these devices, then, you will need an ethernet cable to connect the Raspberry Pi to your router.
And in order to ensure your Raspberry Pi is connected via wired ethernet, you should disable the wireless connection.
However, PiVPN has successfully run on a Zero-series Raspberry Pi, so you could use that too.
Install PiVPN

Head to pivpn.io for more information about the software.
To install it, run the installation command curl -L https://install.pivpn.io | bash in your Terminal.
This step can take a while, but once it’s done, you will see this intro screen.
DHCP Reservation
The PiVPN is a server, so it needs to have a static IP address to function properly.
If you are able to create a DHCP reservation…
Not all routers allow you to create a DHCP reservation, so if you can’t find a section for this setting, skip to the next section.
I have a separate modem and a router that I bought so I could create a DHCP reservation to ensure PiVPN is on the same IP address all the time.
Every router is a bit different, so you’d have to Google the exact instructions for creating a DHCP reservation for your router.
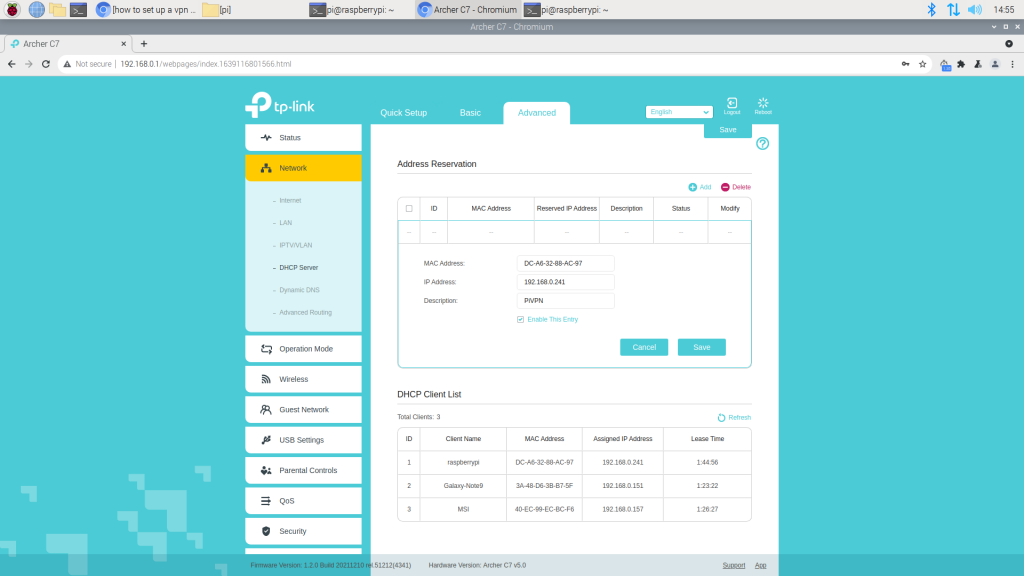
In case you use a TP-Link Archer C7, like I do, you’d go to Advanced > Network > DHCP Server.
Under the Address Reservation section, I clicked on Add. I needed my MAC Address (not shown in PiVPN) and the IP address provided by PiVPN.
Finding your MAC Address
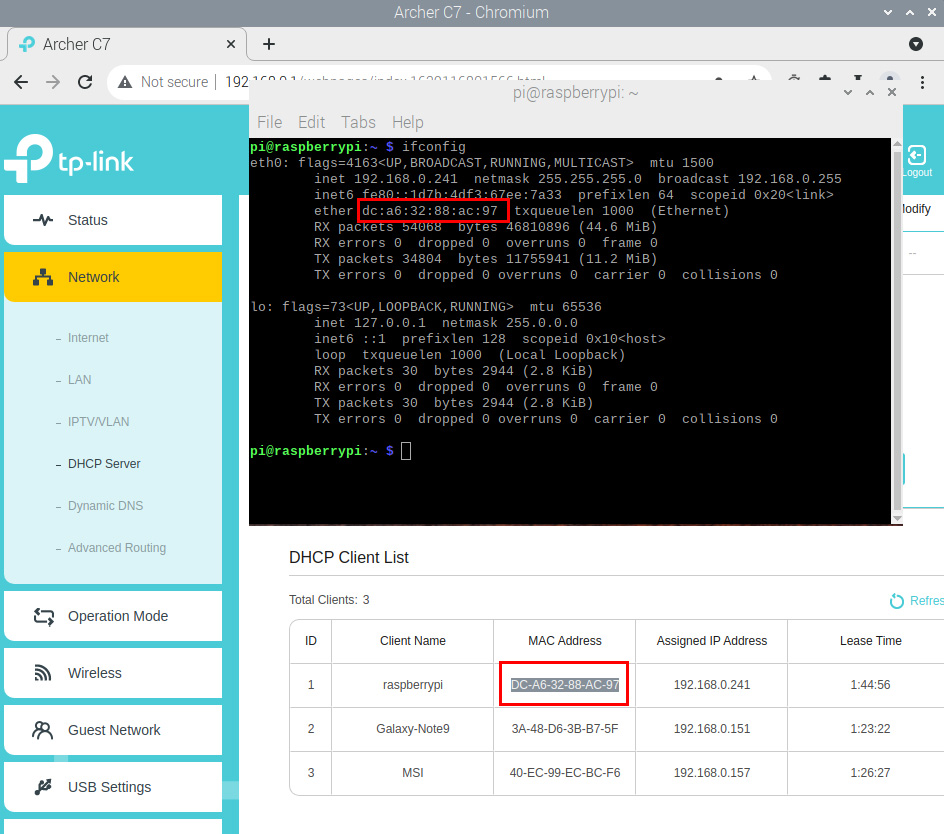
There are two ways you can find your MAC address.
Most conveniently, my TP-Link router displayed my MAC address “DC-A6-32-88-AC-97” in the table of DHCP clients.
Alternatively, you can open up a Terminal and type in ifconfig.
Since you’re connected via wired ethernet, look for “eth0” and on the line where it says ether, that’s where your MAC address is.
If you can’t create a DHCP reservation,
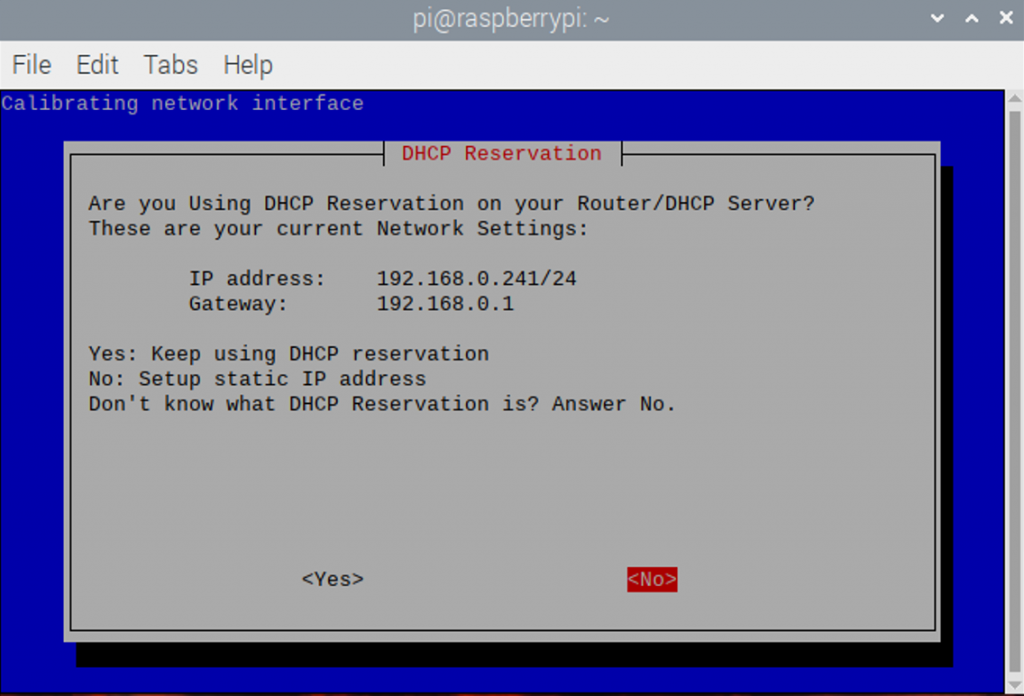
In this menu, press “No” to set up a static IP address.
In the next menu, you will need to configure your static IP address to something that is not within the range of IP addresses that your router will assign devices.
For example, my router assigns connected devices an IP address 192.168.0.100 to 192.168.0.249. So, I can assign PiVPN an IP address of 192.168.0.250.
It’ll then ask you for the gateway IP address. You can leave this as default unless you have a different gateway. It’s usually the IP address of your router.
Finally, press OK on PiVPN until you reach the “Local Users” page.
Local users
In the “Choose A User” page, I chose the one and only user, pi.
In the latest updates of the Raspberry Pi OS, you no longer have “pi” as a default user, so just be aware.
Press OK.
Installation Mode
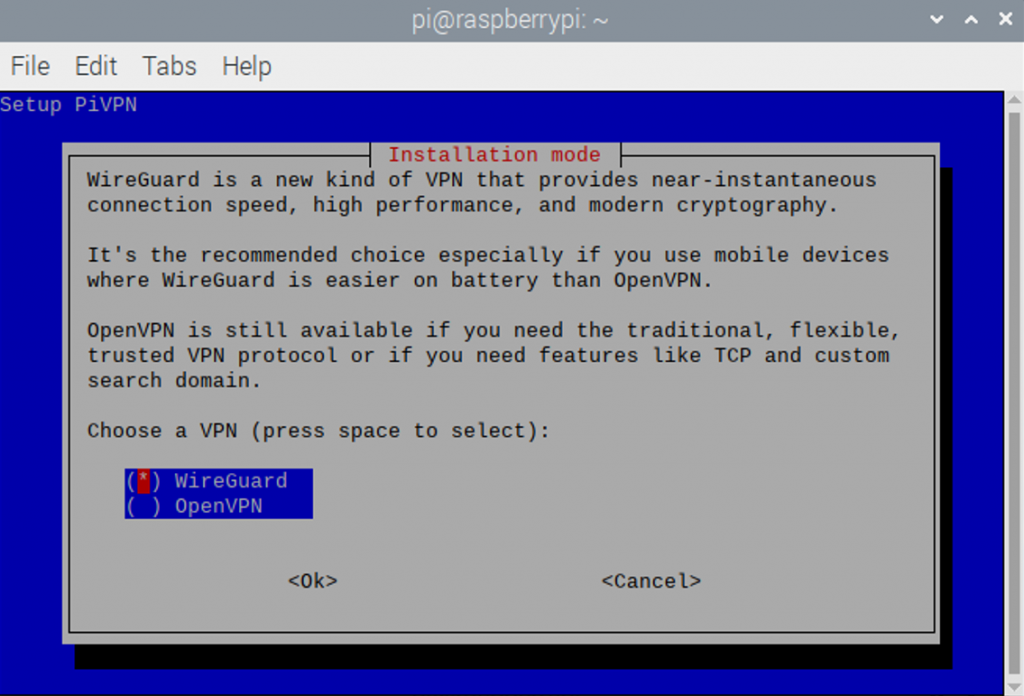
Here, it’ll ask you whether you want to use WireGuard or OpenVPN. I went with WireGuard because it was recommended.
Default Wireguard Port
Unless you need another port, you can just press OK and use the default 51820 port.
DNS Provider
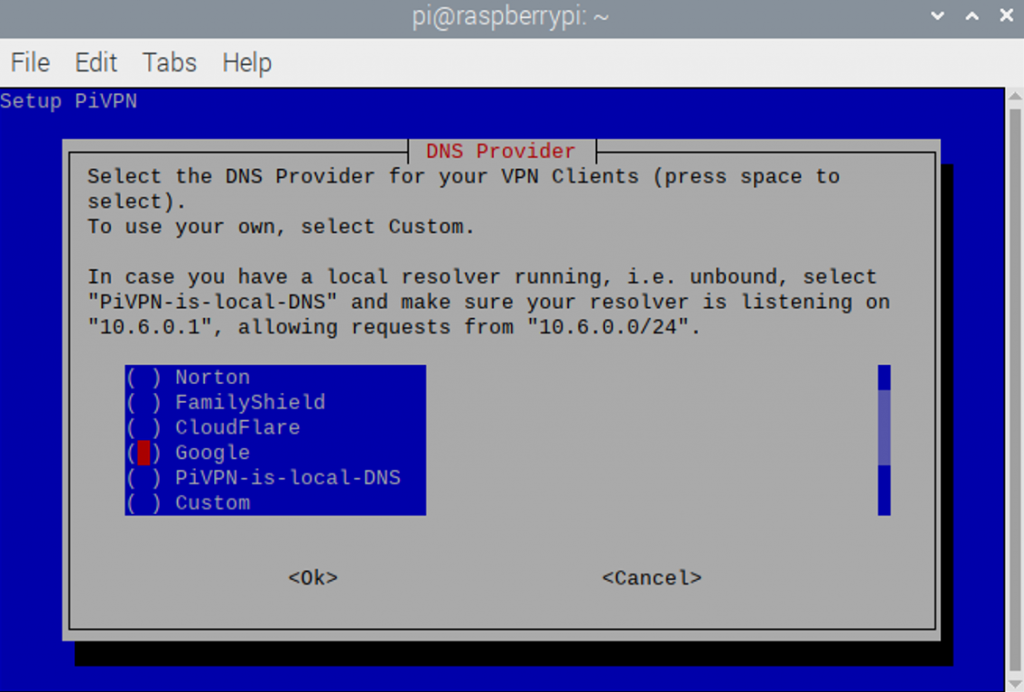
There are many choices for DNS providers here and I just went with Google for the ease of set up.
Public IP or DNS
What you’re seeing here is your public IP address and this will be the IP address you’ll use to connect to your VPN.
Unattended Upgrades
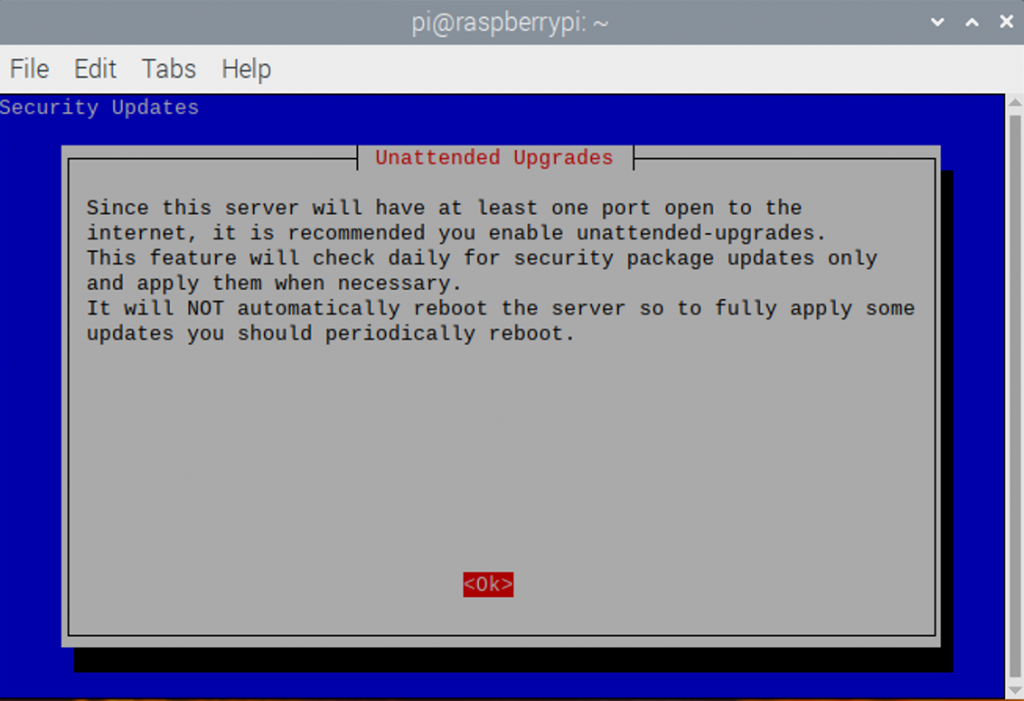
I enabled unattended upgrades because I wanted the security upgrades.
Time to add client profiles
Sweet! You’ve made it to the “Installation Complete” menu.
Setting PiVPN up on the Raspberry Pi is half the battle. The next half is configuring your client profiles so that you can connect computers, phones and other devices to it.
Here’s how:
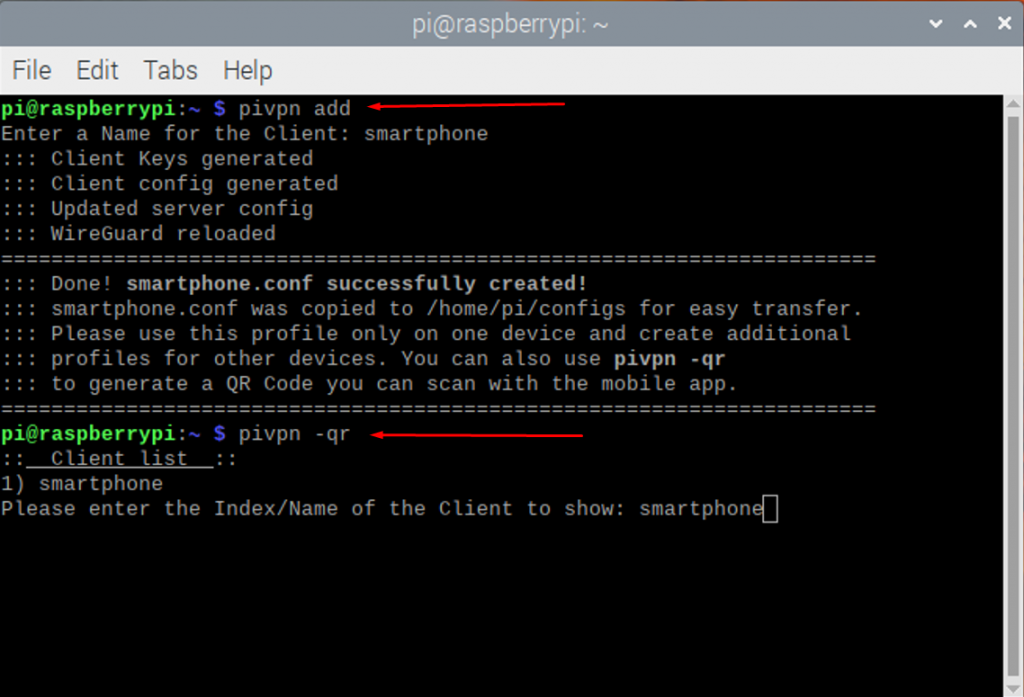
Open up a Terminal and type “pivpn add”
Enter a name for the client. You can use something like “client1”, “client2” or something more intuitive like “smartphone”, “television”, etc.
Press Enter.
When it’s done, you will see a message saying it’s done.
PiVPN would have generated a .conf file that you can use with Wireguard apps.
However, there’s an even easier way to get the configuration onto your phone.
Setting up an Android phone
In the same terminal, enter pivpn -qr
Then, enter the client that you want. There’s only one right now named “smartphone”.
So, enter “smartphone” and press enter.
If everything goes well, you will see a QR code that you can scan with the Wireguard app on your smartphone.

However, if it doesn’t, it will look garbled. This is because the encoding of your Terminal is wrong.
If this happens to you, you can copy the smartphone.conf file onto your phone and point the Wireguard app to the file.

Another way is to try to ssh into the Raspberry Pi and run the command qrencode -t ansiutf8 < /home/pi/configs/smartphone.conf (change “smartphone” to whatever you named your client).
The QR code was generated successfully when I used ssh on my Windows computer.
Setting up WireGuard on your computer
There are two things you need to do. Download the WireGuard app for your computer and also get the .conf file from your Raspberry Pi.
You can download the WireGuard app for Windows, Linux and Mac here.
Once you have that, create a new profile by using pivpn add.
Type in the name of your config file. I used msi-pc, which generates a msi-pc.conf file.
In order to copy the file to your PC, the easiest way is to copy it using a command. You should have SSH access enabled on the Raspberry Pi OS.
If you are on Windows like I am, you would use this command:
pscp.exe [your-user-name]@[your-pi-ip-address]:/home/pi/configs/[wireguard file].conf [local-dir]
Here’s what mine turned out to be like:
pscp.exe [email protected]:/home/pi/configs/msi-pc.conf
In the app, press “Add Tunnel” and locate your .conf file.
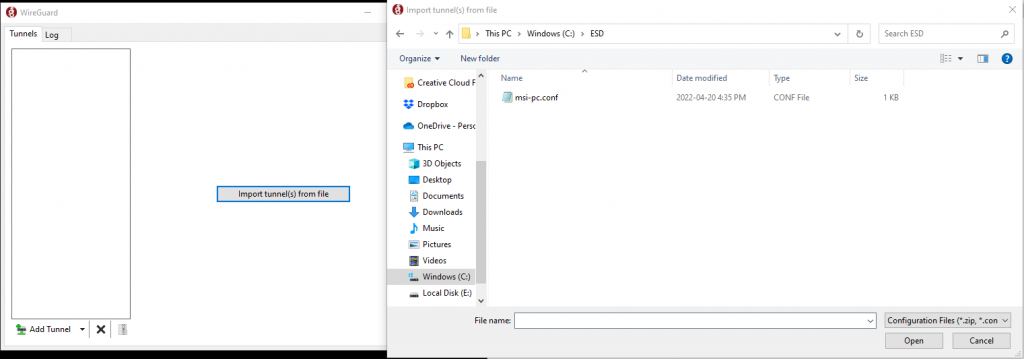
Activate and you are done!
Setup port forwarding on your router
If you’ve followed the steps up until now, you will be able to enable the toggle on your Wireguard app, but you won’t be able to get on the internet.
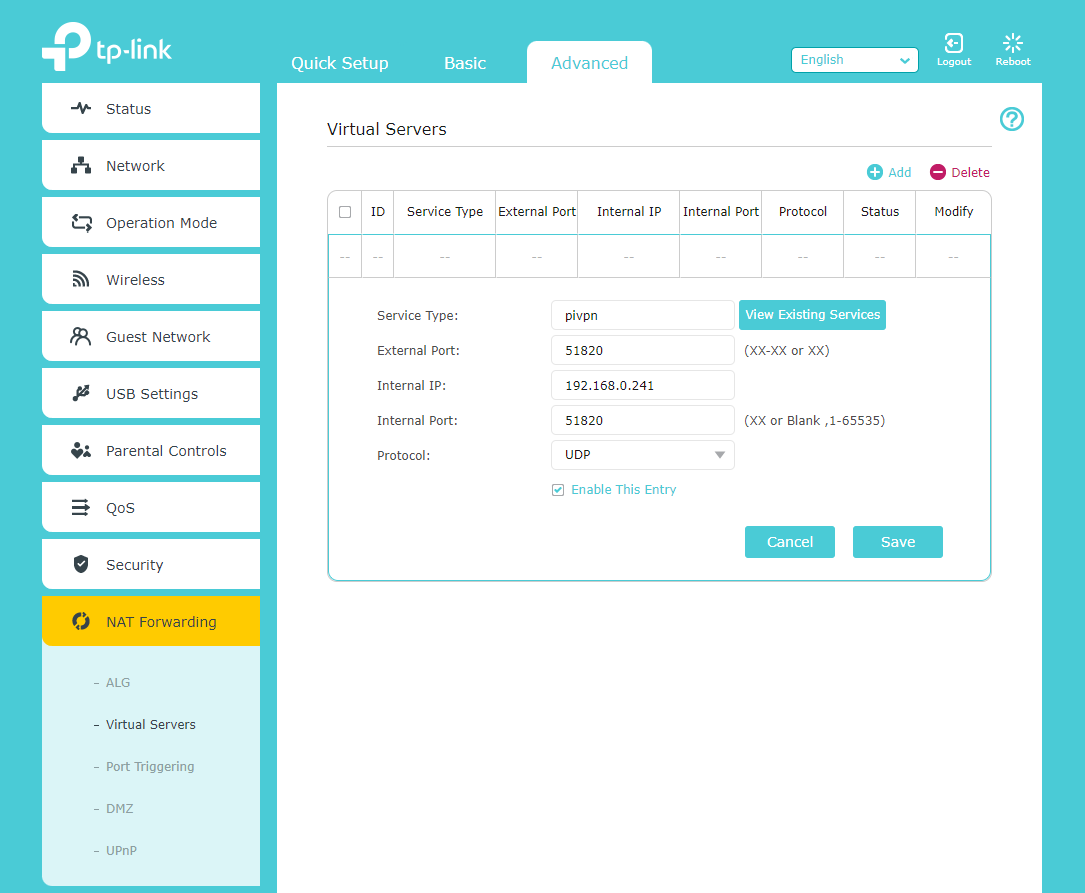
That’s because you need to configure your router so that it points traffic accessing port 51820 to your Raspberry Pi.
In order to do this, go to the port forwarding menu on your router. On my TP-Link Archer router, it was accessible in Advanced > NAT Forwarding > Virtual Servers.
You’ll know you’re in the right place when it asks you for an external and internal port and an internal IP address.
This screen is basically asking, “if we get traffic from the interwebs using port 51820, which device do we send it to and which port?.
In this case, the external and internal ports are 51820, Wireguard’s default. Protocol is UDP and Internal IP is your Pi’s IP address.
How do I know my VPN is working?
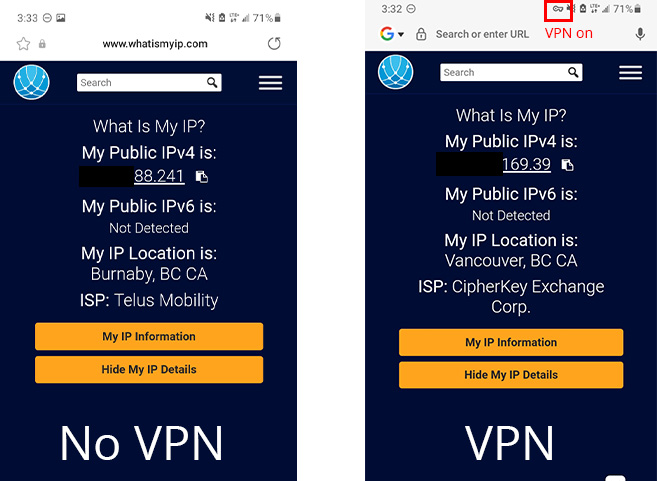
You’ll know your VPN is working if your IP address changes.
In order to test my smartphone’s VPN connection, I first went to find my IP address before I connected to the VPN.
The VPN said my address was XXX.XX.88.241
I connected to my VPN and my IP address changed to XXX.XXX.169.39.
So, if there is a change in your IP address, that means that you have successfully connected.
There are many services out there. You could even just Google “what is my IP address” and Google might be able to tell you on the search result page. Or else, I used whatismyip.com.
What happens if my internet IP changes?
Sometimes, you might not get the same IP address when you reset your router. Power outages, accidental yanks of power cords can happen.
The question is… how do you find your new IP address when you’re not at home and desperately need to connect to your VPN?
Our software PiCockpit makes it easy to find out what your public IP is.
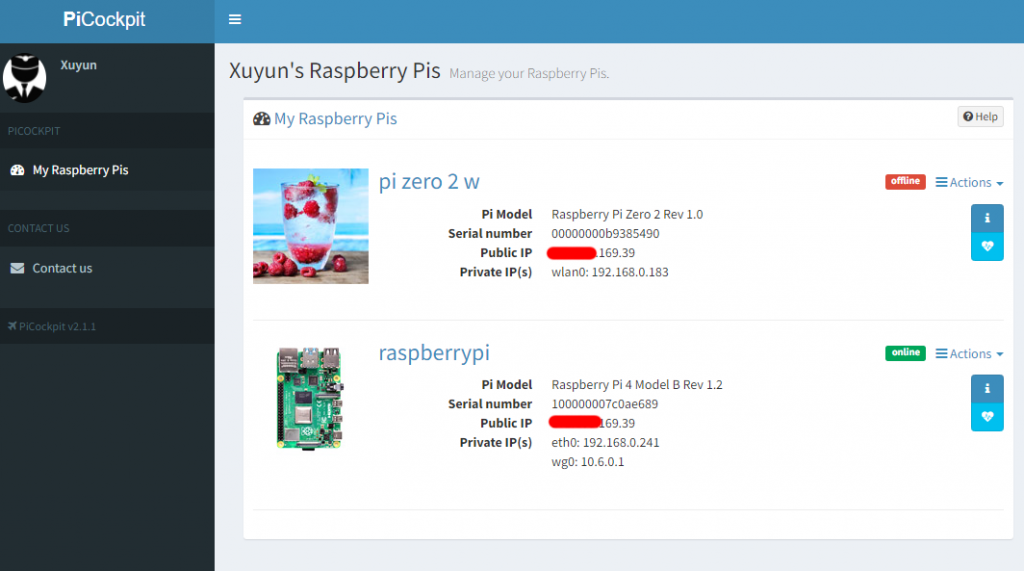
In the screenshot above, that is my public IP. If it ever changes, you can update your .conf files with the new endpoint address.
PiCockpit will also allow you to reboot and diagnose issues with your Raspberry Pi remotely through its web interface.
Follow this guide to install PiCockpit.
Alternatively, you can also get a dynamic DNS service and a hostname. Here’s a guide.
Buen dia espero se encuentren bien, tengo una consulta a ver si me pueden ayudar, estoy en venezuela, yo quisiera trabajar por internet pero necesito que no me detecten, mi IP va a estar en estados unidos, lo que quiero es preguntar… como configuro el raspberry para poder conectarme con la ip residencial alla en eeuu y trabajar en venezuela sin ser detectado y no me baneen las paginas, ademas de eso configurar mi navegador gracias.
John,
Para eso necesitarias tener una raspberry pi en EEUU configurada como servidor VPN (En la casa de un amigo o familiar) y tu PC o LAPTOP en Venezuela tendria q tener el cliente vpn. De esa manera te conectarias desde venezuela a eeuu via vpn y ya serias visto como si estuvieras alla.
[…] can also use one as a VPN server using setups like OpenVPN or WireGuard. You can use either setup for day-to-day use and both make […]
[…] Of course, you could also simply turn your Raspberry Pi into a VPN, which we’ve written about before. […]