6 Ways to Keep Your Raspberry Pi 5 Safe
What should you do to secure your Raspberry Pi 5? In this article, I’ll go over some of the quickest and best ways to ensure that your Raspberry Pi 5 is safe.
So before (or while) you’re setting up your Raspberry Pi 5, read this article first!
#1: Set up secure passwords, seriously
For many people, the standard way of setting up Raspberry Pi 5 will begin with this: the Raspberry Pi Imager.
Luckily, in the past few years, the Raspberry Pi Imager has really evolved. Today, it’s super easy to get started and quickly set up security protocols on your Pi.
So, first things first, if you don’t need a communication interface, don’t set it up. If you’re planning on setting up your Raspberry Pi 5 for something without WiFi, then don’t set up WiFi. If you won’t SSH into your Pi, then don’t configure it.
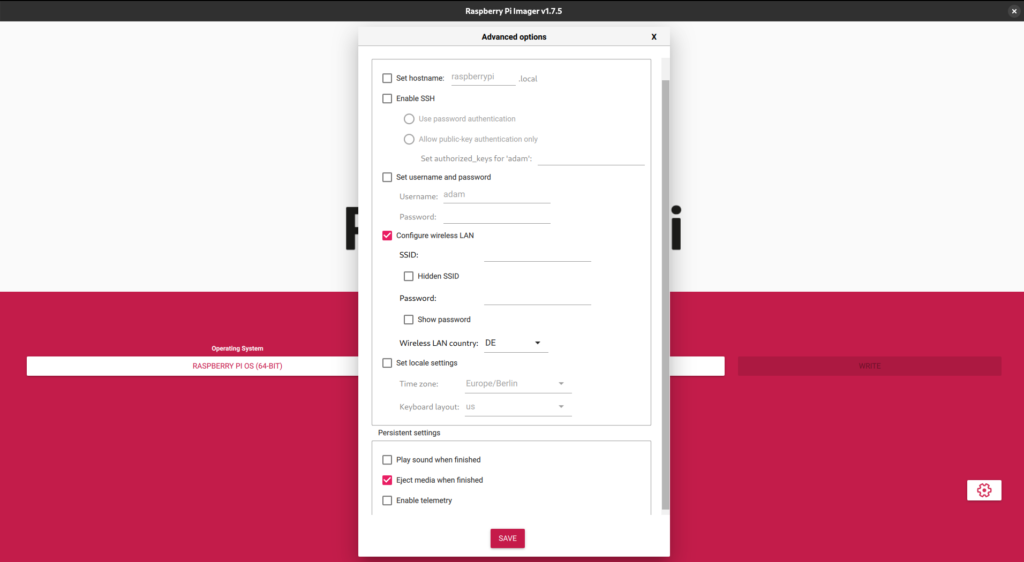
Of course, you can change your mind later and enable these interfaces after you have your Pi set up already. But if you’re going to use these interfaces, then you need to use strong passwords.
Strong passwords are long, include lowercase and uppercase letters, numbers, and special characters. But really, the best passwords are more like passphrases.
Don’t take my word for it. Listen to Edward Snowden:
Today, the Raspberry Pi Imager does not offer a default username and password. Historically, however, as we’ve written about before, the default username and passwords on Raspberry Pis were:
username: pi
password: raspberry
Therefore, a lot of Raspberry Pis out there in the world still have this username and password. This is an easy combination to remember, but not a very secure one.
Please be smart about passwords, because they’re often your primarily line of defense. Of course, even better than passwords are SSH keys, but I’ll leave that for another time.
#2: Update && Upgrade
So once you’ve got your new Raspberry Pi OS flashed onto the SD card, you need to make sure that everything is up to standard.
What you need to do here is simply classic Debian style.
Open up the terminal and run:
sudo apt update && sudo apt upgradeIf you’re already a Debian user, you’re probably used to running this constantly. You’ve got do it before you install a new program, before you make any changes, or just every few days.
If you’re not a Debian user, it might seem unnecessary, but you should absolutely integrate this into your daily computer tasks. If you’re Pi’s software is up-to-date, it is more secure.
#3: Determine who can access SSH
As I mentioned above, if you’re not going to SSH into your Pi, then you can simply disable SSH as an interface. However, if you are planning on using SSH, then you should make sure that it’s as secure as possible.
There are actually a few different ways to ensuring that your SSH is secure, so let me go over a few of them.
One of them is to limit the users who can access the Pi via SSH.
You do this by changed your SSH Daemon configuration file. So you go to the terminal and type in:
sudo nano /etc/ssh/sshd_configThen scroll to the bottom and add AllowUsers followed by the usernames you want to allow. Hit Ctrl-X and then run:
sudo service ssh restartAnd now you’ve limited access to your Raspberry Pi’s SSH.
#4: Change the SSH port number
Another way to keep your SSH secure is to change the SSH port number.
The default SSH port number is 22.
Guess who knows that? Everyone who’s looking for open SSH ports.
So the classic sysadmin fix it to change that number. On your Raspberry Pi, all you need to do is go to the terminal and again change the SSH Daemon configuration file.
So run:
sudo nano /etc/ssh/sshd_configAnd what you’ll need to do is to scroll down and then change the line that reads #Port 22 to something like Port 2222. You’ll also want to delete the # at the beginning of the line.
I should mention that you can also make it another number if you’d like. 2222 is just the typical change.
But then, once again, you need to restart SSH (don’t forget this step!):
sudo service ssh restartNow, when you want to SSH into your Raspberry Pi, you’ll need to add -p 2222 to the SSH command in the terminal.
But that’s it for SSH stuff. Now onto other basic protections.
#5: Install Fail2Ban
Fail2Ban is a wonderful piece of software that blocks IP addresses after they try to log in too many times. It automatically updates the Raspberry Pi’s firewall to block potentially malicious IP addresses.
Thus, it is very useful for keeping your Raspberry Pi secure. It’s also very lightweight at only about 3,000 kB.
So after you’ve used strong passwords, configured your SSH interface, and updated your Raspberry Pi, I recommend installing Fail2Ban.
You should update again:
sudo apt update && sudo apt upgradeAnd then run:
sudo apt install fail2banFail2Ban can do a lot of things and I won’t go into the details here. If you’re interested, then you can dig into the configuration files by going to /etc/fail2ban.
The default configuration is set to 5 failed attempts before it bans the IP address and then the IP address is banned for 10 minutes.
It’s a great little program to protect against someone trying to brute force your password. So now that you’ve gotten that set up, there’s one more thing to do with your Raspberry Pi 5.
#6: Back up your data, seriously
This step is just as important as using good passwords and, unfortunately, just as often ignored.
Your SD card can fail and I’m not alone in that experience.
One of my friends was keeping a lot of important stuff on her SD card and then it failed her miserably.

Don’t be like Anna. Back up your data!
By the way, if you’re interested in learning more about SD cards, which ones you should get, and why they fail, then check out these articles:
- Raspberry Pi 5 Micro SD Card Speed
- Classifying SD Cards
- How does Flash Memory work?
- What are SD Card grades?
- All about SD Card Health on the Raspberry Pi
Get a cool-looking USB stick, use Google Drive, use Dropbox. Ok, don’t use those last two if you actually care about security, but you get what I mean!
You need to keep your data safe and secure and backed up. Trust me.
Conclusion
So there you have it, folks. Those are the 6 things you should do immediately with your Raspberry Pi 5 in order to keep it secure.
Of course, this advice really only covers the basics. But once you have done these, you’ve at least ensured a minimal wall of security for your Pi 5.
Do you have any other ways of keeping your Pi safe? Let us know in the comments!
What is the best way to backup the SD card, other than removing it to copy? Keeping the Pi online.