Everything about the Raspberry Pi Pico
If you are looking to buy your first Raspberry Pi, the Pico could be a very attractive option.
But the real question here is whether the Raspberry Pi Pico is right for you.
There are many pros and cons in buying the Raspberry Pi Pico and it’s important to understand the adage “horses for courses.”
Let’s review the Raspberry Pi Pico
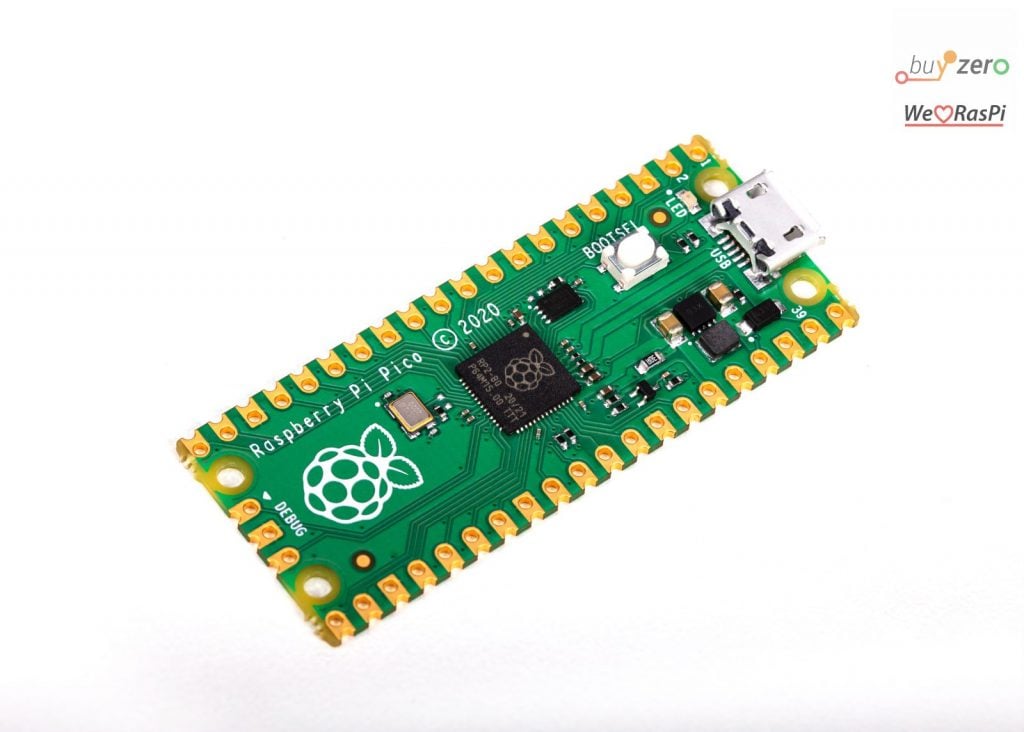
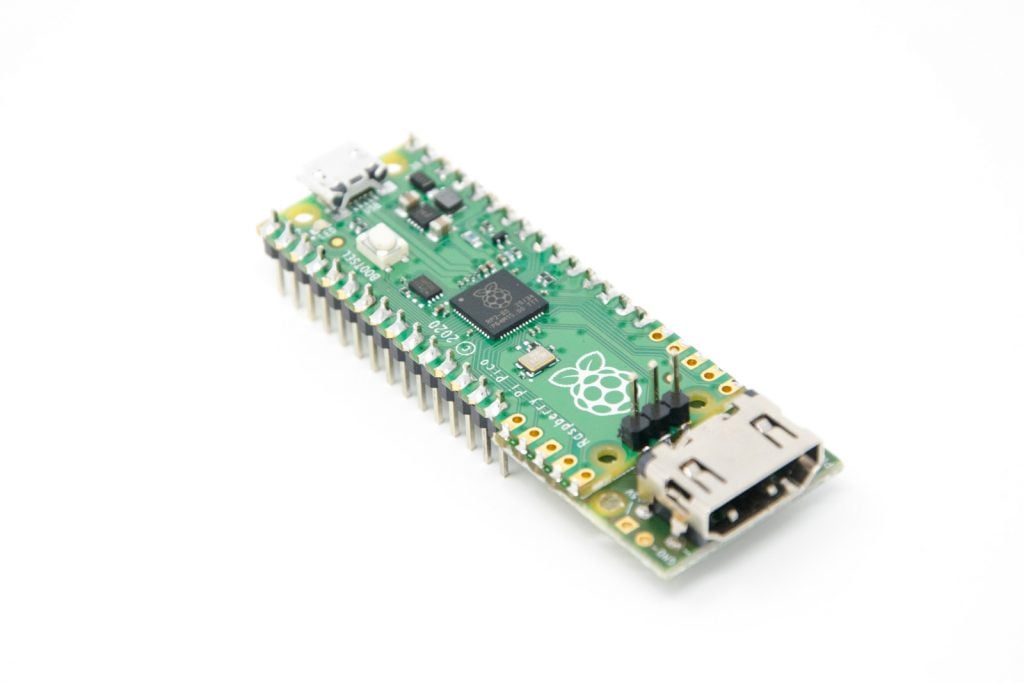
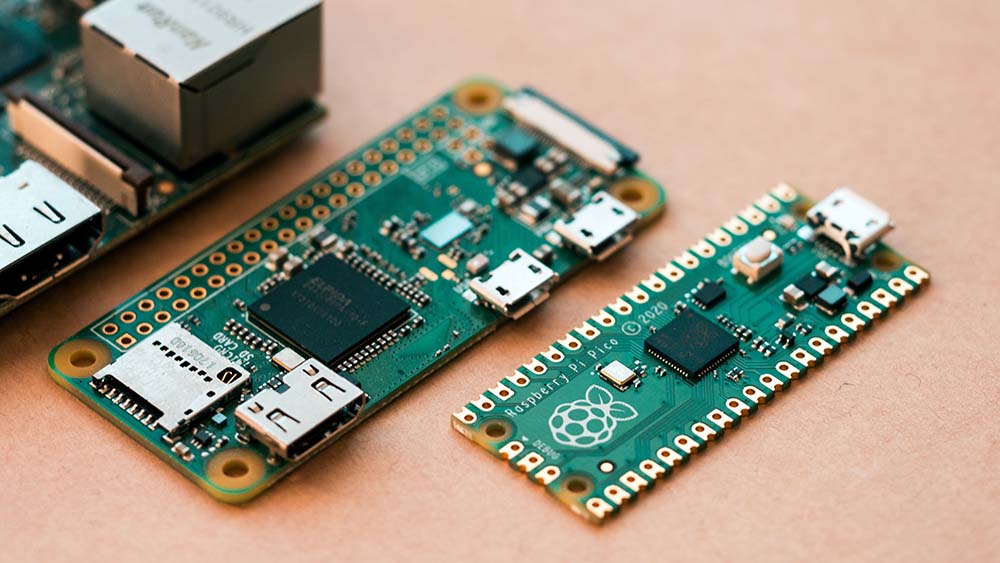
The Raspberry Pi Pico breaks new ground in the Raspberry Pi lineup because it’s a microcontroller development board. This represents a departure from the rest of the Raspberry Pis which are microcomputers.
It features the RP2040 chip which was designed in-house by Raspberry Pi and has the following specifications:
- Dual-core ARM Cortex M0+ CPU cores (up to 133 MHz)
- 264K SRAM
- 2MB flash memory
The Raspberry Pi Pico sets itself apart by being a high-performance microcontroller and has many interesting uses.
Pro: Cheap and great for first timers
We sell the Raspberry Pi Pico for €4.10 which is the cheapest Raspberry Pi that you can buy. In fact, if you are new to tinkering with the Raspberry Pi Pico, you can get a full kit for €24.95 which includes everything you need to build easy projects.
Pro: Great for realtime applications
The Raspberry Pi Pico is perfect for projects where you need to time events precisely. For example, reading sensors, operating motors and monitoring tasks.
Pro: analog inputs
The Raspberry Pi Pico is the first Raspberry Pi that has analog inputs from the factory.
It comes with a total of 5 ADC inputs (Analog Digital Converter). Two of which are used by the Pico for its internal temperature sensor and for voltage monitoring.
So how can having an analog input benefit you? Well, for example, one of my projects used a potentiometer to regulate the the switching frequency of a relay. So, the Raspberry Pi Pico would be able to read a value off the potentiometer and use its values in the program that I have loaded onto it.
The Raspberry Pi Pico resolves ADC signals at 12-bits, which is better than the 10-bit ADC on the Arduino Uno. Other traits include:
- SAR ADC (successive approximation ADC)
- 500 kS/s (with external 48MHz clock)
- DMA interface on ADC inputs which can access memory without using the CPU
Pro: programmable IO (PIO)
This is one of the coolest features of the Raspberry Pi Pico and it’s also what gives the Pico the dynamism that some other microcontrollers do not have.
PIO is a hardware interface that can be programmed independently of the main processors. It can therefore emulate many different interfaces:
- 8080 and 6800 parallel port
- I2C
- 3 pin I2S
- SDIO (SD card interface)
- SPI, DSPI, QSPI
- UART
- DPI or VGA (via resistor network / DAC)
The PIO State Machines are fully programmable and exclusively dedicated to I/O. Particular attention is paid to precise timing.
For example, the PIO interface can be used to set up time-critical (timing-sensitive) applications, such as the control of LED strips, in a stable and reliable manner.
Pro: could output video with modification
Did you see “DPI or VGA” in the previous section? You know what this means…
Yes, the Raspberry Pi can output video which is something that you wouldn’t even dream about on most microcontrollers.
We have a tutorial showing you how it’s done if you’re interested.
Pro: fits on a breadboard
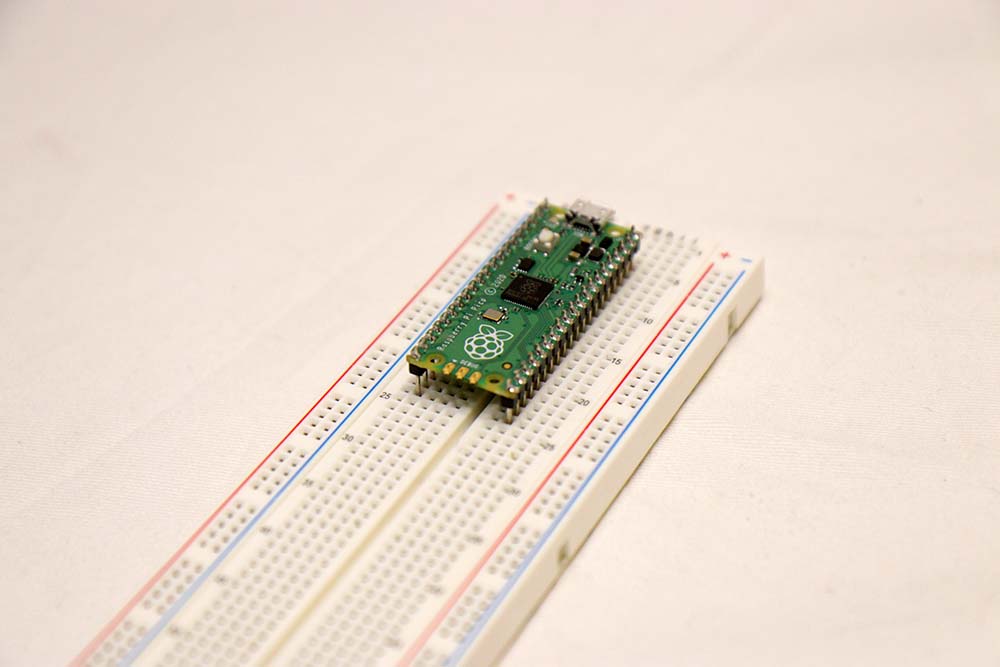
On the Raspberry Pi Pico, the pins are on two opposite sides of the Pi Pico, you can therefore place the Pi Pico directly on the breadboard with each side on across the dividing gutter.
This makes prototyping easier because you won’t need to get male-to-female wires (or male-to-male in the case of the Arduino Uno) to connect the Pico onto a breadboard.
You can’t do this with other Raspberry Pis because their pins are all clustered together.
Pro: Smallest Raspberry Pi
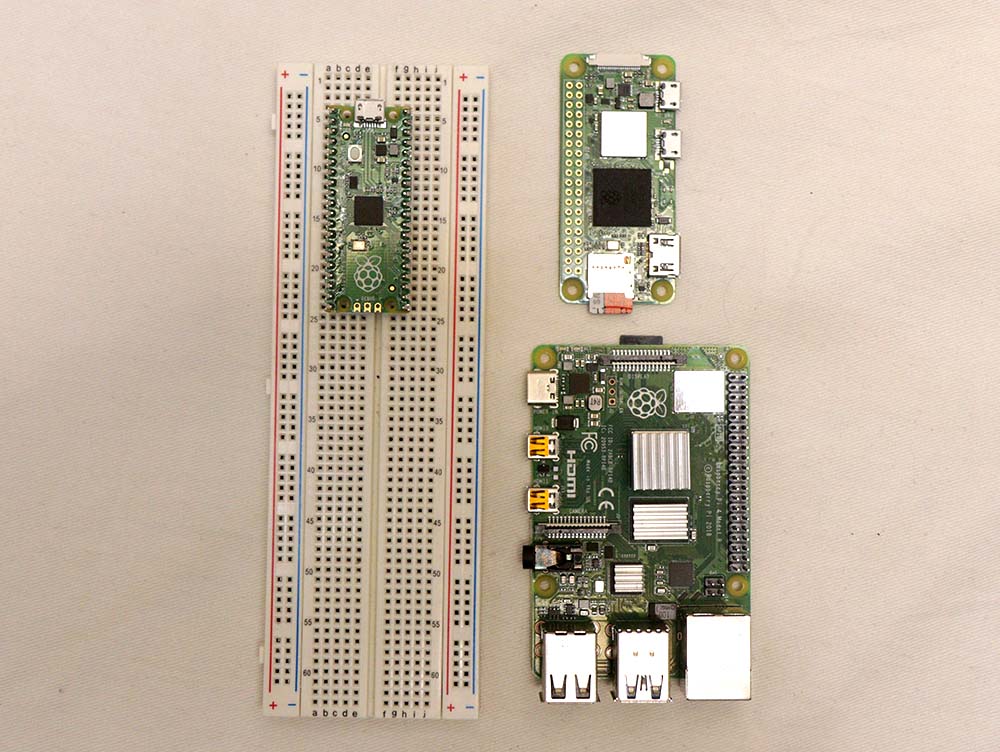
Having a small board is good because it’s easier to fit within tight spaces and easier to mount. For example, let’s say you want to mount the Raspberry Pi Pico to the wall, or within a enclosed environment: robots, handheld devices, watches, etc.
Pros: low power consumption
I mentioned that the Raspberry Pi Pico is small and that it can fit in small spaces.
The great thing is that because the Pico sips power, you won’t need a big battery in order to run it.
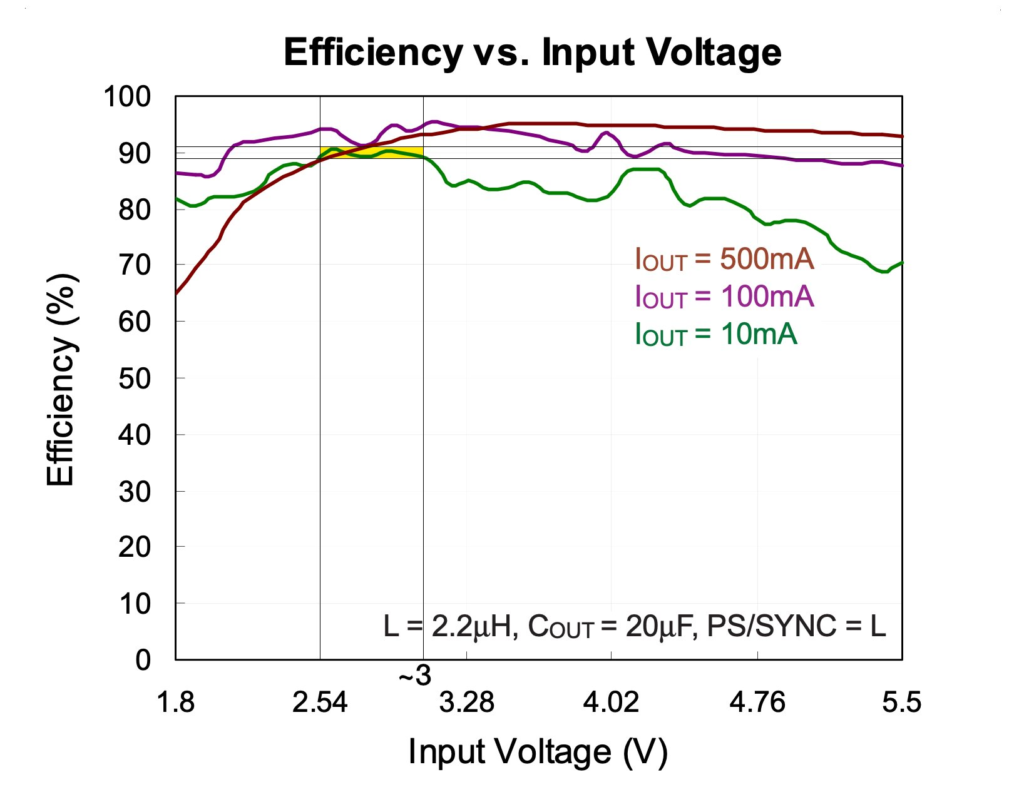
Did I also mention that it takes a wide range of voltages? It can run off 1.8 – 5.5 V, which is great because you can run it off a single lithium battery (3.7V) or nickle-based batteries connected in serial (1.2V each).
An analysis by Joey Castillo showed that the efficiency of the Pico’s buck converter peaks at 2.54V to 3.2V (equivalent to 2 fully-charged AA rechargeable/alkaline batteries) if you are drawing <=10mA of current.
At higher currents, though, you’re better off providing 3 AA’s worth of batteries or one lithium battery’s voltage.
These statistics might not run true for the Pico W, as the Pico W uses a different buck converter. The Pico W uses the RT6154 while the Pico uses the RT6150. Click on the links to see their respective datasheets.
Here’s the graph for the Pico’s buck converter:
Neutral: No Linux support on the Raspberry Pi Pico
Whether this is a pro or con of the Raspberry Pi Pico depends on your project. Not having Linux means that your projects load faster, but overall, you can do more if you have an operating system.
What do I mean by load faster? Well, since there’s no OS to boot, your code will load pretty much in the same moment which you connect power to the Pi Pico.
On any other Raspberry Pi, it will take a much longer time before you see a response.
But unfortunately, without an OS, you are limited to programming with MicroPython or C, whereas with an OS, you can code in many, many more languages. Plus, you can play games, surf the internet and enjoy other multimedia applications.
Neutral: No WiFi
Whether or not this is a downside depends on your project, but say you are developing a project which requires you to check the weather or upload data to Google Sheets, you won’t be able to do it on the Raspberry Pi Pico.
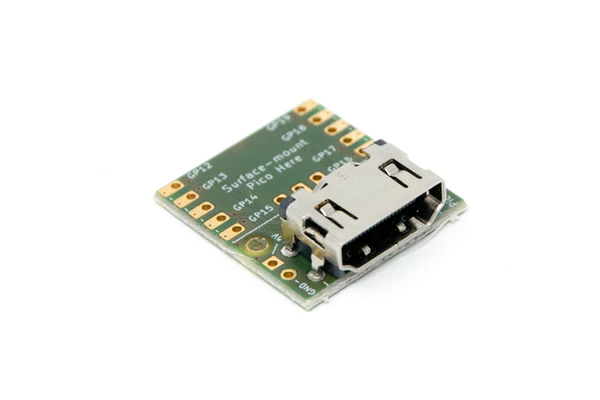
To be fair, you can install WiFi or ethernet using aftermarket parts such as the item below:
Neutral: GPIO outputs 3.3V
Whether or not this is a pro or con depends on the components you’re going to pair the Raspberry Pi Pico to.
One scenario where I found 3.3V to be a hindrance was when I tried to use it with 5V relays. Oops! I couldn’t push enough voltage through to get the relay to switch.
So, I moved to my Arduino Uno, whose GPIO pins put out 5V.
The alternative would be to add components to the prototype so that the 3.3V could be stepped-up, but, uh, why complicate things when I can just do it with a Arduino Uno?
Of course, this is just one scenario. Your mileage may vary depending on what you’re doing.
Raspberry Pi Pico Uses
The range of uses for the Raspberry Pi Pico is endless. You can make something that enhances your life or make something just for fun.
Microcontroller that reads MicroPython (instead of just C)
If you have used an Arduino, you’d know that you would have to program it in C.
However, you might not like programming in C. You might have a stronger background in Python.
And so if you struggled with writing code in C on the Arduino, the good news is that whatever the Arduino can do, the Raspberry Pi Pico is likely to be able to fit into your use case.
So throw those curly braces away and start indenting your code!
Battery-powered builds for long runtime
If you need something that uses as little power as possible, then you’re definitely better off with the Raspberry Pi Pico over something more powerful like the Raspberry Pi Zero.
Here’s why: you can use a much wider range of power inputs (1.8V to 5.5V) and because the Raspberry Pi Pico is so efficient, you will be able to get much longer runtimes than if you used a microcomputer like the Raspberry Pi Zero.
Oh, did I mention that the Raspberry Pi Zero is very picky about the voltage you supply it? It’ll only take 4.75 – 5.25V.*
* According to Arya, who left a comment below, the Raspberry Pi Zero can run on a single lithium battery as long as you don’t have any USB peripherals. Thanks Arya.
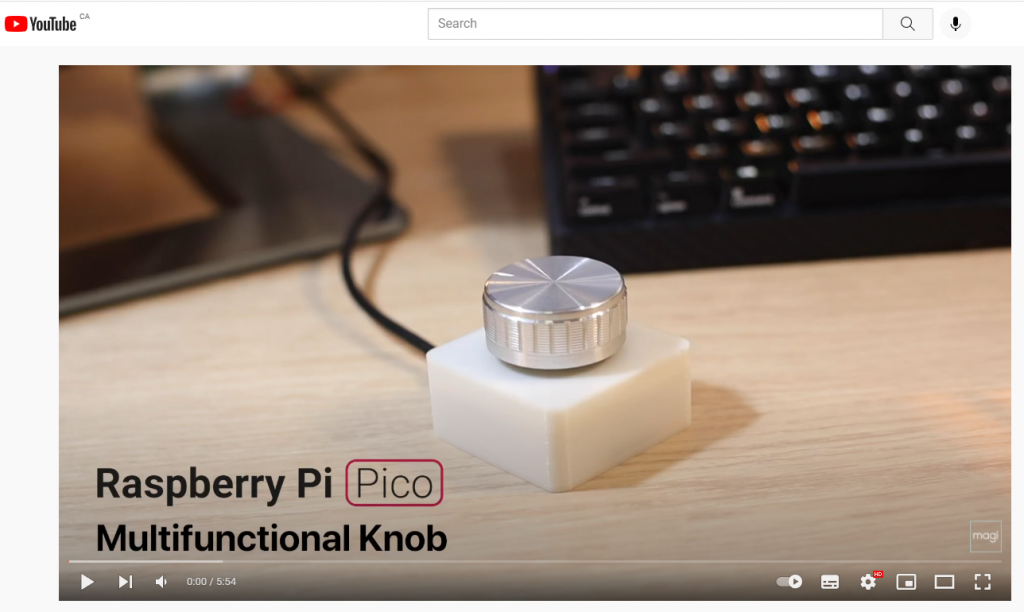
Macro keyboards, spinning toggles and other HIDs
The Raspberry Pi Pico can be used as a Human Interaction Device (HID).
But unlike a boring old mouse or keyboard, the Raspberry Pi Pico allows you to create a device that does something niche and specific to your use case.
Hence, you can create macro keyboards that type out a long string at the press of a button. Or you can use it to mute Discord. Or use it to press CTRL + ALT + DEL. The possibilities are endless.
sArCaSm kEyBoArD
Built a sarcasm converter for your keyboard. Plug in a regular keyboard in, flip the switch and let the world know how you really feel about things pic.twitter.com/J3cAOfCAvw
— Ben S (@BenSommerf) January 26, 2022
What’s better to express sarcasm: display an /s tag at the end of your text or tYpInG lIkE tHiS?
I do prefer the second one because it immediately conveys sArCaSm.
The creator of this project, Ben S, shared that he uses two Raspberry Pi Picos in order to get this going. One Pico acts as a USB HID keyboard device for the computer and another acts as the USB host to read inputs from the keyboard. The host then communicates with the device via UART what the keystroke was.
The Pico sarcasm keyboard switches caps lock on and off after each keystroke, thereby giving sArCaStIc TeXt.
What can’t the Raspberry Pi Pico do?
Let’s talk about a more typical straight-out-of-box configuration.
I’ll acknowledge that there are many ways you can increase the capabilities of the Raspberry Pi Pico. You can output video, set up ethernet, output audio…
With enough modifications, the Raspberry Pi Pico will approach the capability of a microcomputer.
That said, no one rational is going to go that far. Beyond a certain level of modification, it becomes unfeasible.
Why does it become unfeasible?
Because you might as well buy something where you get all these features straight out of the box!
A close competitor that you should be keeping an eye towards is the Raspberry Pi Zero 2. We have a mega-article that will answer all your questions here.
On a fundamental level, the Raspberry Pi Pico has less computational power. Compared to the cheapest microcomputer, the Raspberry Pi Zero, the Pi Pico has a default clock of 133MHz and can do 361.76 Dhrystone Million instructions per second (DMIPS), whereas the Raspberry Pi Zero can do 1250 DMIPS.
The Raspberry Pi Zero also has 512MB RAM, an operating system, WiFi and a SD card slot. For a person most proficient in JavaScript like myself, being able to write Node code to connect it to Google Cloud is a reason why I like using the Pi microcomputers.
Microcomputer vs microcontroller
In illustrating the previous scenario, I used the terms microcomputer and microcontroller. I’ll summarize some uses in which one is better than the other.
A microcontroller is much simpler than a microcomputer, and therefore it’s much easier to get a microcontroller to do simple tasks. If you just need to blink an LED, rotate a servo, measure temperature data, a microcontroller can do it very easily and capably.
In fact, you do get some advantages such as quick restart and longer battery life.
With simplicity comes limitations. For example, it’s a lot easier to connect your prototype to the internet with a microcomputer. For example, you might want to connect your prototype to an email service to ping you when certain thresholds are met. I’d do those projects on a Raspberry Pi Zero rather than trying to make it work with the Raspberry Pi Pico.
| Scenario | Microcontroller (e.g. Raspberry Pi Pico) | Microcomputer (e.g. Raspberry Pi Zero) |
| Run a server | No | Yes |
| Blink an LED | Much faster from start to end | Much slower; many more processes to go through |
| Auto-restart program on power failure? | Yes | Not by default |
| Play video games | No | Yes |
| Runs on battery? | Yes, much likely to last longer on average | Yes, does not last as long on average |
| Heat management? | None required usually | Heatsinks, fans, thermally conductive cases |
| Costs? | Lower | Higher |
Raspberry Pi pins
The Raspberry Pi Pico has 30 GPIO pins, of which 26 are available for use.
- 2x SPI
- 2 x UART
- 2 x I2C
- 8 x two-channel PWM
there is also:
- 4 x general purpose clock output
- 4 x ADC input
- PIO on all pins
Here is the Raspberry Pi Pico’s pinout image:

In fact, a Redditor called C_King_Justice also made a tool that can help you find your Raspberry Pi Pico GPIO pins. You can download the document here.
Raspberry Pi Pico Specs
| Raspberry Pi Pico | |
| Price | €4.10 (board) €24.95 (beginner’s Raspberry Pi Pico kit) |
| CPU | RP2040 with dual-core Cortex M0+ at up to 133MHz |
| CPU capabilities | On-chip PLL allows variable core frequency |
| CPU frequency | up to 133MHz, over/underclockable |
| GPU | No GPU |
| RAM | 264 kB of embedded SRAM in 6 banks |
| Network | Not included, but you can add it in |
| Bluetooth | Not included |
| HDMI port | Not included, but you can add it in |
| USB port | MicroUSB for power and data |
| Composite video | Not included, but you can add it in |
| Reset pin | Not included, but you can solder it in |
| Camera port | None |
| Power consumption | ~1.3mA in SLEEP mode to 93mA in “Popcorn” test |
| Power supply | 5V via microUSB or 1.8 – 5.5V via VSYS |
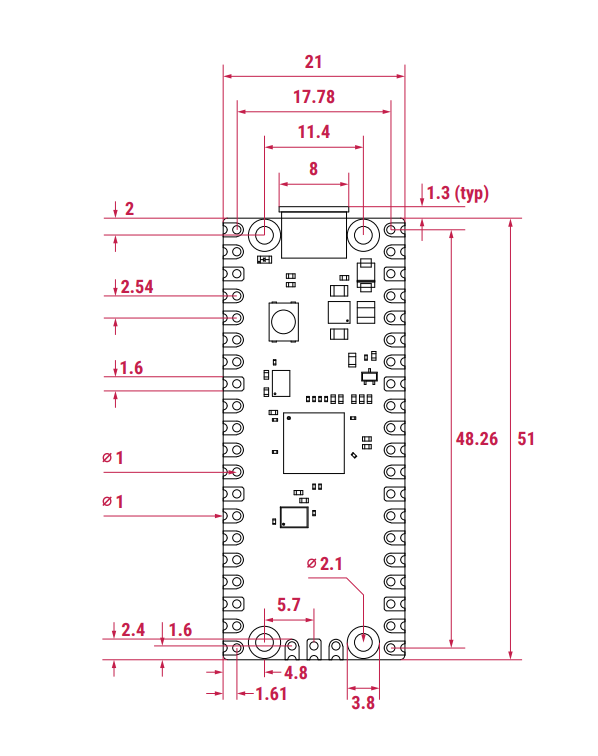
| form factor | 51 x 21 mm |
Does the Raspberry Pi Pico have HDMI?
No, it doesn’t by default. But you can add a video out yourself. See our guide here.
Note that while the video interface is a HDMI connector, this actually outputs a DVI signal. HDMI is a successor to DVI, so DVI signals can be transmitted via HDMI.
In the same vein, you can buy a HDMI to DVI adaptor to convert the HDMI connector to DVI.
That said, note that this set up does not output audio.
Does the Raspberry Pi Pico have ethernet?
No, it doesn’t by default. But you can add ethernet yourself.
Raspberry Pi has officially released a guide which you can follow to install ethernet on your Raspberry Pi Pico.
In essence, you need a RMII Ethernet PHY such as a LAN8720, a breadboard and jumper wires. Your Raspberry Pi Pico must also have headers soldered.
Does the Raspberry Pi Pico have WiFi?
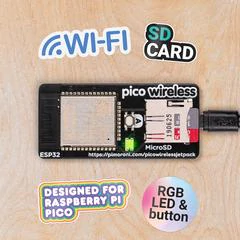
No, but you can install it using aftermarket parts. One compatible chip which will help you get WiFi capabilities is the Adafruit Airlift WiFi Featherwing Co-Processor.
Does the Raspberry Pi Pico have USB?
Yes, the Raspberry Pi Pico has a microUSB port. It can be used to power the Raspberry Pi.
Furthermore, you can also use the Raspberry Pi Pico as a Human Interaction Device. Connecting it to your computer with the proper components and code can allow it to become a joystick, macro keyboard, toggle, etc.
Does the Raspberry Pi Pico have Bluetooth?
No, but you can install it using aftermarket parts.
Typically, integrating Bluetooth on the Raspberry Pi Pico requires you to buy a Bluetooth module such as the a HC-06 Bluetooth Module.
Is there a Raspberry Pi Pico camera?
Yes, you can integrate the Raspberry Pi Pico with a camera module.
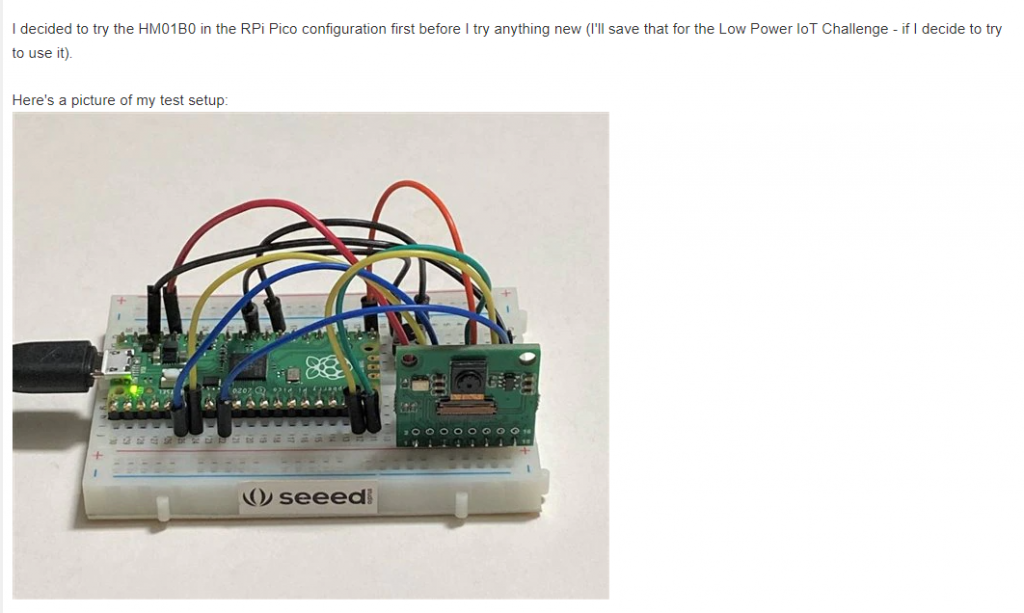
A camera which you can use is the HM01B0 camera from Himax Imaging. The benefit of using this is that it’s extremely low powered, using 1-2 milliwatts according to Ralph Yamamoto who wrote about his experience getting a camera to work with the Raspberry Pi Pico.

His conclusion was that “I’m sure it will require a lot of tweaking,” and further said that he felt limited by his ability in processing, and that the camera’s documentation was lacking.
Raspberry Pi Pico operating system
Generally, you won’t be running an operating system on the Raspberry Pi Pico.
In most projects, you are likely to just need to upload code and then run that one program only. There’s no need for an operating system in that case.
But are you the kind that has multiple tabs on Chrome? Now, imagine if you could only use one Chrome tab.
While the “classic” way of programming the Raspberry Pi Pico is the most resource-efficient way, it also hamstrings your ability to run multiple tasks.
Luckily, there are operating systems out there that would work on the Raspberry Pi Pico.
Official RTOS (Real Time Operating System)
There isn’t one, but Raspberry Pi said in its FAQ (as of Feb 2022) that they “will be working on porting an RTOS soon.”
FreeRTOS
The Raspberry Pi Pico can run FreeRTOS. Here’s a short video that will walk you through going from bare-metal programming (the “typical” way you’d blink an LED) to OS-based programming.
This five-part series goes into deep detail about FreeRTOS, how it works, and how you can set it up and use it.
Fuzix
You can’t get the Raspberry Pi Pico to run Linux with a graphical user interface but you can run a Unix clone on the Raspberry Pi Pico with Fuzix.
Raspberry Pi has published a guide that you can follow and what you need is:
- Non-Pico Raspberry Pi for serial connection
- Raspberry Pi Pico
- MicroSD reader for the Raspberry Pi Pico.
PyDOS
Github user RetiredWizard just created a DOS-like shell for the RP2040/ESP32 boards.
As you can see in the video above, it really takes you back 30+ years.
Getting started with the Raspberry Pi Pico
We designed several kits based on what we believe will help you the most in the long run to enjoy your journey with the Raspberry Pi Pico.
At the most fundamental, here are some recommended Raspberry Pi Pico accessories.
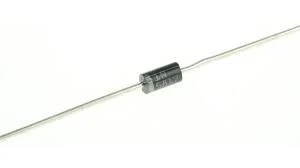
The Schottky Diode is necessary if you intend to run a second power source to the Pico. This is the simplest way to run a power supply that is within the 2.3V to 5.5V voltage range which can be one Lithium cell or three AA batteries.
Adding this diode will allow you to “OR” the two voltages from VBUS and the external voltage to power VSYS with the diodes preventing either supply from back-powering the other.
However, while this is simplest, there are efficiency losses. Raspberry Pi’s datasheet explains this in detail and also explains how to mitigate it in chapter 4.5.
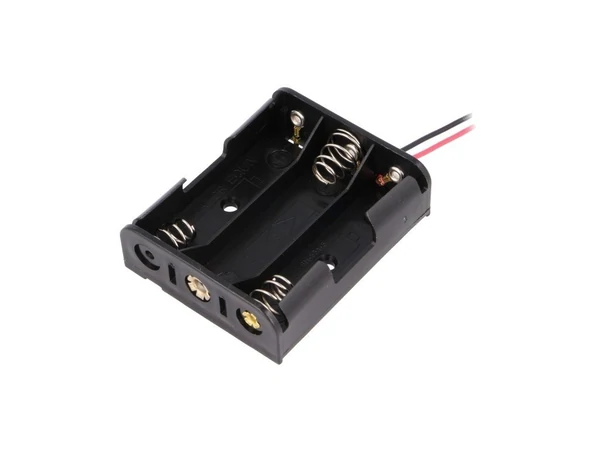
Having a battery holder allows you to have backup power (with a Schottky diode) or run your setup completely off-grid.
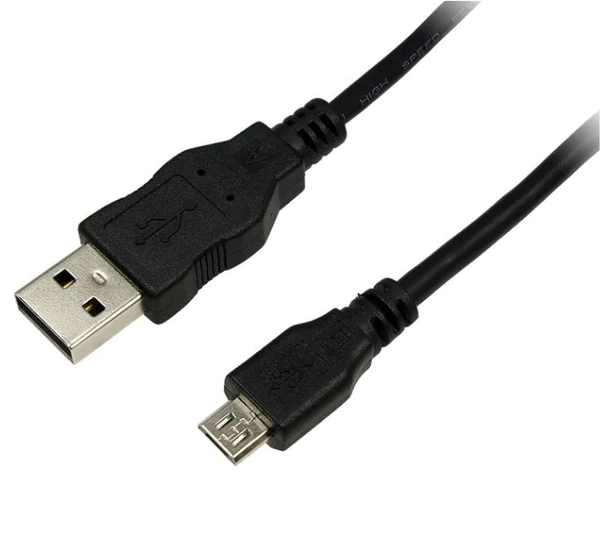
This one is self-explanatory. You need this cable to connect your Raspberry Pi Pico to your computer to upload code. It can also function as a power source.

Two 20-pin headers are essential because you will need them to connect your Raspberry Pi to components or to a breadboard.
The three pin header is required for debugging.
Do not buy a 40-pin header as that’s meant for the other Raspberry Pis.
If you don’t want to solder the headers yourself, you can consider buying a Pico with presoldered headers.
Programming on the Raspberry Pi Pico
You can code in MicroPython, C/C++ and CircuitPython on the Raspberry Pi Pico. Here’s a table that shows the effort needed to blink the internal LED.
| Language | MicroPython | C/C++ | CircuitPython |
| Required setup for first run | Medium | Highest | Lowest |
| Steps to create new program | Medium | Highest | Lowest |
| Control over hardware | Medium | Highest | Medium |
MicroPython on the Raspberry Pi Pico
MicroPython is essentially Python lite. Or diet Python.
It’s Python with a small subset of the Python standard library, optimized to run on microcontrollers like the Raspberry Pi Pico.
In order to use MicroPython, you will need to download Thonny and go to the bottom right where it says “Python 3.7.9” and click on it, selecting MicroPython (Raspberry Pi Pico).
You will likely be greeted by a pop-up window asking you to update. Go ahead with it.
The update ran fine when I ran Thonny on my Raspberry Pi OS, however, on Windows, there was this error saying “SSL: CERTIFICATE_VERIFY_FAILED”.
You can fix this by downloading this certificate (https://letsencrypt.org/certs/lets-encrypt-r3.der), then right click on the downloaded file and “Install Certificate” and you’ll no longer encounter this error.
With MicroPython installed, you can do the Raspberry Pi Pico’s “Hello World” equivalent and blink its internal LED by using this code
from machine import Pin, Timer
led = Pin(25, Pin.OUT)
timer = Timer()

def blink(timer):
    led.toggle()

timer.init(freq=2.5, mode=Timer.PERIODIC, callback=blink)
Press RUN, save it as blink.py and your Raspberry Pi’s internal LED should blink.
With that, let’s see the equivalent process on C.
Further reading
PiCockpit also has a few guies to help you get started with MicroPython on the Raspberry Pi Pico.
Raspberry Pi Pico and MicroPython on Windows – we go deeper on setting up MicroPython on Windows on the Raspberry Pi, how to install the right driver on Windows 8.1, connecting to the Pico using PuTTY and a detailed explanation of Thonny.
C extension for MicroPython on Raspberry Pi Pico – What if you could run MicroPython and C concurrently and gain the benefits of both languages? C performs better than MicroPython on computationally heavy tasks and sometimes you might want to interface some hardware through a C API from within MicroPython. This guide shares how you can do that.
Blinking LED with C/C++
If you need much finer control, you will probably want to write C/C++.
Getting your Raspberry Pi Pico to work with C is a lot more work. It isn’t as easy as writing MicroPython with Thonny.
The most straightforward way is to use a Raspberry Pi microcomputer with Raspberry Pi OS.
If you want to use a Mac or Windows, the official guide offers instructions in chapter nine.
Run these three commands:
wget https://raw.githubusercontent.com/raspberrypi/pico-setup/master/pico_setup.sh $ chmod +x pico_setup.sh./pico_setup.sh
You will need about 2GB of space to run this command. Once that is done, reboot by running sudo reboot .
Once you have booted up, open Visual Studio Code (under the Programming folder in the start menu) and open the folder located in /home/pi/pico/pico-examples. You must load this folder and not a subfolder.
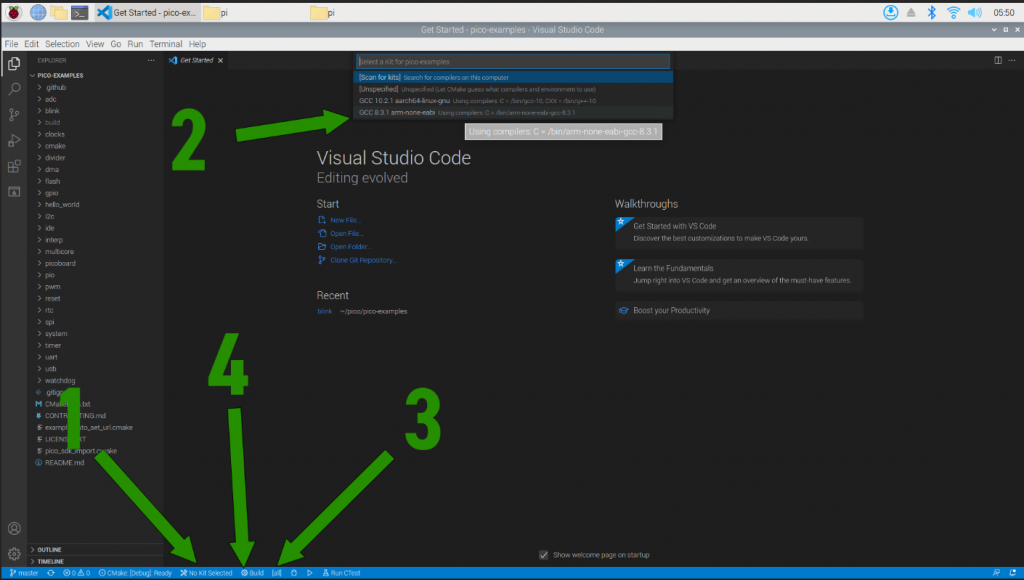
Then you need to configure VS Code. Referring to the image above, do these:
- Click on the part which is saying “No Kit”;
- A popup will appear. Choose the option where it says “arm-none-eabi”;
- Click on the [all] and choose the project you want to compile. To get the internal LED to blink, I chose blink
- Press Build
You will be able to find the blink.uf2 file in the /build/blink folder.
Copy the UF2 file onto your Raspberry Pi Pico and you will see the internal LED start blinking.
Building your own project is more complicated on C/C++. The official guide has chapter eight which tells you how to create your own project.
CircuitPython
A third entrant in the programming languages that work with the Raspberry Pi Pico is CircuitPython.
To start, download the .UF2 file here.
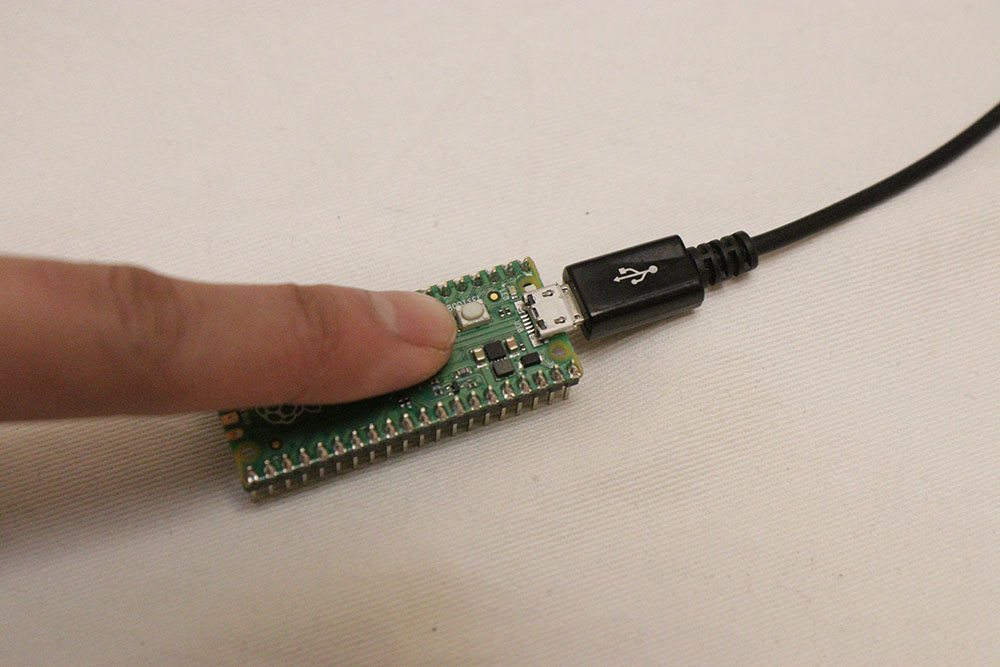
Press and hold the BOOTSEL button and plug in your Pico to your computer. You should see a new drive.
Copy the .UF2 file you downloaded onto that drive. Your Pico will disconnect and reconnect with a new drive called CIRCUITPY.
In that folder, there is a file called code.py, open it with your preferred code editor (even Notepad works).
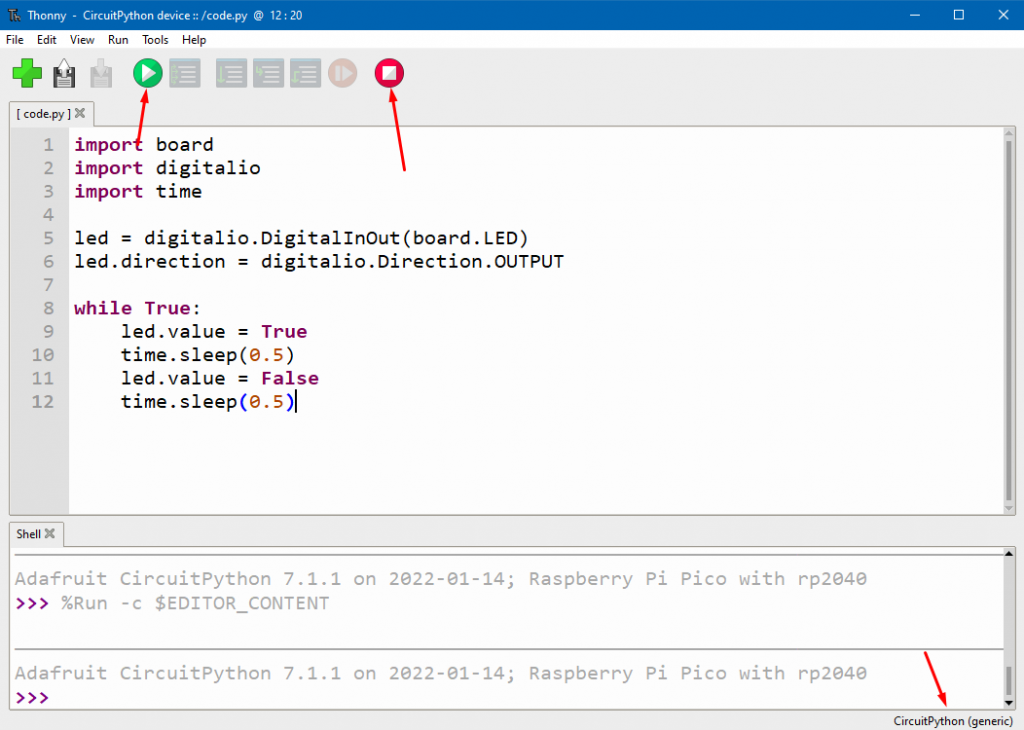
Put this code in:
import board
import digitalio
import time

led = digitalio.DigitalInOut(board.LED)
led.direction = digitalio.Direction.OUTPUT

while True:
    led.value = True
    time.sleep(0.5)
    led.value = False
    time.sleep(0.5)
Once you save it, you’ll see your Pico’s internal LED starts to blink.
Overall, CircuitPython was the smoothest and most direct way to get your internal LED to blink. The other two options were more tedious, especially running C on the Pico (triply so if you are trying to get it to work on Mac/Windows).
With that said, if you’re thinking of using CircuitPython long term, there’s an argument to using Thonny as your IDE because it can download packages for you and you can also run and stop programs by pressing the play/stop button on the commands bar.
For further reference on CircuitPython, see Adafruit’s documentation. To go back to MicroPython, download a .UF2 file from here and upload it to your CIRCUITPY drive.
Bonus: Assembler on the Raspberry Pi Pico
Yes, you can write in assembler if you don’t want to program the Raspberry Pi Pico in C or Python.
Raspberry Pi’s FAQ states that the Pico SDK has a few functions written in assembler and that,
“The processor (dual-core ARM Cortex M0+) implements the ARMv6-M Thumb instruction set, including a number of 32-bit instructions that use Thumb-2 technology. The ARMv6-M instruction set comprises all of the 16-bit Thumb instructions from ARMv7-M excluding CBZ, CBNZ and IT and the 32-bit Thumb instructions BL, DMB, DSB, ISB, MRS and MSR.”
Bonus: Rust programming language on the Raspberry Pi Pico
If you’re feeling crabby because you’re a Rustacean who can’t wait to write in your preferred language, then I have good news for you.
At the heart of this is the RP2040 Hardware Abstraction Layer that you can get on GitHub (named rp-hal). It works for many boards that use the RP2040 microcontroller other than the Raspberry Pi Pico.
Here’s a video that shows you how to set it up.
What is UF2 and why is it used so much on the Raspberry Pi Pico?
It’s magic. You drag a UF2 file onto your Raspberry Pi Pico and suddenly it remounts with a new name or it suddenly blinks an LED.
UF2 (U F squared) stands for USB Flashing Format. When you drag it onto your Raspberry Pi, you are dragging your code in addition to instructions for the bootloader so that it knows what to do with what you have uploaded.
Connecting the Pico via the serial terminal
Windows
Connecting to the Pico using the serial terminal is easy and we have a guide here.
Connecting to a Raspberry Pi 4 (Linux)
In order to connect the Raspberry Pi Pico to a Raspberry Pi 4, you can use either USB or UART pins, minicom and a few jumper wires.
Raspberry Pi’s Getting Started with Pico has all the information in Chapter 4, specifically 4.4 and 4.5.
Debugging the Raspberry Pi Pico
What are these three pins at the bottom for?
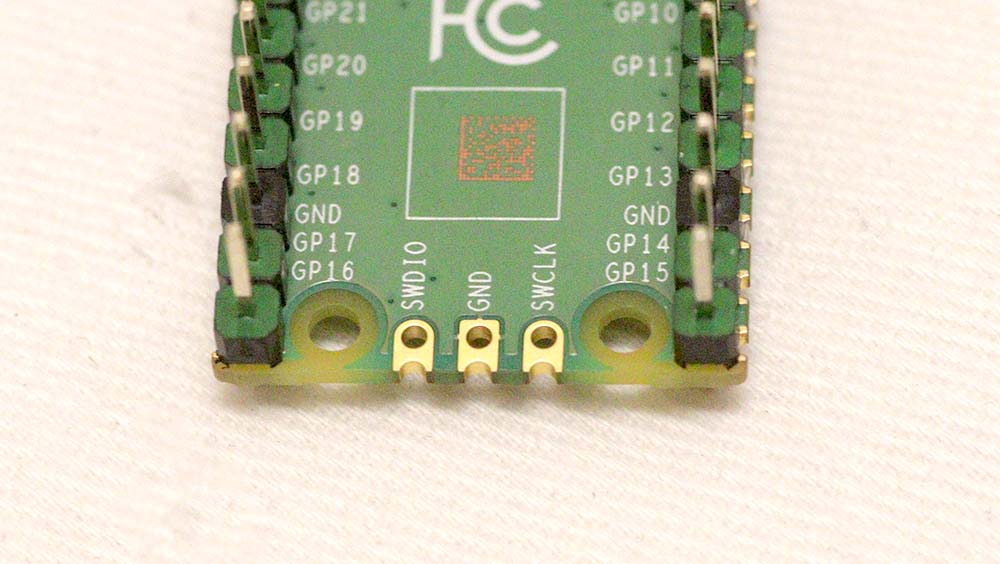
These pins will give you the ability to reset the Pico, load code into flash, run the code and most importantly, debugging capabilities.
The biggest advantage is the advanced debugging capabilities that you can get from these pins. You are now able to do much finer code analysis because you can:
- Set breakpoints in your code. Breakpoints allow you to pause further code execution while you check the values of your variables, for example.
- Step through code execution line by line. When does it all go wrong? Line by line makes it easier to debug.
They can be connected to a Raspberry Pi microcomputer through their GPIO pins. If you want to connect it to other machines, likely via USB, then you’ll need a debug probe.
A Raspberry Pi Pico can also act as a debug probe that connects your computer to the Pico you want to work on. Think of it this way: your computer doesn’t have the GPIO pins needed to establish a UART/SWD connection, so you’re going to use a Pico to provide those connections along with the picoprobe firmware that will enable it.
However, if you intend to use the SWD for debugging, you should use a UART-based serial connection rather than a USB connection. Debugging stops the RP2040’s cores which will cause the USB connection to disconnect.
Let’s talk a bit about what each pin does:
SWDIO: the Serial Wire Debug Input/Output pin carries debug traffic between the RP2040 and the host computer (a full-sized computer or a Raspberry Pi microcomputer, for example).
GND: Ground. Needed to maintain good signal integrity between the host and Pico.
SWCLK: Serial Wire Clock pin synchronizes the connection.
Your best bet is to refer to the Getting Started with Pico datasheet from Raspberry Pi, with a specific focus on chapters 5, 6 and Appendix A: using Picoprobe.
Raspberry Pi Pico Projects
Here are some good projects for beginners that you can get started with minimal extra parts required.
Easy sArCasM keyboard and macro keyboard
This is a fun project that will allow you to create a modifier that turns normal typing into sarcasm case. In seriousness, knowing how to use Adafruit’s HID library with a switch will allow you to create macro keys.

You do not need anything beyond your Raspberry Pi Pico for the most basic design. However, your Raspberry Pi Pico should have CircuitPython with Adafruit’s HID library.
In Thonny’s regular mode, go to Tools -> Manage Packages and search for adafruit-circuitpython-hid. Install it.
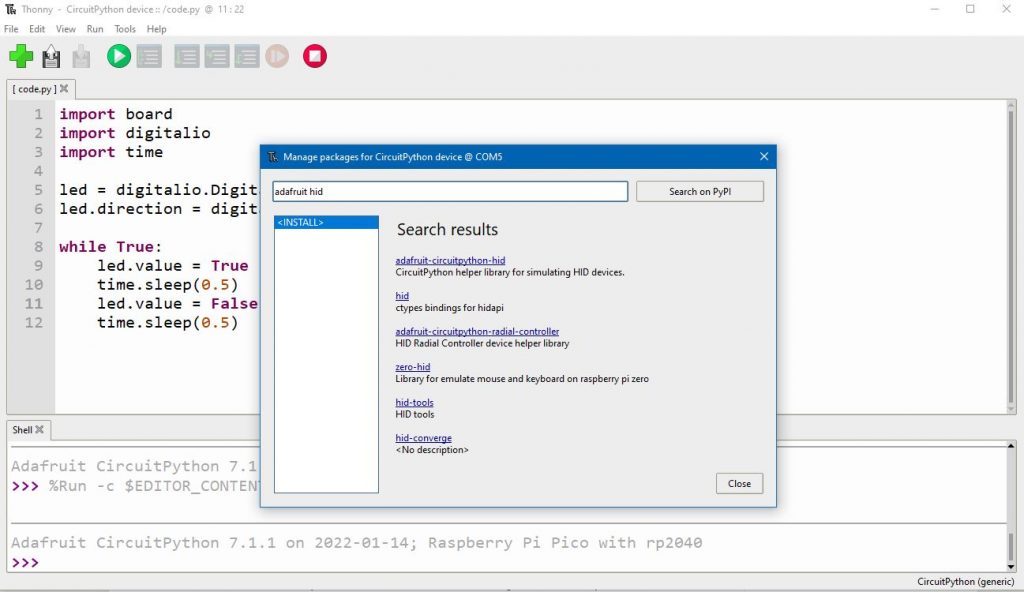
Also make sure you are using the CircuitPython interpreter, found on the bottom right of Thonny.
Put this code in,
import time
import board
import usb_hid
from adafruit_hid.keyboard import Keyboard
from adafruit_hid.keycode import Keycode

keyboard = Keyboard(usb_hid.devices)

while True:

        keyboard.press(Keycode.CAPS_LOCK)
        time.sleep(0.2)
        keyboard.release(Keycode.CAPS_LOCK)
Upload the code to your Pico. If needed, press the RUN button in Thonny.
Now, every time you plug your Raspberry Pi Pico to the computer… WaTch THE MAgIc HapPEn rIGHt iN frONt OF youR eyES.
What this script does is that it toggles Caps Lock on and off every 0.2 seconds, as declared in time.sleep(0.2). If you change the value within the brackets, you can fine-tune your case-switching frequency.
Adding a switch to this project
This basic design has the downside that you must pull the USB in order to stop the sarcasm.
Let’s add a switch that will allow us to turn this feature on and off.
Let’s also keep the board’s LED on when the sarcasm is activated.
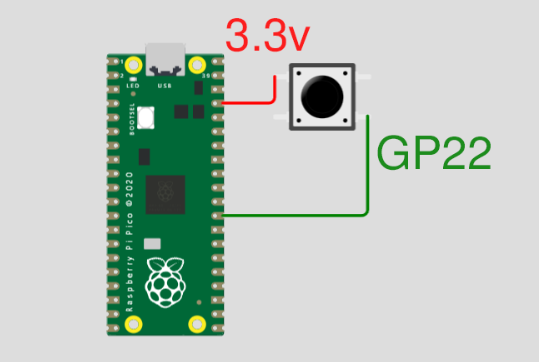
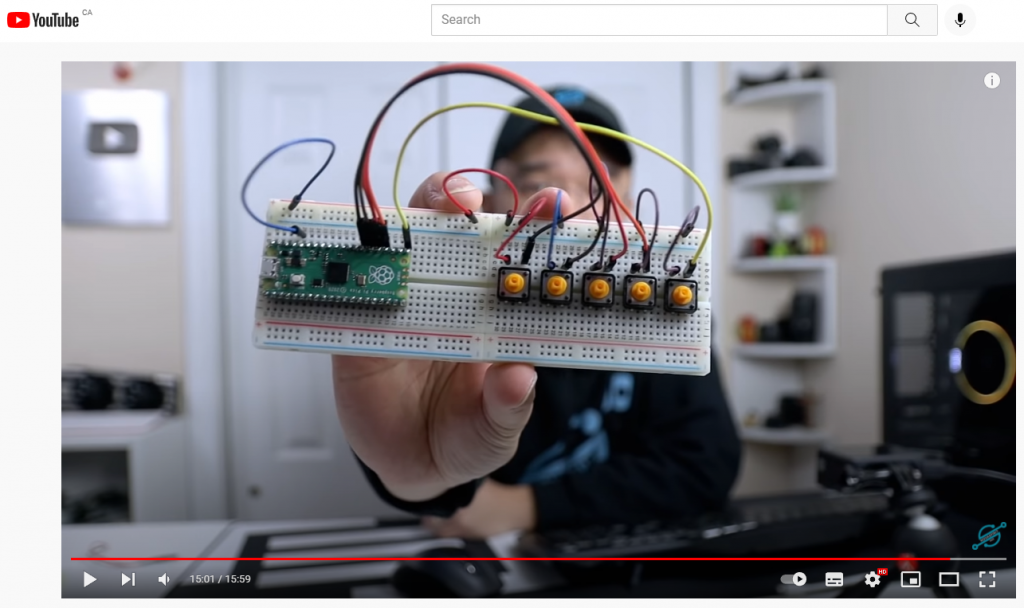
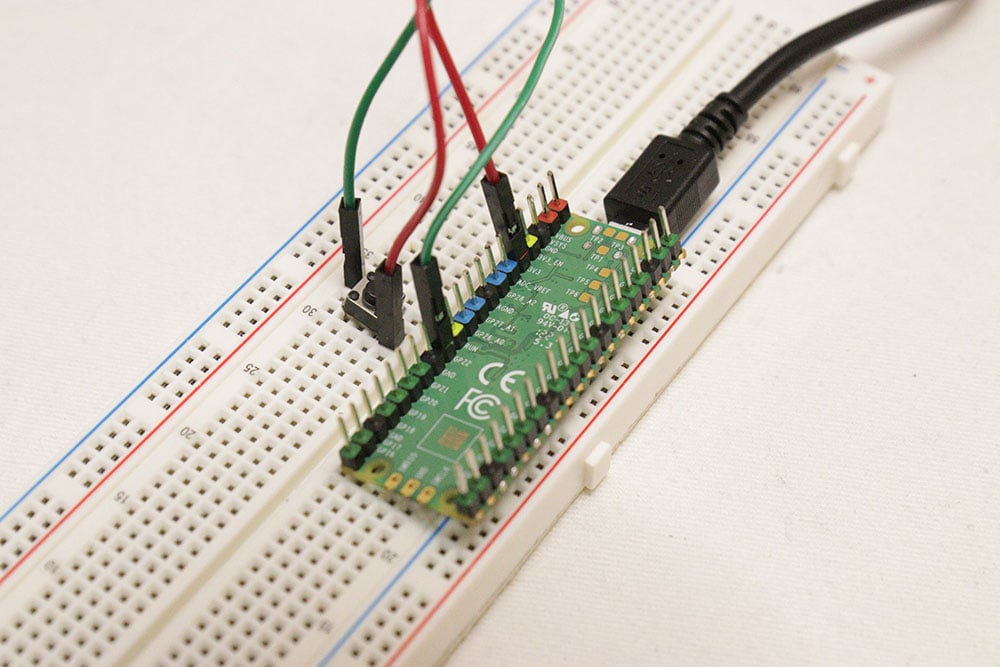
A push button switch has four prongs. Connect the 3.3V pin and GPIO 22 (labelled as GP 22) on diagonally opposite sides of the push button.
What happens here is that when you press the switch, you will connect the 3.3V to the GPIO 22 pin, thereby, in layperson’s terms, activating it.
This is the only physical modification you need to do. It’s very easy.
As for the code, it grew by quite a few lines, (bold = related to button, italics = related to LED)
import time
import digitalio
import board
import usb_hid
from adafruit_hid.keyboard import Keyboard
from adafruit_hid.keycode import Keycode

keyboard = Keyboard(usb_hid.devices)

<strong>btn1_pin = board.GP22
btn1 = digitalio.DigitalInOut(btn1_pin)
btn1.direction = digitalio.Direction.INPUT #GP22 is an input
btn1.pull = digitalio.Pull.DOWN #DOWN means it outputs False

</strong>
<em>led = digitalio.DigitalInOut(board.LED)
led.direction = digitalio.Direction.OUTPUT</em> #powering LED, so give it OUTPUT

activated = False #this variable stores if sarcasm is on or off

while True:
    <strong>if btn1.value: #if user presses btn1, start sarcasm
        activated = True</strong>

    if activated:
        <em>led.value = True</em> #turn on board LED
        keyboard.press(Keycode.CAPS_LOCK)
        time.sleep(0.2)
        keyboard.release(Keycode.CAPS_LOCK)
        if <strong>btn1.value: #if user presses btn1 while activated, cancels sarcasm
            activated = False
            <em>led.value = False</em> #turn off LED
            time.sleep(0.2)</strong>
            <strong>#pauses while loop to give user time to remove finger from btn1</strong>
Converting sarcasm keyboard into macro keyboard
You can use the button to activate macros like ALT + TAB, CTRL + ALT + DEL or anything else up to a maximum of six regular keys.
You just need to modify the keys within this method keyboard.press and keyboard.release.
import time
import digitalio
import board
import usb_hid
from adafruit_hid.keyboard import Keyboard
from adafruit_hid.keycode import Keycode

keyboard = Keyboard(usb_hid.devices)

btn1_pin = board.GP22
btn1 = digitalio.DigitalInOut(btn1_pin)
btn1.direction = digitalio.Direction.INPUT
btn1.pull = digitalio.Pull.DOWN

while True:
    if btn1.value:
        <strong>keyboard.press(Keycode.ALT,Keycode.TAB )</strong>
        time.sleep(0.2)
        <strong>keyboard.release(Keycode.ALT,Keycode.TAB)</strong>
There are many more things you can do with this keyboard hack. For example, you could use this to stop your screensaver from popping up by pressing a harmless key like Page Up. Or you could use it specifically to control Zoom, Discord, OBS, Meet, etc.
Temperature/humidity data with DHT22
If you have a DHT11, DHT22 or AM2302 sensor, you can use it with the Raspberry Pi Pico.
These sensors would probably be best paired with a LCD or a way for you to save the data, but let’s just start ourselves off with a quick-start project.
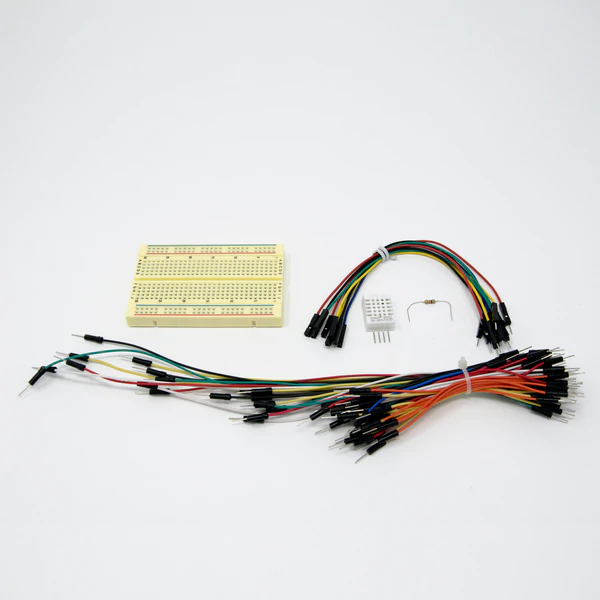
You need three jumper wires, headers on the Raspberry Pi Pico and a 10K resistor. The following package has everything you need, besides the Raspberry Pi Pico with headers.
It’s really easy with Thonny, CircuitPython and Adafruit’s DHT library.
The following steps uses the DHT22.
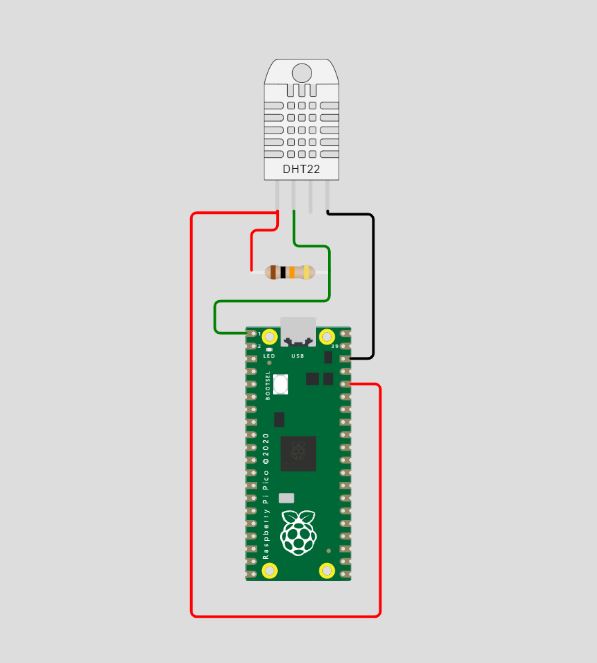
Connecting the DHT22 sensor to the Raspberry Pi Pico
It’s really easy to connect the DHT22 to the Pico.
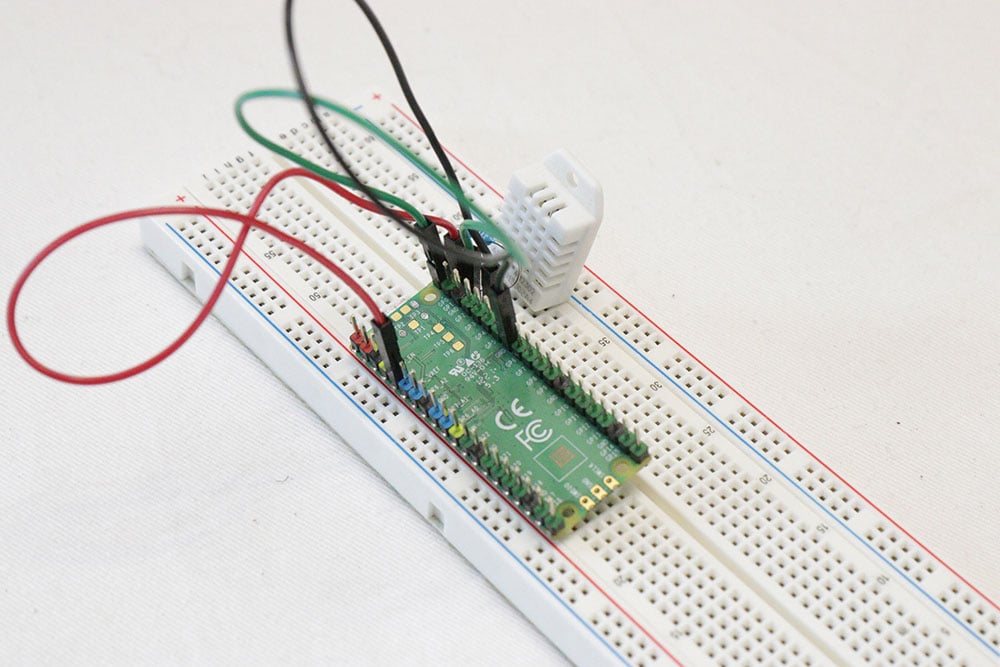
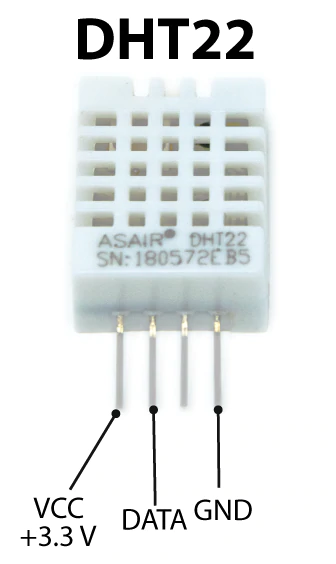
There are four pins on the DHT22. From left to right, with the meshed side facing you, the pins are VCC, DATA, NC and GND. You won’t need to connect NC.
Connect VCC to the 3.3V pin on the Pi.
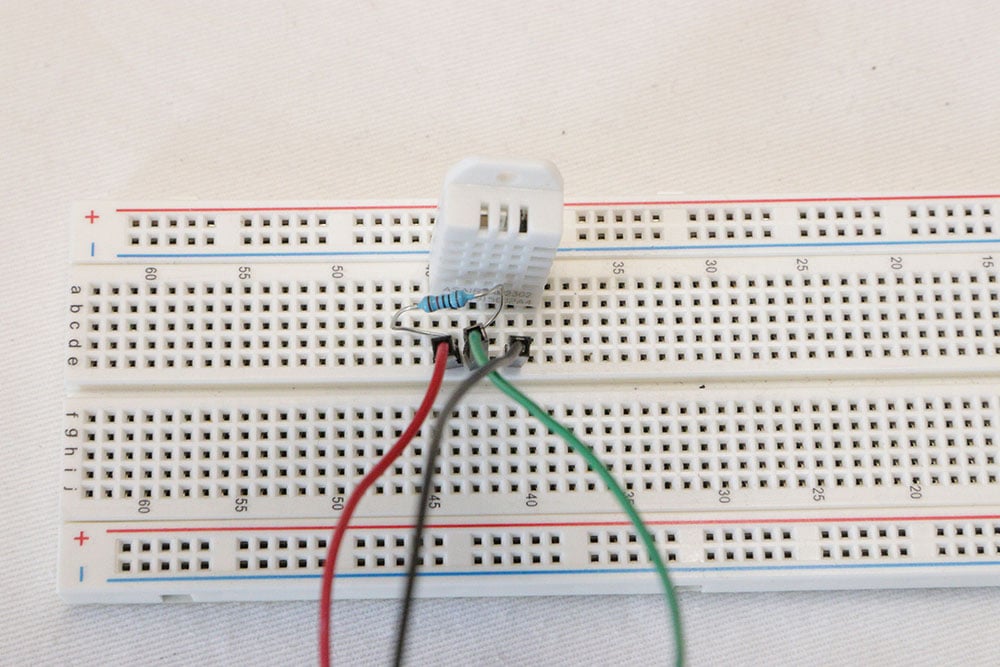
Connect the 10K resistor from the 3.3V to DATA, then connect DATA to GP0. This is easier done with a breadboard so you can split the 3.3V. As seen in the photo above, a resistor goes from the leftmost pin to the second pin, as well, the green wire is connected to the GPIO 0.
Connect GND to any ground pin your Raspberry Pi Pico.
You’re done. It’s time for software.
Coding the DHT22 in Thonny for the Raspberry Pi Pico
First, open Thonny and make you are in Regular Mode and CircuitPython (bottom right). A more detailed guide for Thonny and CircuitPython is available above.
Go to Tools -> Manage packages -> search for adafruit-circuitpython-dht.
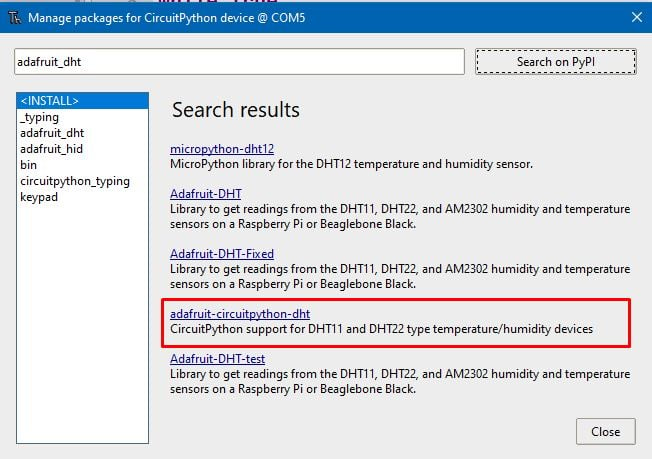
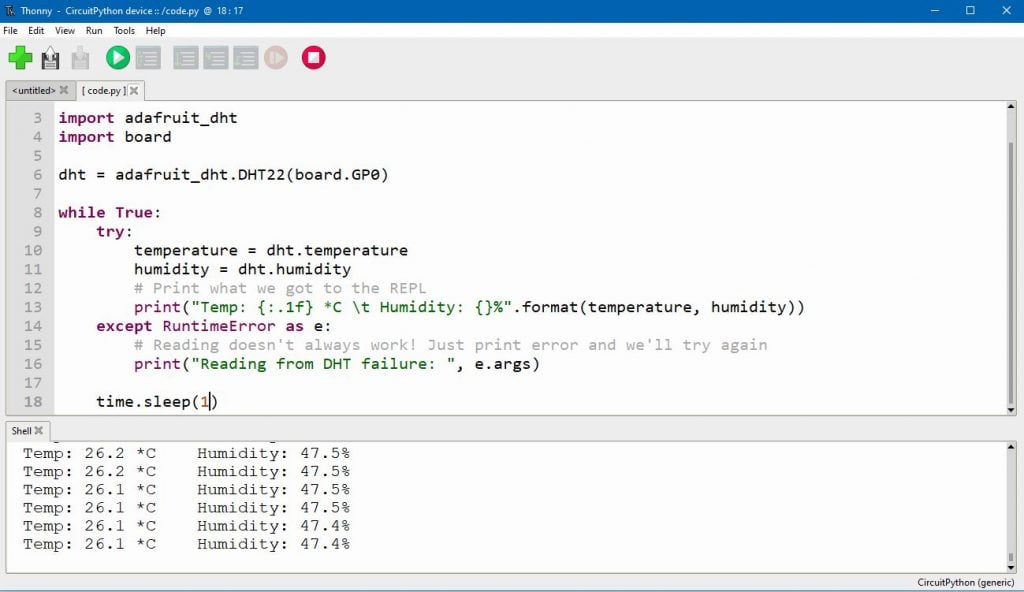
Then, enter this code supplied by Adafruit.
import time

import adafruit_dht
import board

dht = adafruit_dht.DHT22(board.GP0)

while True:
    try:
        temperature = dht.temperature
        humidity = dht.humidity
        # Print what we got to the REPL
        print("Temp: {:.1f} *C \t Humidity: {}%".format(temperature, humidity))
    except RuntimeError as e:
        # Reading doesn't always work! Just print error and we'll try again
        print("Reading from DHT failure: ", e.args)

    time.sleep(1)
Press Run in Thonny and you should see an output:
Raspberry Pi Pico display
The Raspberry Pi Pico is pretty cool because it can display images.
The downside is that it requires quite a bit of work, some technical knowledge and you will be getting images that look like they’re from the Windows 3.1 era.
Why’s that? Because of the limited RAM of 264KB. This limits your display resolution and colour depth.
That said, here are some examples of how what you can output.
Easy video output with DVI sock

The easiest way to output video is by following our guide and using the DVI sock or the VGA & Audio expansion board. The DVI sock uses a HDMI cable which is likely the most compatible port with today’s devices.
Read the full article here on how you can get started
DIY ways to connect Pico to display
There are other ways of outputting video without buying peripherals.
Miroslav Nemecek wrote an article on how you can use eight resistors and a VGA port to connect a monitor to your Raspberry Pi Pico.
And here’s a way you can use a HDMI cable and resistors to connect your Pico to a HDMI monitor.
Raspberry Pi Pico power consumption
Raspberry Pi’s Pico datasheet provides us with a good basis for understanding how much power draw you can expect from the Pico based on certain typical uses.
These figures do not represent the absolute maximum you can draw from the Raspberry Pi Pico, but are a good starting point.
Their first test included video, audio and SD card access to display a “Popcorn” media player demo via the VGA, SD card and Audio board.
| State | |
| Playing Popcorn (video, audio, SD card) | 93.5mA |
| BOOTSEL mode, active | 9.9mA |
| DORMANT mode | 0.8mA |
| SLEEP mode | 1.3mA |
You might be wondering: what is the difference between DORMANT and SLEEP?
Dormant requires an external trigger that manipulates a GPIO pin to wake the Raspberry Pi Pico while SLEEP can run an internal clock to wake the RP2040, as illustrated in the RP2040 datasheet.
In the Raspberry Pi Pico FAQ, they further clarify that,
“SLEEP mode is when processors are in wfi/wfe and DMA is inactive, so you can shut off most system clocks, including things like bus fabric.
DORMANT mode is when you shut down all oscillators, and so is lower power still, but then you have fewer options for waking.”
Can I run the Raspberry Pi Pico off a power bank?
Yes, you can.
But the Raspberry Pi Pico might not draw enough power from the power bank and cause the power bank to go into power saving mode.
The solution is to, unfortunately, draw more power by putting a resistor between the power bank and the Raspberry Pi Pico. Here’s a video to explain the ins and outs.
Powering the Pico (voltages)
The Raspberry Pi Pico can be powered using the microUSB port. This powers the VSYS from the 5V VBUS voltage, via D1.
If you are not using the USB port to power your Raspberry Pi Pico, then you can connect VSYS to your power source in the 1.8V to 5.5V.
However, if you are connecting both, you will need to feed the second power source into VSYS via a Schottky diode, which prevents either supply from back-powering the other. The Schottky diode will also allow the higher of either the VBUS voltage or the external voltage to flow.
However, there is a voltage drop over the Schottky diode, so you will need to supply a voltage of 2.3V to 5.5V.
This means you can power the Raspberry Pi Pico with a minimum of 2x nickle rechargeable batteries (2.4V) or 1x lithium-based battery (3.7V).
In order not to lose efficiency by using the Schottky diode, you can instead use a P-channel MOSFET that is low on resistance.
For more information, view the Raspberry Pi Pico Datasheet.
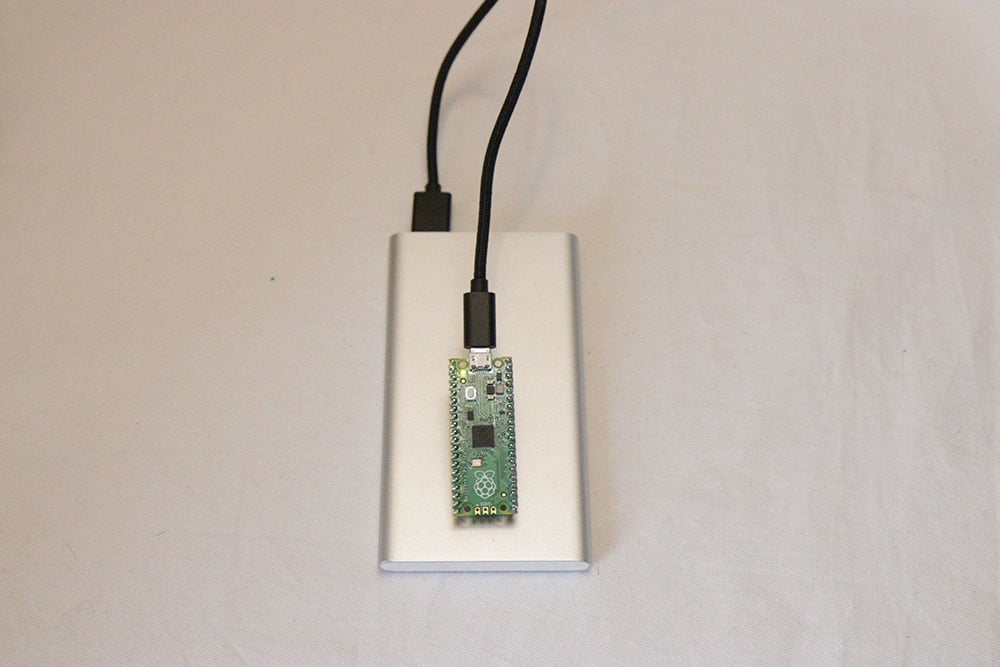
Can I power the Raspberry Pi Pico off a TV’s USB?
Yes, you can. Here’s an image where I blinked internal LED.

A standard USB port should be able to deliver up to 500mA, which is way more than what the Raspberry Pi Pico needs. As you can see in the power consumption tests done by Raspberry Pi, the most intense test only drew about 90mA.
You might run into problems if your Raspberry Pi Pico setup is drawing more than 500mA, for example, if your Pico is running power-hungry peripherals.
Raspberry Pi Pico vs other boards
The Raspberry Pi Pico is a late entrant to the microcontroller world, having only been released in 2021. There’s already keen competition in the microcontroller world with the likes of ESP32 and Arduinos which have many variants that can help you get your project started with the right features such as WiFi.
There are no variants with the Raspberry Pi Pico so you will need to buy HATs and other add-ons to achieve the same goal.
Furthermore, if you are going to add many components on… when does it become time to just buy a microcomputer?
Let’s answer this by looking at the ESP32, Arduino Uno and Raspberry Pi Zero.
Raspberry Pi Pico vs Espressif ESP32
The ESP32 is a big step up from the Raspberry Pi Pico in terms of its technological capabilities. For sake of comparison, I picked the PICO-KIT variant because it felt most similar in form factor to the Pico.
For one, having WiFi and Bluetooth is a major game changer. For example, you’d be able to run a server on the Espressif ESP32 that displays your sensor’s values, whereas you won’t be able to do so on the Raspberry Pi Pico.
The ESP32 also has a faster processor, more RAM and more flash memory but all of this comes at a cost of higher power consumption.
The Raspberry Pi Pico is a bit more modest in its specifications but two things stand out. The fact that it can accept voltages from 1.8 V to 5.5 V really enables you to use one lithium battery which creates a very compact package. This would not be possible with the ESP32 unless you modified the 3.7V voltage from the single lithium battery.
| Raspberry Pi Pico | Espressif ESP32-PICO-KIT | |
| CPU Frequency | 133MHz | 80/160/240MHz |
| Microcontroller | RP2040 | Xtensa LX6 |
| Cores | 2 | 2 |
| Flash memory | 2MB | 4MB |
| RAM | 256KB | 520KB |
| GPIO | 26 (user-usable) | 36 |
| Has USB? | microUSB | microUSB |
| WiFi and/or BT? | No | Yes, both |
| Voltage | 1.8 – 5.5V or 5V USB | 3.3V (via pins) or 5V via USB or 5V-12V (via voltage regulator) |
| Power draw (with activity) | 93mA (Popcorn test) | 100-128mA1 |
| Size | 51x21mm | 52x20mm |
| Languages | MicroPython / C | MicroPython / C |
Note: power consumption figures on the ESP32 is running a program with an empty loop.
Raspberry Pi Pico vs Arduino Uno Rev3
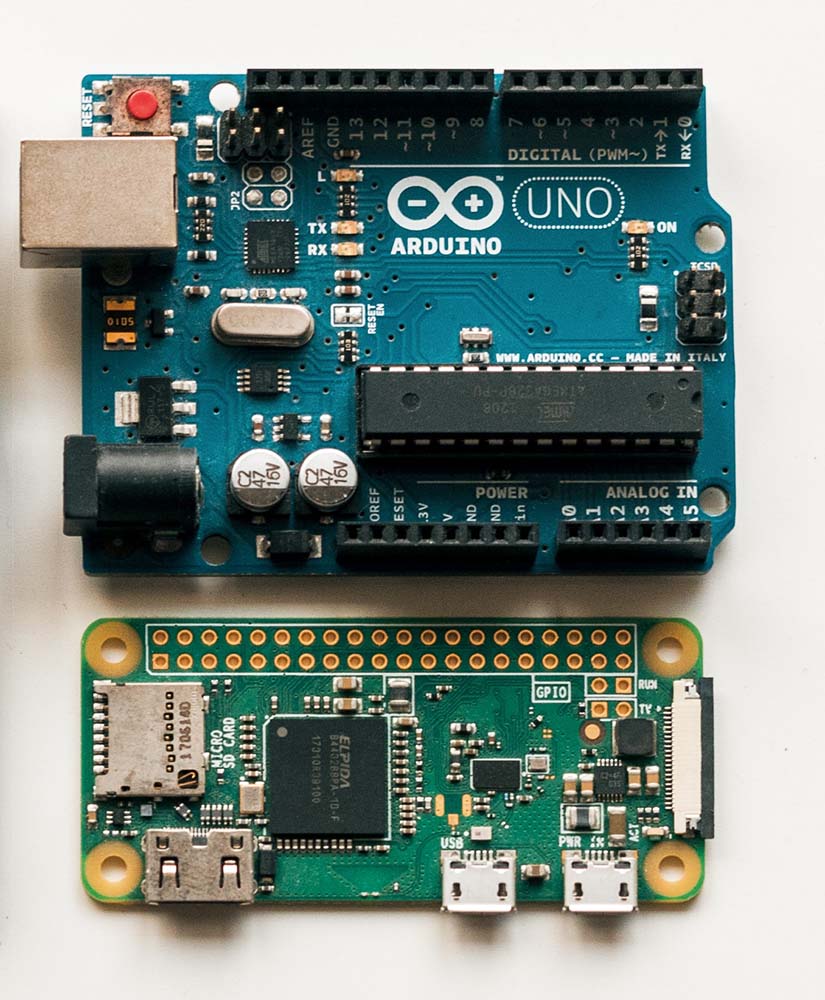
Arduino creates a bunch of boards and in terms of form factor, the Arduino Nano is likely the closest, coming in at 45 x 18mm. Arduino also produces a board that uses the RP2040 microcontroller.
However, the most common board is the Arduino Uno Rev3, so let’s take a look at how these two boards compare.
| Raspberry Pi Pico | Arduino Uno Rev3 | |
| CPU Frequency | 133MHz | 16 MHz |
| Microcontroller | RP2040 | ATmega328P |
| Flash memory | 2MB | 32KB |
| RAM | 256KB | 2KB |
| GPIO | 26 (user-usable) | 14 digital, 6 analog |
| Has USB? | microUSB | USB B |
| WiFi and/or BT? | No | WiFi variant available |
| Voltage | 1.8 – 5.5V or 5V USB | 6-20V (7-12V recommended) or via USB. |
| Size | 51x21mm | 68x53mm |
| Languages | MicroPython / C | C |
For beginners, one of the biggest differences to note is how the Arduino Uno operates on 5V logic whereas the Raspberry Pi Pico operates at 3.3V logic.
5V can potentially make things easier for beginners because some components require a 5V input such as relays. If you have a 5V component that you want to run on the Raspberry Pi Pico, you will have to supply additional componentry to step up 3.3V to 5V.
The other difference is that the Arduino Uno is open source which means you can buy cheaper boards that have the exact same capability. That said, the Raspberry Pi Pico is already extremely cheap at $4 or 4.10€.
The Arduino Uno also takes in a much wider range of voltages (7-12V recommended), which means you can run it off many types of power supplies.
In terms of programming languages, the Pico has the advantage of allowing you to code in MicroPython, whereas you’ll have to write C for the Arduino. That said, the Arduino has a larger library to make working with components easier.
Raspberry Pi Pico vs Raspberry Pi Zero
To some extent, the Pico and the Zero have overlapping capabilities. In simple circuits, you can use the Pico and Zero to do the exact same thing.
But how you get to the same point will vary between the Pico and the Zero.
Here’s the logic which I use to decide which to use:
| Scenario | What to get |
| I am better at a language other than C/Python | Zero |
| I have “unlimited” power (i.e. non-solar or battery use case) | Zero |
| I need WiFi and/or Bluetooth | Zero |
| I need to save data (such as temperature logs) | Zero |
| I need to use a camera | Zero |
| I need the most compact setup | Pico |
| I need quick restart on crash/power failure | Pico |
| I don’t want to set up an OS | Pico |
| I want the cheaper option | Pico |
A more detailed outline of why go for the Pico or Zero is covered above, and this link will take you to it.
Raspberry Pi Pico vs Teensy 4.1
The Teensy 4.1 is an extremely powerful board because of its ARM Cortex-M7 chip running at 600MHz.
Released by PJRC in 2021, the Teensy 4.1 would appeal to people who need something with a lot of processing power, RAM, flash memory, ethernet and more GPIO pins than what you’d find in the Raspberry Pi Pico.
You do get 55 input/output pins but only 42 are “breadboardable”. There are 35 PWM pins, 18 analog inputs, 8 serial, 3 SPI and 3 I2C.
Where the Raspberry Pi Pico shines comes down to its simplicity. If you are just learning and want the easiest way to get started on simple projects, the Raspberry Pi Pico offers the easiest way to get up and running.
For example, the Raspberry Pi Pico’s programming language of choice is MicroPython, whereas the Teensy 4.1 is programmed primarily on C.
It’s also really easy to use CircuitPython on the Raspberry Pi Pico, which makes it easier to build projects.
The price of the Teensy 4.1, at $26.85, is quite a lot more than the $4 Raspberry Pi Pico.
Plus, it’s a lot easier to power the Raspberry Pi Pico on a battery because of the wide voltage it can take.
| Raspberry Pi Pico | Teensy 4.1 | |
| CPU Frequency | 133MHz | 600MHz |
| Flash memory | 2MB | 8MB |
| RAM | 256KB | 1024KB |
| GPIO | 26 (user-usable) | 55 digital, 18 analog |
| Has USB? | microUSB | microUSB |
| WiFi and/or BT? | No | No, but has Ethernet |
| Voltage | 1.8 – 5.5V or 5V USB | 5V via USB or VIN |
| Size | 51x21mm | 61x15mm |
Raspberry Pi Pico downloads
I’ve compiled a list of files that can help you in your projects. Most of them live on the datasheet subdomain of Raspberry Pi and what’s here is what are relevant to the Raspberry Pi Pico.
References
Raspberry Pi Pico datasheet (about the Pico, mechanical/electrical specs, features, powering, debugging, schematic, components location)
Raspberry Pi Pico product brief (marketing deck)
Raspberry Pi Pico Fritzing file
10 curious Raspberry Pi Pico facts
Programming
Raspberry Pi Pico and MicroPython on Windows
Raspberry Pi Pico Getting Started with Pico (for C/C++ development)
CircuitPython for Raspberry Pi Pico UF2 file
Get started with MicroPython on Raspberry Pi Pico
Raspberry Pi Pico C SDK (software development kit) documentation
Raspberry Pi Pico MicroPython SDK (software development kit) documentation
Power consumption is not 6W, its 0.5W (100mA at 5V)
Hey Antony, I’ve corrected it. Thanks for your input.
chyba na wyjściach pinów. Tak przynajmniej jest w karcie technologicznej PICO
Puedo conectar por usb una Raspberry Pi Pico con un Arduino Nano. que la rrasberry envíe por usb datos al arduino?
Gracias
pico w has wifi now
> Oh, did I mention that the Raspberry Pi Zero is very picky about the voltage you supply it? It’ll only take 4.75 – 5.25V.
incorrect, that’s the stated spec, but it takes lower than that and works wonders. see here: https://hackaday.io/project/19035/log/69596
Very nice writeup! I liked this: ” Well, for example, one of my projects used a potentiometer to regulate the the switching frequency of a relay.” – was wondering if you could share detail this project as an example. Did you use PIO / PIO State Machine?
No PIO used!
Basically, when you connect a potentiometer to an ADC, you will get a value. Turning the pot will increase or decrease the value.
I basically used those values to create a timer. So for example, if the value is 2000, it will correspond to 2 seconds on, 2s off.
Buenas, es posible que la raspberry pi pico se queme al recibir de entrada una correinte de 2A pero voltaje de 5V?
Estas usando un cargador de movil que tiene una corriente de 2A? Aunque siempre haya riesgo, creo que el Pico solo tomaria la corriente que necesite, aunque tu cargador puede ponerle 2A (al maximo).
You’re not limited to C or microPython for programming. I have picos with FORTH and BASIC interpreters installed and there’s always CircuitPython.
thank you for the feedback – interesting to know that you can run such languages as FORTH on the Pico as well!
Su Raspberry Pi Pico W non riesco ad installare la libreria adafruit-circuitpython-hid.
Inizia l’installazione e dopo un po mi da errore 28 memoria piena.
dove sbaglio?
Grazie 1000
Great article! I used a Pico for my custom keyboard with kmk firmware (circuit python based) and it’s great.
I bought some pico clones on aliexpress recently for as low as 2.7 dollar with type C and 16 mb… Not tested yet.