Full Transition to the New PiCockpit Client

If you’ve kept up with PiCockpit these past few weeks, you know that we’ve been making some big changes. Chief among them is that this week, we completely transitioned our new client to Node.js.
As we announced on December 22nd, PiCockpit is now available for the new Raspberry Pi Bookworm OS.
Additionally, we have revamped our entire client to be compatible with both Bullseye OS.
While we currently recommend upgrading to Raspberry Pi Bookworm OS, the backported client ensures PiCockpit’s new features are available on the three most recent variants of Raspberry Pi OS.
We officially support Bookworm OS and Bullseye OS, having conducted extensive testing on both operating systems.
Please note that Buster OS is no longer officially supported, and we encourage users to transition to the recommended operating systems for optimal performance and compatibility.
This restructuring significantly improves the long-term stability of each application within the PiCockpit ecosystem.
However, we acknowledge that there are ongoing issues with our BME688 AirMeter App and the CO2 Sensor App. Rest assured, our team is actively working on resolving these issues, and updates will be rolled out in the coming weeks.
Furthermore, we are aware of the instability of the GPIO App on a Raspberry Pi 5 and are diligently working towards a solution.
We are committed to enhancing the stability of our platform, and we appreciate your patience as we address and resolve these concerns promptly.
Looking ahead, we are focusing on expanding our app suite significantly. Stay tuned for upcoming extensions and new applications that will further enhance your PiCockpit experience.
For those who do not yet have PiCockpit, we have provided a concise guide for installation below. For existing users, upgrading to the new client is straightforward, and you can find instructions below.
Installing the PiCockpit Client
Installing the PiCockpit Client requires a few easy steps:
Step 1: Access your user profile
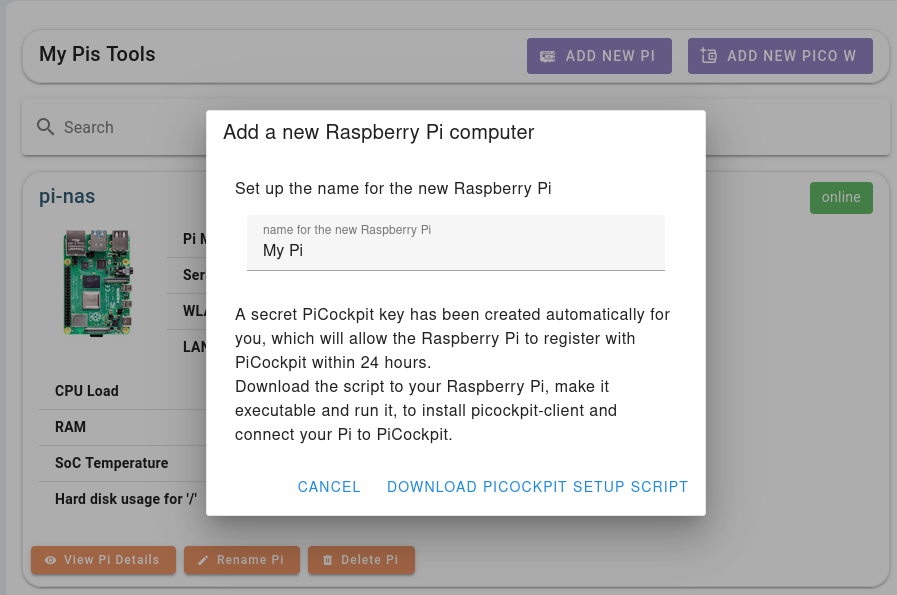
Step 2: Click on the “ADD NEW PI” button
Step 3: Download the PiCockpit Setup Script onto your Raspberry Pi
Step 4: Make the script executable.
After that, you need to make it executable. For instance, if the file is saved as picockpit-addrpi-v2.5.0.sh, then you’ll run the following:
chmod +x picockpit-addrpi-v2.5.0.shStep 5: Run the script:
./picockpit-addrpi-v2.5.0.shStep 6: Follow the instructions of the PiCockpit Client.
For more detailed installation instructions, please visit:
Upgrading the PiCockpit Client
If you already have PiCockpit installed and you would like to upgrade to the new client, then you can open up a terminal on your Raspberry Pi and enter the following command:
sudo apt update && sudo apt upgradeThis will upgrade the packages on your Raspberry Pi, including the PiCockpit Client.
This works on Raspberry Pi Bookworm OS, Bullseye OS, and Buster OS.
Conclusion
If you have any questions or encounter issues during the installation or upgrade process, please feel free to contact our support team.
Stay tuned for further updates, new applications, and increased extensibility. Don’t forget to sign up for our newsletter to stay informed about major announcements.