Tutorial sui componenti per principianti di Raspberry Pi Pico W
Questa esercitazione sui componenti Raspberry Pi Pico W per principianti vi insegnerà come interagire con il microcontrollore per interagire con semplici componenti come LED, sensori a ultrasuoni e molti altri elementi presenti in un kit per principianti.
Se siete principianti, questo tutorial vi aiuterà a capire MicroPython in modo da poter leggere, scrivere e modificare il codice. Con queste conoscenze, potrete combinare codice e componenti per creare qualcosa che abbia un caso d'uso reale.
Se provenite da un Pico, questa esercitazione vi insegnerà come controllare il Pico W in modalità wireless. In precedenza, era possibile interagire con il Pico solo tramite un interruttore, un pulsante o un dispositivo di interazione fisica. Ora non più! Ora è possibile controllare i componenti con il telefono o il desktop.
Flusso del tutorial
Introduzione
Il tutorial Hello World per il Pico W
Un passo avanti
Modalità di base per la trasmissione dei dati dal sensore
- Pico W e sensore a ultrasuoni HC-SR04
- Trasmettere una pagina web con i dati del sensore
- Riduzione del carico utile con AJAX
- Pimoroni Phew per semplificare la codifica degli endpoint
Connessione alle utilità web
- Registrare i dati climatici del sensore DHT22 in Google Sheets con IFTTT
- Costruire un telecomando Spotify con funzioni di riproduzione/pausa/skip
Controllo GPIO senza codice con PiCockpit
- Installazione semplicissima di PiCockpit su Pico W
- Semplice controllo dei LED con PiCockpit e Pico W
- Pico W, ventola a 5V e transistor, controllato da PiCockpit
MQTT
Indice dei contenuti
Obiettivi del tutorial in sintesi
- Imparare a interagire con i componenti fondamentali che compongono progetti più ampi.
- Controllate tutto questo in modalità wireless, senza interruttori, pulsanti o altri dispositivi di interazione.
- Conoscere meglio i punti di forza di Pico W
Link importanti
Repository Github per il codice del tutorial (tranne secrets.py)
Errori, suggerimenti, commenti? Lasciate un commento nella casella dei commenti qui sotto, mandami un'email o Twittami.
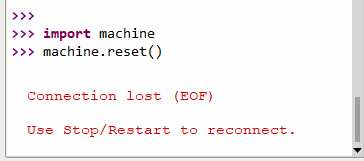
OSError: [Errno 98] EADDRINUSE
Se si verifica questo errore, è sufficiente scollegare e ricollegare il Raspberry Pi Pico.
È possibile farlo anche digitando questi comandi nella shell di Thonny:
import machine
machine.reset()
Risultato:
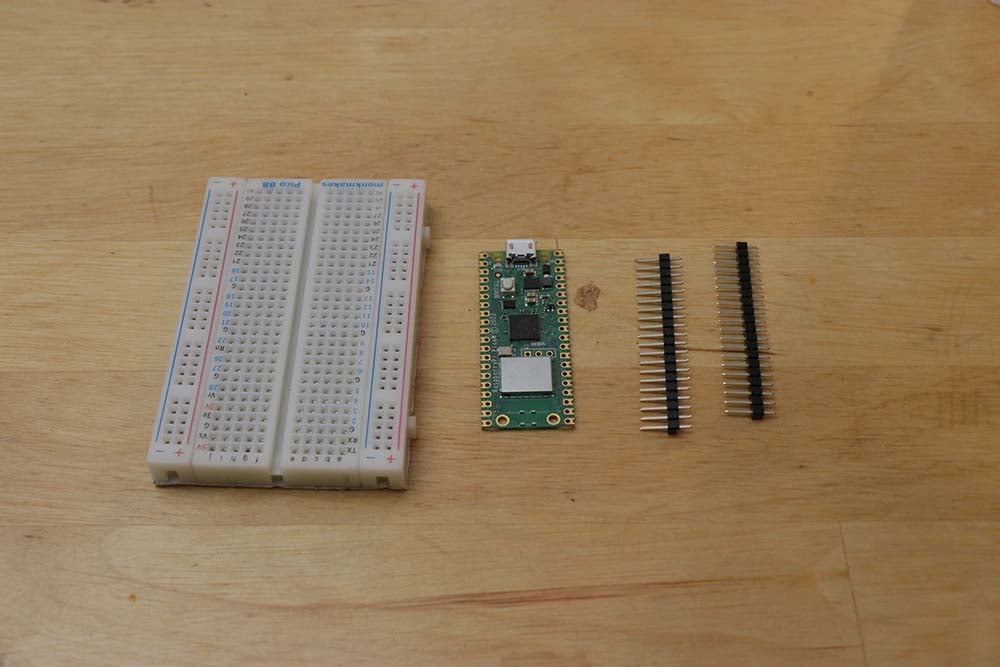
Saldatura dei pin della testata
Quando si acquista un Raspberry Pi Pico W, è possibile che non venga fornito con gli header che consentono di collegare i componenti al Pico.
Al momento in cui scriviamo, il Pico WH (H per header) non è ancora stato rilasciato. Il nostro mega-articolo su Pico W ne segue l'uscita.
Tuttavia, se riuscite a trovare un Pico W con header pre-saldati, vi consiglio di acquistarlo.
Tuttavia, per tutti gli altri, saldare gli header sul Pico W è una cosa semplice. Sono necessari:
- Lavagna per pane
- Saldatore e saldatore
- Intestazioni
Quando acquistate gli header, assicuratevi di acquistarne uno adatto al Pico W. A differenza degli header per la serie Raspberry Pi Zero, gli header del Pico W non sono affiancati. Si trovano alle estremità opposte della scheda.
I pin hanno un lato lungo e uno corto. I pin più lunghi devono trovarsi sul lato in cui si vedono le etichette GPIO (GP0, GP1, GND, VBUS, VSYS, ecc.).
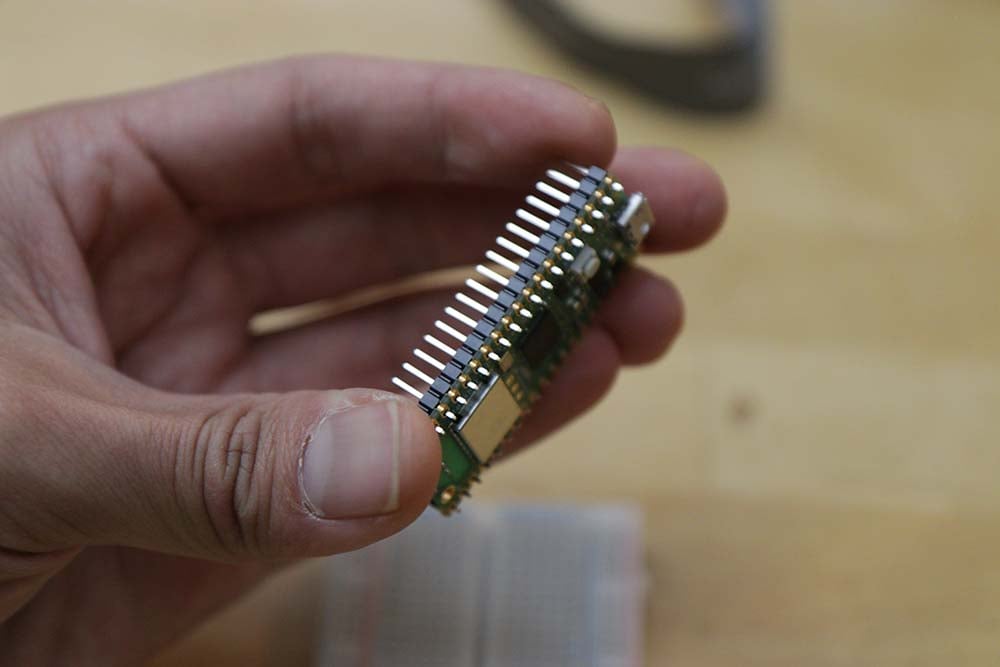
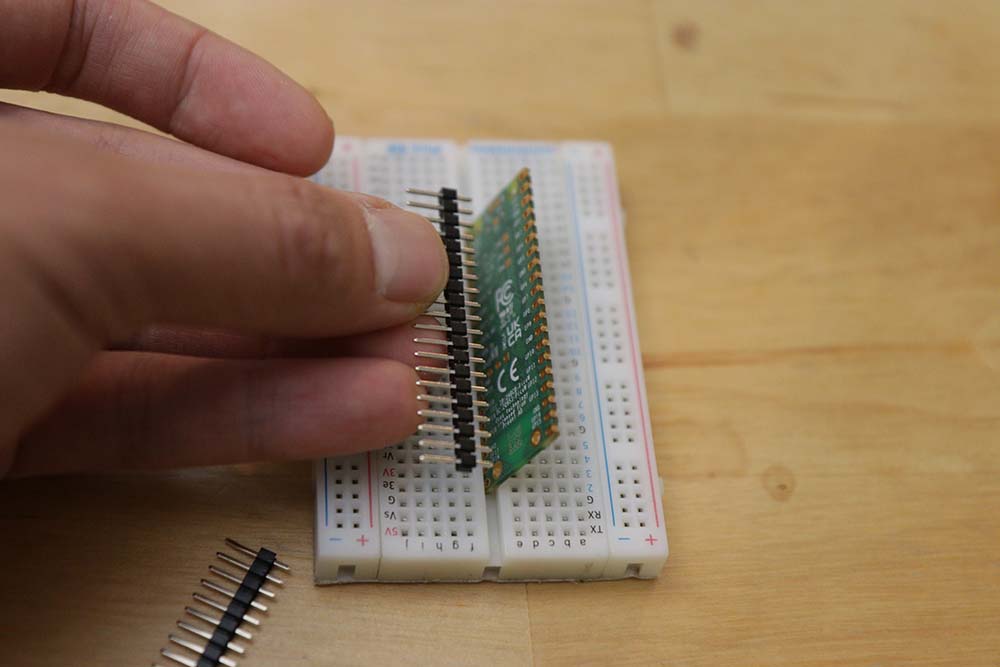
Pertanto, inserire i pin più lunghi nella breadboard. Sono necessari quattro fori e una distanza di un metro tra di essi. Se non siete sicuri, fate una prova con il vostro Pico W.
Saldare è facile. Assicurarsi che il saldatore sia caldo e utilizzare la punta del saldatore.
La cosa più efficace è stata avvicinare la punta del saldatore al pin, far toccare la punta alla saldatura e vederla scorrere lungo il pin e creare un collegamento.
Dopo la saldatura, accertarsi che non vi siano saldature estranee che potrebbero collegare tra loro due pin GPIO o residui di saldatura sulla scheda.
Utilizzare Thonny come editor di codice
Thonny rimane il modo più semplice per programmare il vostro Raspberry Pi Pico W.
Se si utilizza il sistema operativo Raspberry Pi, è già installato.
Tuttavia, se si utilizza Windows o Mac, è necessario scaricarlo e configurarlo.
Ecco una guida che vi guiderà attraverso i passaggi.
Assicuratevi anche di consultare la guida su come caricare i file sul Pico W.
Aggiornare il firmware caricando l'ultima versione dell'UF2.
Quando si acquista il Pico W, è possibile che il firmware sia già obsoleto.
Sono in arrivo molte modifiche al Pico W, quindi è ideale aggiornare subito il firmware.
Alcuni cambiamenti che ho visto dal giorno del rilascio sono miglioramenti nella funzione di access point della WLAN e futuri aggiornamenti potrebbero sbloccare la funzione Bluetooth sulla scheda.
Aggiornate ora! Ecco una guida nel nostro mega-articolo.
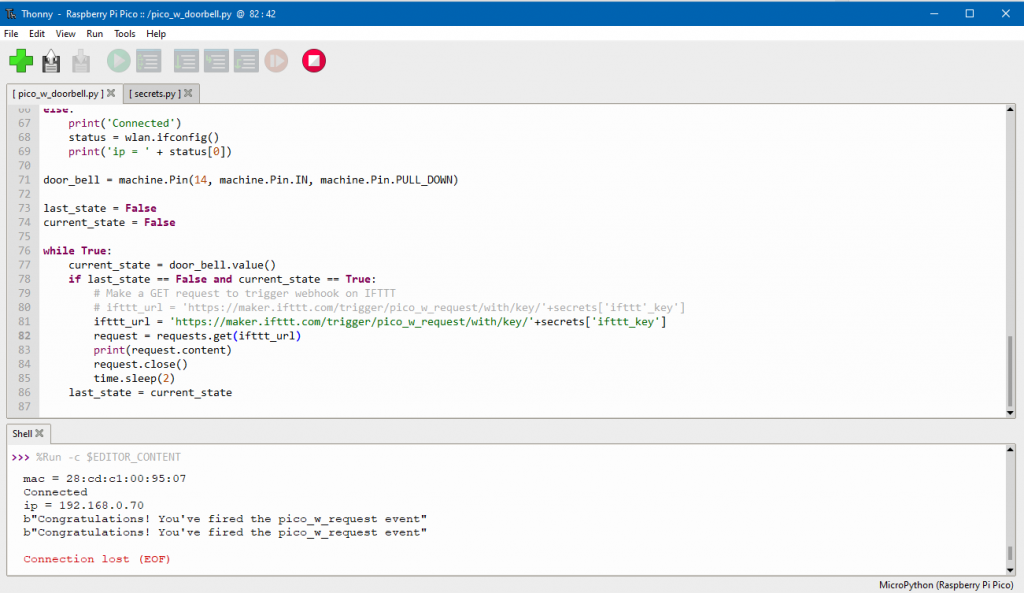
1. Servire una pagina web che dice "Hello World" sul Pico
Uno dei progetti fondamentali in tutti i tutorial di programmazione è il progetto "Hello World".
Il "Hello World" di un microcontrollore di solito consiste nel far lampeggiare un LED. È facilissimo. Ecco come fare.
Tuttavia, dato che Pico W può servire una pagina web, iniziamo a imparare come servire una pagina web con un messaggio "Hello World".
L'impostazione qui utilizzata costituirà l'elemento fondamentale per il resto delle esercitazioni.
Esistono due modi per connettersi al Pico W. È possibile farlo aderire a una rete WiFi oppure è possibile trasmettere un hotspot SoftAP simile a quello dello smartphone. Se volete provare quest'ultimo, segui questo link. Tuttavia, per coerenza, nel corso di questa esercitazione ci collegheremo sempre a una rete WiFi piuttosto che a una rete broadcast del Pico W.
Quindi, fondamentalmente, i passaggi per servire una pagina web comportano:
- Connessione al WiFi
- Scrittura del codice per servire index.html a chiunque si connetta all'indirizzo IP di Pico W
Prepariamo alcuni file. Salvare questi file e caricarli sul Raspberry Pi Pico W. Ecco come caricare i file, nel caso vi sia sfuggito.
wifi.py
wifi.py è un boilerplate che aiuta a connettersi alla rete WiFi. Creare un file separato e importarlo in main.py in seguito contribuirà a ridurre l'ingombro del codice.
Si noti che è necessario modificare il codice del proprio paese nella riga rp2.country('DE') se il vostro paese non è la Germania.
import rp2
import network
import ubinascii
import machine
import urequests as requests
import time
from secrets import secrets


def init_wifi():
    # Set country to avoid possible errors
    rp2.country('DE')

    wlan = network.WLAN(network.STA_IF)
    wlan.active(True)

    # Load login data from different file for safety reasons
    ssid = secrets['ssid']
    pw = secrets['pw']

    wlan.connect(ssid, pw)

    # Wait for connection with 10 second timeout
    timeout = 10
    while timeout > 0:
        if wlan.status() < 0 or wlan.status() >= 3:
            break
        timeout -= 1
        print('Waiting for connection...')
        time.sleep(1)

    # Define blinking function for onboard LED to indicate error codes
    def blink_onboard_led(num_blinks):
        led = machine.Pin('LED', machine.Pin.OUT)
        for i in range(num_blinks):
            led.on()
            time.sleep(.2)
            led.off()
            time.sleep(.2)

    wlan_status = wlan.status()
    blink_onboard_led(wlan_status)

    if wlan_status != 3:
        raise RuntimeError('Wi-Fi connection failed')
    else:
        print('Connected')
        status = wlan.ifconfig()
        print('ip = ' + status[0])
segreti.py
wifi.py importazioni segreti.pydove vengono memorizzate le informazioni della rete WiFi.
segreti.py è un semplice file JSON che contiene l'SSID e la password del WiFi.
secrets = {
    'ssid': 'SM-A520W9371',
    'pw': 'starting',
    }
serve_webpage.py
Come suggerisce il nome, questa pagina serve i siti web agli utenti che si collegano a Pico W.
Quando riceve una connessione, Pico W trova un file chiamato indice.html e lo invia al client connesso, come si vede nella riga response = get_html('index.html').
import socket

def serve_webpage():
    #Function to load in html page
    def get_html(html_name):
        # open html_name (index.html), 'r' = read-only as variable 'file'
        with open(html_name, 'r') as file:
            html = file.read()

        return html

    # HTTP server with socket
    addr = socket.getaddrinfo('0.0.0.0', 80)[0][-1]

    s = socket.socket()
    s.bind(addr)
    s.listen(1)

    print('Listening on', addr)

    # Listen for connections
    while True:
        try:
            cl, addr = s.accept()
            print('Client connected from', addr)
            response = get_html('index.html')
            cl.send('HTTP/1.0 200 OK\r\nContent-type: text/html\r\n\r\n')
            cl.send(response)
            cl.close()

        except OSError as e:
            cl.close()
            print('Connection closed')
Infine, è necessario creare il file indice.html che verrà inviato a un client connesso.
<!DOCTYPE html>
<html>
    <head>
        <title>Pico W</title>
    </head>
    <body>
        <h1>Hello World</h1>
    </body>
</html>
Si tratta di un semplice boilerplate HTML con due modifiche: una all'elemento <title>che riporta "Pico W" come titolo e il tag <h1> che dice "Hello World".
main.py
Dal momento che abbiamo collocato tutto il codice altrove, il nostro main.py deve solo importare e chiamare queste funzioni per servire la pagina web Hello World.
Come si può vedere, inizializziamo il WiFi prima di servire la pagina web.
from wifi import init_wifi
from serve_webpage import serve_webpage

init_wifi()
serve_webpage()
Ci sei quasi!
Facendo riferimento alla schermata sottostante, assicurarsi che:
- Avete caricato cinque file nel vostro Raspberry Pi Pico W (vedi riquadro rosso in basso a sinistra)
- Assicurarsi che l'interprete sia impostato su MicroPython (Raspberry Pi Pico) (vedi riquadro in basso a destra)
- Quindi, evidenziare la voce main.py nell'editor di codice e fare clic sul pulsante verde di esecuzione (riquadro rosso in alto a sinistra).
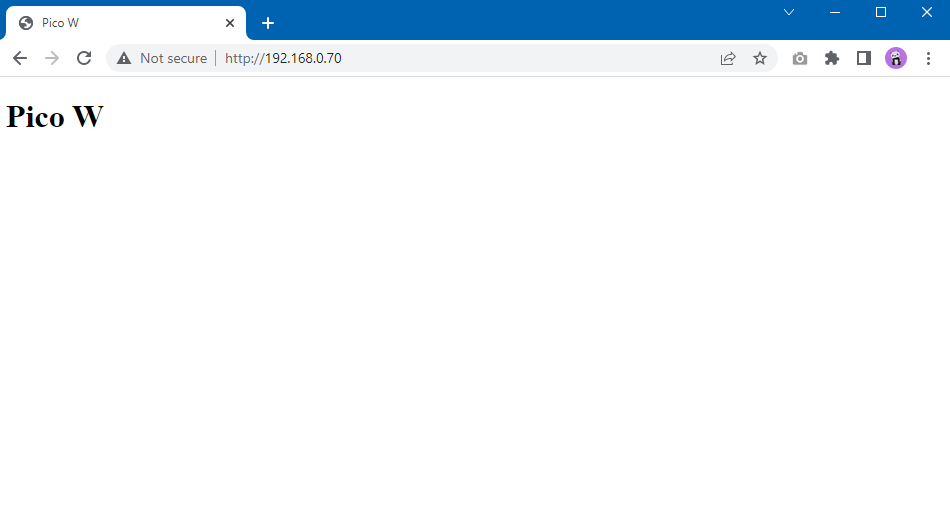
- Una volta eseguito, nella shell verrà visualizzato il vostro indirizzo IP. Andate nel vostro browser e digitate questo indirizzo per visualizzare la pagina web Hello World.
- Se la shell non è aperta, andare su Visualizza -> Shell.
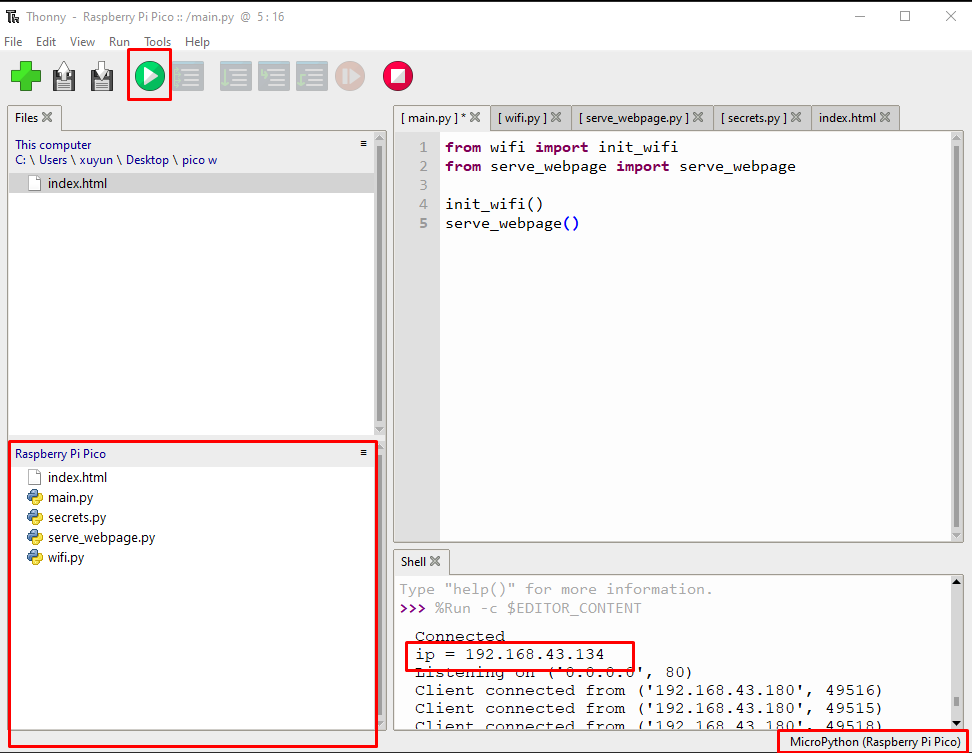
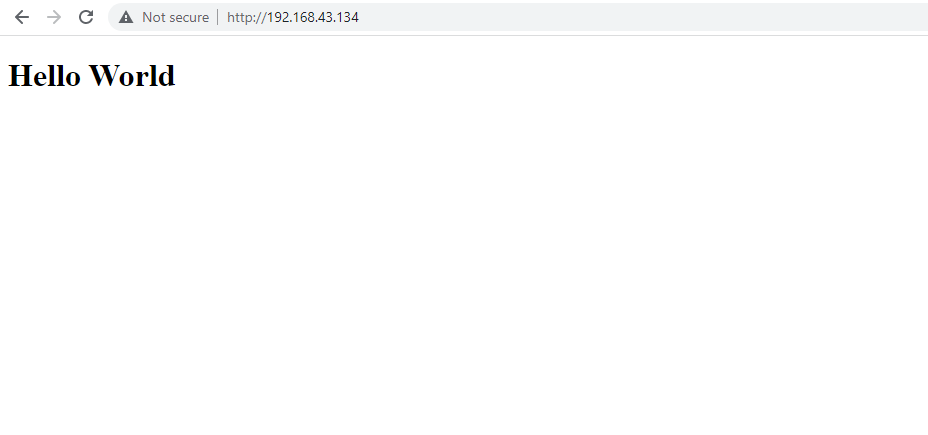
Se tutto è andato a buon fine, verrà visualizzata la pagina seguente.
2. Controllo di un LED in modalità wireless
Ora che sono state impostate le basi, facciamo un passo avanti.
Uno dei progetti fondamentali di Raspberry Pi prevede il lampeggiamento di un LED.
Aumentiamo il livello controllando il LED in modalità wireless. Vogliamo essere in grado di far lampeggiare, accendere e spegnere il LED.
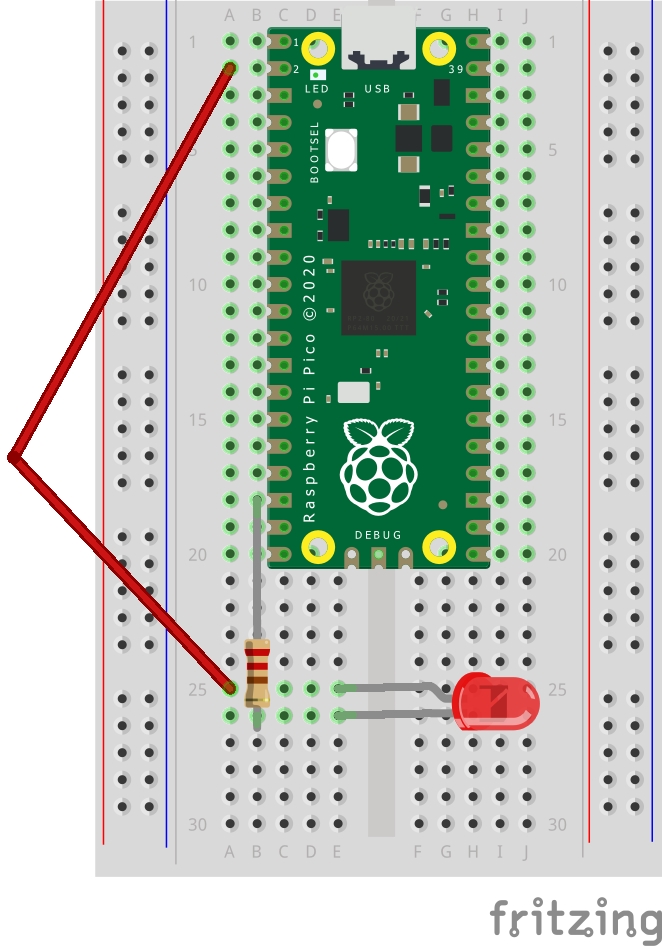
A tale scopo, è necessario impostare un circuito e un server Web con tre pulsanti: ON, OFF, BLINK.

Per questo progetto sono necessari un LED, una resistenza da 330 ohm, un cavo di collegamento e una breadboard.
Utilizzeremo un LED rosso perché la maggior parte dei kit ne è dotata. Se si utilizza un LED di un altro colore, è necessario regolare la resistenza.
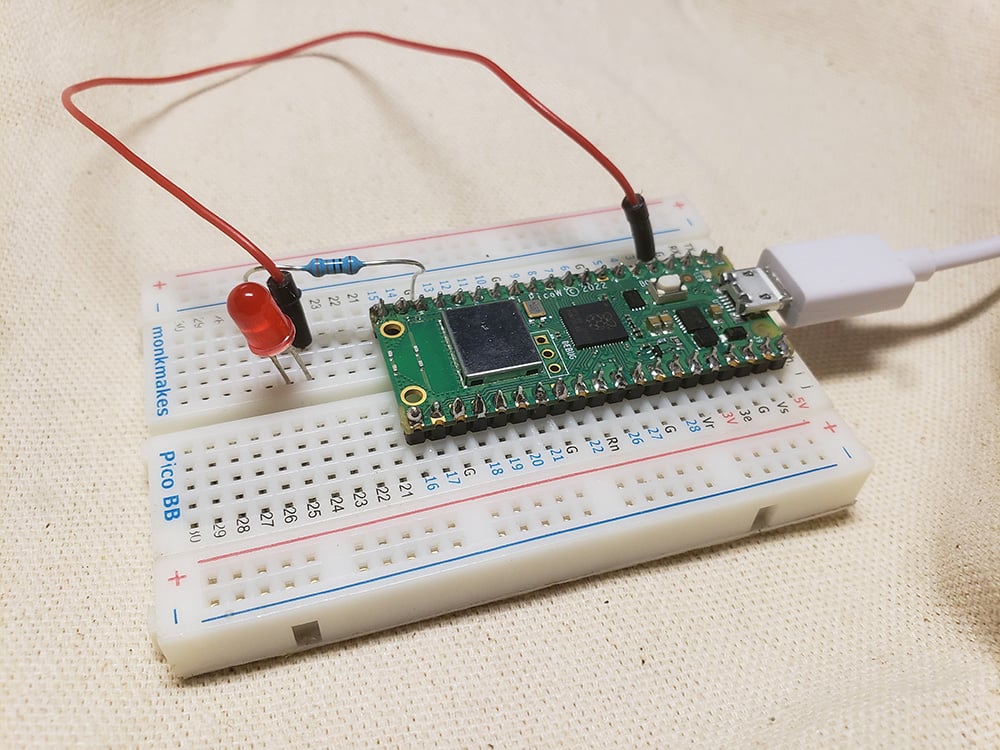
Ecco come collegare i componenti
- GPIO 2 -> gamba lunga del LED (anodica/positiva)
- GND -> Resistenza da 330 ohm -> Gamba corta del LED (catodo/negativo)
Codice per il controllo del LED su Pico W
Facciamo riferimento a quanto fatto nell'esercitazione precedente. Gli unici due file che dovremo modificare sono indice.html per aggiungere pulsanti e main.py per interagire con il LED in base agli input provenienti da indice.html.
Le parti in grassetto indicano le nuove linee che sono state aggiunte a index.html. Aggiungono tre pulsanti e un paragrafo che dice "Controllo del LED".
<!DOCTYPE html>
<html>
<head>
<title>Pico W</title>
</head>
<body>
<h1>Pico W</h1>
<p>Control the LED</p>
<a href=\"?led=on\"><button>ON</button></a>
<a href=\"?led=off\"><button>OFF</button></a>
<a href=\"?led=blink\"><button>BLINK</button></a>
</body>
</html>Quando si premono i pulsanti, viene aggiunto un parametro all'indirizzo IP di Pico W (ad es. http://192.168.43.134/%22?led=blink\). Questi parametri vengono acquisiti dal backend di Pico W e controllano il LED.
Ci sposteremo serve_webpage.pynel codice main.py file.
Ecco main.py:
from wifi import init_wifi
import socket
import machine
import time

init_wifi()


#LED controls
led = machine.Pin(2, machine.Pin.OUT)

def blink_led():
    led.on()
    time.sleep(0.2)
    led.off()
    time.sleep(0.2)

#Function to load in html page
def get_html(html_name):
    # open html_name (index.html), 'r' = read-only as variable 'file'
    with open(html_name, 'r') as file:
        html = file.read()

    return html

# HTTP server with socket
addr = socket.getaddrinfo('0.0.0.0', 80)[0][-1]

s = socket.socket()
s.bind(addr)
s.listen(1)

print('Listening on', addr)

# Listen for connections
while True:
    try:
        cl, addr = s.accept()
        print('Client connected from', addr)
        request = cl.recv(1024)
        print(request)

        request = str(request)
        led_on = request.find('?led=on')
        led_off = request.find('?led=off')
        led_blink = request.find('?led=blink')
        print('led_on = ', led_on)
        print('led_off = ', led_off)
        print('led_blink = ', led_blink)
        if led_on > -1:
            print('LED ON')
            led.on()

        if led_off > -1:
            print('LED OFF')
            led.off()

        if led_blink > -1:
            print('LED BLINK')
            blink_led()

        response = get_html('index.html')
        cl.send('HTTP/1.0 200 OK\r\nContent-type: text/html\r\n\r\n')
        cl.send(response)
        cl.close()

    except OSError as e:
        cl.close()
        print('Connection closed')
Il primo, e fondamentale, segmento è riportato di seguito:
request = cl.recv(1024)
        print(request)

        request = str(request)
        led_on = request.find('?led=on')
        led_off = request.find('?led=off')
        led_blink = request.find('?led=blink')
        print('led_on = ', led_on)
        print('led_off = ', led_off)
        print('led_blink = ', led_blink)
        if led_on > -1:
            print('LED ON')
            led.on()

        if led_off > -1:
            print('LED OFF')
            led.off()

        if led_blink > -1:
            print('LED BLINK')
            blink_led()
La variabile "request", quando viene stampata, produce il primo blocco di testo sottostante. Le ultime tre righe sono le istruzioni di stampa che controllano l'accensione, lo spegnimento o il lampeggiamento del LED:
b'GET /%22?led=blink\\%22 HTTP/1.1\r\nHost: 192.168.43.134\r\nConnection: keep-alive\r\nCache-Control: max-age=0\r\nUpgrade-Insecure-Requests: 1\r\nUser-Agent: Mozilla/5.0 (Windows NT 10.0; Win64; x64) AppleWebKit/537.36 (KHTML, like Gecko) Chrome/107.0.0.0 Safari/537.36\r\nAccept: text/html,application/xhtml+xml,application/xml;q=0.9,image/avif,image/webp,image/apng,*/*;q=0.8,application/signed-exchange;v=b3;q=0.9\r\nReferer: http://192.168.43.134/%22?led=on\\%22\r\nAccept-Encoding: gzip, deflate\r\nAccept-Language: en-US,en;q=0.9,es;q=0.8,zh-TW;q=0.7,zh-CN;q=0.6,zh;q=0.5\r\n\r\n'
led_on =  456
led_off =  -1
led_blink =  10
Il codice qui sopra proverà a cercare stringhe specifiche come "led=on". Se esiste, il valore sarà superiore a -1 e quindi attiverà la relativa funzione se dichiarazione.
Ad esempio, se led=on esiste nei parametri, la variabile led_on sarà maggiore di -1, quindi il parametro se led_on > -1 attiva ed esegue l'istruzione led.on();
L'unica parte complicata è il led_blink che attiverà la funzione:
    def blink_led():
        led.on()
        time.sleep(0.2)
        led.off()
        time.sleep(0.2)
Infine, ecco come inizializzare il GPIO 2 per far funzionare il LED:
import machine
import time

#LED controls
led = machine.Pin(2, machine.Pin.OUT)
Importiamo la macchina per interagire con il pin GPIO. Come si può vedere nella variabile ledvogliamo che la Pico W alimenti il GPIO 2.
Importiamo tempo in modo da poter avere una pausa di 0,2 secondi in blink_led().
3. LED RGB su Pico W
Per accendere il LED RGB, è necessario:
- Tre resistenze da 330 ohm
- Un LED RGB
- Un cavo di collegamento
Sul LED RGB sono presenti quattro gambe. Una gamba sarà la più lunga. Si tratta di un catodo (negativo) o di un anodo (positivo). Il mio LED RGB aveva un catodo condiviso, quindi ecco il collegamento:
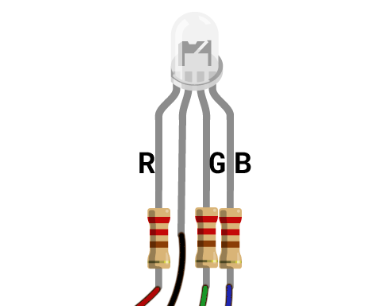
- GPIO 15 -> resistenza da 330 ohm -> LED rosso
- GPIO 17 -> resistenza -> LED verde
- GPIO 16 -> resistenza -> LED blu
Ecco un po' di codice per verificare se il cablaggio è corretto:
import machine

red_led = machine.PWM(machine.Pin(15))
green_led = machine.PWM(machine.Pin(17))
blue_led = machine.PWM(machine.Pin(16))

red_led.duty_u16(65534)
green_led.duty_u16(65534)
blue_led.duty_u16(65534)
In questo esempio, utilizziamo la funzione PWM, che consente di variare la luminosità dei LED R, G e B.
È possibile modificare i valori passati a [color].duty_u16 con un valore compreso tra 0 e 65534. In teoria, si dovrebbe poter passare 65535, ma per qualche motivo non sembra funzionare.
Se si passa il valore "0" significa che si desidera una luminosità pari allo zero per cento. Se si passa 65534, si desidera una luminosità del 100 percento.
Se si esegue 65534 per un colore e zero per gli altri, si potrà capire se si sono collegati i giusti pin GPIO al giusto colore di LED.
Allora perché usiamo la PWM? Perché consente di ottenere più colori. Se si utilizza un metodo "on-and-off", si possono ottenere luce rossa, verde, blu, bianca o nulla. Con il PWM, invece, è possibile variare l'intensità dei LED R, G, B e creare tutti i colori possibili e immaginabili.
Ora creiamo qualcosa che si possa controllare in modalità wireless!
indice.html
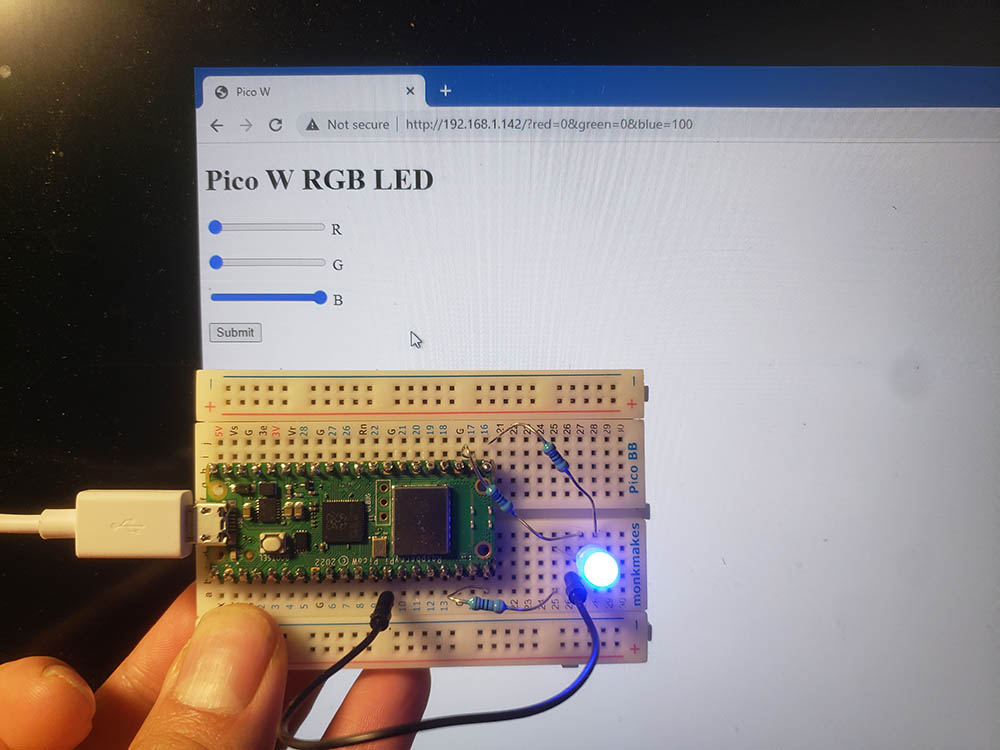
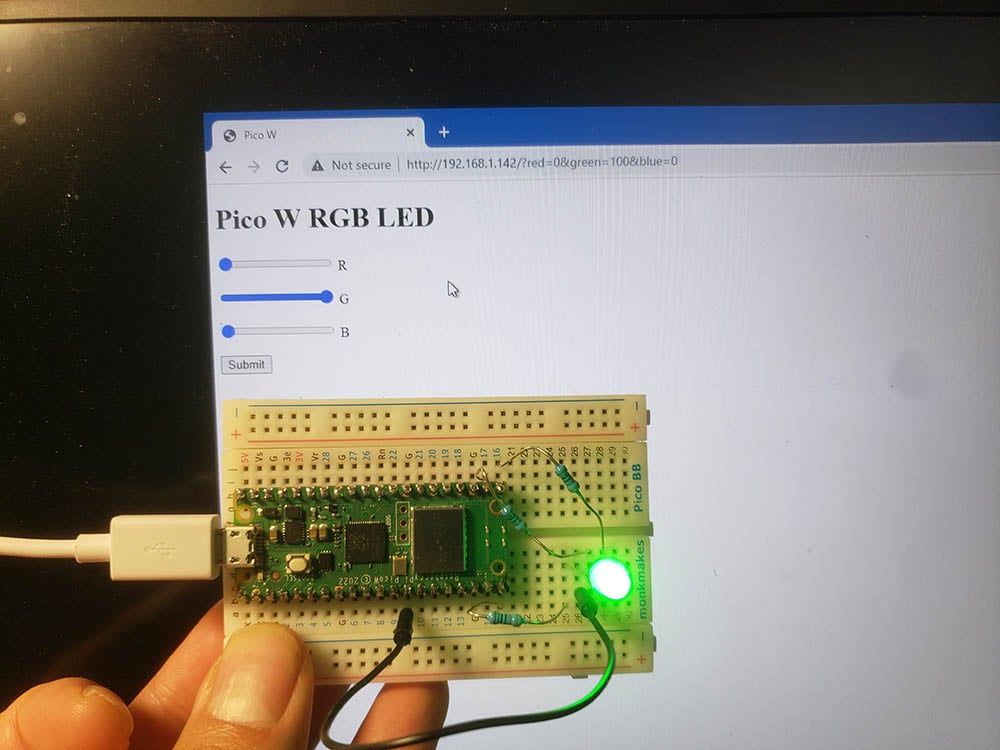
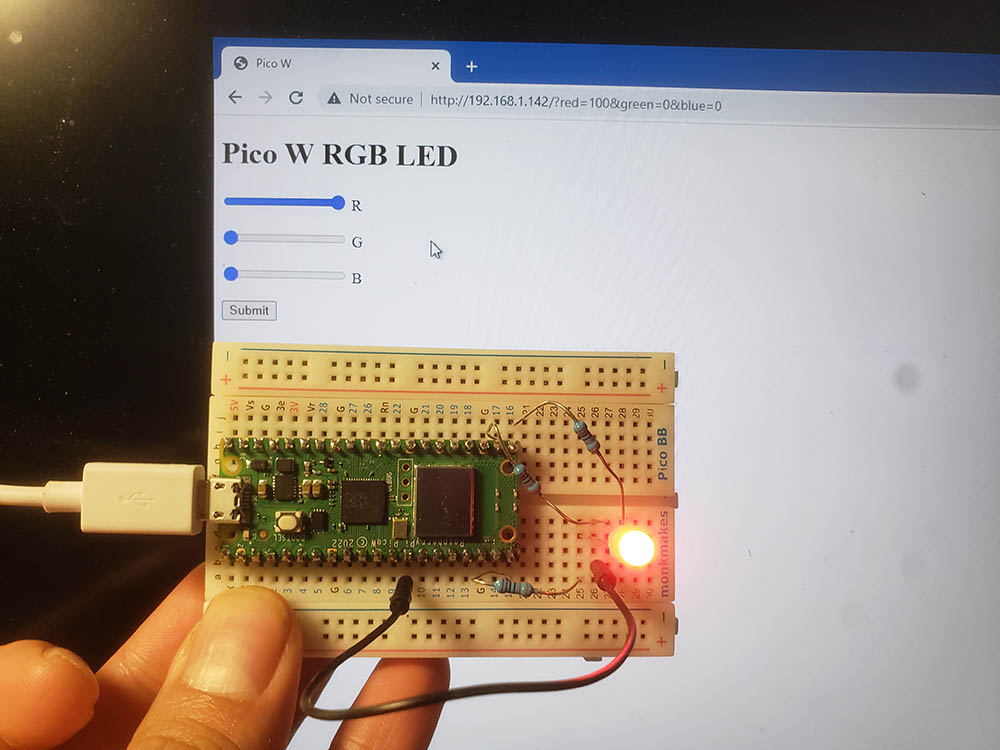
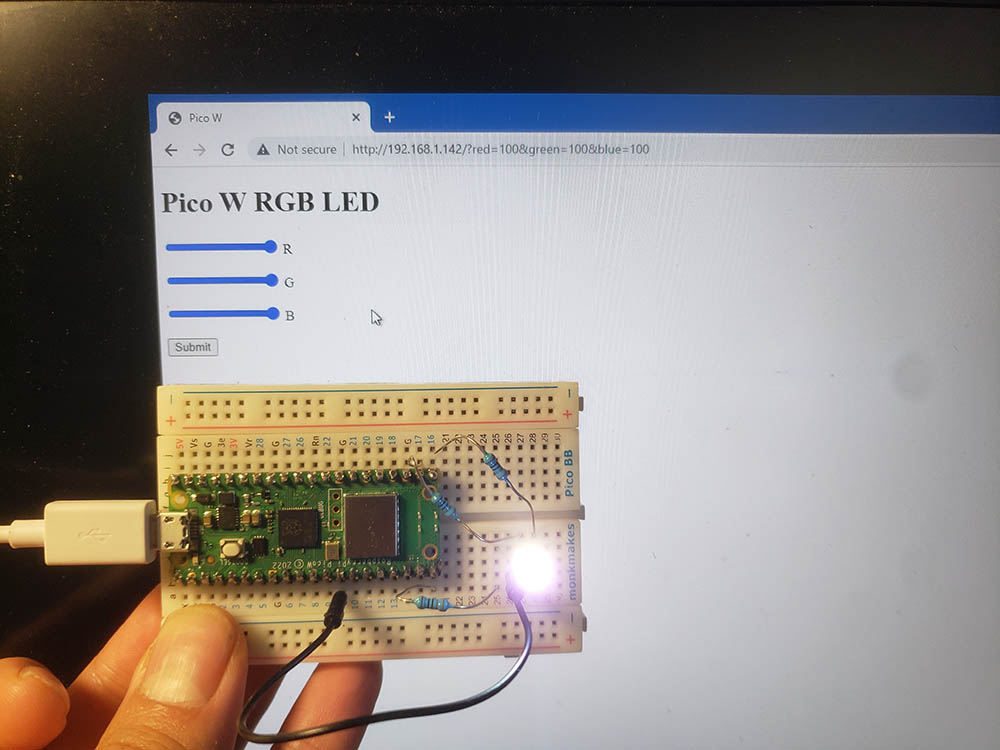
La modifica principale consiste nell'avere un <form> che ha tre cursori. Questi cursori hanno un valore compreso tra zero e 100.
L'uso di valori da zero a 100 aiuta a visualizzare la luminosità come percentuale. Inoltre, riduce la quantità di codice necessaria per analizzare il valore dai parametri (visto più avanti in main.py)
Una volta impostati i valori per i LED R, G, B, si preme il tasto di invio e i dati vengono acquisiti da Pico W.
<!DOCTYPE html>
<html>
    <head>
        <title>Pico W</title>
    </head>
      <body>
        <h1>Pico W RGB LED</h1>
        <form id="form">

            <input type="range" min="0" max="100" value="slider_value" name="red" id="red">
            <label for="red">R</p>

            <input type="range" min="0" max="100" value="slider_value" name="green" id="green">
             <label for="green">G</p>

            <input type="range" min="0" max="100" value="slider_value" name="blue" id="blue">
            <label for="blue">B</p>

            <input type="submit" id="submit">
        </form>
        <script>

            submit.addEventListener('click', function ()  {
                form.submit();
            }, false);

        </script>
</html>
main.py
from wifi import init_wifi
import socket
import machine
import time

init_wifi()

#LED controls
red_led = machine.PWM(machine.Pin(15))
green_led = machine.PWM(machine.Pin(17))
blue_led = machine.PWM(machine.Pin(16))

#Function to load in html page
def get_html(html_name):
    # open html_name (index.html), 'r' = read-only as variable 'file'
    with open(html_name, 'r') as file:
        html = file.read()
    return html

def find_intensity(color, request_str):
    index = request_str.find(color) + len(color)
    offset = 0
    if request_str[index].isdigit():
        offset = 1
        if request_str[index+1].isdigit():
            offset = 2
            if request_str[index+2].isdigit():
                offset = 3

    intensity = int(request_str[index:index+offset])
    return intensity


# HTTP server with socket
addr = socket.getaddrinfo('0.0.0.0', 80)[0][-1]

s = socket.socket()
s.bind(addr)
s.listen(1)

print('Listening on', addr)

# Listen for connections
while True:
    try:
        cl, addr = s.accept()
        print('Client connected from', addr)
        request = cl.recv(1024)

        request_str = str(request)

        #find intensity ONLY if the params exist in request
        if request_str.find('red') > -1 :
            #int = get rid of decimal
            #/100*65534 = find_intensity returns something 0 to 100,
            # so x/100 = proportion of 65534 that you want to send to LED
            # 65534 = max number you can use for PWM
            red_intensity = int(find_intensity('red=', request_str) /100 * 65534)
            green_intensity = int(find_intensity('green=', request_str) /100 * 65534)
            blue_intensity = int(find_intensity('blue=', request_str) /100 * 65534)

            #print('r=' + str(red_intensity))
            #print('g=' + str(green_intensity))
            #print('b=' + str(blue_intensity))

            red_led.duty_u16(red_intensity)
            green_led.duty_u16(green_intensity)
            blue_led.duty_u16(blue_intensity)

        response = get_html('index.html')
        cl.send('HTTP/1.0 200 OK\r\nContent-type: text/html\r\n\r\n')
        cl.send(response)
        cl.close()

    except OSError as e:
        cl.close()
        print('Connection closed')
Quando si preme il tasto di invio sul indice.html pagina web, il Pico W prenderà i parametri e li elaborerà.
Vediamo alcuni punti chiave del codice, evidenziati in grassetto nel blocco di codice qui sopra.
Funzione find_intensity
Questa funzione richiede due parametri: colore e richiesta_str. colore inserisce "rosso", "verde" o "blu" e trova il valore dopo il segno di uguale (=).
Ad esempio, l'URL dopo l'invio del modulo è "http://192.168.1.142/?red=89&green=50&blue=50".
Se si passa "red" a find_intensity, questo restituisce 89.
parser dell'intensità
Il secondo blocco di codice in grassetto rappresenta il codice che indica al GPIO di Pico W la luminosità desiderata da ciascun LED.
Per prima cosa, dobbiamo assicurarci che i parametri esistano nell'URL. Questo viene fatto dal metodo se dichiarazione request_str.find('red') > -1. Ho usato solo 'rosso' perché i parametri 100% conterranno la stringa 'rosso' se si utilizza il modulo.
Se si visita per la prima volta l'indirizzo IP di Pico W (ad es. http://192.168.1.142/), non si dispone dei parametri, quindi il programma si blocca se si esegue trova_intensità.
Se i parametri esistono, troviamo l'intensità per ogni LED in base ai valori inviati. Diamo un'occhiata a intensità_rossa.
red_intensity = int(find_intensity('red=', request_str) /100 * 65534)
...
red_led.duty_u16(red_intensity)
trova_intensità restituisce un intero da zero a 100. Lo dividiamo per 100 in modo da ottenere una percentuale. Questa percentuale divide il valore massimo che il dovere_u16 metodo può essere adottato.
Tuttavia, abbiamo bisogno di un int per avvolgere questa funzione, perché a volte si può ottenere un galleggiante e dovere_u16 ha bisogno di un int. Ad esempio, se si desidera una luminosità di 41% - 41% di 65534 è 26.868,94. Non è possibile passare questo valore fluttuante perché il programma si blocca.
4. Funzionamento del cicalino sul Pico W
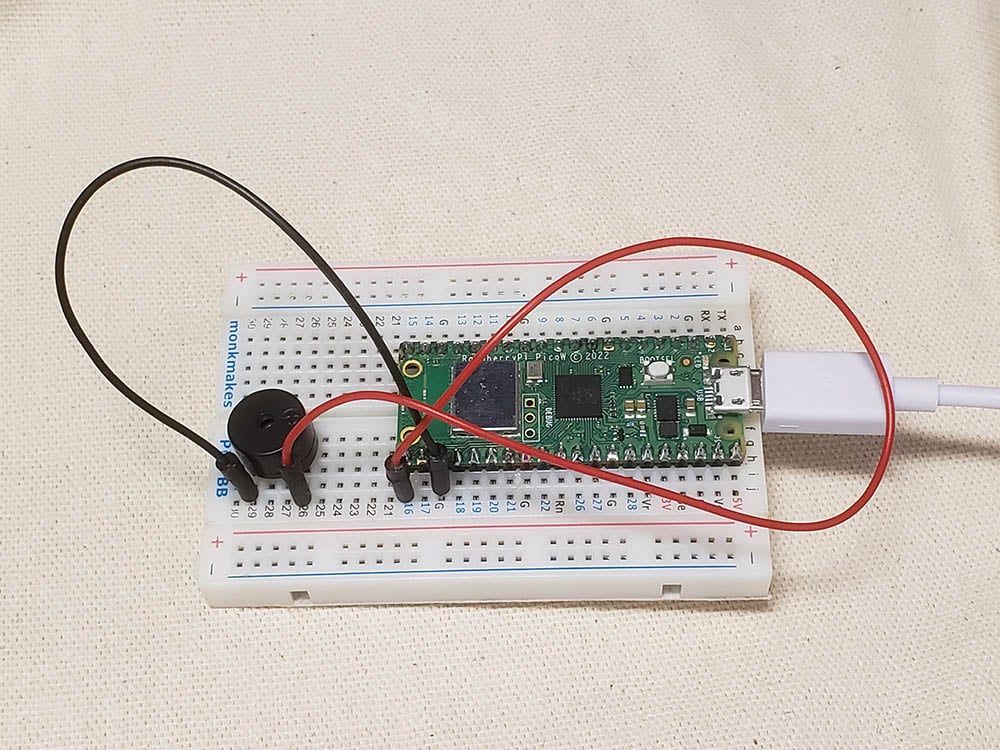
Il cicalino è un componente piuttosto importante per le notifiche di base: proprio come un LED può indicare lo stato di qualcosa, un cicalino fornisce una notifica uditiva.
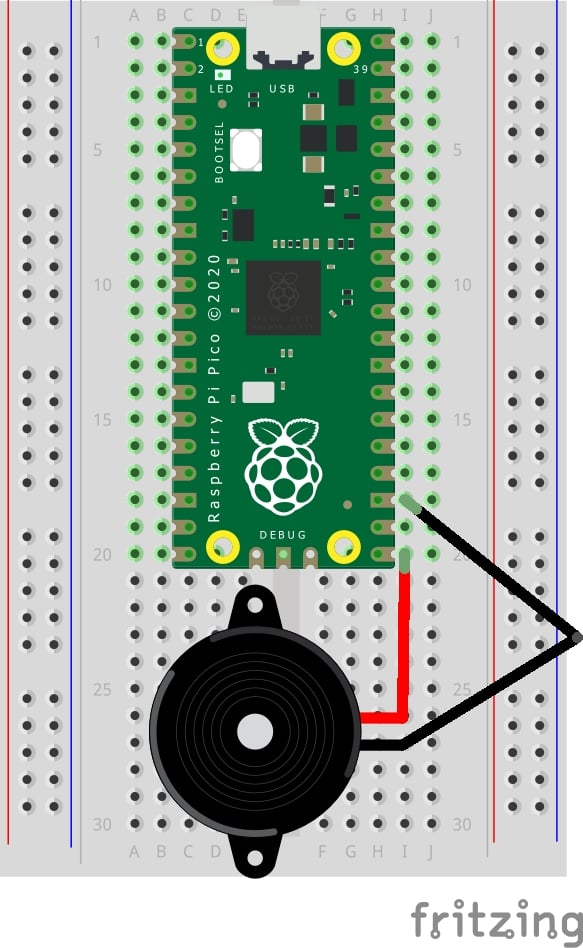
Piuttosto che implementare il mio codice, ho scelto di utilizzare il codice Attuazione di Giuseppe Cassibba. Se si esegue il codice su Pico W, si sentiranno dei segnali acustici sul cicalino.
Ma poiché questo codice è destinato al Pico, non avrà alcuna funzione di interattività wireless.
Quindi, tiriamo fuori la forchetta!
Per prima cosa, modifichiamo il file indice.html per implementare i pulsanti. Abbiamo un pulsante per "ON", "OFF", "SCALE", "MUSICA".
I primi due pulsanti si spiegano da soli. Il terzo pulsante riproduce una scala di Do e l'ultimo riproduce un brano musicale.
<!DOCTYPE html>
<html>
<head>
<title>Pico W</title>
</head>
<body>
<h1>Pico W Buzzer</h1>
<p>Control the buzzer</p>
<a href=\"?buzzer=on\"><button>ON</button></a>
<a href=\"?buzzer=off\"><button>OFF</button></a>
<a href=\"?buzzer=scale\"><button>SCALE</button></a>
<a href=\"?buzzer=music\"><button>MUSIC</button></a>
</body>
</html>Come in precedenza, creiamo alcuni <button> tag con <a> che li circondano. Facendo clic sui pulsanti, l'URL avrà un parametro, ad esempio /buzzer=on. Il Pico W lo legge e attiva il cicalino.
Vediamo ora il codice di Giuseppe per il Pico:
from machine import Pin, PWM
from time import sleep

buzzerPIN=16
BuzzerObj=PWM(Pin(buzzerPIN))

def buzzer(buzzerPinObject,frequency,sound_duration,silence_duration):
    # Set duty cycle to a positive value to emit sound from buzzer
    buzzerPinObject.duty_u16(int(65536*0.2))
    # Set frequency
    buzzerPinObject.freq(frequency)
    # wait for sound duration
    sleep(sound_duration)
    # Set duty cycle to zero to stop sound
    buzzerPinObject.duty_u16(int(65536*0))
    # Wait for sound interrumption, if needed
    sleep(silence_duration)


# Play following notes by changing frequency:
#C (DO)
buzzer(BuzzerObj,523,0.5,0.1)

#D (RE)
buzzer(BuzzerObj,587,0.5,0.1)

#E (MI)
buzzer(BuzzerObj,659,0.5,0.1)

#F (FA)
buzzer(BuzzerObj,698,0.5,0.1)

#G (SOL)
buzzer(BuzzerObj,784,0.5,0.1)

#A (LA)
buzzer(BuzzerObj,880,0.5,0.1)

#B (SI)
buzzer(BuzzerObj,987,0.5,0.1)

#Deactivates the buzzer
BuzzerObj.deinit()
Il suo codice riproduce una scala C quando viene eseguito utilizzando la funzione cicalino(), che accetta quattro parametri: Oggetto del cicalino, frequenza in Hertz, durata del suono e durata della pausa prima della riproduzione del suono successivo.
Modifichiamo il codice in modo da poter attivare l'opzione ON, OFF, SCALA e MUSICA.
Ecco come si integra il codice di Giuseppe nel nostro main.py:
from wifi import init_wifi
import socket
import machine
import time

init_wifi()

# Buzzer
buzzerPIN = 16
BuzzerObj = machine.PWM(machine.Pin(buzzerPIN))


def buzzer(buzzerPinObject, frequency, sound_duration, silence_duration):
    # Set duty cycle to a positive value to emit sound from buzzer
    buzzerPinObject.duty_u16(int(65536*0.2))
    # Set frequency
    buzzerPinObject.freq(frequency)
    # wait for sound duration
    time.sleep(sound_duration)
    # Set duty cycle to zero to stop sound
    buzzerPinObject.duty_u16(int(65536*0))
    # Wait for sound interrumption, if needed
    time.sleep(silence_duration)

# Function to load in html page


def get_html(html_name):
    # open html_name (index.html), 'r' = read-only as variable 'file'
    with open(html_name, 'r') as file:
        html = file.read()

    return html


# HTTP server with socket
addr = socket.getaddrinfo('0.0.0.0', 80)[0][-1]

s = socket.socket()
s.bind(addr)
s.listen(1)

print('Listening on', addr)

# Listen for connections
while True:
    try:
        cl, addr = s.accept()
        print('Client connected from', addr)
        request = cl.recv(1024)

        request = str(request)
        buzzer_on = request.find('?buzzer=on')
        buzzer_off = request.find('?buzzer=off')
        buzzer_scale = request.find('?buzzer=scale')
        buzzer_music = request.find('?buzzer=music')

        if buzzer_on > -1:
            BuzzerObj.duty_u16(int(65536*0.2))
            BuzzerObj.freq(440)

        if buzzer_off > -1:
            BuzzerObj.duty_u16(0)

        if buzzer_scale > -1:
            #C (DO)
            buzzer(BuzzerObj, 523, 0.5, 0.1)

            #D (RE)
            buzzer(BuzzerObj, 587, 0.5, 0.1)

            #E (MI)
            buzzer(BuzzerObj, 659, 0.5, 0.1)

            #F (FA)
            buzzer(BuzzerObj, 698, 0.5, 0.1)

            #G (SOL)
            buzzer(BuzzerObj, 784, 0.5, 0.1)

            #A (LA)
            buzzer(BuzzerObj, 880, 0.5, 0.1)

            #B (SI)
            buzzer(BuzzerObj, 987, 0.5, 0.1)

            BuzzerObj.deinit()

        if buzzer_music > -1:
            pass

        response = get_html('index.html')
        cl.send('HTTP/1.0 200 OK\r\nContent-type: text/html\r\n\r\n')
        cl.send(response)
        cl.close()

    except OSError as e:
        cl.close()
        print('Connection closed')
Nell'implementazione di cui sopra, non abbiamo scritto il codice per MUSICA.
Il codice è molto simile a quello dell'esercitazione sul LED rosso, in cui il Pico W cattura i parametri dopo l'indirizzo IP del Pico W stesso. Se i parametri cicalino=ON, riprodurrà un suono a 440Hz. Se buzzer=scala, suonerà la scala che è stata presa dal codice di Giuseppe.
E l'implementazione della musica? L'implementazione della musica è un po' più complicata, quindi dovremmo creare un nuovo file chiamato costanti.py e aggiungere alcune righe nel nostro file main.py.
Questo codice è un fork di Codice Arduino di Rowan Packard.
costanti.py
A3F = 208  # 208 Hz
B3F = 233  # 233 Hz
B3 = 247  # 247 Hz
C4 = 261  # 261 Hz MIDDLE C
C4S = 277  # 277 Hz
E4F = 311  # 311 Hz
F4 = 349  # 349 Hz
A4F = 415  # 415 Hz
B4F = 466  # 466 Hz
B4 = 493  # 493 Hz
C5 = 523  # 523 Hz
C5S = 554  # 554 Hz
E5F = 622  # 622 Hz
F5 = 698  # 698 Hz
F5S = 740  # 740 Hz
A5F = 831  # 831 Hz
main.py (aggiunte in grassetto)
from wifi import init_wifi
import socket
import machine
import time
from constants import *

init_wifi()

# Buzzer
buzzerPIN = 16
BuzzerObj = machine.PWM(machine.Pin(buzzerPIN))


def buzzer(buzzerPinObject, frequency, sound_duration, silence_duration):
    # Set duty cycle to a positive value to emit sound from buzzer
    buzzerPinObject.duty_u16(int(65536*0.2))
    # Set frequency
    buzzerPinObject.freq(frequency)
    # wait for sound duration
    time.sleep(sound_duration)
    # Set duty cycle to zero to stop sound
    buzzerPinObject.duty_u16(int(65536*0))
    # Wait for sound interrumption, if needed
    time.sleep(silence_duration)

# Function to load in html page


def get_html(html_name):
    # open html_name (index.html), 'r' = read-only as variable 'file'
    with open(html_name, 'r') as file:
        html = file.read()

    return html


# HTTP server with socket
addr = socket.getaddrinfo('0.0.0.0', 80)[0][-1]

s = socket.socket()
s.bind(addr)
s.listen(1)

print('Listening on', addr)

# Listen for connections
while True:
    try:
        cl, addr = s.accept()
        print('Client connected from', addr)
        request = cl.recv(1024)

        request = str(request)
        buzzer_on = request.find('?buzzer=on')
        buzzer_off = request.find('?buzzer=off')
        buzzer_scale = request.find('?buzzer=scale')
        buzzer_music = request.find('?buzzer=music')

        if buzzer_on > -1:
            BuzzerObj.duty_u16(int(65536*0.2))
            BuzzerObj.freq(440)

        if buzzer_off > -1:
            BuzzerObj.duty_u16(0)

        if buzzer_scale > -1:
            #C (DO)
            buzzer(BuzzerObj, 523, 0.5, 0.1)

            #D (RE)
            buzzer(BuzzerObj, 587, 0.5, 0.1)

            #E (MI)
            buzzer(BuzzerObj, 659, 0.5, 0.1)

            #F (FA)
            buzzer(BuzzerObj, 698, 0.5, 0.1)

            #G (SOL)
            buzzer(BuzzerObj, 784, 0.5, 0.1)

            #A (LA)
            buzzer(BuzzerObj, 880, 0.5, 0.1)

            #B (SI)
            buzzer(BuzzerObj, 987, 0.5, 0.1)

            BuzzerObj.deinit()

        if buzzer_music > -1:
            pause = 0.05
            # pauses between notes
            t = 0.125
            # time that music note plays

            music_notes = [B4F, B4F, A4F, A4F,
                           F5, F5, E5F, B4F, B4F, A4F, A4F, E5F, E5F, C5S, C5, B4F,
                           C5S, C5S, C5S, C5S,
                           C5S, E5F, C5, B4F, A4F, A4F, A4F, E5F, C5S,
                           B4F, B4F, A4F, A4F,
                           F5, F5, E5F, B4F, B4F, A4F, A4F, A5F, C5, C5S, C5, B4F,
                           C5S, C5S, C5S, C5S,
                           C5S, E5F, C5, B4F, A4F, A4F, A4F, E5F, C5S, C5S]

            rhythm = [1, 1, 1, 1,
                      3, 3, 6, 1, 1, 1, 1, 3, 3, 3, 1, 2,
                      1, 1, 1, 1,
                      3, 3, 3, 1, 2, 2, 2, 4, 8,
                      1, 1, 1, 1,
                      3, 3, 6, 1, 1, 1, 1, 3, 3, 3, 1, 2,
                      1, 1, 1, 1,
                      3, 3, 3, 1, 2, 2, 2, 4, 8, 4]

            for i in range(len(music_notes)):
                buzzer(BuzzerObj, music_notes[i], rhythm[i]*t, pause)

        response = get_html('index.html')
        cl.send('HTTP/1.0 200 OK\r\nContent-type: text/html\r\n\r\n')
        cl.send(response)
        cl.close()

    except OSError as e:
        cl.close()
        print('Connection closed')
Come si può vedere, ci sono due array, note_musicali e ritmo. Si esegue quindi un ciclo for per inserire questi valori nel file cicalino() funzione. Inoltre, all'inizio del codice, importiamo tutte le variabili da costanti.py.
Il cicalino() La funzione utilizza anche due nuove variabili - t e pausa. Queste due variabili aiutano ad accordare il tempo della musica. t definisce la durata di esecuzione di ciascuna nota e pausa definisce la durata del silenzio tra le note.
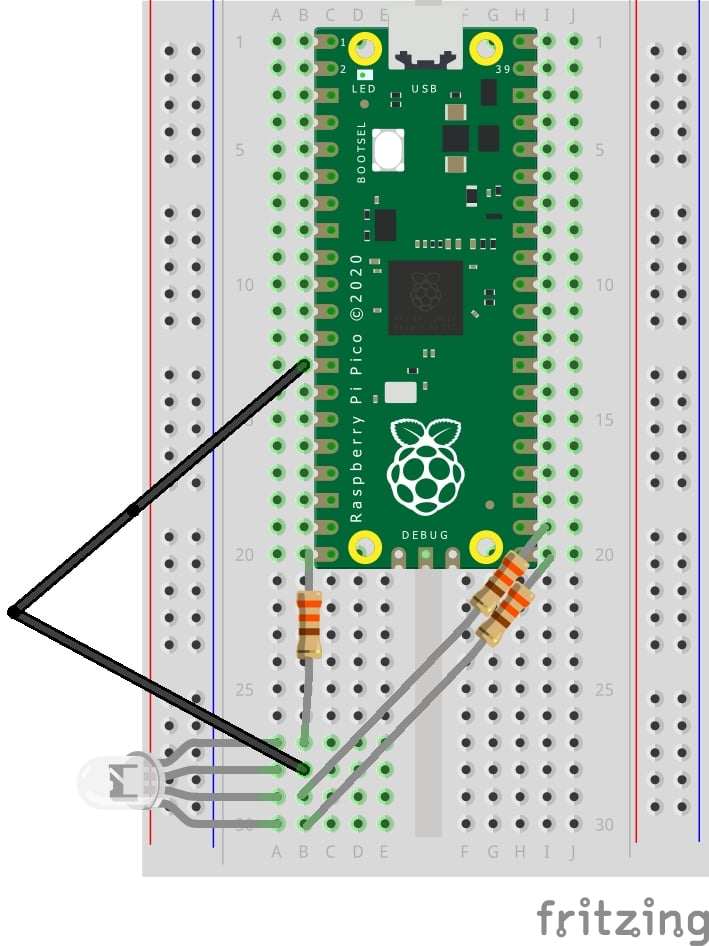
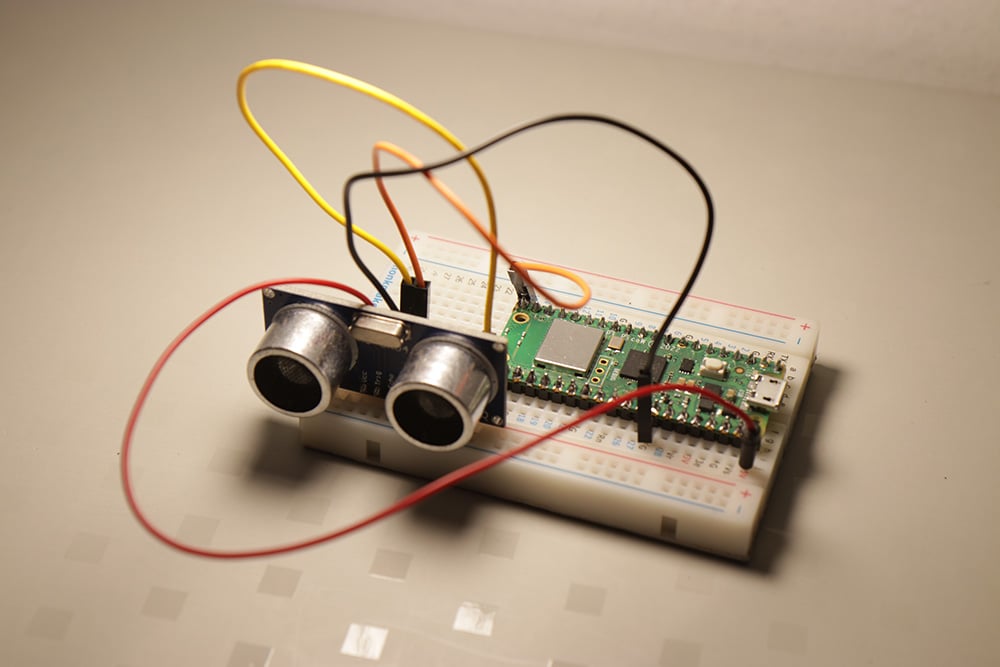
5. Sensore a ultrasuoni Pico W e HC-SR04
Nelle esercitazioni precedenti, abbiamo utilizzato il Pico W per inviare comandi ai LED e ai cicalini.
Ma cosa succede se si utilizza il Pico W per ricevere informazioni?
In questo caso, stiamo parlando del sensore di distanza a ultrasuoni HC-SR04.
Quando si collega il sensore a ultrasuoni, assicurarsi di sapere se si tratta di un componente a 5V o a 3,3V. Ho collegato la mia versione da 5 V al pin da 3,3 V e non ho ottenuto alcuna risposta dal programma, che condividerò di seguito. Una volta spostata la fonte di alimentazione sul pin da 5 V, ho ottenuto immediatamente una risposta.
A quanto pare, alcune versioni più recenti dell'HC-SR04 sono in grado di accettare sia 3,3V che 5V. Forse è meglio provare prima con il pin da 3,3 V e vedere se si ottiene un risultato. In caso contrario, provare con i 5 V.
Ecco gli schemi e il programma da eseguire in Thonny. Se si ottiene una risposta, significa che è stato inserito tutto nel modo giusto, compresa la tensione.
Cablaggio
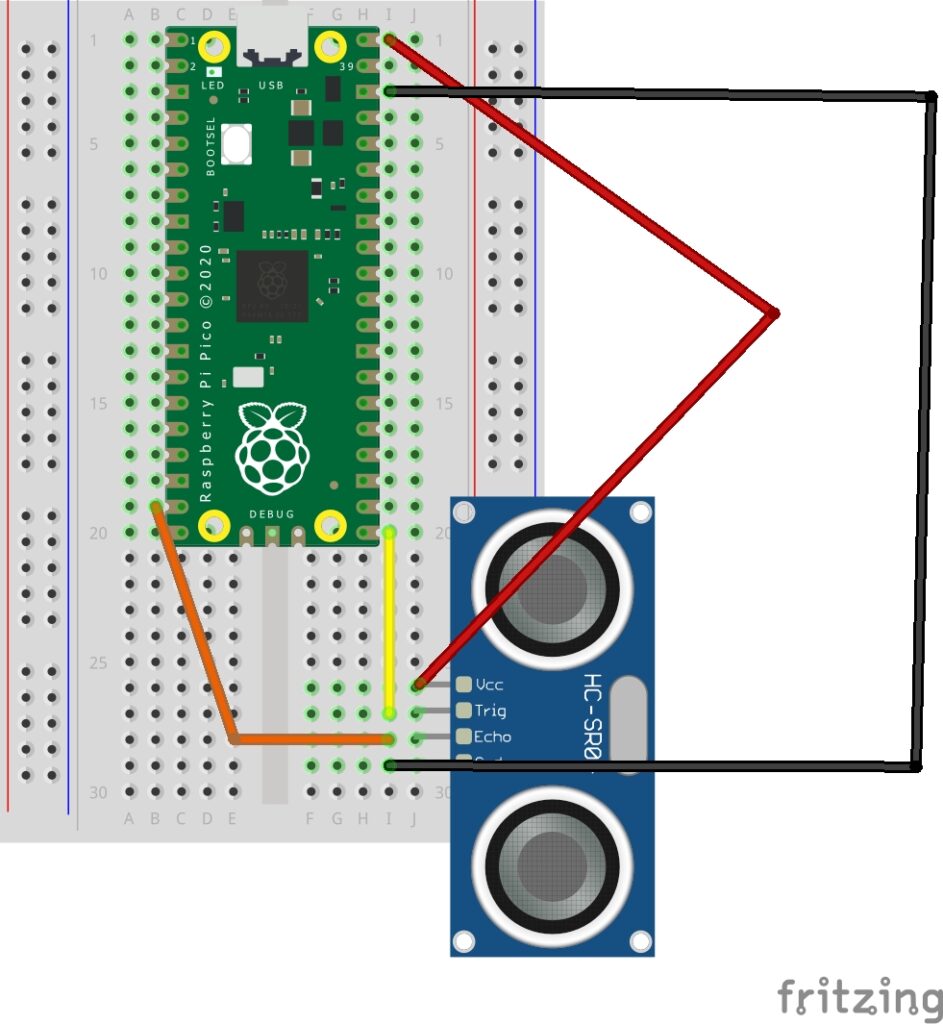
Il cablaggio dai pin etichettati dei sensori HC-SR04 è il seguente:
- VCC al pin da 3,3 V o 5 V (in caso di dubbio, provare prima con 3,3V)
- TRIG a GPIO 16
- ECHO a GPIO 15
- Da GND a GND
Programma di prova per HC-SR04
Per verificare se il cablaggio è corretto, provare questo codice che stampa la distanza sulla conchiglia Thonny.
from machine import Pin
import time
trigger = Pin(16, Pin.OUT)
echo = Pin(15, Pin.IN)
def ultrasonic():
   trigger.low()
   time.sleep_us(1)
   trigger.high()
   time.sleep_us(10)
   trigger.low()
   while echo.value() == 0:
       signaloff = time.ticks_us()
   while echo.value() == 1:
       signalon = time.ticks_us()
   timepassed = signalon - signaloff
   distance = (timepassed * 0.0340) / 2
   print("Distance = ",distance,"cm")
while True:
   ultrasonic()
   time.sleep(1)
Il risultato dovrebbe essere:
Distance =  9.707001 cm
Distance =  9.707001 cm
Distance =  8.619 cm
Distance =  8.415001 cm
Distance =  8.551001 cm
Distance =  8.551001 cm
Distance =  8.619 cm
Se il programma viene eseguito e si chiude senza alcuna uscita, probabilmente è stato collegato qualcosa di sbagliato. Quando ho collegato il sensore a un pin da 3,3 V anziché a uno da 5 V, il programma si è chiuso senza alcuna risposta.
Ottenere i dati inviati al browser
Riprendiamo i file utilizzati per servire una pagina web e modifichiamoli in modo da poter vedere i valori della distanza.
Ecco il codice finale:
main.py
from wifi import init_wifi
import socket
from machine import Pin
import time

init_wifi()

# ultrasonic sensor pins and functions
trigger = Pin(16, Pin.OUT)
echo = Pin(15, Pin.IN)


def ultrasonic():
    trigger.low()
    time.sleep_us(1)
    trigger.high()
    time.sleep_us(10)
    trigger.low()
    while echo.value() == 0:
        signaloff = time.ticks_us()
    while echo.value() == 1:
        signalon = time.ticks_us()
    timepassed = signalon - signaloff
    distance = (timepassed * 0.0340) / 2
    return distance

# Function to load in html page

def get_html(html_name, distance):
    # open html_name (index.html), 'r' = read-only as variable 'file'
    with open(html_name, 'r') as file:
        html = file.read()
    content = html.replace(
        "<h2 id=\"ultrasonic\"></h2>", f"<h2 id=\"ultrasonic\">{distance}cm</h2>")

    return content


# HTTP server with socket
addr = socket.getaddrinfo('0.0.0.0', 80)[0][-1]

s = socket.socket()
s.bind(addr)
s.listen(1)

print('Listening on', addr)

# Listen for connections
while True:
    try:
        cl, addr = s.accept()
        print('Client connected from', addr)
        request = cl.recv(1024)
        print(ultrasonic())
        response = get_html('index.html', ultrasonic())
        cl.send('HTTP/1.0 200 OK\r\nContent-type: text/html\r\n\r\n')
        cl.send(response)
        cl.close()

    except OSError as e:
        cl.close()
        print('Connection closed')
indice.html
<!DOCTYPE html>
<html>
    <head>
        <title>Pico W</title>
    </head>
      <body>
        <h1>Pico W Ultrasonic Distance</h1>
        <h2 id="ultrasonic"></h2>
        <script>
            setInterval(() => location.reload(), 500)
        </script>
</html>
Vediamo alcuni frammenti di codice per capire cosa sta succedendo.
Codice per ottenere la distanza ultrasonica
def ultrasonic():
    trigger.low()
    time.sleep_us(1)
    trigger.high()
    time.sleep_us(10)
    trigger.low()
    while echo.value() == 0:
        signaloff = time.ticks_us()
    while echo.value() == 1:
        signalon = time.ticks_us()
    timepassed = signalon - signaloff
    distance = (timepassed * 0.0340) / 2
    return distance
Il blocco di codice sopra riportato attiva l'emissione di un'onda ultrasonica. Il time.sleep tra i bassi e gli alti sono necessari per il funzionamento del sensore a ultrasuoni.
Per misurare il tempo che intercorre tra l'emissione dell'onda ultrasonica e il tempo di ritorno dell'onda sonora, si usa time.ticks_us per misurare il tempo di emissione e il tempo di rilevamento dell'eco.
time.ticks_us è un numero arbitrario, quindi dovremo sottrarre segnalatore da segnale di spegnimento per far passare il tempo.
Per ottenere la distanza, si utilizza la formula distanza = (tempo trascorso * velocità del suono)) / 2. La velocità del suono è 340m/s, quindi 0,0340.
Il motivo per cui dobbiamo dividere per due è che l'onda sonora viaggia verso l'oggetto e torna indietro.
Codice per servire la pagina web con il valore della distanza
def get_html(html_name, distance):
    # open html_name (index.html), 'r' = read-only as variable 'file'
    with open(html_name, 'r') as file:
        html = file.read()
    content = html.replace(
        "<h2 id=\"ultrasonic\"></h2>", f"<h2 id=\"ultrasonic\">{distance}cm</h2>")

    return content

...

response = get_html('index.html', ultrasonic())
Questa funzione è stata leggermente modificata rispetto alle esercitazioni precedenti, inserendo un parametro aggiuntivo distanza, che esegue ultrasonico().
La funzione apre il file indice.html normalmente, ma utilizza il file sostituire per trovare il metodo <h2> e inserisce l'elemento distanza variabile.
index.html invia un ping al server ogni 500 ms per ottenere il nuovo valore

La pagina web principale riceve una funzione che ricarica la pagina web ogni 500ms. A ogni ricarica il Pico W riceve il nuovo valore della distanza ultrasonica.
    <script>
            setInterval(() => location.reload(), 500)
        </script>
6. Dati a ultrasuoni, ma utilizziamo AJAX per ridurre il carico utile
Il tutorial precedente funziona facendo in modo che il Raspberry Pi Pico W invii un nuovo file indice.html ogni volta che c'è una connessione.
Funziona, ma è incredibilmente inefficiente perché l'intero sistema di indice.html quando è sufficiente aggiornare i dati della distanza a ultrasuoni.
Vogliamo ottenere gli stessi risultati dell'esercitazione precedente, ma senza il pesante carico di lavoro del metodo precedente.
Quindi, dobbiamo fare in modo che il client (il telefono o il PC) esegua il ping di un endpoint che risponderà solo con i dati ultrasonici.
La nuova metodologia è la seguente: se le persone visitano l'URL principale, ad esempio 192.168.1.119, verrà loro servito il file indice.html.
indice.html avrà un codice JavaScript che invia un ping al sito /dati che attiva il Pico W per ottenere i dati sulla distanza a ultrasuoni e rispondere con essi.
Allora, indice.html riceverà questi dati e aggiornerà la pagina web.
Splicing della richiesta da parte del client
Ricordate che nel main.pyc'è sempre una frase che dice richieste = cl.recv(1024). L'oggetto richiesta ha un aspetto simile a questo:
b'GET /data HTTP/1.1
Host: 192.168.1.119
Connection: keep-alive
Cache-Control: max-age=0
Upgrade-Insecure-Requests: 1
User-Agent: Mozilla/5.0 (Windows NT 10.0; Win64; x64) AppleWebKit/537.36 (KHTML, like Gecko) Chrome/107.0.0.0 Safari/537.36
Accept: text/html,application/xhtml+xml,application/xml;q=0.9,image/avif,image/webp,image/apng,*/*;q=0.8,application/signed-exchange;v=b3;q=0.9
Referer: http://192.168.1.119/data
Accept-Encoding: gzip, deflate
Accept-Language: en-US,en;q=0.9,es;q=0.8,zh-TW;q=0.7,zh-CN;q=0.6,zh;q=0.5
Per prima cosa, dobbiamo filtrare questo muro di testo.
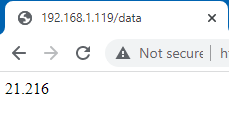
Utilizziamo il trovare() per scoprire se il metodo richiesta La variabile ha "/data". In caso affermativo, rispondere con i dati della distanza a ultrasuoni. Se non c'è nessun "/data", rispondere con indice.html.
Prima
request = cl.recv(1024)
        print(ultrasonic())
        response = get_html('index.html', ultrasonic())
Dopo
 request = cl.recv(1024)
        request = str(request)
        print (request.find('/data'))
        if (request.find('/data') > -1):
            #if string is found, respond with data.
            response = str(ultrasonic())
        else:
            response = get_html('index.html', ultrasonic())
Se si visita /data nel browser, si vedrà stampato il valore della distanza, come di seguito.
In precedenza, il backend gestiva quasi tutto. La distanza ultrasonica è stata modificata prima di essere servita come index.html.
Ora, indice.html è il recupero dei dati del sensore da Pico W, quindi dobbiamo apportare alcune modifiche al JavaScript che si trova all'interno del file HTML. Le modifiche sono evidenziate in grassetto.
<!DOCTYPE html>
<html>
    <head>
        <title>Pico W</title>
    </head>
      <body>
        <h1>Pico W Ultrasonic Distance</h1>
        <h2 id="ultrasonic"></h2>
        <script>
            //instead of hardcoding, use address which browser accessed Pico W.
            const PicoAddress = window.location.href

            const getData = async () => {
                //there is a slash at the end of PicoAddress, so don't use "/data". use "data"
                const data = await fetch(`${PicoAddress}data`);
                //response is just a string, so use data.text() to decode the Response's body
                const distance = await data.text();
                //target ultrasonic id and change its inner HTML
                ultrasonic.innerHTML = `${distance} cm`;
                //run getData() again.
                setInterval(getData,100)
                //you can run getData() but it seems more optimized if you give it some time to breathe
            };

            getData();

        </script>
</html>
Al centro del codice c'è il metodo Recupero API e l'ultimo async/await sintassi qui.
La funzione getData() esegue il ping dell'endpoint /data del Pico W e il Pico W risponde. Ci assicuriamo che il programma non salti in avanti prima di aver ricevuto una risposta completa che gli chieda di attendere.
Fetch diventa un oggetto Response, che dovrà essere usato con il metodo Response.text() per arrivare al corpo della risposta. Da qui le righe const distance = await data.text();
Una volta ottenuti i dati ultrasonici, modifichiamo il parametro <h2 id="”ultrasonic”"> dell'elemento, che inizia vuoto, con i dati sulla distanza. Si può puntare a un elemento con un'opzione id direttamente senza utilizzare l'opzione getElementById() o querySelector() metodi.
Una volta terminato tutto il codice, vogliamo eseguire nuovamente getData(). Perché ho usato un metodo impostaIntervallo per impostare un intervallo di 100 ms?
Ho scoperto che se si chiama getData() senza un intervallo, si ottengono più pause tra le uscite. Si ottiene una sequenza di aggiornamenti veloci, poi una pausa. Con i 100 ms di intervallo, Pico W funziona un po' meglio e gli aggiornamenti sembrano ancora più o meno in tempo reale.
Se si vuole capire cosa succede sotto il cofano, si può fare riferimento al file Documentazione dell'API di Fetch e il async/await documentazione.
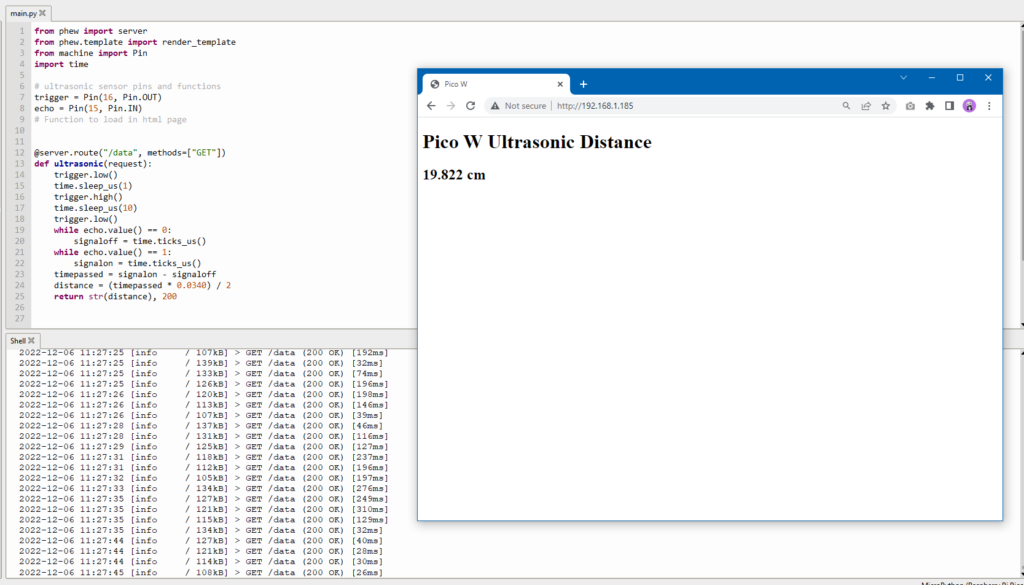
7. Pimoroni Per un codice più pulito
Nell'ultima sezione abbiamo trattato il metodo AJAX per aggiornare i dati del sensore a ultrasuoni.
Ma esiste un modo ancora migliore per farlo?
Pimoroni's Phew è una libreria che aiuta a fare molte reti in modo semplice, perché si possono evitare molte droghe.
Gli obiettivi sono gli stessi:
- Ottenere i dati ultrasonici e visualizzarli su indice.html
- Mantenere il carico utile il più basso possibile.
Ecco come main.py sembra.
from wifi import init_wifi
from phew import server
from phew.template import render_template
from machine import Pin
import time

init_wifi()

# ultrasonic sensor pins and functions
trigger = Pin(16, Pin.OUT)
echo = Pin(15, Pin.IN)


# Function to load in html page

@server.route("/data", methods=["GET"])
def ultrasonic(request):
    trigger.low()
    time.sleep_us(1)
    trigger.high()
    time.sleep_us(10)
    trigger.low()
    while echo.value() == 0:
        signaloff = time.ticks_us()
    while echo.value() == 1:
        signalon = time.ticks_us()
    timepassed = signalon - signaloff
    distance = (timepassed * 0.0340) / 2
    return str(distance), 200


@server.catchall()
def catchall(request):
    return render_template("index.html")


server.run()
Come si può vedere, il codice è molto più leggibile, in quanto è possibile impostare gli endpoint e collegarli a funzioni che restituiscono dati specifici.
Invece di armeggiare con il codice per eseguire i socket, basterebbe richiamare una funzione dalla libreria di Phew.
Alcune cose che piacciono di Phew sono:
- Non è più necessario utilizzare request.find() per creare un endpoint
- Non di più get_html() per aprire il file indice.html è sufficiente utilizzare il file render_template()
- main.py è molto più facile da leggere, con un minimo sforzo aggiuntivo!
- Phew aggiunge anche una funzionalità di logging che consente di eseguire il debug del codice in modo più semplice.
L'unico aspetto negativo è che Phew è ancora "un progetto molto nuovo e deve essere considerato, nella migliore delle ipotesi, in fase alfa". Quindi, a volte si possono trovare ostacoli inaspettati.
Le esercitazioni precedenti hanno illustrato come interagire con il Pico W tramite il PC/cellulare.
Facciamo un passo avanti e facciamo interagire Pico W con un servizio cloud.
Per questo, realizziamo un registratore di temperatura e umidità con un sensore DHT22 che invia i dati a Google Sheets tramite IFTTT.
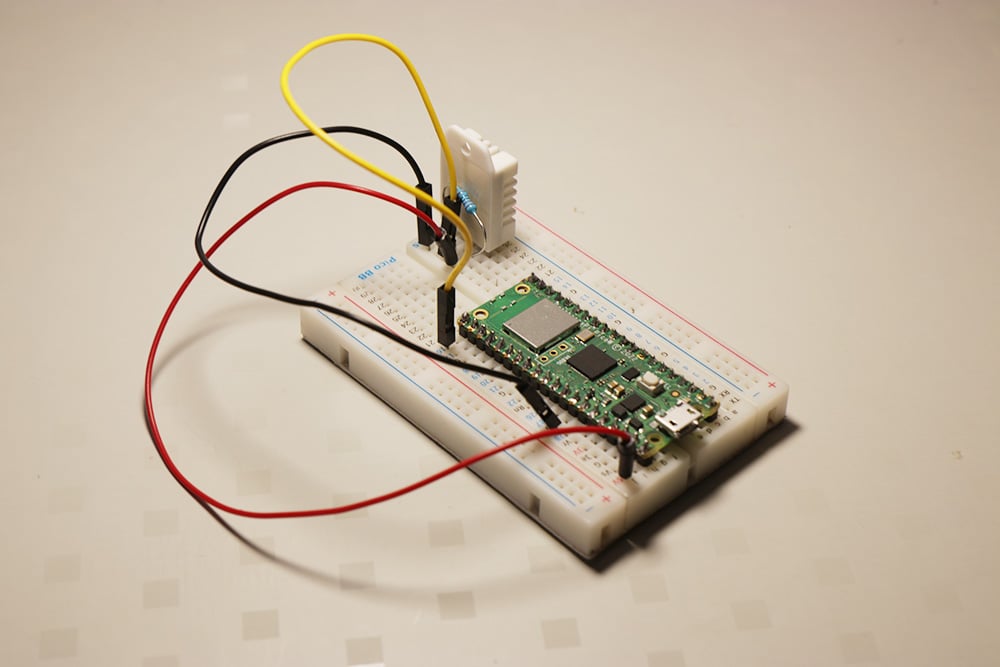
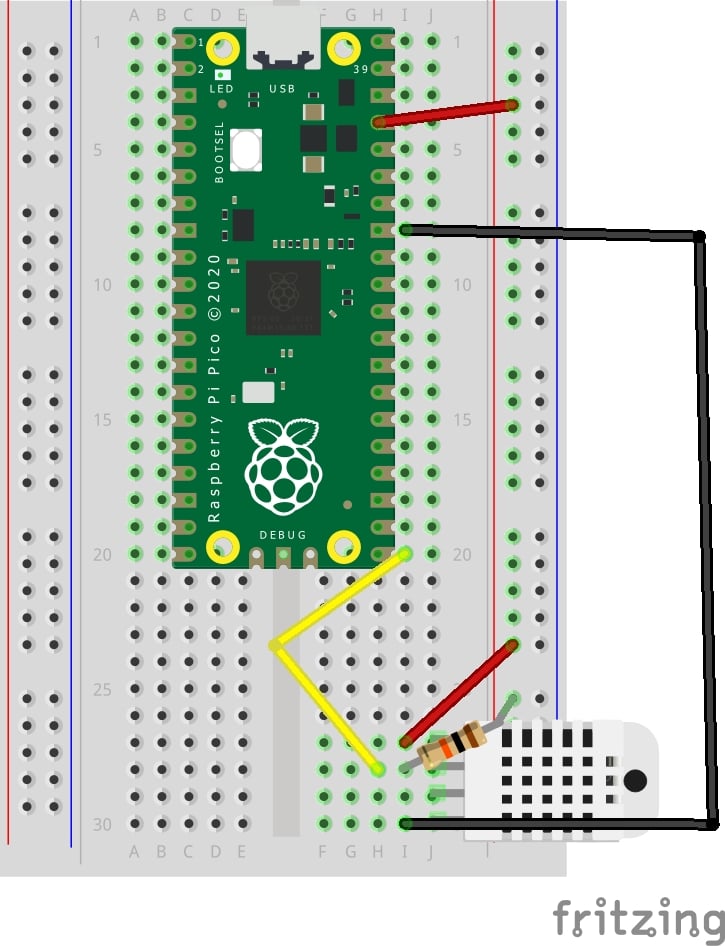
8. Impostazione del sensore di temperatura e umidità DHT22 su Pico W
Tutti questi passaggi funzionano per il DHT11 e il DHT22. La differenza principale tra i due è la precisione delle letture. Il DHT11 è di colore blu, mentre il DHT22 è bianco.
Se si dispone di un DHT11, i riferimenti al DHT22 nel codice devono essere modificati in DHT11. Ad esempio,
import dht
#dht22 = dht.DHT22(Pin(16))
#should be
dht11 = dht.DHT11(Pin(16))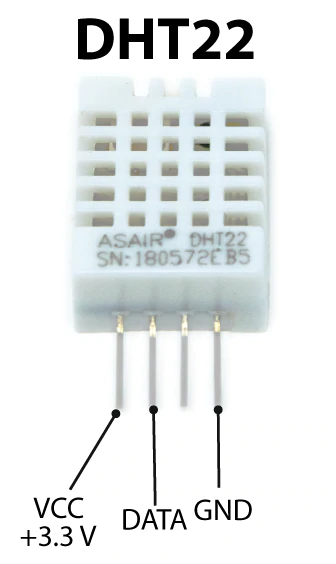
Osservando il diagramma sottostante, dall'alto verso il basso del DHT22, si collega 3,3 V al primo pin.
Il secondo pin è quello dei dati. È necessario alimentarlo. Collegare quindi un resistore da 10K ohm dalla linea di alimentazione e poi collegare un altro filo di ponticello al GPIO 16 del Raspberry Pi Pico.
GND va a GND.
Per testare il sensore, eseguire questa operazione:
from machine import Pin
import dht

# ultrasonic sensor pins and functions
dht22 = dht.DHT22(Pin(16))

print(dht22.measure())
print(dht22.temperature())
print(dht22.humidity())
Se si ottiene OSError: [Errno 110] ETIMEDOUT significa che si sta eseguendo lo script troppo presto. Il DHT22 richiede una pausa di due secondi prima di poter restituire un altro valore. Il DHT11 richiede un secondo.
Collegamento tra IFTTT e Google Sheets

Il modo più semplice per trasferire i dati da Pico W a Google Sheets è tramite IFTTT.
Primo, registrarsi per l'account IFTTT.
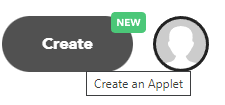
Quindi, fare clic sul pulsante "Crea" per creare l'applet.
Verrà visualizzata questa schermata:
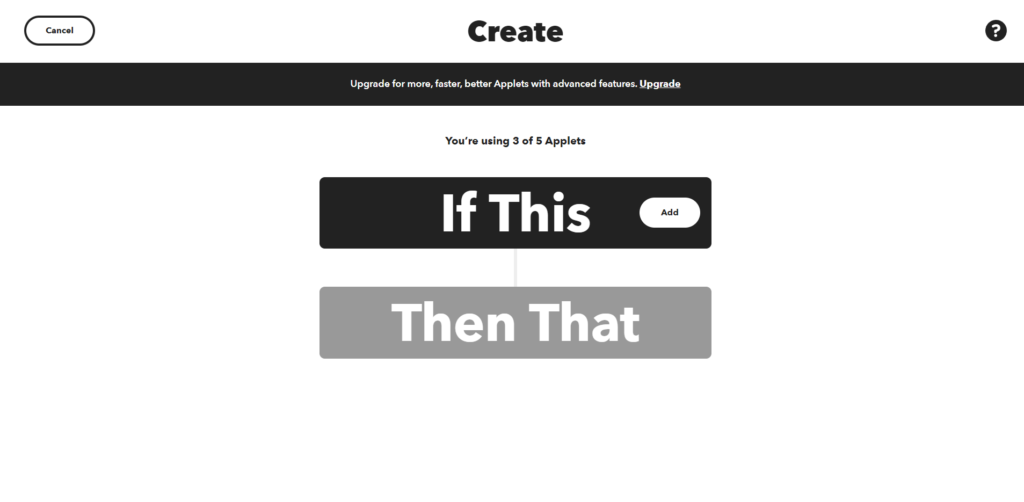
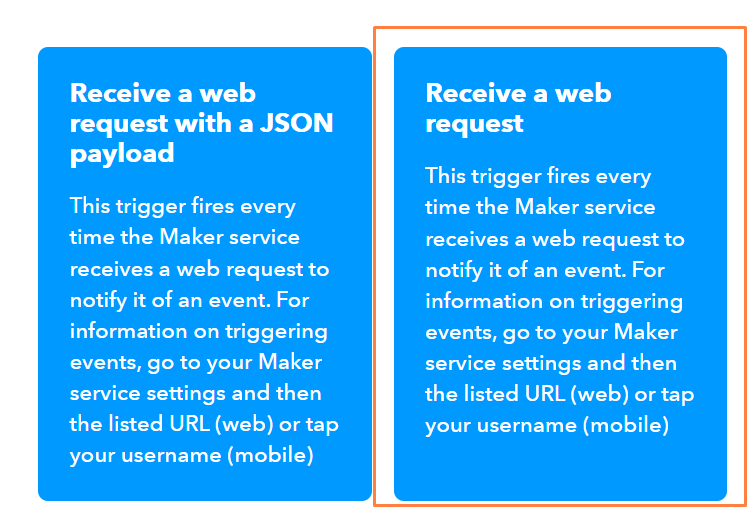
Fare clic su "If This" e cercare Webhooks. Fare clic su "Ricevi una richiesta web". Non scegliere quella JSON. Assegnare all'evento il nome "dht22". Il nome dell'evento è fondamentale perché è così che IFTTT sa quale applet attivare.
Si tratta di creare un endpoint che può essere pingato con i dati del sensore del DHT22.
Quindi, fare clic su "Poi questo". Scegliere "Fogli Google". Quindi selezionare "Aggiungi riga al foglio di calcolo". È necessario collegare l'account di Google Sheets.
Modificare il "Nome del foglio di calcolo" e il "Percorso della cartella Drive" come si desidera. L'unica cosa critica è la "Riga formattata", dove si desidera che sia
{{OccurredAt}} ||| {{Value1}} ||| {{Value2}}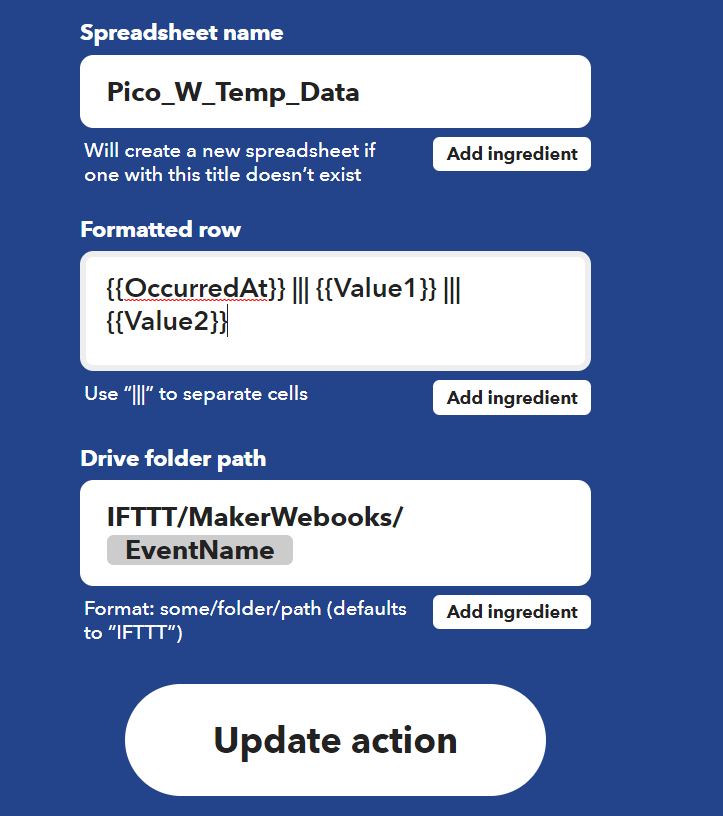
A questo punto, è necessario ottenere l'endpoint a cui il Pico W può inviare i dati del sensore.
Testa a https://ifttt.com/maker_webhooks e fare clic su "Documentazione".
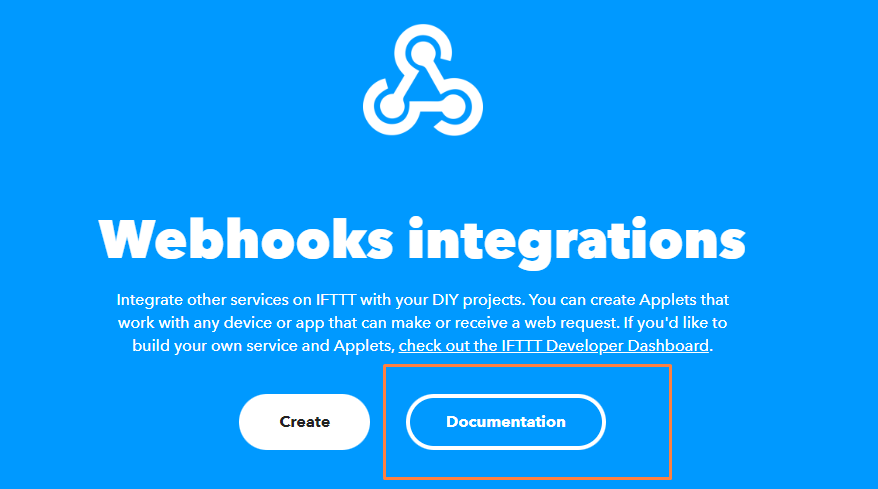
La documentazione indica la chiave, l'endpoint a cui inviare i dati e come strutturare il corpo JSON.
Poiché è stato utilizzato "dht22" come nome dell'evento, l'endpoint è:
ttps://maker.ifttt.com/trigger/dht22/with/key/[your_key_here]Si dovrà anche strutturare il corpo JSON in questo modo:
{'value1': *** temperature data *** , value2': *** humidity data *** }Codifica del Pico W per ottenere i dati DHT22 e inviarli a IFTTT
Ecco come.
from machine import Pin
from wifi import init_wifi
import urequests
import ujson
import dht
import time

init_wifi()

dht22 = dht.DHT22(Pin(16))


def send_data():
    #tell dht22 to take a reading
    dht22.measure()
    #find temp & humidity data and then jsonify data.
    dht_data = {'value1': str(dht22.temperature()),
                'value2': str(dht22.humidity())}
    post_data = ujson.dumps(dht_data)
    request_url = 'https://maker.ifttt.com/trigger/dht22/with/key/[your_key_here]'
    res = urequests.post(request_url, headers={
                         'content-type': 'application/json'}, data=post_data)
    #log response from IFTTT.
    print(res.text)
    #sleep for a minute before running send_data again
    time.sleep(1*60)
    send_data()


send_data()
Se si vuole copiare questo codice, assicurarsi di sostituire [tua_chiave_qui] nella locanda url_richiesta variabile.
Ogni minuto si dovrebbe ottenere una nuova lettura che viene registrata in Google Sheet, come indicato di seguito.
Si noti che la temperatura registrata è in gradi Celsius. Se la si desidera in Fahrenheit, ecco la formula:
fahrenheit = dht22.temperature() * 1.8000 + 32.00Se si desidera che i dati vengano registrati più (o meno) frequentemente, modificare il valore in time.sleep().
Utilizzate IFTTT per ricevere una notifica in caso di errore.
Naturalmente, questo codice è ancora piuttosto fragile.
Supponiamo che qualcosa non vada per il verso giusto. Ad esempio, il vostro gatto ha tirato il filo del ponticello da 3,3 V mentre voi eravate sul pavimento per registrare la temperatura.
Il programma muore, ma l'utente non riceve alcuna notifica finché non si accorge che i dati non vengono registrati.
Come si risolve questo problema?
Beh, fate in modo che IFTTT vi invii una notifica quando ciò accade!
È necessaria l'applicazione IFTTT sul telefono. Quindi scaricatela.
Quindi, si crea una nuova applet.
Per il "Se questo" parte, Scegliere Webhooks -> Ricevere una richiesta web. Dai un nome al tuo evento "errore".
Per il "Allora questo". scegliere "Notifiche" e "Invia una notifica dall'app IFTTT"..
Ho reso il messaggio semplice
Error: {{Value1}}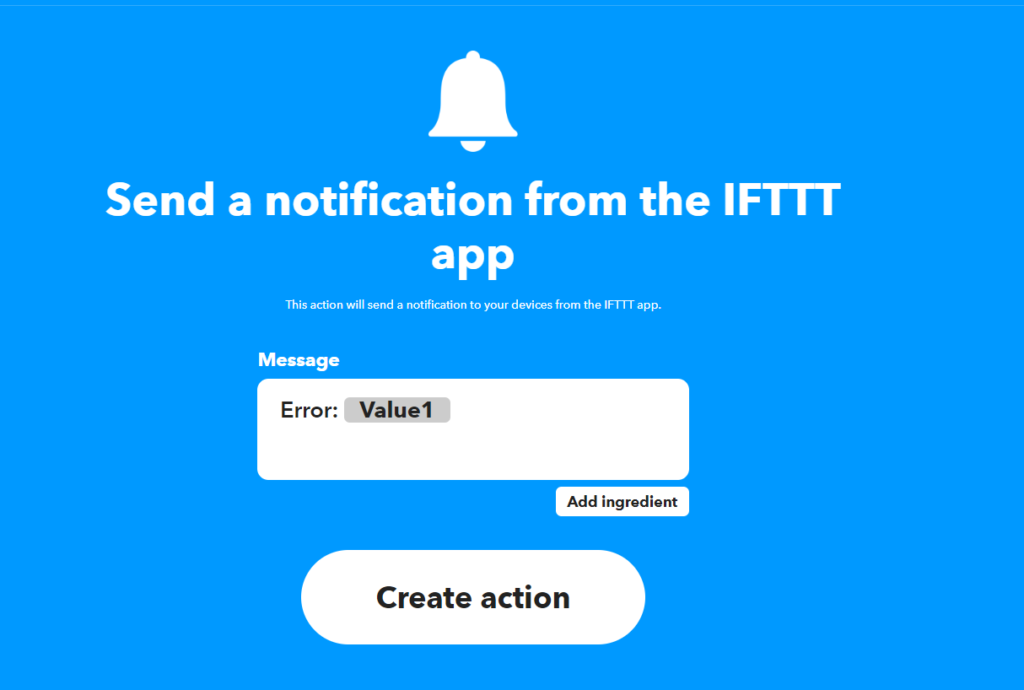
Ora costruiamo i blocchi try-error.
from machine import Pin
from wifi import init_wifi
import urequests
import ujson
import dht
import time

init_wifi()

dht22 = dht.DHT22(Pin(16))


def send_data():
    # tell dht22 to take a reading
    dht22.measure()
    # find temp & humidity data and then jsonify data.
    dht_data = {'value1': str(dht22.temperature()),
                'value2': str(dht22.humidity())}
    post_data = ujson.dumps(dht_data)
    request_url = 'https://maker.ifttt.com/trigger/dht22/with/key/[your-key-here]'
    res = urequests.post(request_url, headers={
                         'content-type': 'application/json'}, data=post_data)
    # log response from IFTTT.
    print(res.text)
    # sleep for a minute before running send_data again
    time.sleep(1*60)
    send_data()


try:
    send_data()
except Exception as e:
    print(e)
    request_url = 'https://maker.ifttt.com/trigger/error/with/key/[your-key-here]'
    post_data = ujson.dumps({"value1": str(e)})
    urequests.post(request_url, headers={
        'content-type': 'application/json'}, data=post_data)
Provate. Scollegate il cavo da 3,3 V dal DHT22 e riceverete una notifica in tal senso:
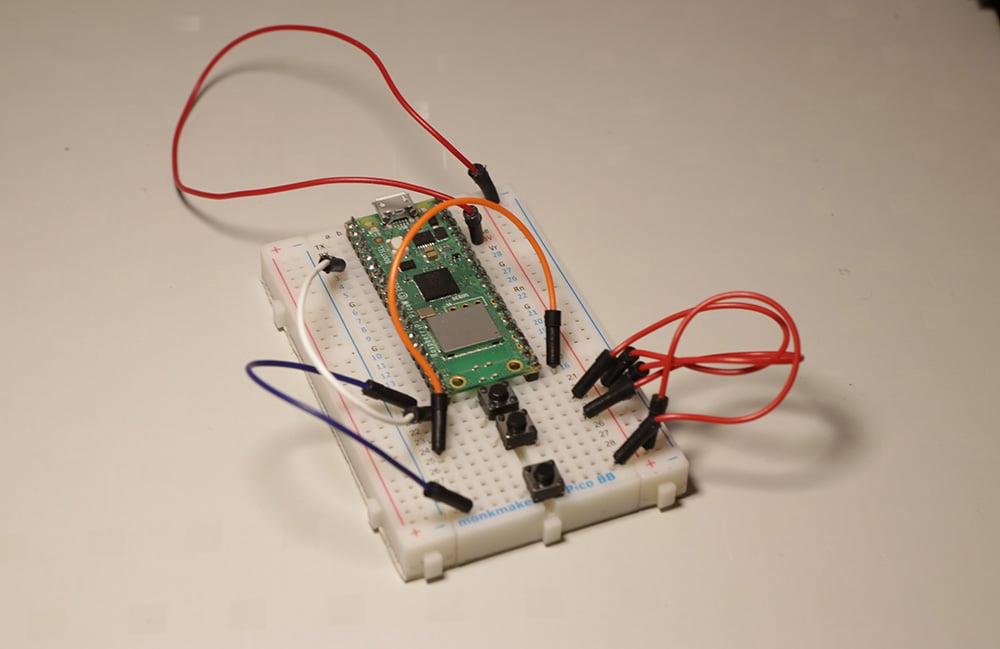
9. Costruire un telecomando fisico per Spotify con Raspberry Pi Pico W
Sulla base del progetto precedente, utilizzeremo IFTTT per controllare Spotify.
Creeremo un dispositivo con un pulsante di riproduzione, pausa e salto di traccia.
Il vantaggio principale dell'utilizzo di IFTTT per controllare Spotify è la sua semplicità.
L'aspetto negativo è che è necessario un account Spotify a pagamento e le risposte sono lente. Ciò significa che se si preme il pulsante "salta", bisogna aspettare un po' prima di vedere il risultato.
Il bello di avere un telecomando Spotify dedicato è che si può cambiare musica senza dover portare in giro il telefono o aprire l'app Spotify.
Se avete mai guidato un'auto moderna, saprete quanto siano utili i comandi al volante.
Cablaggio di un controller remoto di Spotify
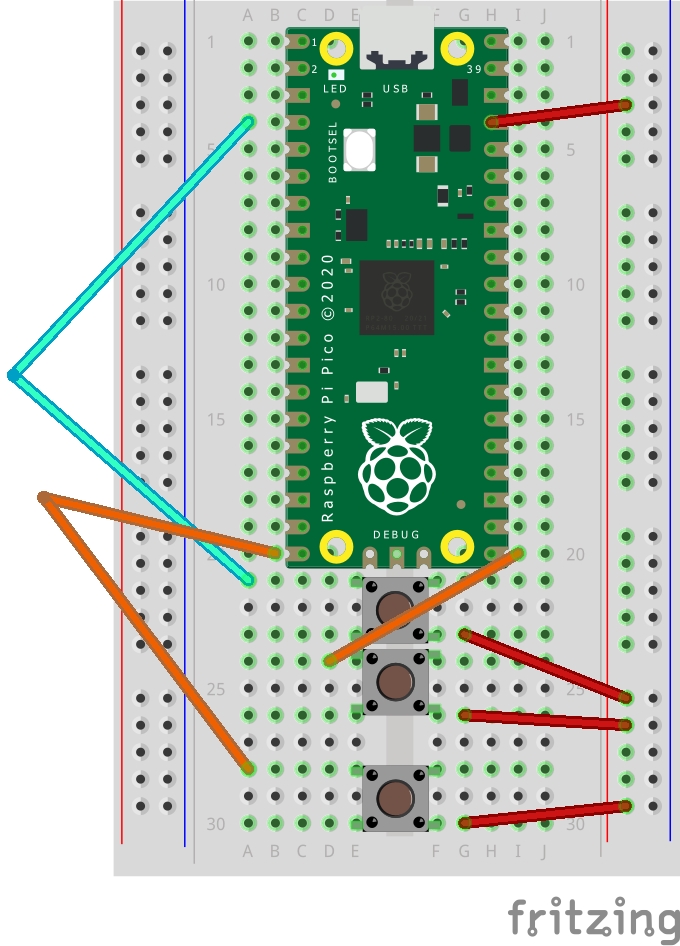
Avrete bisogno di...
- 7x cavi di collegamento
- 3x pulsanti
- Raspberry Pi Pico W
- Account Spotify a pagamento
Nell'immagine ci sono molti fili che si incrociano, quindi ecco una spiegazione testuale.
I pulsanti sono come interruttori. È necessario collegare il pin 3V3 a ciascuno di essi, il che significa utilizzare la colonna positiva della breadboard. Pertanto:
3V3 -> Colonna positiva della breadboard -> Pulsante (su un lato della canalina della breadboard) -> GPIO (sull'altro lato)
Il mio codice utilizzerà GPIO 16 per il pulsante di riproduzione, GPIO 2 per il pulsante di pausa e GPIO 15 per il pulsante di salto traccia.
Impostazione di IFTTT per controllare Spotify
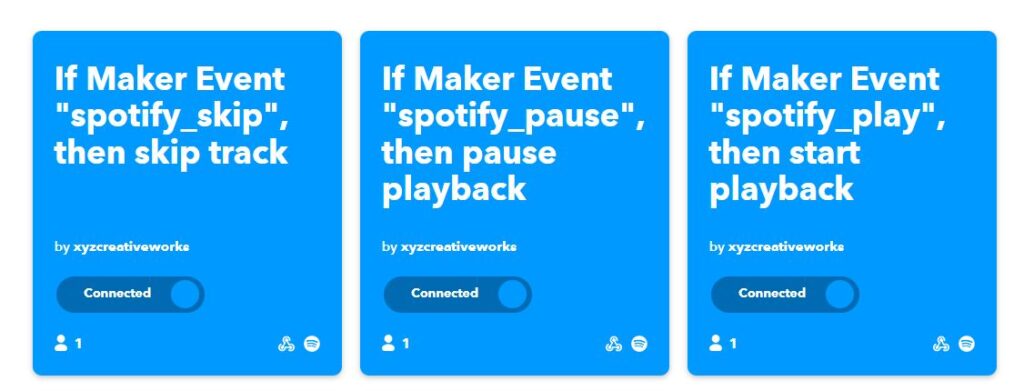
Dobbiamo creare tre applet, una per ogni funzione di riproduzione, pausa e salto.
Se avete la versione premium di IFTTT, probabilmente potreste usare i filtri JavaScript per racchiudere tutto in un'unica app. Ma poiché non è così, abbiamo bisogno di un'applet ciascuno.
Una volta effettuato l'accesso, cliccare su "Crea" in alto a destra del menu principale.
Nella barra "If This", fare clic su di essa e cercare Webhooks.

Quindi, fare clic su "Ricevi una richiesta web" (non sull'altra opzione che riporta "con un payload JSON").
Per il nome dell'evento, digitare spotify_skip.
Si dovrà ripetere questo passaggio altre due volte per spotify_pausa e spotify_play una volta terminata la creazione dell'applet.
Una volta fatto questo, andare alla voce "Allora quello" e fare clic su di essa. Cercare "Spotify".
Dovrete autorizzare IFTTT a connettersi a Spotify una volta.
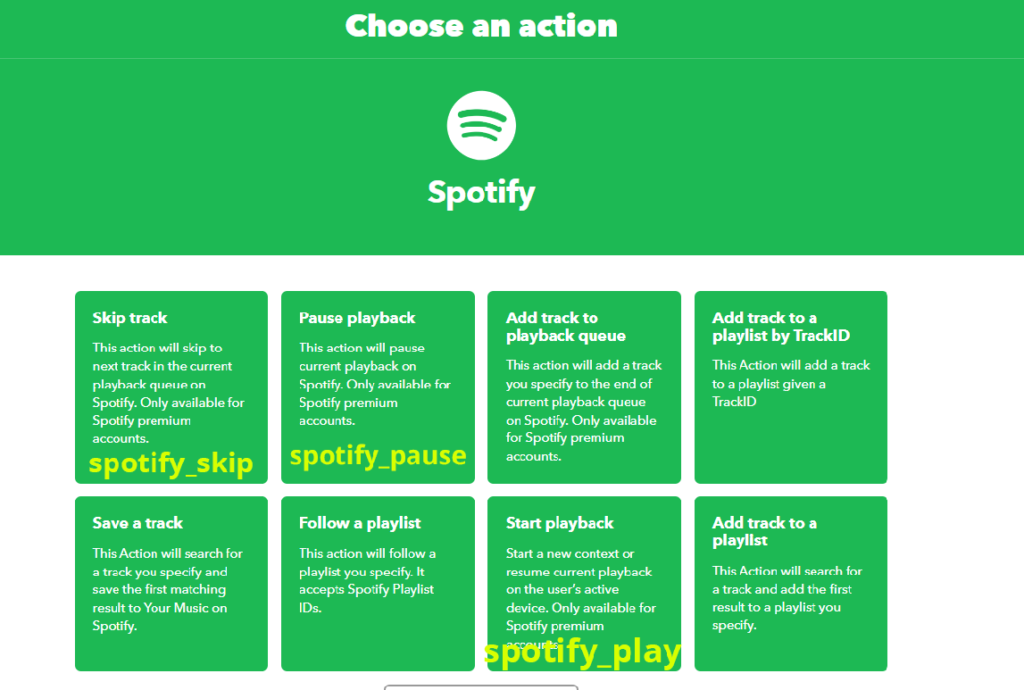
Se si sta eseguendo il spotify_skip si dovrà fare clic su "Salta traccia". Se invece si sta eseguendo un'applet per eseguire un'altra azione, l'immagine qui sopra mostra quale utilizzare.
Una volta create tutte e tre le applet, è il momento del codice!
Codifica del telecomando Spotify per Pico W
Innanzitutto, è necessario conoscere l'endpoint da raggiungere.
Vai a questa pagina e fare clic sul pulsante Documentazione.
Lì si vedrà la propria chiave. Se avete seguito tutti i passaggi precedenti, la differenza tra il vostro endpoint e il mio è la vostra chiave. Quindi,
Punto finale di riproduzione: https://maker.ifttt.com/trigger/spotify_play/with/key/[your_key_here]
Pausa: https://maker.ifttt.com/trigger/spotify_pause/with/key/[your_key_here]
Salto: https://maker.ifttt.com/trigger/spotify_skip/with/key/[your_key_here]
Codice
from machine import Pin
from wifi import init_wifi
import urequests
import time

init_wifi()

play_btn = Pin(16, Pin.IN, Pin.PULL_DOWN)
pause_btn = Pin(2, Pin.IN, Pin.PULL_DOWN)
skip_btn = Pin(15, Pin.IN, Pin.PULL_DOWN)


def play():
    request_url = 'https://maker.ifttt.com/trigger/spotify_play/with/key/[your_key_here]'
    res = urequests.post(request_url)
    # print response from IFTTT.
    print(res.text)


def pause():
    request_url = 'https://maker.ifttt.com/trigger/spotify_pause/with/key/[your_key_here]'
    res = urequests.post(request_url)
    # print response from IFTTT.
    print(res.text)


def skip():
    request_url = 'https://maker.ifttt.com/trigger/spotify_skip/with/key/[your_key_here]'
    res = urequests.post(request_url)
    # print response from IFTTT.
    print(res.text)


try:
    while True:
        if play_btn():
            print('play btn')
            play()
            time.sleep(0.25)
        if pause_btn():
            print('pause btn')
            pause()
            time.sleep(0.25)
        if skip_btn():
            skip()
            print('skip')
            time.sleep(0.25)

except Exception as e:
    print(e)
    request_url = 'https://maker.ifttt.com/trigger/error/with/key/[your_key_here]'
    post_data = ujson.dumps({"value1": str(e)})
    urequests.post(request_url, headers={
        'content-type': 'application/json'}, data=post_data)
Esaminiamo il codice.
Si noti che è necessario sostituire [tua_chiave_qui] con la propria chiave reale, ottenuta tramite il programma Documentazione link.
Innanzitutto, dichiariamo le variabili per i pulsanti.
play_btn = Pin(16, Pin.IN, Pin.PULL_DOWN)
pause_btn = Pin(2, Pin.IN, Pin.PULL_DOWN)
skip_btn = Pin(15, Pin.IN, Pin.PULL_DOWN)
Attualmente, se non si preme il pulsante, la variabile avrà un valore di 0. Se lo si preme, diventa 1. Questo è ciò che useremo per attivare il metodo play() , pausa() e saltare() funzioni.
Quindi, creiamo funzioni per gli endpoint di riproduzione, pausa e salto. Il modello generale è il seguente:
def play():
    request_url = 'https://maker.ifttt.com/trigger/spotify_play/with/key/[your_key_here]'
    res = urequests.post(request_url)
    # print response from IFTTT.
    print(res.text)
È piuttosto semplice. Se questa funzione viene eseguita, invierà una richiesta POST a IFTTT. L'invio di una richiesta GET non funziona.
Poi, abbiamo il blocco try/except.
try:
    while True:
        if play_btn():
            print('play btn')
            play()
            time.sleep(0.25)
        if pause_btn():
            print('pause btn')
            pause()
            time.sleep(0.25)
        if skip_btn():
            skip()
            print('skip')
            time.sleep(0.25)

except Exception as e:
    print(e)
    request_url = 'https://maker.ifttt.com/trigger/error/with/key/[your_key_here]'
    post_data = ujson.dumps({"value1": str(e)})
    urequests.post(request_url, headers={
        'content-type': 'application/json'}, data=post_data)
Se si preme un pulsante, il codice esegue la funzione corrispondente. Ad esempio, premendo il pulsante di salto verrà eseguita la funzione saltare().
A time.sleep(0,25) mette in pausa la funzione per 250 ms. In caso contrario, anche una breve pressione può sovraccaricare e mandare in tilt il Pico W.
Il tranne Il blocco è opzionale, ma io l'ho fatto perché avevo già un'applet "error" su IFTTT. Se avete seguito il tutorial precedente, potreste averla usata.
In pratica, invia il messaggio di errore, ea IFTTT, in modo da ricevere il messaggio di errore come notifica dell'app del telefono.
Perché non funziona?
L'utilizzo di IFTTT come mezzo per controllare Spotify è facile, ma presenta alcuni svantaggi.
Prima è necessario avviare la musica nel modo normale
Se avete provato a premere il pulsante di riproduzione sul vostro Pico W e vi aspettavate che la musica partisse... beh, non succede nulla.
La soluzione è avviare normalmente la musica sul computer o sul telefono. È necessario accedere all'applicazione e premere play.
Credo che questo dichiari quale sia il dispositivo attivo. Una volta eseguita questa operazione, sarà possibile utilizzare il telecomando Pico W Spotify.
Risposte lente
Tra la pressione del pulsante e la risposta passano alcuni secondi. Purtroppo le cose stanno così.
Potreste pagare un aggiornamento di IFTTT per ottenere una velocità di risposta maggiore. O almeno, questo è ciò che promettono in cambio del vostro denaro.
Esiste un modo diretto per collegare Spotify?
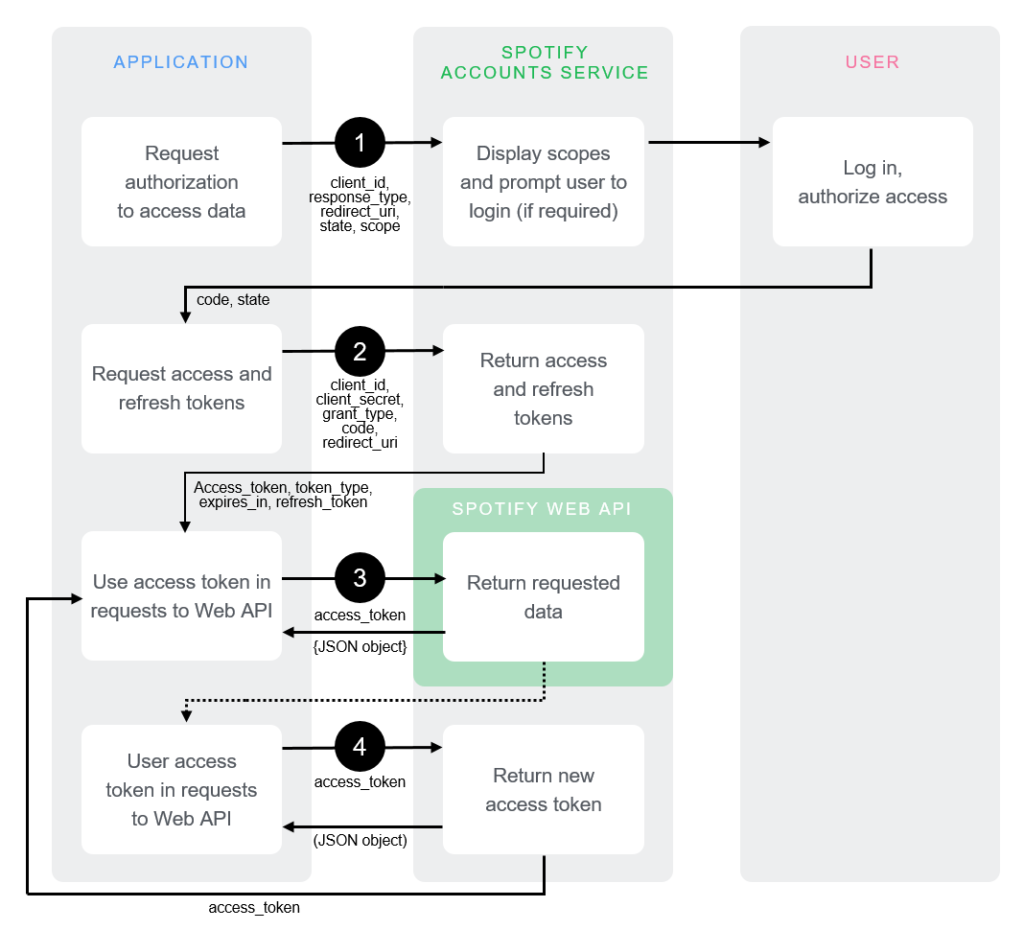
Sì! Spotify dispone di un'API alla quale è possibile collegarsi.
In questo modo si ottiene un controllo significativamente maggiore. Si può aggiungere un encoder rotativo per controllare il volume. Si può aggiungere uno schermo LCD per visualizzare la riproduzione. Scoprite la console di Spotify qui.
Incredibile, ma anche molto più difficile da programmare, soprattutto su un Pico W.
IFTTT rende tutto più semplice perché si occupa di tutto il lavoro pesante. Se volete essere voi a fare il lavoro pesante, controllate il flusso di autenticazione.
Naturalmente, siamo appassionati di Raspberry Pi. Qualcuno là fuori lo farà. Dovreste essere voi? O io? Commentate qui sotto.
Controllate la vostra Pico W in modalità wireless con PiCockpit!

È possibile controllare e ottenere dati dal Pico W in modalità wireless utilizzando PiCockpit.
PiCockpit consente di ottenere i valori, controllare e utilizzare il PWM attraverso un'interfaccia grafica grazie all'applet GPIO.
È anche possibile vedere le statistiche di Pico W attraverso l'applet PiStats.
Integrare PiCockpit nel vostro Pico W è semplicissimo.
Scrivete ancora meno codice con PiCockpit e Pico W
PiCockpit consente di controllare facilmente i pin GPIO senza dover scrivere alcun codice.
Se si guarda a esercitazione numero 2Si noti quanto codice è necessario solo per attivare un LED.
Con la nuova integrazione di Pico W, PiCockpit rende tutto molto più semplice, poiché non è necessario programmare nulla. Nemmeno la configurazione WiFi, che viene eseguita con la nostra procedura guidata.
10. Semplice controllo dei LED con PiCockpit e Pico W
Se il LED è stato configurato esattamente come ho fatto nel tutorial n. 2, non resta che configurarlo su PiCockpit.
Se si esegue la codifica, si dichiarerà su quale pin si trova il LED utilizzando led = machine.Pin(2, machine.Pin.OUT)
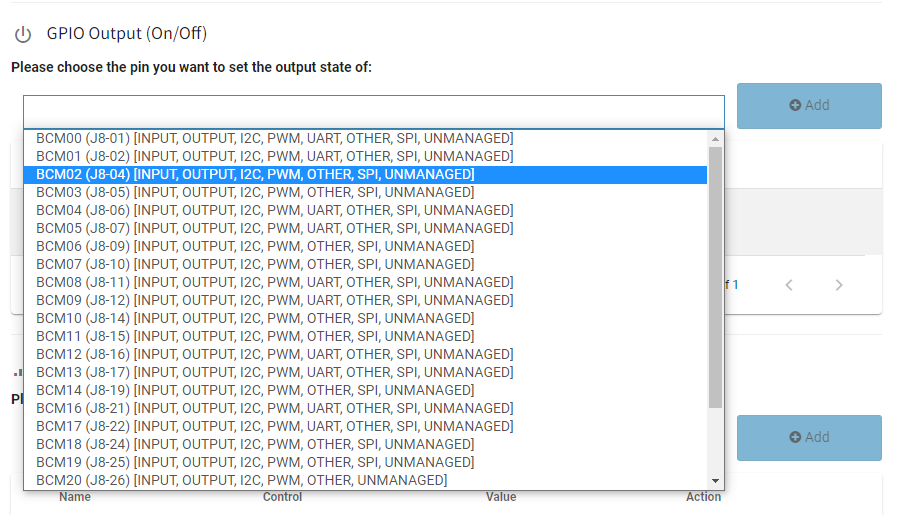
Su PiCockpit, si va all'applet GPIO e si scorre fino a "GPIO Output (On/Off)".
Scegliere BCM02 dal menu a discesa perché il LED si trova sul GPIO 2.
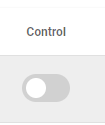
Quindi, nella colonna "Controllo", attivare l'interruttore per accendere il LED.
È inoltre possibile utilizzare facilmente la sezione PWM del software per controllare la luminosità del LED.
Si noti che è necessario rimuovere l'impostazione precedente perché non è possibile avere due uscite sullo stesso GPIO.
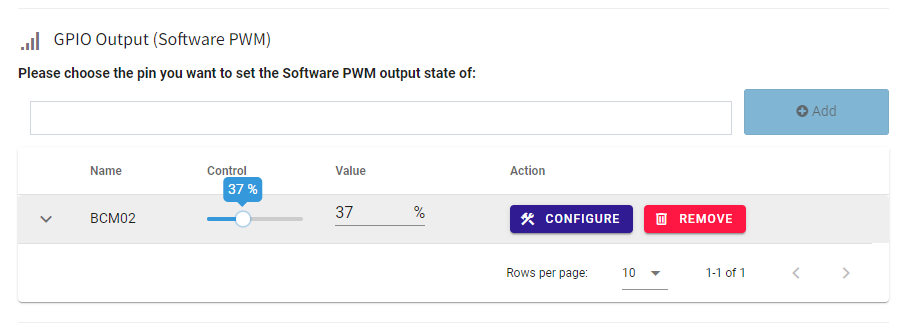
Quando si sposta il cursore "Controllo", si noterà che la luminosità del LED cambia.

11. Pico W, ventola a 5 V e un transistor, controllato da PiCockpit
Proviamo a fare qualcosa di più completo, ma utilizzando lo stesso interruttore di uscita GPIO.
Per illustrare alcuni casi d'uso reali, alimenterò una ventola a 5V utilizzando PiCockpit.
Si tratta di una ventola a bassa potenza da 5 V, prelevata dal mio Raspberry Pi 4, quindi rientra nelle capacità di uscita del Raspberry Pi Pico W.
Detto questo, trattandosi di una ventola a 5 V, non posso utilizzare un pin GPIO. Nei componenti che richiedono meno energia, come i LED, il GPIO può svolgere il doppio compito di alimentare il componente e di essere l'"interruttore" che lo accende e lo spegne.
Ma la ventola a 5 V richiederebbe una tensione troppo elevata. Quindi, la soluzione migliore è quella di inserire un transistor nel mezzo.
Questo mi permette di fornire 5 V alla ventola, assicurandomi di poterla accendere e spegnere.
Ancora una volta, grazie a PiCockpit, non ho fatto alcuna programmazione. Mi sono occupato solo dell'hardware, che è cablato come segue:
La ventola è una ventola da 5 V/0,12 A, collegata a 5 V sul polo positivo (filo rosso), mentre il filo negativo va all'emettitore del transistor.
Il transistor è un PN2222 (NPN), il che significa che si attiva quando riceve un segnale alto.
Da sinistra a destra, con la parte semicircolare rivolta verso l'esterno, le gambe sono l'Emettitore, la Base e il Collettore.
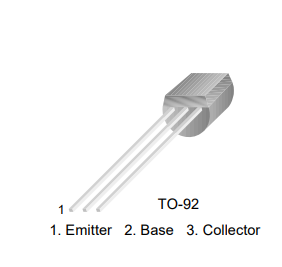
Il tratto di base è collegato a un resistore da 1K, quindi è collegato al GPIO 15.
Il tratto del collettore è collegato a massa.
Configurazione di PiCockpit per il funzionamento con i transistor
Ancora una volta, super facile.
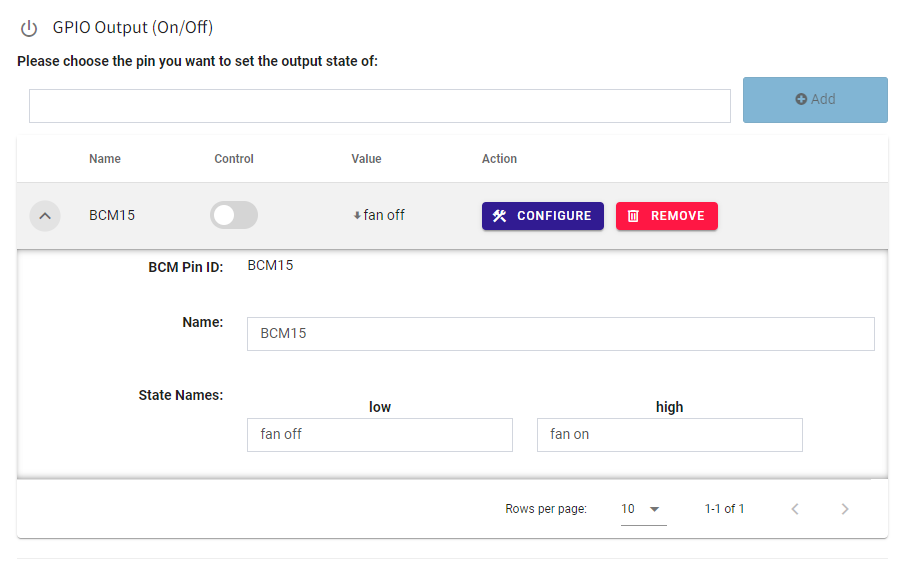
Andare al menu a discesa nella sezione Uscita GPIO e aggiungere BCM15.
Una volta inserito, è possibile fare clic sulla freccia verso il basso e modificare i nomi di stato in "fan off" e "fan on".
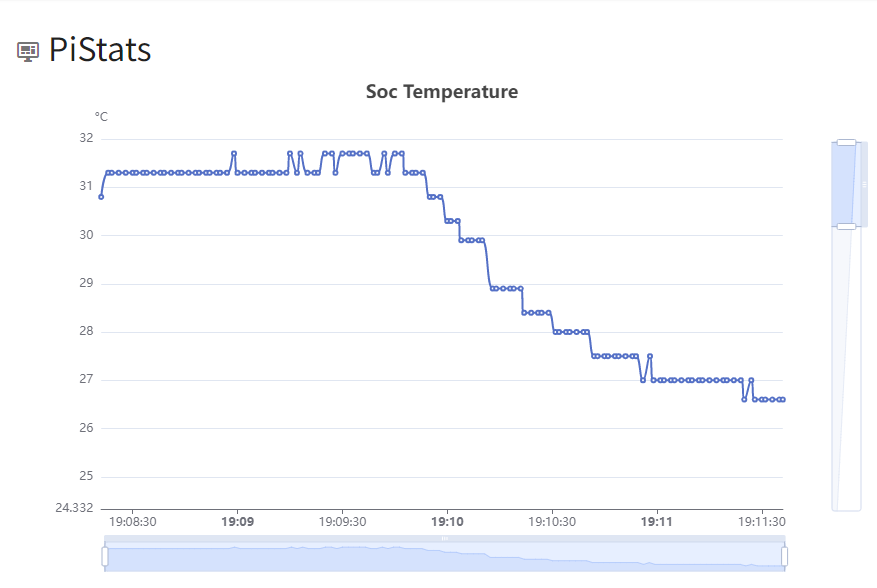
Attivare l'interruttore di controllo e si dovrebbe vedere la ventola accendersi.
È anche possibile utilizzare PiStats per vedere il calo delle temperature sulla scheda.
Visualizzazione del fotoresistore tramite MQTT e Node-RED con Pico W.
L'obiettivo principale di questa esercitazione è introdurre MQTT.
Nelle esercitazioni precedenti, vi ho mostrato come potete usare il vostro Pico W per fornire dati, ma cosa succede se volete un repository centrale di dati nel cloud?
HiveMQ Cloud è un servizio gratuito che possiamo utilizzare per raggiungere questo obiettivo. Utilizzando i computer di qualcun altro, possiamo anche alleggerire il carico di Pico W.
Inoltre, MQTT presenta notevoli vantaggi rispetto ai metodi utilizzati in precedenza. Innanzitutto, è molto più efficiente nell'invio di dati di piccole dimensioni. Le intestazioni del protocollo MQTT hanno una dimensione di 2 byte. L'HTTP è circa 4000 volte più grande.
La riduzione del carico di elaborazione locale e del carico di rete si traduce in una maggiore durata della batteria del Pico W, perfetta per i progetti alimentati a batteria o a energia solare.
Collegamento del fotoresistore con il Pico W
Un fotoresistore (fotocellula) è facilissimo da collegare.
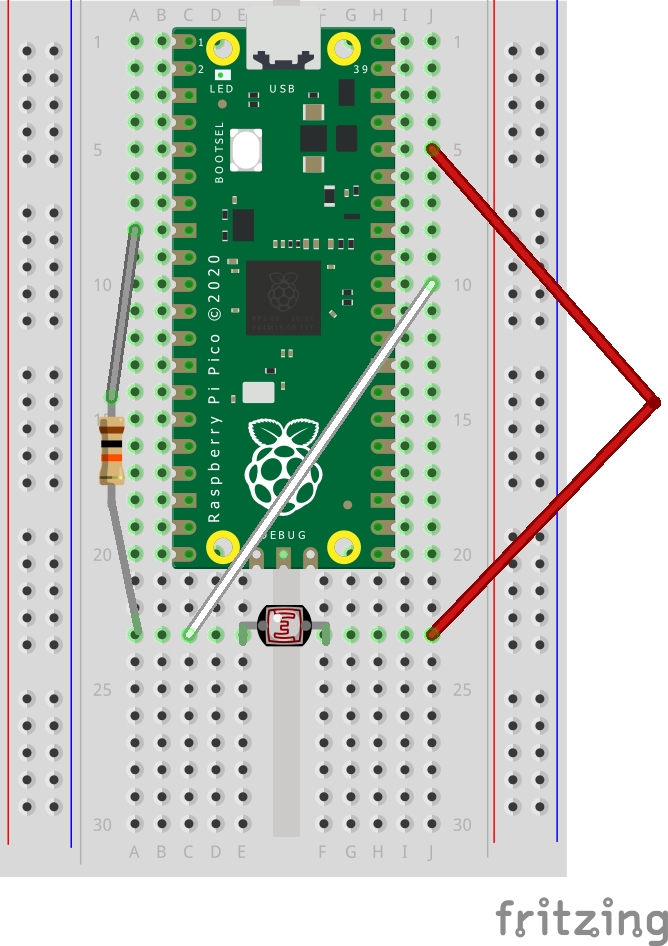
Posizionare il fotoresistore attraverso la canalina centrale della breadboard.
Quindi, collegare il pin 3V3 a un lato del fotoresistore.
È necessario collegare un pin ADC all'altro lato del fotoresistore, quindi collegare il GPIO 26.
Infine, collegare una resistenza da 10K ohm dalla massa alla fotocellula.
HiveMQ Cloud e la codifica di Pico W
Il primo, iscriversi a HiveMQ Cloud qui.
Passare alla configurazione e creare un cluster. Vi chiederà di scegliere AWS o Azure. Per i nostri scopi, non c'è differenza.
Quindi, fare clic su "Gestisci cluster".
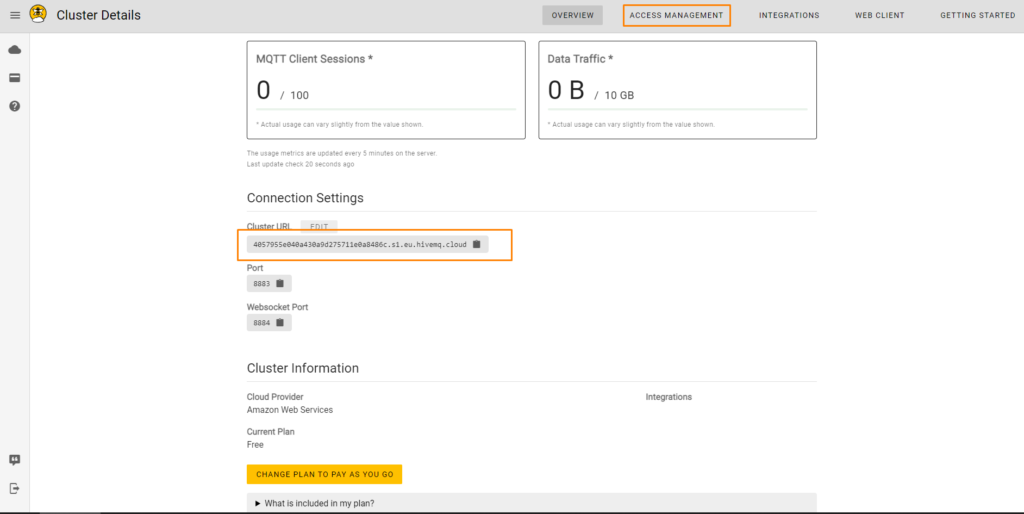
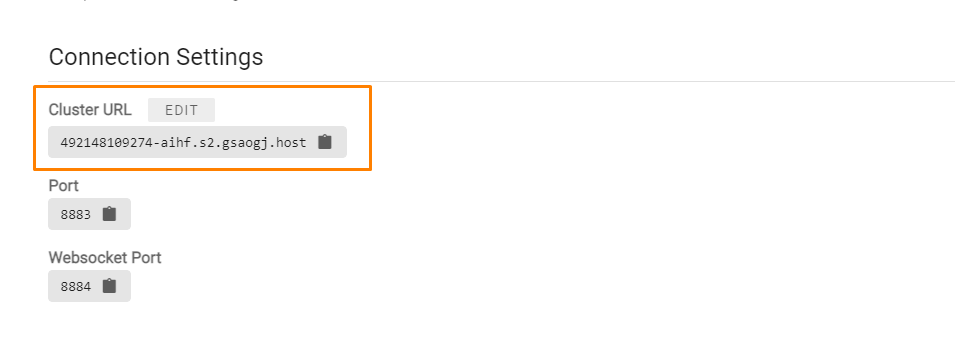
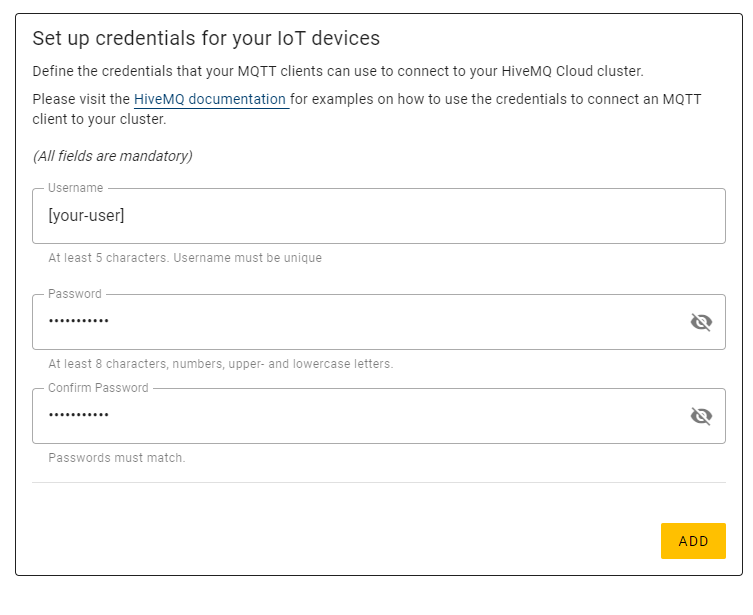
Prendete nota dell'URL del vostro cluster e fate clic su Gestione accesso per creare un nuovo utente. Seguite i passaggi e create un nuovo utente.
Con questi dettagli, è ora possibile programmare il Pico W per inviare i dati in questo punto.
Codifica del Pico W per ricevere i dati delle fotocellule e MQTTClient
from machine import Pin, ADC
from wifi import init_wifi
import time
from umqtt.simple import MQTTClient

init_wifi()

photoresistor = ADC(Pin(26))


def readLight():
    light = photoresistor.read_u16()
    return light


# Connect MQTT

def connectMQTT():
    client = MQTTClient(client_id=b"[your_client_id]",
                        server=b"[your-host-name]",
                        port=0,
                        user=b"[your-user]",
                        password=b"[your-pw]",
                        keepalive=7200,
                        ssl=True,
                        ssl_params={
                            'server_hostname': '[your-host-name]'}
                        )

    client.connect()
    return client


client = connectMQTT()


def publish(topic, value):
    print(topic)
    print(value)
    client.publish(topic, value)
    print("data published")


while True:
    brightness = str(readLight()) #to publish, must send string

    print(brightness)

    publish('picow/brightness', brightness)

    time.sleep(0.1)
Per prima cosa, mettiamo in ordine le importazioni.
from machine import Pin, ADC
from wifi import init_wifi
import time
from umqtt.simple import MQTTClient
Il wifi L'importazione proviene dalle esercitazioni precedenti.
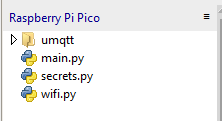
È necessario disporre della libreria umqtt.simple, che può essere scaricato qui.
Una volta scaricato, è possibile caricarlo sulla propria scheda (guida qui).
Questi file dovrebbero essere presenti sul Pico W.
Quindi, creare una funzione per ottenere una lettura dal fotoresistore:
photoresistor = ADC(Pin(26))

def readLight():
    light = photoresistor.read_u16()
    return light
Restituisce un valore fino a 65535. Più luminoso è, più alto è il valore.
Connessione a HiveMQ
Per connettersi a HiveMQ, è necessario inviare alcuni parametri alla classe MQTTClient.
# Connect MQTT

def connectMQTT():
    client = MQTTClient(client_id=b"[your_client_id]",
                        server=b"[your-host-name]",
                        port=0,
                        user=b"[your-user]",
                        password=b"[your-pw]",
                        keepalive=7200,
                        ssl=True,
                        ssl_params={
                            'server_hostname': '[your-host-name]'}
                        )

    client.connect()
    return client


client = connectMQTT()
Sostituire [your-host-name] con l'indirizzo presente nel dashboard. È necessario eseguire questa operazione due volte, una volta per server e un altro per server_hostname. Sostituite anche [your_client_id] con un nome per il vostro dispositivo, ad esempio "your_picow".
Quindi, sostituire [your-user] e [your-pw] con l'utente creato nella pagina Gestione accessi (schermata della pagina Gestione accessi qui sotto).
Come riferimento, questa funzione invia i dati a HiveMQ:
def publish(topic, value):
    print(topic)
    print(value)
    client.publish(topic, value)
    print("data published")
Chiamiamolo nel nostro while ciclo:
while True:
    brightness = str(readLight()) #to publish, must send string

    print(brightness)

    publish('picow/brightness', brightness)

    time.sleep(0.1)
Quando si pubblica, è necessario inviare delle stringhe, per questo motivo brightness = str(readLight()) è presente.
Se si inviano numeri interi o float, il programma muore.
Nella funzione di pubblicazione, date un nome al vostro argomento. Diciamo, picow/brightnessquindi aggiungere il valore che si desidera inviare. In questo caso, vogliamo inviare la lettura della luce stringata, brightness.
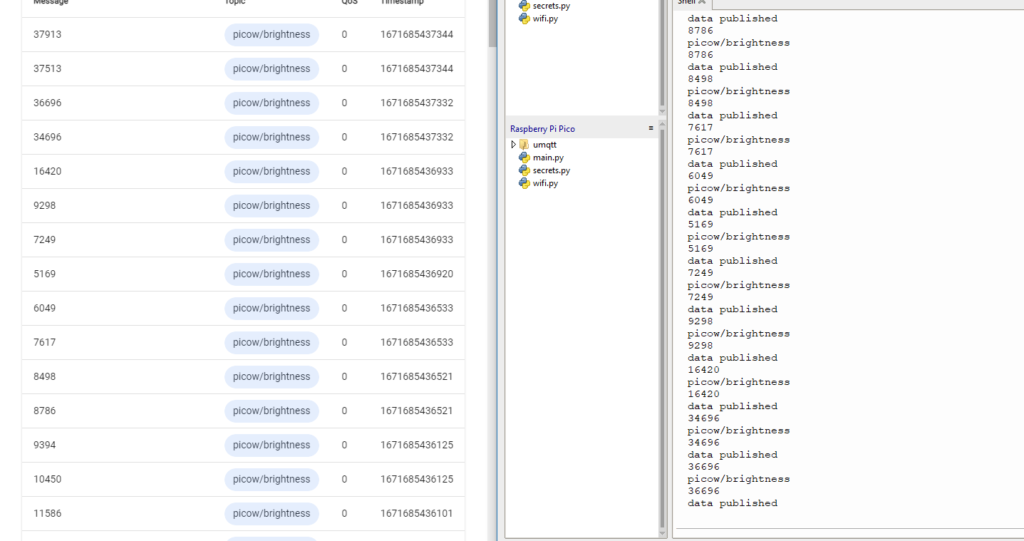
Quando si accede alla scheda Client Web, si dovrebbe essere in grado di vedere i dati pubblicati.
Nodo rosso
Questi sono solo numeri online che possono sembrare senza senso. E se si volesse accedere ai dati su HiveMQ Cloud e presentarli graficamente?
Piuttosto che creare il proprio, si può usare Node-RED.
Node-RED rende molto semplice prendere i dati da HiveMQ e presentarli con rappresentazioni grafiche.
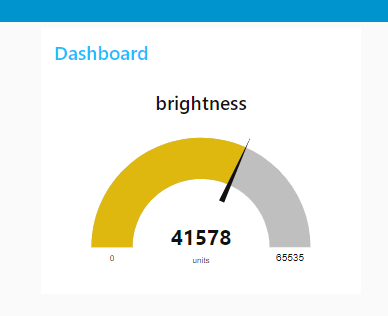
Creeremo un indicatore utilizzando Node-RED.
Per iniziare, è necessario disporre di nodejs. Controllare la documentazione di HiveMQ per vedere quale versione è consigliata.
Una volta installato Node, è necessario aprire un prompt dei comandi/terminale ed eseguire questi comandi (escludendo sudo se si è su Windows):
sudo npm install -g --unsafe-perm node-redSi utilizzerà il gestore di pacchetti di node (npm) per installare Node-RED a livello globale.
Quindi, eseguire Node-RED digitando node-red nel prompt del Terminale/comando.
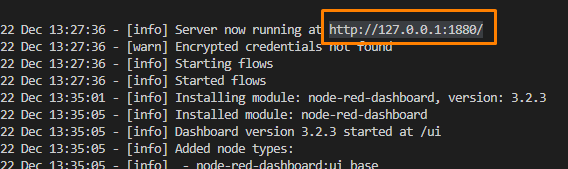
Aprite il vostro browser e andate su http://127.0.0.1:1880 o l'indirizzo indicato nel vostro terminale.
Costruiamo il flusso. Trascinare un "mqtt in" sul canvas. Si trova sotto la scheda "network" nella barra laterale sinistra.
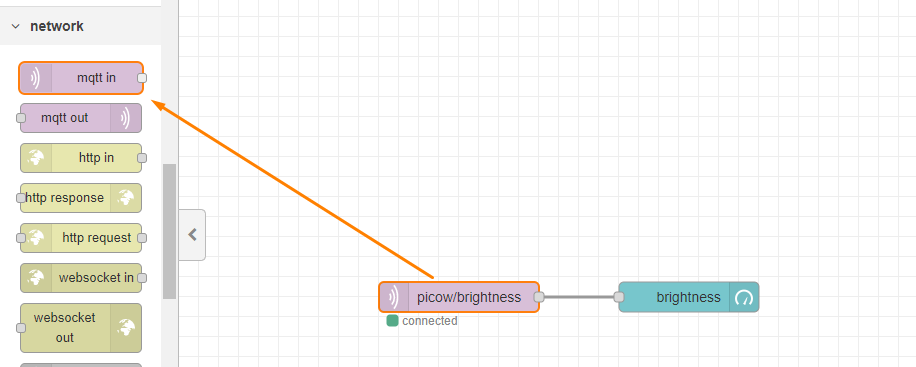
È necessario configurare la scheda, quindi fare doppio clic sul rettangolo e procedere come segue:
Nel campo "argomento", assicurarsi di aggiungere picow/luminosità, visto che è quello che avete pubblicato dal Pico W.
In "Server", aggiungete un nuovo server facendo clic sull'icona della matita e verrete portati al menu successivo.
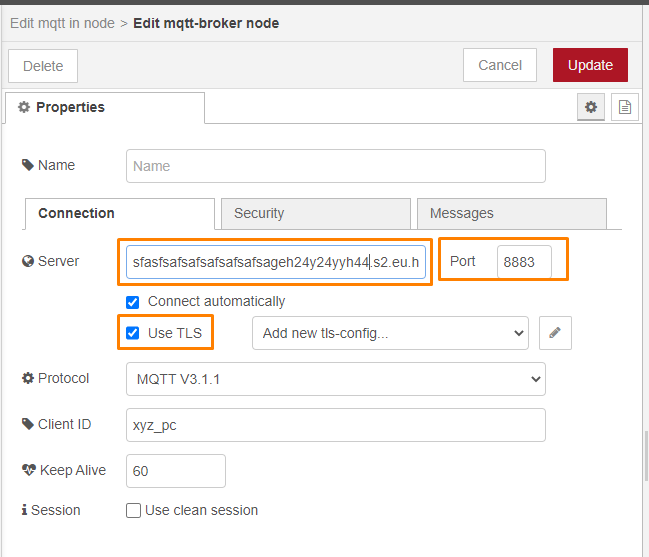
Inserite un nuovo indirizzo di server e cambiate la porta in 8883. Spuntare "Usa TLS", ma non preoccuparsi di aggiungere una nuova configurazione tls.
Quindi, andare alla scheda Sicurezza e aggiungere le credenziali di accesso.
Tutti questi dettagli si trovano nel codice quando si inizializza MQTTClient.
Aggiunta di un indicatore
Per aggiungere un indicatore, è necessario disporre dell'opzione nodo-rosso-cruscotto.
Nella barra laterale sinistra, se non li vedete:
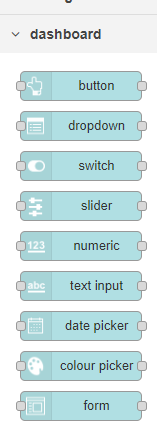
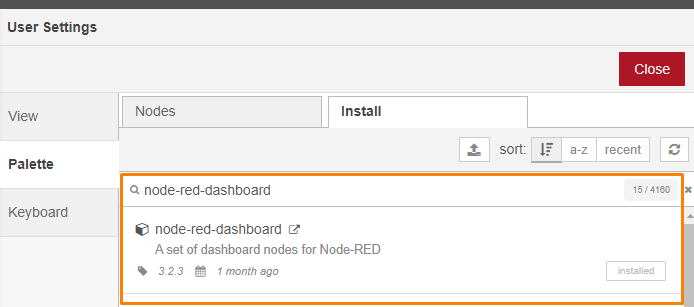
Quindi andare al menu (pulsante in alto a destra) -> Gestisci tavolozza. Andare quindi alla scheda Install e cercare node-red-dashboard. Fare clic su "Installa".
Trascinare e rilasciare un "indicatore" a destra dell'elemento mqtt in e collegarli trascinando una linea da mqtt in al calibro.
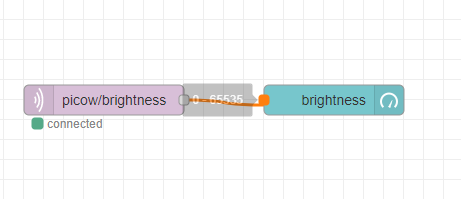
Fare doppio clic sul rettangolo dell'indicatore e modificare l'etichetta in "luminosità" e l'"intervallo" massimo in 65535.
Ottimo. Ora premiamo "Deploy".
Se le impostazioni sono corrette, si vedrà un cerchio verde e la scritta "connected" sotto il rettangolo. In caso contrario, il terminale fornirà maggiori dettagli sul motivo dell'errore.
Dopo che Pico W ha trasmesso i dati a HiveMQ Cloud, è giunto il momento di controllare la dashboard. Visitare http://127.0.0.1:1880/ui e si dovrebbe vedere che l'indicatore viene aggiornato frequentemente.
I vostri suggerimenti sono benvenuti.
Lasciate un commento nella casella dei commenti qui sotto!
Salve,
Grazie per aver condiviso con noi le vostre conoscenze.
Potreste indicarmi se gli esercizi WiFi sono solo per la rete? Non sono riuscito ad accedere a Pico W se sono su un'altra rete WiFi. Se è così, avete qualche esempio per l'accesso fuori rete?
Grazie.
Sì, a causa della natura delle reti, dei router e dei firewall, questi esercizi funzionano solo all'interno della stessa rete WiFi.
PiCockpit stesso è una soluzione che si estende su tutte le reti: potete accedere al vostro Pico W da qualsiasi punto di Internet.
Stiamo lavorando per aggiungere altre funzioni alla piattaforma.
Se si vuole ricreare qualcosa di simile da soli, è necessario disporre di un qualche tipo di soluzione di tunneling per la propria rete, o di un server relay, o qualcosa del genere.
Offriamo servizi di consulenza se volete approfondire questo argomento.
Grazie per questo ottimo tutorial.
Purtroppo non funziona.
Sono bloccato alla fine della parte "1. Servire una pagina web che dice "Hello World" sul Pico".
I miei browser web Firefox e Chrome mi dicono solo "Errore di connessione interrotta".
A Thonny vedo
Collegato
ip = 192.168.188.198
In ascolto su ('0.0.0.0', 80)
Cliente connesso da ('192.168.188.100', 54025)
Connessione chiusa
La connessione chiusa arriva un paio di volte.
Cosa posso modificare per far funzionare il mio Pico W?
Vi ringrazio in anticipo per il vostro aiuto.
Saluti Pete
Quando si esegue il file main.py, viene visualizzato un messaggio di errore, come posso risolverlo?
File "", riga 1, in
ImportError: nessun modulo chiamato 'wifi'
Grazie in anticipo.
È necessario creare e aggiungere wifi.py, che è mostrato un po' più in alto nella pagina. Senza wifi.py, il codice non funzionerà.
Il "Tutorial sui componenti per principianti di Raspberry Pi Pico W" è una guida fantastica per chi è alle prime armi con la piattaforma Raspberry Pi Pico W. Il tutorial è ben strutturato e facile da seguire, il che lo rende ideale per i principianti. Copre i componenti essenziali e fornisce istruzioni chiare, rendendolo un ottimo punto di partenza per chiunque voglia esplorare questa tecnologia. L'inclusione di spiegazioni dettagliate e immagini migliora l'esperienza di apprendimento, assicurando che i lettori possano afferrare rapidamente i concetti. Nel complesso, questo tutorial è una risorsa preziosa per chi vuole iniziare a utilizzare Raspberry Pi Pico W e i suoi componenti.