Paragon Project: Pico Air Quality Monitor
Want to monitor the air quality in your home or city? Then this is the ideal project for you! It’s a straightforward and simple air quality monitor with a Raspberry Pi Pico!
This great little project was put together by Yakroo and shared on hackster.io.
Before I tell you all about it though, I do want to mention that we at PiCockpit actually have a free air quality monitoring app. And just like with Yakroo’s project, you can use our PiCockpit app on a Pico W.
But more on that later.
For now, I want to focus on Yakroo’s very cool air monitoring app! On the project page, Yakroo explains that the inspiration came from a health concern. In countries where air pollution is on the rise, it’s important to be able to monitor outdoor air.
This project gives you just that ability.
Best of all, Yakroo has given the code an MIT license, so it’s open source and free!
Hardware
This project relies on five main components. One of these components is a custom PCB that Yakroo created specifically for this project.
Another key component is, of course, a Raspberry Pi Pico.
You’ll also need an air sensor. Yakroo put this Pico air quality monitor together with a PMS7003. A PMS7003 is a breakout board that measures particulate matter in the air. It’s the newer generation of the PMS5003 breakout board.
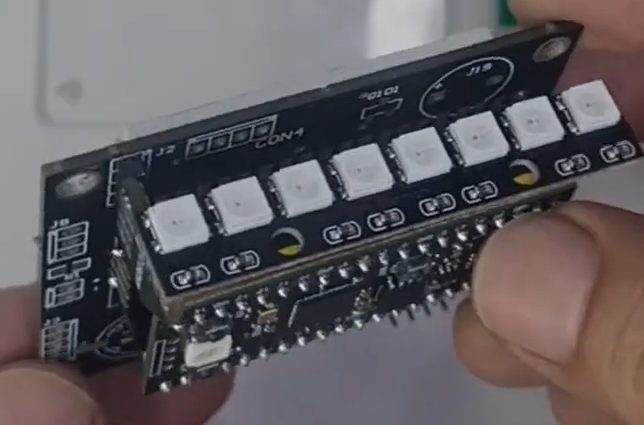
Then Yakroo has added an LED strip with 8 lights to the top of the setup. The idea is that the LEDs can give extra visual feedback. So the LEDs turn red when the air quality is poor and blue when the air quality is good.
The project page suggests using an RGB WS2812 LED strip, but you could really use any. I’m thinking about putting one together using a NeoPixel Stick.
And the final major component is a Thin-Film-Transistor (TFT) LCD. You could go with, for instance, an Adafruit ST7789. Really, any TFT LCD would work with this project though.
Software
When it comes to software, this project is really straightforward.
Yakroo has written the software in MicroPython (although one of Yakroo’s videos says CircuitPython) and has shared the code on GitHub, which you can access here.
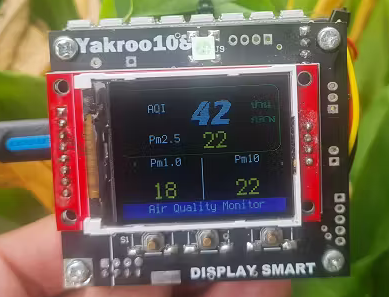
If you take a look at the code (it’s not very long), you’ll quickly see how it works. The Pico talks to the PMS7003 and returns the values of particulate matter that’s up to 1.0 micrometer (PM1.0), particulate matter that’s up to 2.5 micrometers (PM2.5), and particulate matter up to 10 micrometers (PM10).
It also provides the Air Quality Index (AQI) lights up the LEDs accordingly.
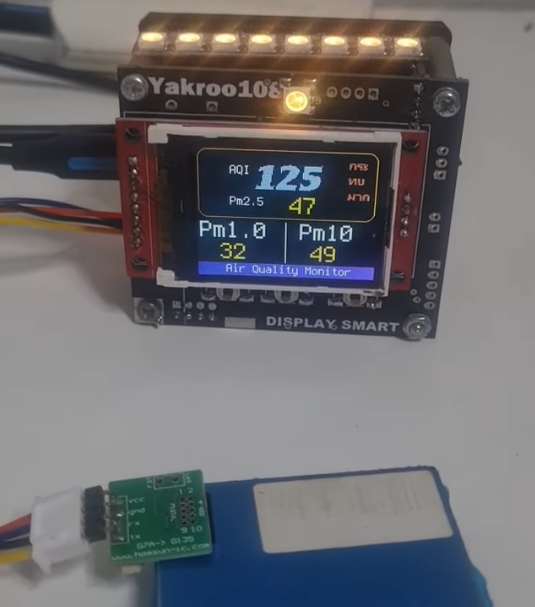
The yellow LEDs in the photo indicate a middle-range (although still pretty bad) air quality (125 AQI).
Conclusion
This is a fantastic project if you’re interested in checking up on your local air quality. It’s easy to put together and it’s easy to customize. So a huge thanks to Yakroo for putting this together and for sharing it!
If you want to find more details on the setup, head over on the hackster.io page, which has all the specifics on the project.
In the meantime, be sure to check out more Paragon Projects here!
Also, if you haven’t you can sign up for PiCockpit on our homepage, which includes an app for monitoring air quality with a BME688 board. The BME688 board measures indoor air quality, air pressure, temperature and humidity.
You can even use the BME688 to recognize scents! We’ve got a PiCockpit app for that too!
You can read more about that here:
Are you more interested in indoor air quality or outdoor air quality where you live? What would you do with this project?
Let us know in the comments!
Salve, premetto che sono un novizio quindi potrei non capire, ovviamente sarei interessato a costruire questo progetto, ma non trovo una sintesi di montaggio dei componenti, né tantomeno una lista esaustiva degli stessi.
sul sito hackster.io vedo solo l’acquisto di una board Raspberry Pi Pico e DIYables Button. Tutti i video fanno vedere sostanzialmente un prodotto già completo e definito.
Grazie a chi potrà aiutarmi
Marco
Hi Marco: I too am a novice interested in this project. I think that most of what you would need is available at the hackster.io page, but would require some ‘reverse engineering”: reading the code to see what pins the different components should connect to, assembling it and trying it out. One challenge too is the availability of the PMS7003. I haven’t searched much but haven’t found it at my usual vendors. I think there are still some lessons to be learned by reading how the code was put together. Best of luck!
Ciao Marco: Anch’io sono un novizio interessato a questo progetto. Penso che la maggior parte di ciò di cui avresti bisogno sia disponibile sulla pagina hackster.io, ma richiederebbe un po’ di ‘reverse engineering’: leggere il codice per capire a quali pin dovrebbero essere collegati i diversi componenti, assemblarlo e provarlo. Una sfida è anche la disponibilità del PMS7003. Non ho cercato molto, ma non l’ho trovato dai miei fornitori abituali. Penso che ci siano ancora delle lezioni da imparare leggendo come è stato messo insieme il codice. In bocca al lupo!