Teach your BME688 how to smell
A complete guide on how to train your BME688 sensor
Hi fellow tech enthusiasts! Bosch released the BME688, an awesome new sensor that can distinguish up to four different scents. This guide will explain all the details of teaching your BME688 how to distinguish smells. Don’t worry if you are new to AI or Python. This guide is suited for beginners.
So, let’s jump right ahead.
Prerequisites
- Raspberry Pi
- BME688 Breakout Board or Bosch BME688 Gas Sensor Developer Kit
- Specimens that produce desired smells
- An airtight container to house the sensor and the specimen
- BSEC and AI Studio by Bosch
- PiCockpit
Steps
- Choose your application
- Record data
- Train the algorithm
- Detect smells
1. Choose your application
The first step is to choose your application. For this guide I am going to use meat and cheese as examples. But there is an endless range of possibilities. You can distinguish fruits from vegetables or cleaning agents from perfume. You could also try to determine when food has gone bad.
There are certain things that you should consider when choosing an application. You need many specimens for each class that you want to distinguish, to ensure that the algorithm becomes robust. To start you should choose something which is cheap and widely available. Also keep in mind that it is advisable to use normal air as one of the classes, since it will almost always be present.
To create a robust algorithm you should use at least half an hour of measurement data for each specimen. Therefore, specimens that produce a constant scent are a good choice. Also make sure to use a wide range of specimens. If for example, you only use oranges, lemons and limes for your fruit class, the sensor might fail to classify a raspberry as fruit, because it is too different from the specimens you used for training. The more different specimens are used the better.
Once you have finalised your choice it is time to create a new AI Studio project. Open AI Studio and press the Create Project … Button. Press Configure BME Board if you want to record data with a specific configuration.
2. Record data
This process varies, depending on if you use the BME688 Breakout Board or Bosch BME688 Gas Sensor Developer Kit (further shuttle board). The shuttle board is easier to use and will capture data eight times faster than the breakout board, but it is a lot more expensive. I will explain both methods in detail in the following sections.
Note: The BME688 sensor needs some time to adjust to the environment and burn in. Make sure to leave it running for at least 24 hours before recording your training data
Record data with the BME688 Shuttle Board
BOSCH equipped the shuttle board with eight BME688 sensors, hence it produces eight times as much data in the same amount of time. All the software is already installed, and it is ready to go out of the box. Watch this video tutorial by Bosch to learn about the measurement process.
If you are recording many specimens in a single session you might want to note down the sequence of specimens to avoid confusion. You can always crop the data in AI Studio later so don’t be afraid to capture lots of data.
Record data with the BME688 Breakout Board
If you are using the BME688 Breakout Board I still advise you to watch the Bosch tutorial because it provides some useful information about the training process in AI Studio. But to record the training data some additional steps are required.
We at pi3g created a python library for the BME68X sensors, which you can upgrade with Boschs BSEC 2.0. So it is helpful if you have some python experience, but it is not necessary.
Note: See the installation and usage instructions directly on our GitHub.
Start by cloning our bme68x-python-library. This can be done by executing the following command in a bash terminal.
git clone https://github.com/pi3g/bme68x-python-library.gitNow you need to build and install the bme68x python module. The BSEC 2.0 is proprietary software so you need to download version 2.0.6.1 directly from Bosch and agree to their license. Unzip it into the bme68x-python-library folder and proceed with these commands.
cd path/to/bme68x-python-library
sudo python3 setup.py install
Now you can run the bmerawdata.py script with the default settings.
cd tools/bmerawdata
python3 bmerawdata.py
The script will display the recorded data after each measurement. Terminate the script and save the data in an AI Studio compatible file by pressing Ctrl+c.
3. Train the algorithm
Import data
Regardless whether you are using the BME688 Breakout Board or the Bosch BME688 Gas Sensor Developer Kit, the next step is to import the data into AI Studio. Press the Import Data Button and select your .bmerawdata file.
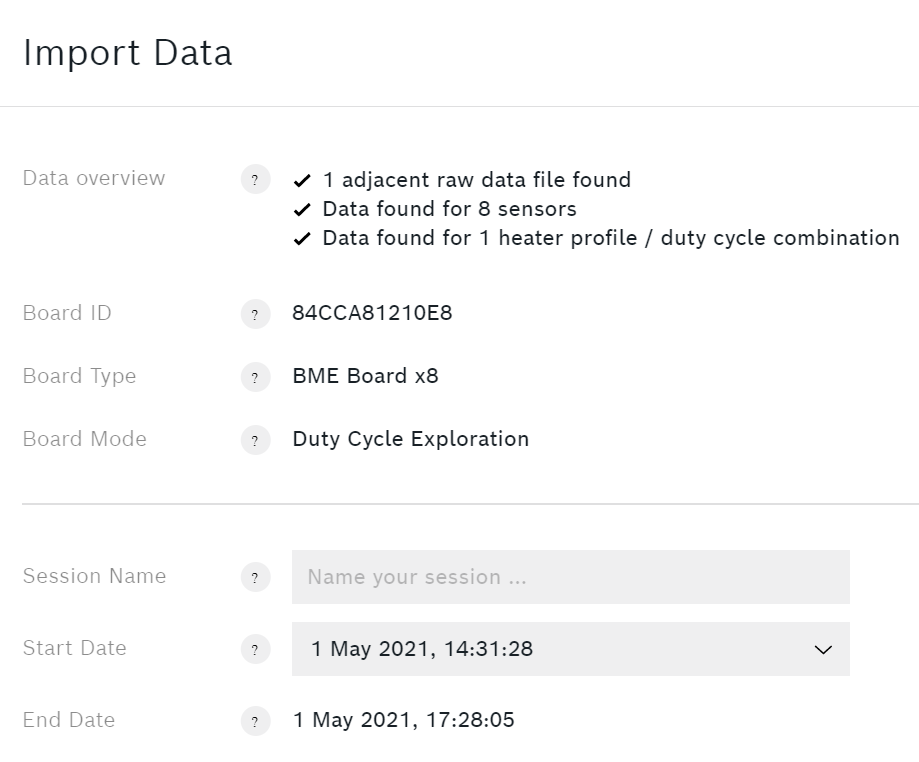
Your session needs a meaningful name. It is suitable to choose an enumeration of the specimens.
You can see a plot of your data for example of the gas data channel as shown below.
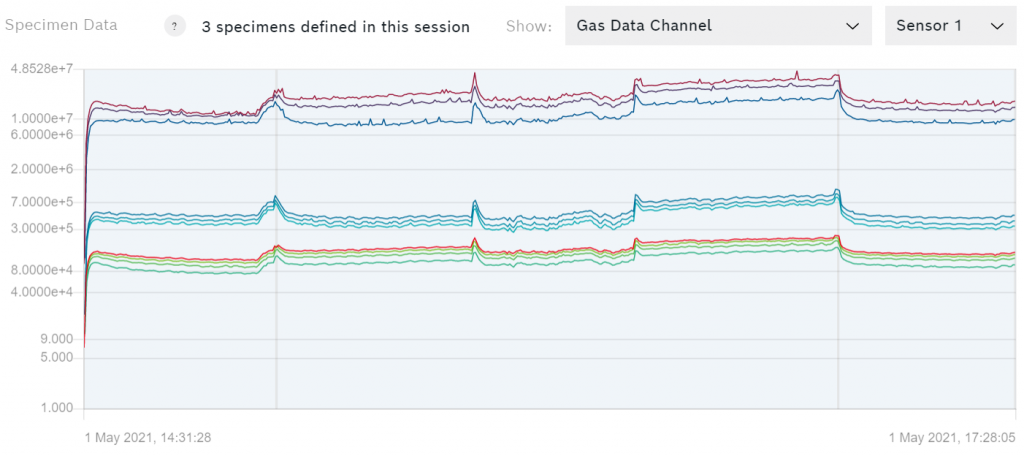
If the data comes from the shuttle board you can switch between the data of the eight sensors. Each one of the coloured lines represents one step of the heater profile that was used to capture the data.
Note: In most cases you should only use the gas data channel for training.
Now we need to label our specimens. If you recorded the data with the shuttle board and used the on-board buttons to mark specimens, you will already be able to see a template for each one of them. You can also crop the specimens and create new ones (for example if you recorded multiple specimens using our breakout board).
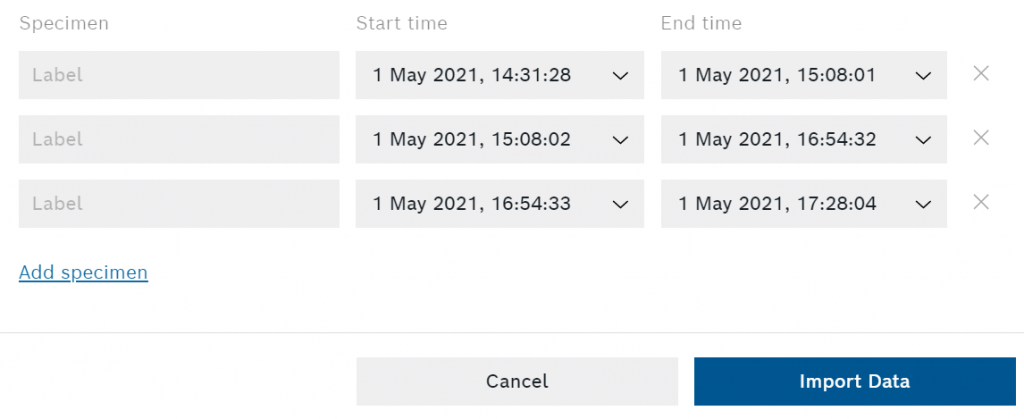
After you have finished editing the session press the Import Data button in the bottom right corner of the dialog.
Once you imported and labelled all your specimens it is time to create and train the algorithm.
Create the algorithm
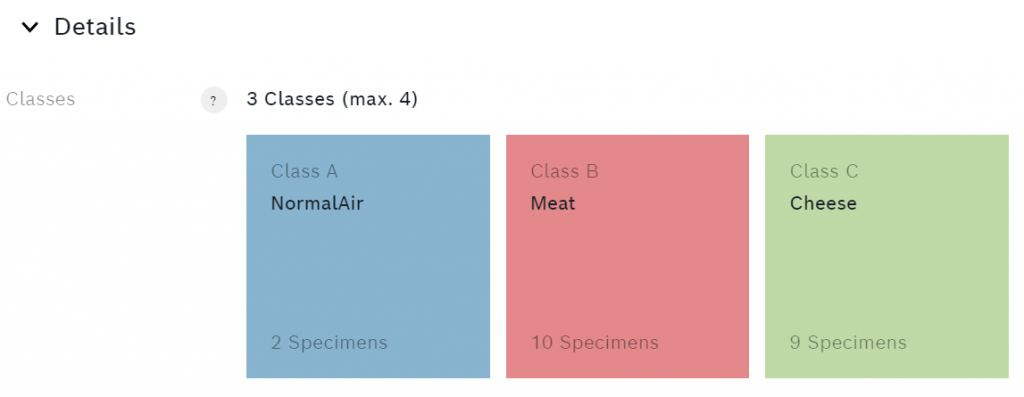
Select My Algorithms at the top and click on + New Algorithm . Give your algorithm a name that represents what it is supposed to do, in my case AirMeatCheese. Then add the classes. I called my classes NormalAir, Meat and Cheese. Select which specimens belong to which class and choose a colour for each class.
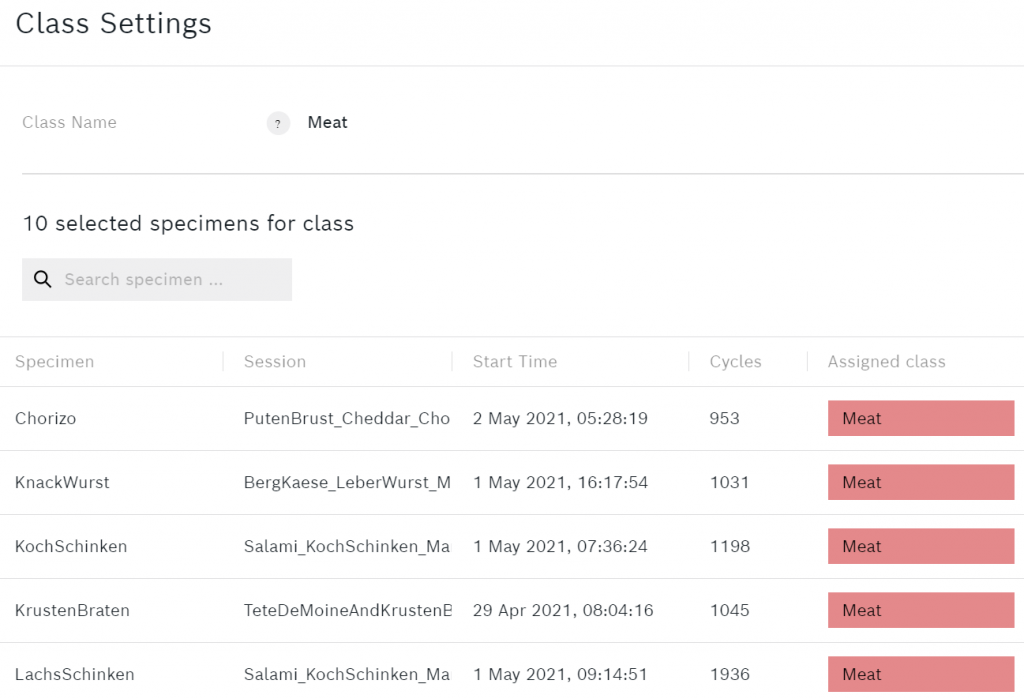
To add or remove specimens you can click on one of the classes. Here is an example of what the Meat class looks like.
Below the classes you can see some additional data about the algorithm.
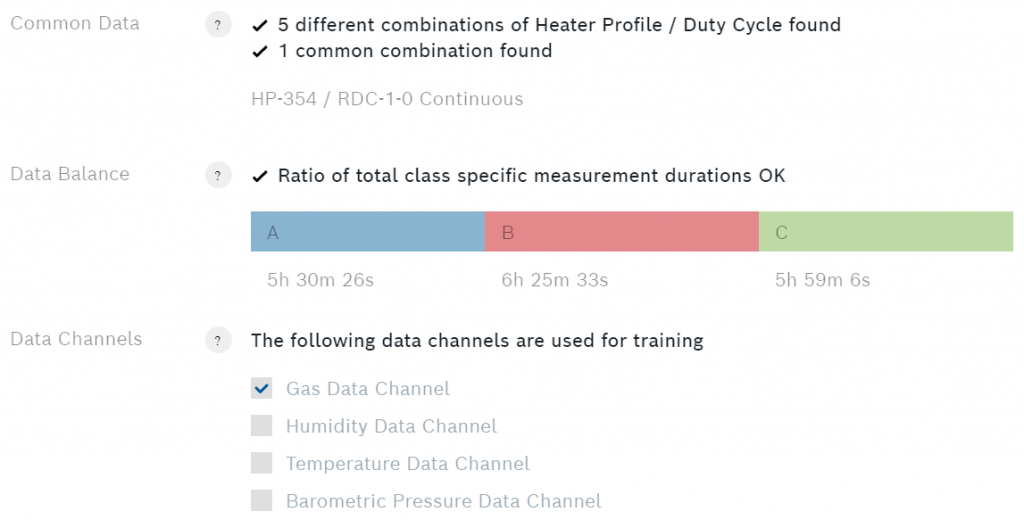
The data balance shows the total measurement duration for each class. To ensure the best performance the measurement duration of each class should be equal. If the measurement duration of one of the classes is far greater, you might experience a bias of the algorithm towards that class. Also note the question mark button in front of each heading. Press it to obtain more detailed info.
Note: Make sure to check the BME688 AI Studio Documentation for further info.
Under data channels you can select which of the four sensor outputs you want to use for your algorithm. I recommend only using the gas data channel, since the other channels mostly depend on the environment and not on the specimen. Once you have set everything up it is time for training.
Training and export
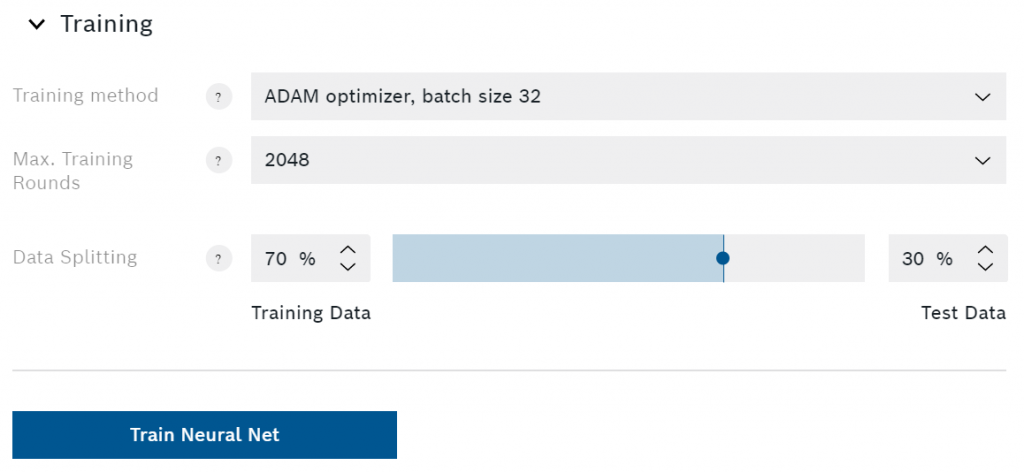
Here you can select the training method, the max rounds and data splitting. If you are new to neural networks, you should leave everything at the default settings. Nevertheless, I will try to explain each of those settings briefly.
The only training method available at the time I am writing this is the ADAM optimizer. This is a specific way of finding a minimum in the error function (less error means more accurate predictions). You can select different batch sizes to improve training speed and stability.
Increasing the maximum training rounds is another way to improve the performance of the algorithm. For each round (often referred to as epoch) AI Studio feeds the entire training data set trough the neural network. That means a higher number of maximum rounds will increase the time it takes to train the algorithm. Most of the time AI Studio will detect if a minimum is reached and finish training before the maximum rounds are reached. This reduces training time and avoids overfitting.
Overfitting means that the neural network has adjusted too much to the training data. If the algorithm scores very high accuracy in training but performs poorly in real life testing, you might want to decrease the maximum training rounds.
The data splitting setting allows you to select how much of your recorded data is used for training and how much is used for testing. You should avoid using more than a third of the data for testing. As the name suggests, the algorithm will only use the training data for training. After the training is finished AI Studio will evaluate the algorithm using the testing data, which it has never seen before.
Press Train Neural Net to start the training. You will see the estimated remaining training time and line chart of the accuracy and loss.
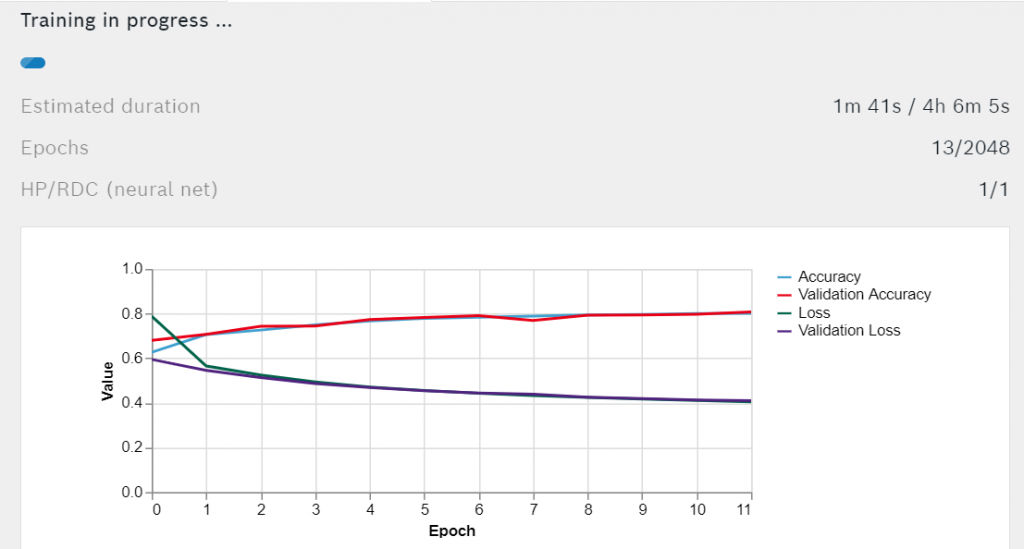
With each epoch the Accuracy and Validation Accuracy should improve, while the Loss and Validation Loss should decrease. Wait until the training is finished.
When the training is done, check the confusion matrix. It contains important information about the training results. The most interesting stat is the accuracy but if your training data is unevenly distributed the F1 score might be a better metric.
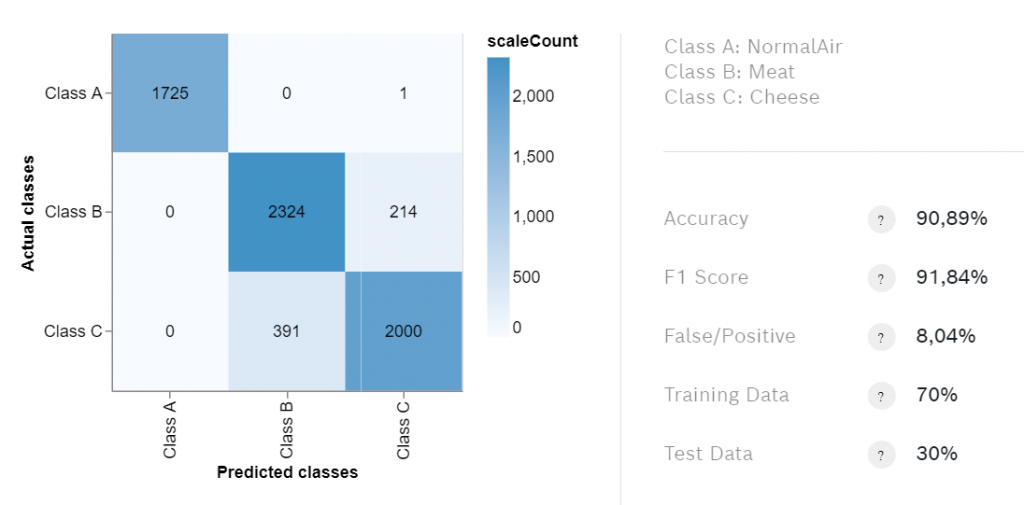
You will rarely achieve an accuracy of over 90% so if the accuracy is above 80% you should export the algorithm to test it. We will detect smells using our PiCockpit web interface. Make sure to export the algorithm for BSEC version 2.0.6.1 since PiCockpit only supports this version so far.
Note: In most cases the training will be finished before the estimated duration is reached.
4. Detect smells
To detect smells simply install the PiCockpit client and connect it to your account. If you do not have PiCockpit yet just register for free and follow the instructions given there. Our Digital Nose App allows you to upload your trained algorithm and see live predictions via the web interface. Check out the Digital Nose help for a complete explanation on how to use the app.
Another way to detect smells is by using our BME68X Python extension. This requires some python coding but offers more control and allows you to create your own applications using your algorithm. Refer to the README.md, the Documentation.md and the examples folder to learn how to install and use the extension.
So there you have it. You should now be able to record data, train your algorithm and detect smells. Please let me know if you found this guide useful or if you experienced any trouble while following this guide.
Contact me at [email protected]
For me, training the algorithm does not work. Instead, the software shows the error “Algorithm could not be trained. Either training data or test data appears to be missing.”. However, I have captured about one hour of data for each of my classes using the BME688 Breakout Board. Do you have any idea what I could be doing wrong?
This sounds like the .bmerawdata file could be corrupted. You could try to take a look at the file, to see if there are any bad values contained. It is in json format
did you find a fix for this ?
Hi Nathan
I also just tried out your code and im getting the samme error when making an algorithm.
” Either training data or test data appears to be missing.”
is there some issue in your code maby?
Hi Thomas
I could not recreate the error yet.
What version of AI Studio dp you use? The script was tested with AI Studio version 1.6.0
Hi Nathan
I used newest version (1.6.0) also i send you a mail about it, so you want me to send you the sample files ?
Have tried alot of testing but same error each time 🙁
yes im also using 1.6.0 please check this files from data collection one is fumes other is normal air https://we.tl/t-PwfkYXjnGP
[…] on, such as a temperature-and-humidity sensor or perhaps an air quality project with a DHT22 or BME688, or a brightness sensor with a light […]
[…] Teach your BME688 how to smell […]