Collaborative Document Editing with Raspberry Pi
Want to keep your personal and business documents private and secure? Then storing them on external servers is not the way to go. In this article, I will go over how you can set up local collaborative document editing with a Raspberry Pi.
Indeed, if you’re still using Google Docs, then your data is neither private nor secure. As the maxim goes – the “cloud” is just someone else’s computer.
So the easy solution is to switch over to local document storage. But then you need a way to easily edit these documents. Luckily, we’ve got you covered.
The software application we’re going to use is called Etherpad Lite.
In this article, I’m going to go through the steps on exactly what you need to do to allow for collaborative document editing on a Raspberry Pi. I’ll explain what Etherpad is, how to install it, and how to get it configured.
Whether on your home network or your business network, an Etherpad server on a Raspberry Pi offers an ideal solution.
Etherpad & Etherpad Lite
So, let me start by explaining what Etherpad is.
Etherpad is an open-source application that enables real-time collaborative editing, just like what you’re probably used to with Google Docs. You can track changes and multiple people can jointly edit a single text.And actually, you can use it directly as an alternative to Google Docs if you want to.
In principle, you don’t need to set up your own Etherpad server in order to use it. However, if you use a public server, then you’re not guaranteeing the privacy of a local server.
It was initially developed by AppJet and later acquired by Google and released as open-source in 2009.
These days, there are actually two variants of Etherpad. Etherpad classic and Etherpad Lite.
Etherpad Lite is a lightweight version of Etherpad. It’s also more modular and easier to set up and deploy. In my opinion, it’s a much better variant of Etherpad and it also seems to be the most popular variant today.
In fact, if you go to etherpad.org, it’s actually Etherpad Lite.
And so, now, I’m going to walk you through how to set up an Etherpad Lite server on your Raspberry Pi.
Setting Up Etherpad on a Raspberry Pi
First of all, you’ll need to get a version of Raspberry Pi OS up on your Raspberry Pi. Then you’ll need to make sure that your Raspberry Pi is connected to the internet for the installation process.
So first, ensure your Raspberry Pi is up-to-date. Open a terminal and run:
sudo apt update && sudo apt upgradeThen we’re going to install Node.js, which is what Etherpad Lite relies on.
sudo apt install nodejs npmThen you need to create an empty folder for Etherpad and navigate into it.
mkdir etherpad
cd etherpad
Once that’s done, we need to bring Etherpad Lite into that folder.
git clone https://github.com/ether/etherpad-lite.gitThen navigate into the etherpad-lite folder.
cd etherpad-liteAnd install the dependencies:
bin/installDeps.shNow you’ve successfully installed Etherpad Lite. All that’s left to do is configure it as you see fit. For instance, you could set up the IP address to 0.0.0.0 to allow external access. You’ll need to open up the settings.json file.
nano settings.jsonAnd then make sure that “ip” is set to “0.0.0.0”.
"ip": "0.0.0.0",To save the file in Nano, you hit Ctrl + X and then Y.
All that’s left to do is start up Etherpad Lite with the following command:
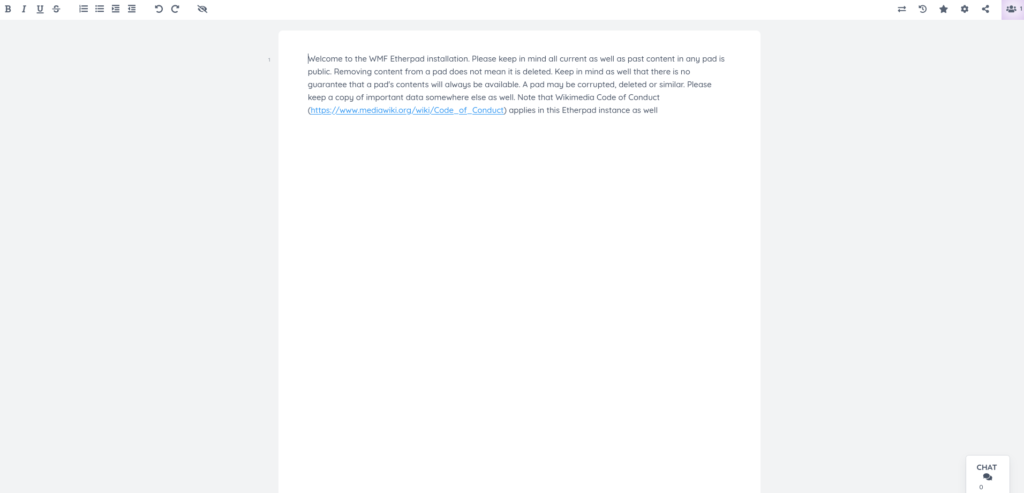
bin/run.shYou can now double-check on your Raspberry Pi that everything is running. If you open up a browser and type in http://localhost:9001 you’ll be able to see your instance of Etherpad Lite.
If you want to connect to Etherpad Lite now from other devices, you’ll have to replace “localhost” with the Raspberry Pi’s IP address.
You can find the IP address by running the following command on your Raspberry Pi:
hostname -IThen you can type in http://RASPBERRYPIIPADDRESS:9001 and you have access to a locally-hosted Etherpad Lite server on your Raspberry Pi. Make sure it’s http and not https. Otherwise, you might run into difficulties.
But now you have an accessible Etherpad Lite server running on a Raspberry Pi that you can access from devices on the network.
Conclusion
So now you’ll be able to locally host all your documents and edit them collectively as well. This is a super handy solution and relatively easy to setup on your Raspberry Pi.
Looking for other ideas on how to improve your office? Be sure to check out:
And you can sign up for our Newsletter to keep up-to-date with projects, contests, and other articles here at PiCockpit!
Do you have any other ways of collaborative document editing on a Raspberry Pi? Let us know in the comments below!