Turn your Raspberry Pi into a NAS with Samba in 2023
Today I’m going to show you how to turn your Raspberry Pi into a NAS.
What is a NAS? Network-Attached Storage is a local storage solution that you can use from multiple clients. So you can store files from your computers, tablets, and phones all on a single device.
But a NAS is expensive.
Whereas a Raspberry Pi NAS is significantly cheaper.
In fact, we recently talked about a Raspberry Pi Zero NAS. But that brilliant project requires a customized PCB.
This NAS requires nothing more than a Raspberry Pi and a storage device.
This is also the perfect project if you just bought a Raspberry Pi 5 and now you’re looking for a project for your old Raspberry Pi 4. Either way, this project is for you.
So let’s do this in 5 steps!
What you’ll need
For this project, I’ll be using:
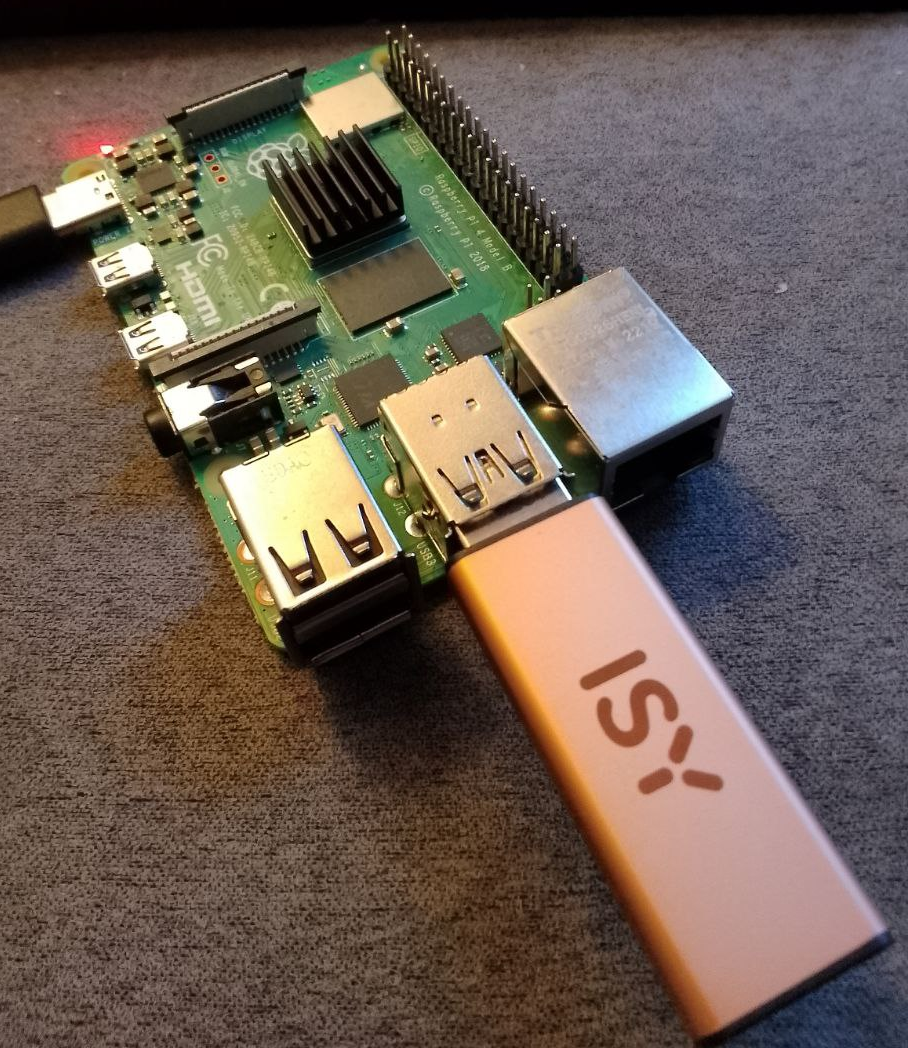
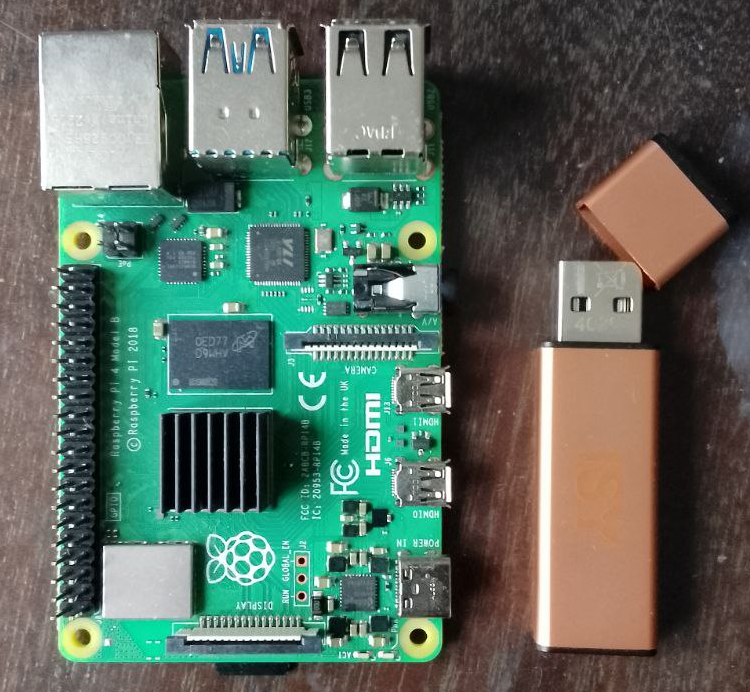
- A Raspberry Pi 4
- A USB stick (You could also use an external hard drive)
- A micro SD card
You’ll also need a power supply for your Raspberry Pi 4, but I imagine that goes without saying.
When it comes to your Raspberry Pi 4, the best option for a NAS is one with either 4GB or 8GB RAM.
I’m using a USB stick with 64GB, but like I wrote above, you can go wild with how much storage you want!
Step One: Flash Raspberry Pi OS Lite
We’re going to be setting up a headless Raspberry Pi. That is, we’re going to set up the Raspberry Pi without a monitor.
So we’re going to install Raspberry Pi OS Lite. Why Lite?
Well, if you’re looking at the new Bookworm OS, you’ll see that the 64-Bit variant is 1.1GB and the 32-Bit variant is 1.2GB.
Meanwhile, the 64-Bit variant of Raspberry Pi OS Lite takes up 0.4GB. So we’re saving a ton of space!
If you haven’t used the imager recently, you’ll notice that it’s been updated in the past few months.
First, you’ll choose the Raspberry Pi Device, which for me is a Raspberry Pi 4.
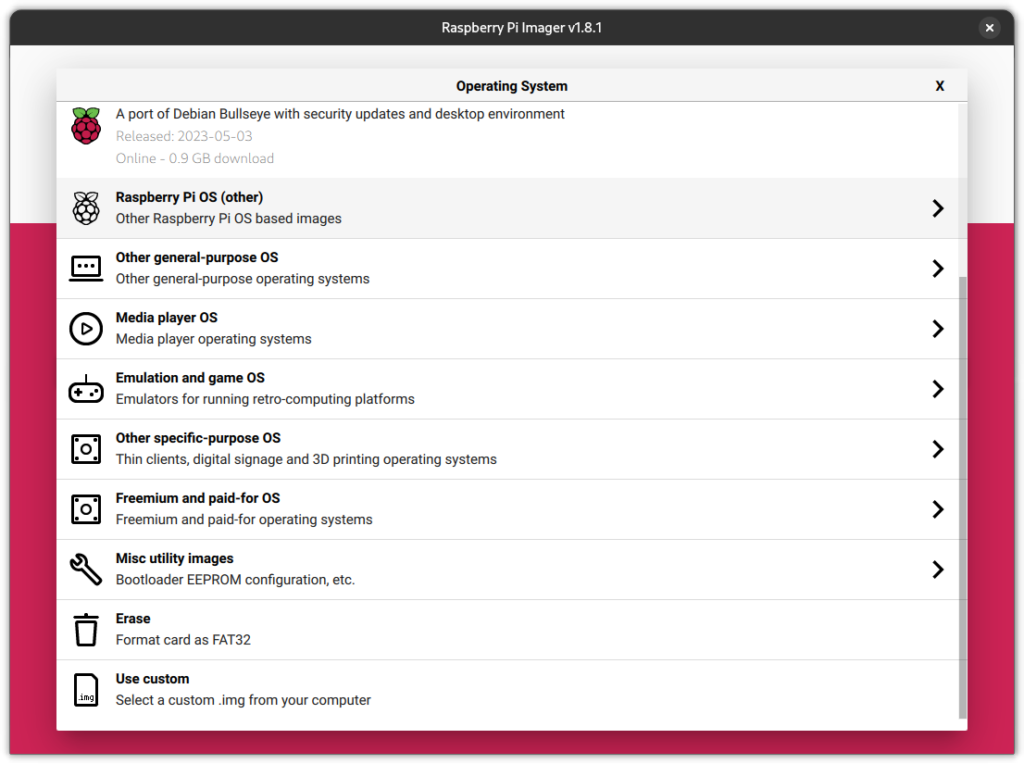
For the operating system, you go to Raspberry Pi OS (other) and then scroll down to Raspberry Pi OS Lite (64-Bit). And when it comes to choosing storage, you need to make sure you choose the micro SD card.
It will wipe the SD card entirely and replace it solely with the Raspberry Pi OS, so make sure you don’t have anything on there that’s important!
You’ll need to then configure everything to look something like this:
Let’s set the hostname to nas.
And then I’m going to set the username to rpi and the password to raspberry.
Definitely configure wireless LAN. The SSID is the name of your internet.
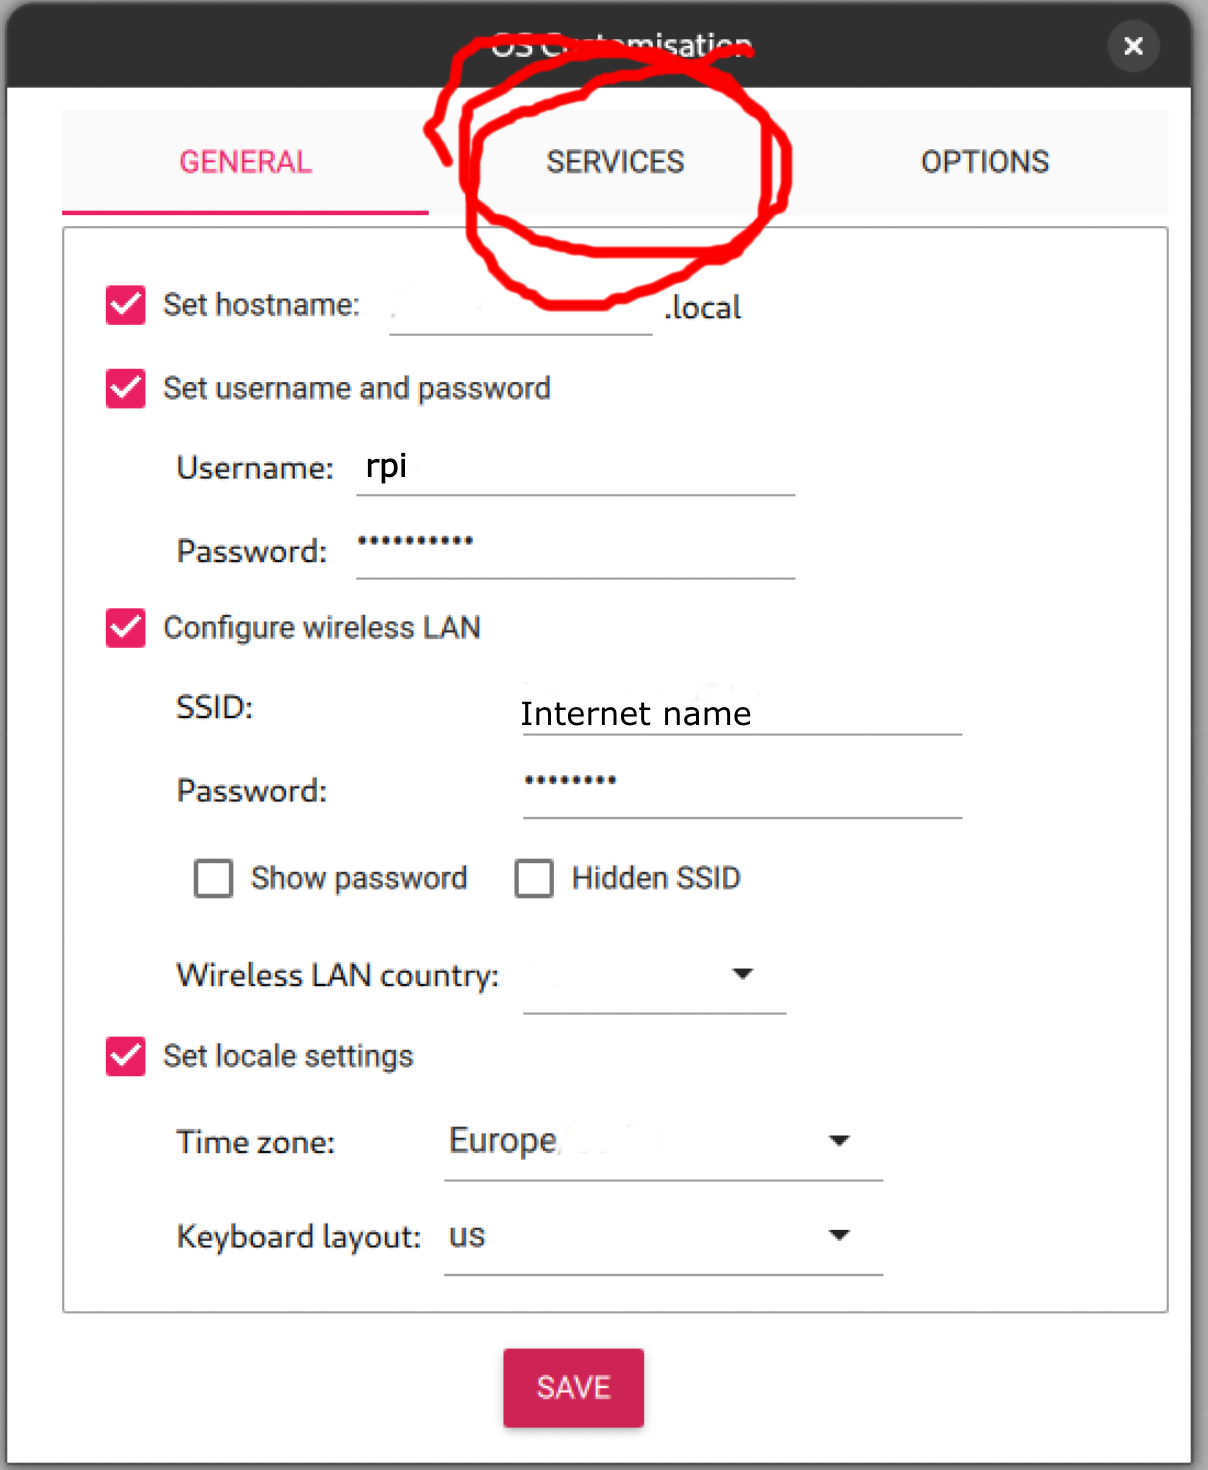
I’ve also circled “Services” in the picture above, because you need to click there in order to enable SSH. That’s very important for running the Raspberry Pi headless.
Once you have configured everything you can proceed to flash Raspberry Pi OS Lite onto the micro SD card. This will take a few minutes, so you can sit back and relax while you wait.
Step Two: SSH into your Pi
So now, you put your micro SD card into your Raspberry Pi and plug it in. We’re going to access the Pi headless.
We’re using Secure Shell (SSH), which sets up an encrypted connection between your main computer and your Raspberry Pi. By default, SSH sets up this secure connection through Port 22.
So, to SSH into the Pi, you’ll need to open a terminal on your main computer and type in the following:
ssh rpi@nas.localThis, of course, assumes that you’ve followed me in using the hostname nas and the username rpi. You’ll need to type in the password. And now, you’ll see that the terminal will put you in the Pi.
Step Three: Configure your drive
We need to configure the drive. So first, we’re going to run lsblk, which lists information about all available block devices (i.e., storage devices) and their partitions.
So using the terminal that SSH’d into the Pi, type in:
lsblkAnd then you’ll see something like this:
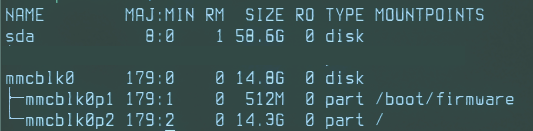
Here, sda refers to the USB drive that I have plugged into my Raspberry Pi. Meanwhile, mmclk0 refers to the micro SD card (“mmc” stands for Multimedia Card). You can see that it’s partitioned into mmcblk0p1, which is the boot partition, and mmcblk0p2, which is the root file system.
We need to partition the USB drive as well in order to make sure that the operating system recognizes the drive correctly. So we’re going to use fdisk, which stands for “fixed disk” or “format disk”.
This process will erase everything on the USB drive, just so you’re aware.
So in the terminal, we need to run the following in order to partition the USB drive:
sudo fdisk /dev/sdaNow, if you run lsblk again to see everything, you should see something that now looks like this:
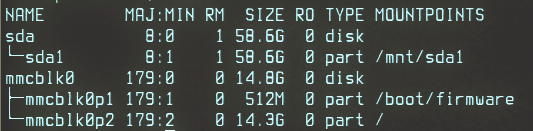
We’re going to come back to that mountpoint of /mnt/sda1. For the moment, we need now to format the partition. Formatting sets up this new sda1 partition as the point for data storage and retrieval on your Raspberry Pi.
So you need to run:
sudo mkfs.ext4 /dev/sda1As you can see, this is formatting the new partition with the ext4 file system. This will probably take a few minutes, so you can take a minute to relax.
Now, finally, we need to mount the drive. This is really the final important step in making the USB drive available to the file system on the Pi:
sudo mount /dev/sda1And you’ll definitely want to set this up so that the drive mounts automatically in the future. So we’re going to edit the configuration fall for disk drives: fstab. It stands for “file system table.”
sudo nano /etc/fstabSo we’re opening this configuration file with Nano. You’ll immediately see something that looks like this:

The UUIDs are the device identifiers. These are followed by the mountpoint. The vfat and ext4 are the file system types. Then defaults refers to the mount options. Finally, the 0 refers to the dump field and the final number refers to the fsck field.
We’re going to add the following:
/dev/sda1 /mnt/sda1/ ext4 defaults 0 1Now all you need to do is press Ctrl+X and then Y and finally, Enter.
Now all that’s left to do to configure everything is to set up a shared nas folder.
So let’s start by making a new folder. Run:
mkdir /mnt/sda1/nasAnd we’re going to make sure that everything is is fully accessible and able to be changed. So we’re going to make it readable, writable, and executable for everyone with the following:
sudo chmod 777 -R /mnt/sda1/nasAnd that’s it for configuration. If you ran into any problems with this section, let us know in the comments below!
Step Four: Install Samba
So now what we need to do is install Samba. First things first, let’s make sure everything on the Raspberry Pi is up-to-date. So start with:
sudo apt update && sudo apt upgradeNow we need to install Samba by running:
sudo apt install samba samba-common-bin -yThen we’re going to edit the configuration file so that other devices can access the shared nas file. So just as we did above, we need to open the configuration file with Nano:
sudo nano /etc/samba/smb.confScroll all the way down and add the following:
[NAS]
path=/mnt/sda1/nas
public=no
guest ok=no
create mask=0777
directory mask=0777
writeable=yes
Allow me to briefly explain what all this is. [NAS] is the name that other devices will see and it has the path /mnt/sda1/nas, which is the folder we created above.
We set public=no so that it isn’t visible to all users on the network. You need to know its name in order to access it.
We set guest ok=no so that authentication is required to access the NAS.
When it comes to create mask and directory mask, these set permissions for the files that are shared to the NAS. That’s why we’re setting them to 0777, just as we did with the permissions above.
Finally, we set it to writeable=yes, which is what allows users to create, modify, and delete files.
And now you need to restart the Samba daemon:
sudo systemctl smbd restartStep Five: Establish Access for your NAS
Now you need to add users.
Let’s imagine that you want to add your partner named Noa. To do that, you’ll type in:
sudo adduser noaYou’ll be prompted for a password and then for personal information. You can choose to give as much information as you please.
This isn’t enough, however. You need to ensure that you go one step further and separately assign passwords.
This step is very important, otherwise you won’t be able to access the NAS. So now run:
sudo smbpasswd -a noaNow type in Noa’s password.
You shouldn’t need to reboot after all of this, but I always like to reboot just to ensure that everything’s up and running and stable. If you want to, just run:
sudo rebootAnd now your Raspberry Pi should reboot and access the USB disk without any problems!
Conclusion
So that’s all folks. Enjoy your brand new Raspberry Pi NAS!
You can access it from iOS, MacOS, Windows, and other Linux devices. All you have to do is going to your file manager and connect your device to the NAS.
If you’re interested in other tutorials like this, you can click on the button below:
And if you’re interested in other projects with your Raspberry Pi 4, be sure to check out our Paragon Projects series:
What are you going to do with your new NAS?
I have been running a RPi 4 2GB samba server for almost 4 years now. I have two USB drives (one 2.5inch powered by the bus, one 3.5 powered by a separate wall adapter). A 1 hour spindown setting in the USB drives works great and ensure I only see a couple of spin-ups per day. I tried substituting a RPi 5 to see if I would get better performance, but I saw less than 10% read performance. Even moving large files, I never had any difficulty with the 2GB of ram. I had Kodi running on the same server and watched videos as files were accessed by other PCs.
I highly recommend this setup.
В плане софтвера сделать nas на raspberry не сложно. Таких мануалов в сети уже миллионы, ничего нового в этой статье нет. Не говоря уже о том, что эту подделку нельзя назвать nas. Это локальный SMB-сервер, аналог банальной расширенной папки. Где приложение? Где SFTP? Где веб-морда? Где ПО для Web-визуализации контроля и управления накопителями? Ах да, про накопители… Где они? NAS на баз сраной флэшки? Серьёзно? Купить железку за 5-8к чтобы сделать nas из флэшки? Вспоминается картинка с троллейбусом из буханки хлеба… Если хочешь поделиться чем то полезным, приобрети к распберику sata-шилд, жёсткие диски, напечатай корпус с обдувом, предусмотри в нём установку flex блока питания, накатит туда nextcloud, убери его вебку за Nat, сделай разделение доступа, установи плагины для работы с документами, создай дублирующий райд, установи софт для сетевого резервирования. Вот тогда это будет похоже на NAS.
lol
Уровень вложений уже не «любительский». Для такого применения проще наверное взять старый полноценный ПК? У него и sata, и сеть гигабит (причём не мультиплексирована с usb или ещё с чем)
Est-ce possible de faire cet meme installe mais avec un disque dure SSD a la place de la clé USB ? Est-ce que les commandes de config, change a ce moment la ?